


ChatGPT has become popular recently, and the boss is also ready to ask us to connect ChatGPT to Feishu. After a morning of research, we finally successfully registered and connected the Feishu robot to ChatGPT.
Let me share with you the detailed steps to access Feishu.
How to access Feishu
The interaction between Feishu and chatgpt is as follows. Our custom service acts as a middleman to forward messages.

Create a Feishu robot
1. Enter the Feishu open platform and choose to create a self-built application for the enterprise.

#2. After creating the application, click to enter the application and add the robot.

#3. Configure message-related permissions for the robot. If you are not sure what permissions are required, you can enable them all first.

4. Configure event subscription. Event subscription requires first developing an interface for Feishu to verify. The interface needs to be accessible from the public network.

The code of this interface can be referred to as follows:
@PostMapping(value = "/message")
public FeishuEventDTO message(@RequestBody String body) {
log.info("收到消息:{}", body);
FeishuEventParams feishuEventParams = JSON.parseObject(body, FeishuEventParams.class);
FeishuEventDTO eventDTO = new FeishuEventDTO();
eventDTO.setChallenge(feishuEventParams.getChallenge());
return eventDTO;
}

@Data
public class FeishuEventParams {

private String challenge;
private String token;
private String type;
}

@Data
public class FeishuEventDTO {
private String challenge;
}
One thing to note is that this verification interface and the following receive Feishu messages The interface is the same address, but the message body is different.
That is to say, the verification interface is one-time use, and this interface needs to be modified after the verification is completed.
We first publish this interface to a project that can be accessed from the public network. For example, the interface address is
https://www.php.cn/link/4aee31b0ec9f7bb7885473d95961e9a6

OK, now the configuration of Feishu is basically completed. Here is the logic we need to process.
Docking logic and implementation
Let me first talk about the general logic of our company’s docking for your reference.
After a user sends a message to Feishu, Feishu will forward the message to our own service.
But there will be a problem here, that is, when multiple users initiate conversations concurrently, or when many people in a large group are @our robot, we need to remember everyone's reply and query it in chatgpt After getting the result, reply to this person accurately.
Since our company is currently also using it for internal testing and does not want to implement too complicated, the idea we adopt is: when each user's session is forwarded to our service, the session content is first saved to a global ConcurrentLinkedQueue queue, and then start a thread to continuously consume this queue.
The generic type of queue is an object constructed in advance. This object stores the message ID of the current message, the sender, the question content, etc.
Every time an object is consumed, the object's question content is sent to chatgpt. After obtaining the response result, the session reply interface provided by Feishu is called to reply to the user. (If the amount of concurrency is relatively large, it can be made asynchronous here).
Okay, that’s the general idea, let’s take a look at the specific code.
1. Open our project and introduce the jar provided by chatgpt.
<dependency>
<groupId>com.theokanning.openai-gpt3-java</groupId>
<artifactId>service</artifactId>
<version>0.10.0</version>
</dependency>
2, rewrite the above verification interface and change it to receive Feishu messages. (Do not change the interface path)
@Slf4j
@RestController
@RequestMapping(value = "/query")
public class QureyController {

public static ConcurrentLinkedQueue<FeishuResponse> consumer
= new ConcurrentLinkedQueue<>();

@PostMapping(value = "/message")
public String message(@RequestBody String body) {
log.info("收到飞书消息:{}", body);
JSONObject jsonObject = JSONObject.parseObject(body);
JSONObject header = jsonObject.getJSONObject("header");
String eventType = header.getString("event_type");
if ("im.message.receive_v1".equals(eventType)) {
JSONObject event = jsonObject.getJSONObject("event");
JSONObject message = event.getJSONObject("message");
String messageType = message.getString("message_type");
if ("text".equals(messageType)) {
String messageId = message.getString("message_id");
String content = message.getString("content");
JSONObject contentJson = JSON.parseObject(content);
String text = contentJson.getString("text");

FeishuResponse feishuResponse = new FeishuResponse();
feishuResponse.setMessageId(messageId);
feishuResponse.setQuery(text);
log.info("投递用户消息,{}", JSON.toJSON(feishuResponse));
consumer.add(feishuResponse);
} else {
log.info("非文本消息");
}
}

return "suc";
}
}
The structure of FeishuResponse is as follows.
@Data
public class FeishuResponse {

private String messageId;

private String query;

}
3, write a task thread.
@Slf4j
public class AutoSendTask implements Runnable {
//你的chatgpt的key
public static final String token = "";
public static OpenAiService openAiService = null;

static {
openAiService = new OpenAiService(token, Duration.ofSeconds(60));
}

@Override
public void run() {
while (true) {
try {
FeishuResponse poll = consumer.poll();
if (poll == null) {
log.info("no query,sleep 2s");
TimeUnit.SECONDS.sleep(2);
} else {
String query = this.query(poll.getQuery());
this.reply(poll, query);
}
} catch (InterruptedException e) {
log.error("Thread exception...", e);
}
}
}

private String query(String q) {
log.info("开始提问:{}", q);
CompletionRequest completionRequest = CompletionRequest.builder()
.prompt(q)
.model("text-davinci-003")
.maxTokens(2048)
.echo(false)
.build();
StringBuilder sb = new StringBuilder();
CompletionResult completion = openAiService.createCompletion(completionRequest);
log.info("q:{},获取响应:{}", q, JSON.toJSONString(completion));
completion.getChoices().forEach(v -> {
sb.append(v.getText());
});
String rs = sb.toString();
if (rs.startsWith("?")) {
rs = rs.replaceFirst("?", "");
}
if (rs.startsWith("nn")) {
rs = rs.replaceFirst("nn", "");
}
log.info("格式化后的rs:{}", rs);
return rs;
}

private String reply(FeishuResponse poll, String rs) {
JSONObject params = new JSONObject();
params.put("uuid", RandomUtil.randomNumbers(10));
params.put("msg_type", "text");

JSONObject content = new JSONObject();
content.put("text", rs);
params.put("content", content.toJSONString());

String url = String.format("https://open.feishu.cn/open-apis/im/v1/messages/%s/reply",
 poll.getMessageId());
String tenantAccessToken = FeishuUtils.getTenantAccessToken();
String body = null;
try (HttpResponse authorization = HttpUtil.createPost(url)
.header("Authorization", "Bearer " + tenantAccessToken)
.body(params.toJSONString())
.execute()) {
body = authorization.body();
}

return body;
}

}
The tool class for obtaining Feishu token is as follows:
@Slf4j
public class FeishuUtils {

public static final String tokenUrl
= "https://open.feishu.cn/open-apis/auth/v3/app_access_token/internal/";
//构建一个cache 缓存飞书的token
static Cache<String, String> tokenCache =
CacheBuilder.newBuilder().expireAfterWrite(Duration.ofSeconds(3500)).build();
//这个是飞书应用的appid和key,可以在创建的飞书应用中找到
public static final String appId = "";
public static final String appKey = "";

public static String getTenantAccessToken() {
String token = null;
try {
token = tokenCache.get("token", () -> {
JSONObject params = new JSONObject();
params.put("app_id", appId);
params.put("app_secret", appKey);
String body;
try (HttpResponse execute = HttpUtil.createPost(tokenUrl)
.body(params.toJSONString()).execute()) {
body = execute.body();
}
log.info("获取飞书token:{}", body);
if (StrUtil.isNotBlank(body)) {
String tenantAccessToken = JSON.parseObject(body).getString("tenant_access_token");
tokenCache.put("token", tenantAccessToken);
return tenantAccessToken;
}
return null;
});
} catch (ExecutionException e) {
throw new RuntimeException(e);
}
return token;
}
}
4. Just start the thread class.

Finally, for the sake of privacy, the effect of chatgpt group conversation will not be displayed. Let’s show the effect of direct conversation with the robot.

Finally
Since we introduced chatgpt just with a trying attitude, the code is relatively rough. If there is anything wrong with the writing , I hope everyone will understand.
The code in this article also introduces additional jars: guava, hutool-all, and fastjson.
The above is the detailed content of Code attached, detailed steps for connecting ChatGPT to Feishu. For more information, please follow other related articles on the PHP Chinese website!

 Tesla's Robovan Was The Hidden Gem In 2024's Robotaxi TeaserApr 22, 2025 am 11:48 AM
Since 2008, I've championed the shared-ride van—initially dubbed the "robotjitney," later the "vansit"—as the future of urban transportation. I foresee these vehicles as the 21st century's next-generation transit solution, surpas
 Sam's Club Bets On AI To Eliminate Receipt Checks And Enhance RetailApr 22, 2025 am 11:29 AM
Revolutionizing the Checkout Experience Sam's Club's innovative "Just Go" system builds on its existing AI-powered "Scan & Go" technology, allowing members to scan purchases via the Sam's Club app during their shopping trip.
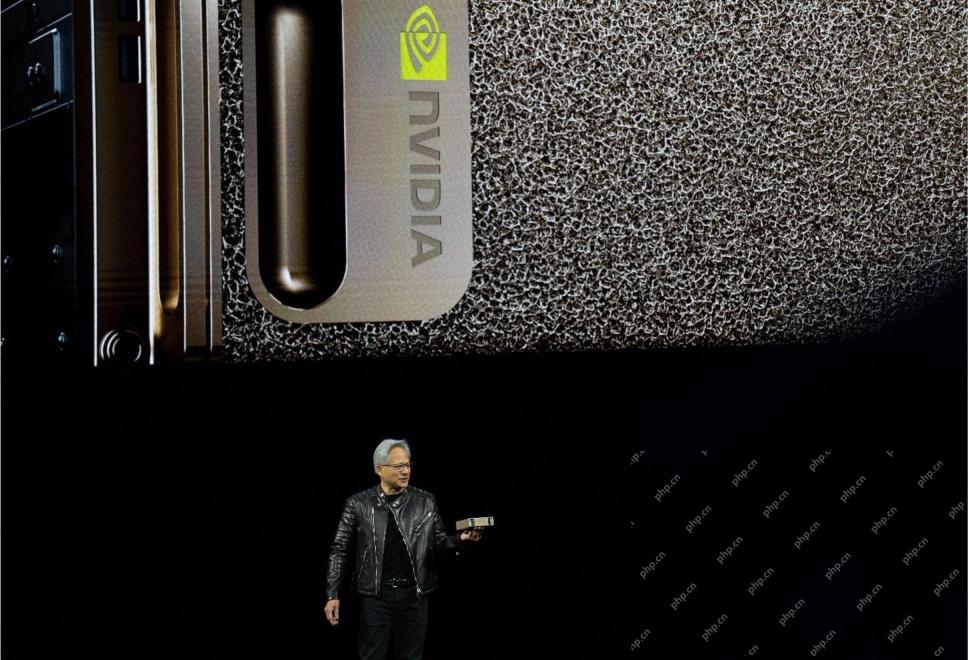 Nvidia's AI Omniverse Expands At GTC 2025Apr 22, 2025 am 11:28 AM
Nvidia's Enhanced Predictability and New Product Lineup at GTC 2025 Nvidia, a key player in AI infrastructure, is focusing on increased predictability for its clients. This involves consistent product delivery, meeting performance expectations, and
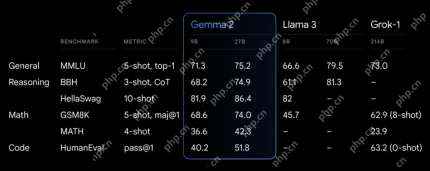 Exploring the Capabilities of Google's Gemma 2 ModelsApr 22, 2025 am 11:26 AM
Google's Gemma 2: A Powerful, Efficient Language Model Google's Gemma family of language models, celebrated for efficiency and performance, has expanded with the arrival of Gemma 2. This latest release comprises two models: a 27-billion parameter ver
 The Next Wave of GenAI: Perspectives with Dr. Kirk Borne - Analytics VidhyaApr 22, 2025 am 11:21 AM
This Leading with Data episode features Dr. Kirk Borne, a leading data scientist, astrophysicist, and TEDx speaker. A renowned expert in big data, AI, and machine learning, Dr. Borne offers invaluable insights into the current state and future traje
 AI For Runners And Athletes: We're Making Excellent ProgressApr 22, 2025 am 11:12 AM
There were some very insightful perspectives in this speech—background information about engineering that showed us why artificial intelligence is so good at supporting people’s physical exercise. I will outline a core idea from each contributor’s perspective to demonstrate three design aspects that are an important part of our exploration of the application of artificial intelligence in sports. Edge devices and raw personal data This idea about artificial intelligence actually contains two components—one related to where we place large language models and the other is related to the differences between our human language and the language that our vital signs “express” when measured in real time. Alexander Amini knows a lot about running and tennis, but he still
 Jamie Engstrom On Technology, Talent And Transformation At CaterpillarApr 22, 2025 am 11:10 AM
Caterpillar's Chief Information Officer and Senior Vice President of IT, Jamie Engstrom, leads a global team of over 2,200 IT professionals across 28 countries. With 26 years at Caterpillar, including four and a half years in her current role, Engst
 New Google Photos Update Makes Any Photo Pop With Ultra HDR QualityApr 22, 2025 am 11:09 AM
Google Photos' New Ultra HDR Tool: A Quick Guide Enhance your photos with Google Photos' new Ultra HDR tool, transforming standard images into vibrant, high-dynamic-range masterpieces. Ideal for social media, this tool boosts the impact of any photo,


Hot AI Tools

Undresser.AI Undress
AI-powered app for creating realistic nude photos

AI Clothes Remover
Online AI tool for removing clothes from photos.

Undress AI Tool
Undress images for free

Clothoff.io
AI clothes remover

Video Face Swap
Swap faces in any video effortlessly with our completely free AI face swap tool!

Hot Article
Hot Tools

Atom editor mac version download
The most popular open source editor

Dreamweaver Mac version
Visual web development tools

PhpStorm Mac version
The latest (2018.2.1) professional PHP integrated development tool

mPDF
mPDF is a PHP library that can generate PDF files from UTF-8 encoded HTML. The original author, Ian Back, wrote mPDF to output PDF files "on the fly" from his website and handle different languages. It is slower than original scripts like HTML2FPDF and produces larger files when using Unicode fonts, but supports CSS styles etc. and has a lot of enhancements. Supports almost all languages, including RTL (Arabic and Hebrew) and CJK (Chinese, Japanese and Korean). Supports nested block-level elements (such as P, DIV),

EditPlus Chinese cracked version
Small size, syntax highlighting, does not support code prompt function

