
Home >Backend Development >Python Tutorial >Teach you a trick! Create a REST API with Python and Flask!
Teach you a trick! Create a REST API with Python and Flask!

- 王林forward
- 2023-04-12 08:13:051625browse
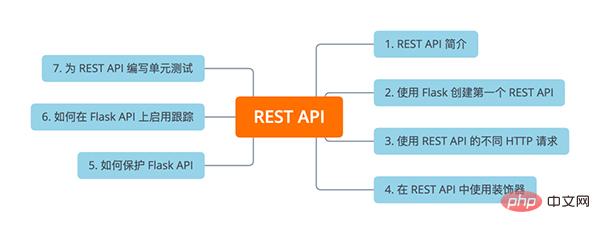
Introduction to REST API
Note that this is only a brief introduction to the REST API, which serves as a starting point and does not provide more in-depth content. Within the scope of this study, interested friends can view relevant materials for in-depth study. In addition, this account accepts submissions in this field, please contact Yun Duojun!
API
API, the full name is Application Programming Interface (Application Programming Interface). Simply put, it is an interface developed by the brand to allow Third parties can additionally develop and apply system communication interfaces to their own products.
REST API
REST is an architectural style for designing APIs through the HTTP protocol. Its main advantage is its great flexibility. Developers use REST APIs whenever they need to provide data directly from the server to the users of a web application or site.
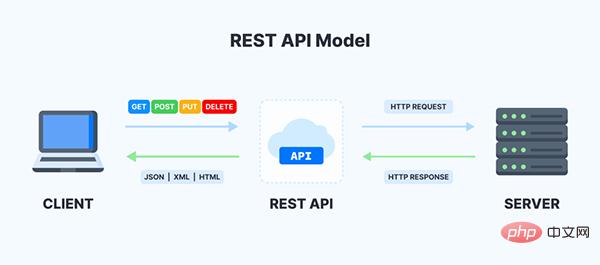
Main components of the REST API:
- Client — A client or program initiated on the user side (on his device) that initiates communication.
- Server — A server whose functionality and data are accessed using APIs.
- Resources — Any content (video, text, pictures) that the server transmits to the client.
REST API communicates through HTTP requests to complete the following functions - create, read, update and delete data. They are also called CRUD operations. REST provides information about the requested resource and uses four methods to describe how to handle the resource:
- POST — Create the resource;
- GET — Get the resource;
- PUT — update the resource;
- DELETE — delete the resource.
RESTful API
REST, the full name is Representational State Transfer (presentation layer state transfer), it is a design style, RESTful is just turned into an adjective, such as the noun peace , converted into an adjective is peaceful, and RESTful describes an API designed according to this specification, which is called RESTful API.
RESTful API is mainly composed of three components:
- Nouns: URL that defines the location of the resource. Each resource will have a unique location on the network, just like every household They all have the same unique address.
- Verbs Verbs: Actions to be performed on resources.
- ontent Types Resource presentation method: API resources can be presented in a variety of ways, the most commonly used is JSON, which is lightweight and easy to process.
So using an API designed in RESTful style has the following advantages and limitations:
- There is a unique URL indicating the resource location and a unified API interface. (Uniform Interface)
- Stateless. (Stateless)
Restful API It allows integrating application apps or interacting with Restful web services. It is now growing into the most common method of connecting components in microservices architecture. With the help of APIs, we are able to get or send data to the website and perform some operations with the aim of completing our tasks through web services. Every website uses different types of APIs, like stock market trading websites, with the help of APIs they get the current prices and ups and downs.
Create the first REST API
Similarly, we create the Hello world API, which means that if you make a get request to it, you will get a JSON response. In general, the API gives the JSON type the response to. Next, use the pip package manager to install Flask:
pip install flask
pip install flask-restful
from flask import Flask
from flask_restful import Resource, Api
app = Flask(__name__)
api = Api(app)
class Helloworld(Resource):
 def __init__(self):
 pass
 def get(self):
 return {
 "Hello": "World"
 }
api.add_resource(Helloworld, '/')
if __name__ == '__main__':
app.run(debug=True)
ok. The first Rest api has been created so far. It seems quite simple. So, what is Flask-Restful?
Flask restful defines the resource Resource class, which contains methods for each HTTP method. The method name should be the same as its corresponding HTTP method and written in lowercase, as shown in the code above. We found that these methods do not have route decorators, which is because they are based on resource routing. No matter what class is defined, we can use the add_resource method to define a route to it and call the class on the corresponding route.
Instructions: In the above code, we first load the required parent class, and then initialize our app and API. After that, we have created a program and we are making a GET request stating that if someone clicks on this program then he will get Hello world as a response in JSON format. To open a specific URL, we use the add resource method and route it to the default slash. To run this file, you can use the POSTMAN tool, an API maintenance tool to create, test, and manage APIs. You can also use the requests module to test this API using the following code. First, run the above file and it will give you the localhost URL, then in another command prompt, run the following code file:
import requests
url = "http://127.0.0.1:5000/"
response = requests.get(url=url)
print(response.text)
{
"Hello": "World"
}
通过 Flask RESTApi 理解 HTTP 请求
通过以上内容的学习,相比大家已经对 REST API 有个初步印象。接下来我们将继续探索使用 REST API 的不同 HTTP 方法,其中我们定义一个列表,该列表将以字典(JSON 对象)的形式存储从服务器获取的所有数据。这是很重要的,因为我们在项目中有不同的api来获取数据,而不是其他地方的数据。
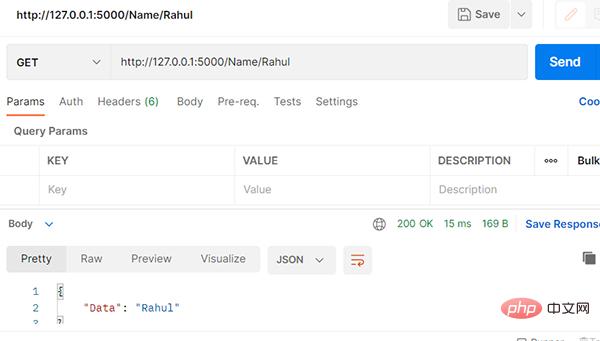
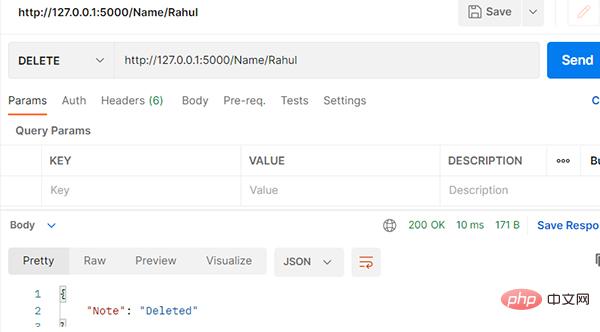
首先创建一个 API,在其中创建 3 个名为 GET、POST 和 DELETE 的 HTTP 方法,并且在其中创建一个自定义 URL,当请求 POST 方法时,它将以 Name 作为输入;在请求 GET 方法时,将名称返回;在DELETE时,如果该名称存在,我们将删除该名称,再次访问它会给我们 NULL。
创建一个文件并编写以下代码:
from flask import Flask
from flask_restful import Resource, Api
app = Flask(__name__)
api = Api(app)
data = []
class People(Resource):
def get(self):
for x in data:
if x['Data'] == name:
return x
return {'Data': None}
def post(self, name):
temp = {'Data': name}
data.append(temp)
return temp
def delete(self):
for ind, x in enumerate(data):
if x['Data'] == name:
temp = data.pop(ind)
return {'Note': 'Deleted'}
api.add_resource(People, '/Name/')
if __name__ == '__main__':
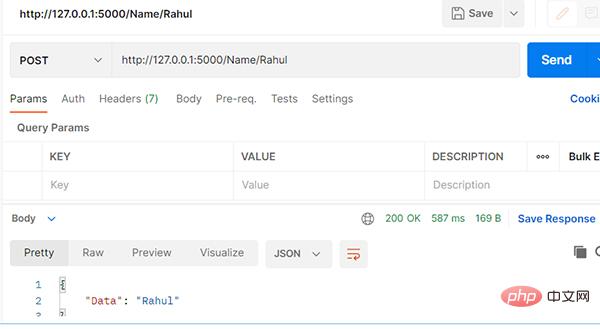
app.run(debug=True)打开 POSTMAN API 工具并点击每个 HTTP 方法请求。首先,当我们使用 post 请求Name时,它给了我们一个name。在获取请求时,我们将返回name。它在删除时被删除,当再次将其取回时,它会给你返回 NULL。
结果如下
如何在 Flask REST API 中使用装饰器
我们使用带有 API 的装饰器来监控 IP 地址、cookie 等。我们将继续学习如何使用带有装饰器的Flask API。装饰器是一个将另一个函数作为参数并返回另一个函数的函数。也可以将其理解为在不改变或修改当前功能的情况下,为现有功能提供一些附加功能的功能。
这里我们创建一个新文件,我将通过创建两个装饰器来展示。在第一个文件中,编写返回代码执行时间的外部时间函数。我们从 functools 模块(用于高阶 python 函数的标准模块)导入应用于 wrapper 函数的 wrap 装饰器 。它通过复制所有参数来更新包装函数。
from flask import Flask
from flask_restful import Resource, Api
import datetime
from flask import request
from functools import wraps
app = Flask(__name__)
api = Api(app)
def time(function=None):
 @wraps(function)
 def wrapper(*args, **kwargs):
 s = datetime.datetime.now()
 _ = function(*args, **kwargs)
 e = datetime.datetime.now()
 print("Execution Time : {} ".format(e-s))
 return _
 return wrapper
class HelloWorld(Resource):
 @monitor
 def get(self):
 return {"hello": "world"}
api.add_resource(HelloWorld, "/")
if __name__ == "__main__":
 app.run(debug=True)
我们创建第二个装饰器来监视cookie和IP地址,因此创建下面的函数。不是向hello world函数添加时间装饰器,而是添加监视器装饰器并运行代码。
def monitor(function=None):
 @wraps(function)
 def wrapper(*args, **kwargs):
 _ = function(*args, **kwargs)
 print("Ip Address: {} ".format(request.remote_user))
 print("Cookies : {} ".format(request.cookies))
 print(request.user_agent)
 return _
 return wrapper
如何使 Flask API 更安全
当我们设计API时,我们也应该注意安全性,因为很多人会访问它。因为API可能包含一些双方之间的机密数据,因此我们可以指定只有授权的人可以访问API,那该怎么办?此时可以使用Flask基本身份验证。当然,此时需要使用pip命令安装这个flask模块。
pip install flask-httpauth
我们正在构建一个API并定义User数据字典,其中包含用户名和密码。当在实时用例中工作时,可以通过配置文件或从数据库中接受用户名和密码。首先,我们创建一个主要函数来匹配用户名和密码,并创建一个GET方法,该方法表示任何点击此API的人,如果没有登录,我们就无法访问数据。
from flask import Flask
from flask_restful import Resource, Api
from flask_httpauth import HTTPBasicAuth
app = Flask(__name__)
api = Api(app, prefix="/api/v1")
auth = HTTPBasicAuth()
USER_DATA = {
"admin": "SuperSecretPwd"
}
#route to verify the password
@auth.verify_password
def verify(username, password):
if not(username and password):
return False
return USER_DATA.get(username) == password
class PrivateResource(Resource):
@auth.login_required
def get(self):
return {"How's the Josh": "High"}
api.add_resource(PrivateResource, '/private')
if __name__ == '__main__':
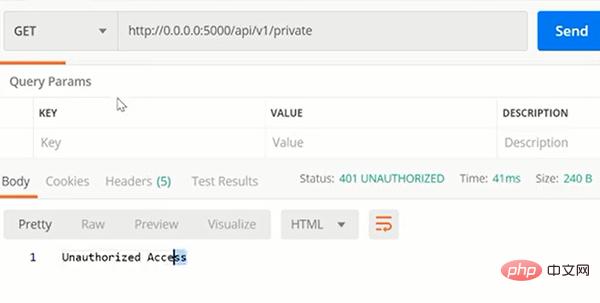
app.run(debug=True)当我们使用POSTMAN运行上述文件时,我们会尝试在没有登录的情况下获取数据,以便给你演示未经授权的访问权限。
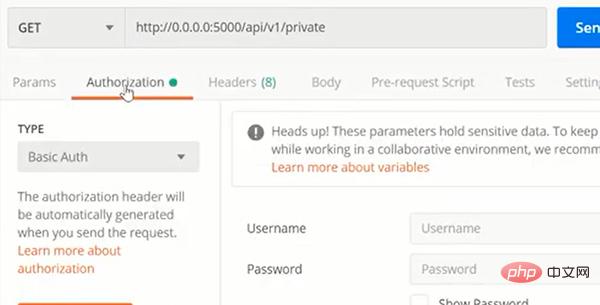
现在转到授权,并单击Basic authorization。输入用户名和密码,然后点击GET请求以获得所需的结果。
这是保护 Flask API 的方法,也是最基本的方法,当然还有更多更高级的方法,这里不做过多的介绍。
如何在 Flask API 上启用跟踪
至此我们已经了解了如何保护我们的 API,在未经授权的登录禁止访问,但是如果我们还想知道访问者的位置(纬度和经度点)、IP 地址、服务器名称(例如访问API 的人的详细信息),我们还可以继续配置,使用 REST API 的基本flask跟踪应用程序。首先,使用 PIP 命令安装flask跟踪包。
pip install flask-track-usage
接下来看下该程序:
from flask import Flask, g
app = Flask(__name__)
app.config['TRACK_USAGE_USE_FREEGEOIP'] = False
app.config['TRACK_USAGE_INCLUDE_OR_EXCLUDE_VIEWS'] = 'include'
from flask_track_usage import TrackUsage
from flask_track_usage.storage.printer import PrintWriter
from flask_track_usage.storage.output import OutputWriter
t = TrackUsage(app, [
 PrintWriter(),
 OutputWriter(transform=lambda s: "OUTPUT: " + str(s))
])
@t.include
@app.route('/')
def index():
 g.track_var["optional"] = "Write_Something"
 return "Hello"
#Run the application
if __name__ == "__main__":
app.run(debug=True)
该程序通过导入 Track Usage、Input writer 和 output writer 来创建一个跟踪应用程序。将flask app传递给 Track 包并使用输出编写器,并使用 lambda 函数以字符串格式写入输出。之后在 slash 上创建一个基本路由,并将跟踪应用程序作为装饰器包含在内。g 代表全局,表示数据在上下文中是全局的。因此,创建一个基本 API,它在浏览器返回"Hello",同时在后端获得所有人员的信息。
如何为REST API编写单元测试代码
现在已经为案例创建了一个不错的REST API。尽管如此,我们还需要为REST API编写单元测试代码,因为从API中识别常见错误,并确保生产安全是至关重要的。
如下是创建一个名为run的新文件并开发以下简单API。
from flask import Flask
from flask_restful import Resource, Api
import json
app = Flask(__name__)
api = Api(app)
class Helloworld(Resource):
def __init__(self):
 pass
def get(self):
 return json.dumps({"Message": "Fine"})
api.add_resource(Helloworld, '/')
if __name__ == '__main__':
app.run(debug=True)
现在创建另一个名为test的文件,在其中编写用于对API进行单元测试的代码。最常见的情况是执行以下三个基本单元测试。
- 检查响应码是否为200
- 检查从API编写的内容是否为应用程序JSON格式
- 检查我们正在访问的所有键是否都存在于API数据处理中
from run import app
import unittest
class FlaskTest(unittest.TestCase):
#Check for response 200
def test_inde(self):
 tester = app.test_client(self) #tester object
 response = tester.get("/")
 statuscode = response.status_code
 self.assertEqual(statuscode, 200)
#check if the content return is application JSON
def test_index_content(self):
tester = app.test_client(self)
response = tester.get("/")
self.assertEqual(response.content_type, "application/json")
#check the Data returned
def test_index_data(self):
tester = app.test_client(self)
response = tester.get("/")
self.assertTrue(b'Message' in response.data)
if __name__ == '__main__':
unittest.main()
如果你已经学习过网络爬虫,你应该知道 200 响应意味着对特定 URL 的请求已成功发出,并返回响应。
好了,这就是本文的全部内容。到这里我们已经学会了从头开始创建 Flask REST API ,并轻松安全地对其进行维护。
Flask 作为 Python Web 领域最为著名的轻量级 Web 开发框架,对于致力于 Web 开发的同学来说,掌握基本的 Flask 技能还是非常有必要的,你学会了吗?
The above is the detailed content of Teach you a trick! Create a REST API with Python and Flask!. For more information, please follow other related articles on the PHP Chinese website!