Home >Technology peripherals >AI >Don't know how to deploy machine learning models? 15 pictures take you into the TensorFlow deployment framework!
Don't know how to deploy machine learning models? 15 pictures take you into the TensorFlow deployment framework!
- WBOYWBOYWBOYWBOYWBOYWBOYWBOYWBOYWBOYWBOYWBOYWBOYWBforward
- 2023-04-11 18:10:031578browse

Opening Chapter
A few days ago, I chatted with a friend Xiao Li who has been engaged in development for 3 years and learned that his company is conducting research related to machine learning. project. Recently, he received a task to deploy the trained machine learning model. This worries Xiao Li. He has been involved in machine learning development for almost half a year. He is mainly engaged in data collection, data cleaning, environment building, model training, and model evaluation. However, this is his first time doing model deployment.
So, I conducted popular science on machine learning model deployment based on my own experience. As shown in Figure 1, in traditional programming, we pass rules and data to the program to get the answers we want. For machine learning, we train the rules through the answers and data. This rule is the model of machine learning. .
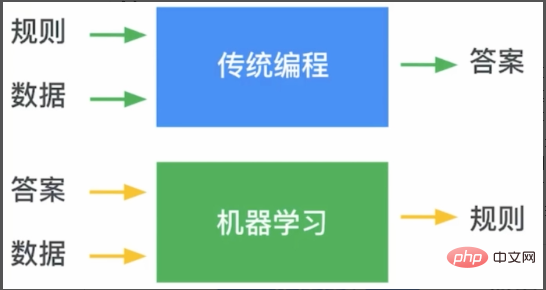
Figure 1 The difference between traditional programming and machine learning
And the model deployment of machine learning is to Deploy this rule (model) to the endpoint where machine learning needs to be applied. As shown in Figure 2, the model trained by machine learning can be understood as a function, API or SDK, and is deployed on the corresponding terminal (the gray part in the figure). After deployment, the terminal will have the capabilities given by the model. At this time, by inputting new data, the predicted results can be obtained according to the rules (model).
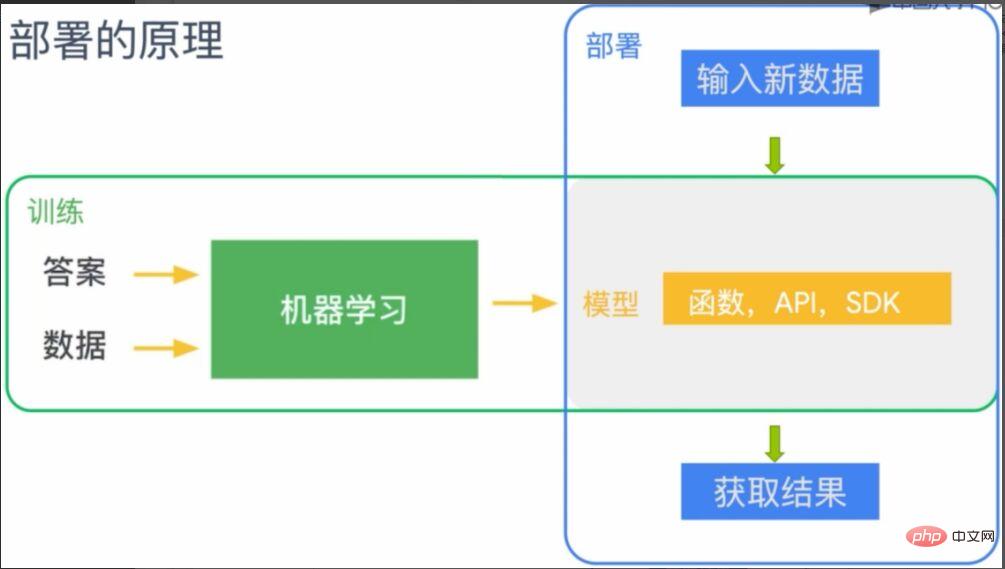
Figure 2 Principle of machine learning model deployment
TensorFlow machine learning deployment framework
Xiao Li said he understood after listening to my introduction, and told me all about the deployment of their project with great interest, and wanted to ask for my opinion. As shown in Figure 3, they want to deploy an image recognition model to IOS, Android, Raspberry Pi, web browser and server side.
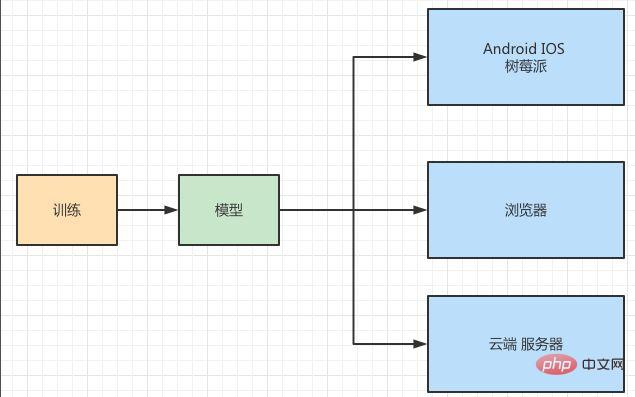
Figure 3 Model deployment scenario
From the deployment application scenario, it is lightweight , cross-platform features. The same machine learning model needs to be deployed on multiple different platforms, and each platform has different storage and computing capabilities. At the same time, the availability, performance, security, and scalability of model operation must be taken into consideration, and a relatively stable large platform needs to be used. So, I recommended TensorFlow’s machine learning deployment framework to him. As shown in Figure 4, TensorFlow's deployment framework provides component support for different platforms. Among them, Android, IOS, and Raspberry Pi correspond to TensorFlow Lite, which is a model deployment framework specially used for mobile terminals. The browser side can use TensorFlow.js, and the server side can use TensorFlow Serving.
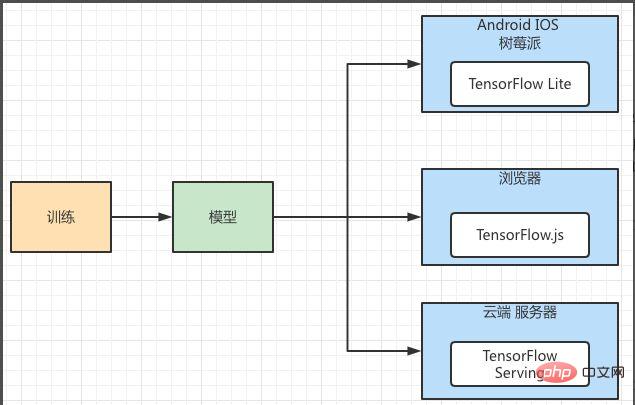
Figure 4 TensorFlow machine learning model deployment framework
TensorFlow Lite actual operation
小李 wanted to know a more specific deployment process. I happened to have a project that used TensorFlow's deployment framework, so I demonstrated the process to him. This project is to deploy the "cat and dog recognition" model to Android phones. Since IOS, Android, Raspberry Pi, and browsers are all clients, their computing resources cannot be compared with those of the server. In particular, mobile applications have the characteristics of lightweight, low latency, high efficiency, privacy protection, power saving, etc., so TensorFlow has specially designed their deployment and uses TensorFlow Lite to deploy them.
Using TensorFlow Lite to deploy a model requires three steps:
- Use TensorFlow to train the model.
- Convert to TensorFlow Lite format.
- Use the TensorFlow Lite interpreter to load and execute.
In the first step, we have completed the model training. The second step is to convert the generated model into a pattern format that TensorFlow Lite can recognize and use. As mentioned above, when the model is used on the mobile terminal, various issues need to be considered, so a special file format needs to be generated for the mobile terminal. The third step is to load the converted TensorFlow Lite file into the mobile interpreter and execute it.
Since our focus is on model deployment, the first step of training the model is temporarily skipped, which means that you have already trained the model. For the second step of model conversion, please refer to Figure 5. The TensorFlow model will be converted into a model file with the suffix ".tflite" through Converter, and then published to different platforms, and processed through the interpreter on each platform. Explain and load.
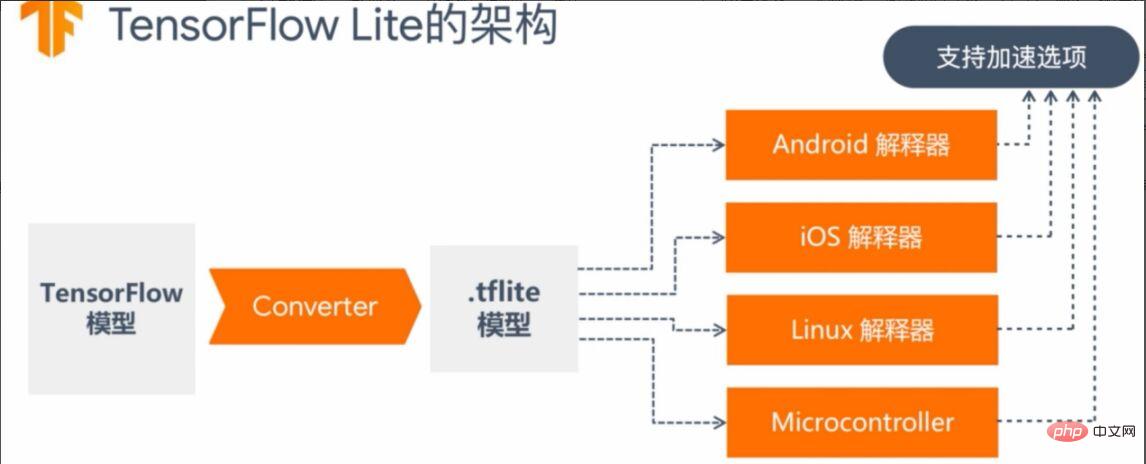
Figure 5 TensorFlow Lite model conversion architecture
Model saving and conversion
The architecture of TensorFlow Lite is introduced above. Here you need to save the model as a TensorFlow model and convert it. As shown in Figure 6, we call the saved_model.save method in TensorFlow to save the model (trained model) in the specified directory.
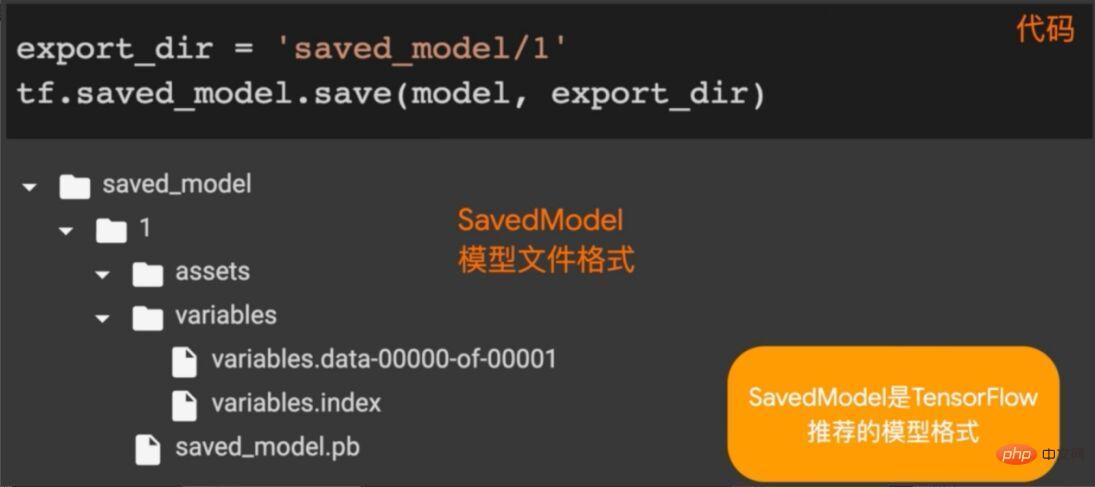
Figure 6 Saving the TensorFlow model
After saving the model, it is time to convert the model, as shown in Figure 7 As shown, call the from_saved_model method in the TFLiteConverter package in TensorFlow Lite to generate an instance of the converter (model converter), then call the convert method in the converter to convert the model, and save the converted file to the specified directory.
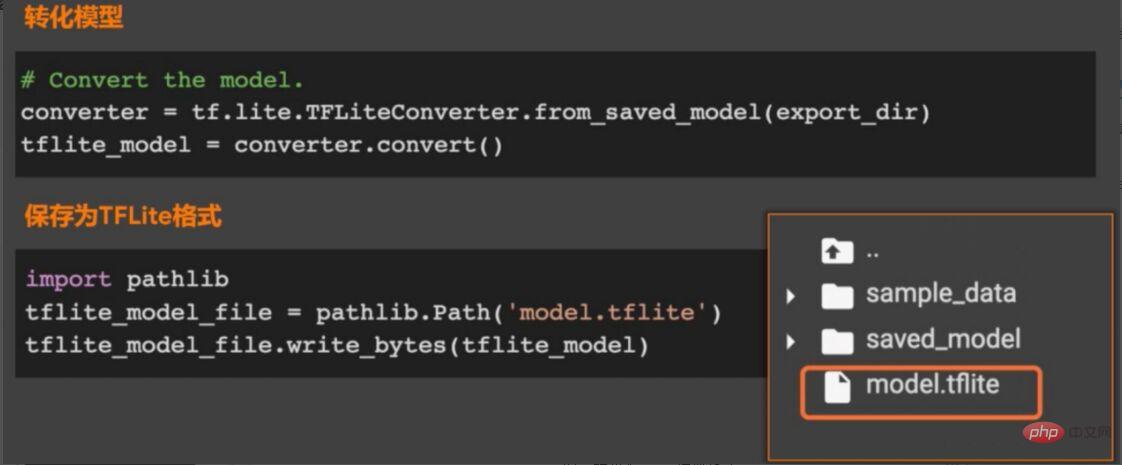
Figure 7 Convert to tflite model format
Load application model
Because This example is for model deployment on the Android system, so the dependency of TensorFlow Lite needs to be introduced in Android. As shown in Figure 8, introduce the dependency of TensorFlow Lite, and set noCompress to "tflite" in aaptOptions, which means that files with "tflite" will not be compressed. If compression is set, the Android system may not recognize tflite files.
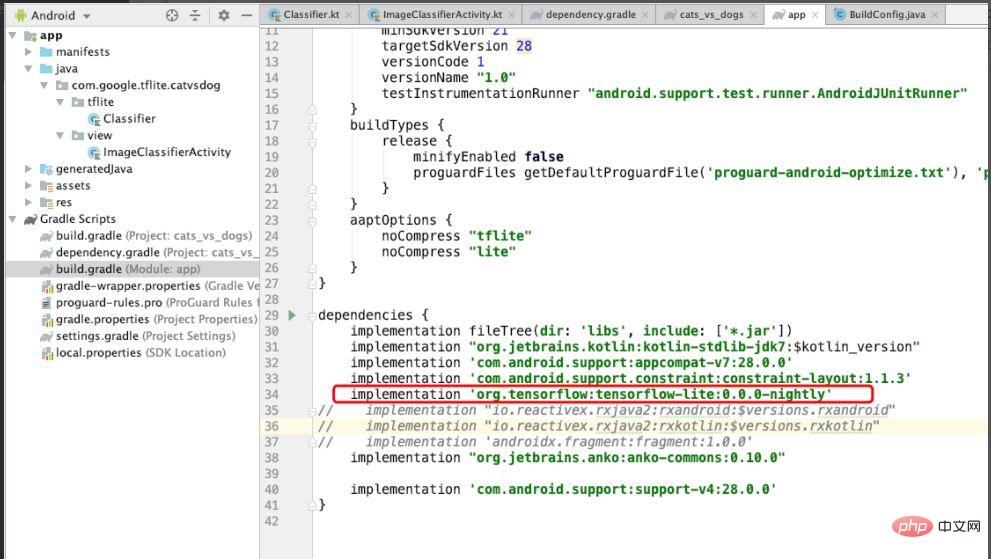
Figure 8 Dependencies introduced to TensorFlow Lite in the project
After configuring the dependencies, convert Copy the good tflite file to the assets file, as shown in Figure 9. This file will be loaded later to execute the machine learning model.
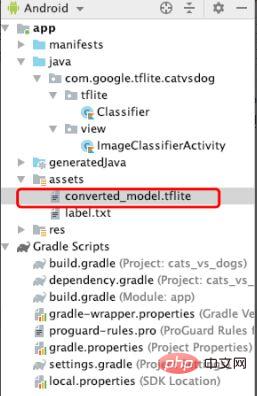
Figure 9 Add tflite file
After adding the tflite file, we will create the Classifier classifier , used to classify “cat and dog” pictures. As shown in Figure 10, the interpreter is initialized in init in Classifer, the loadModuleFlie method is called to load the tflite file, and the classification label (labelList) is specified. The label here is "cat dog".
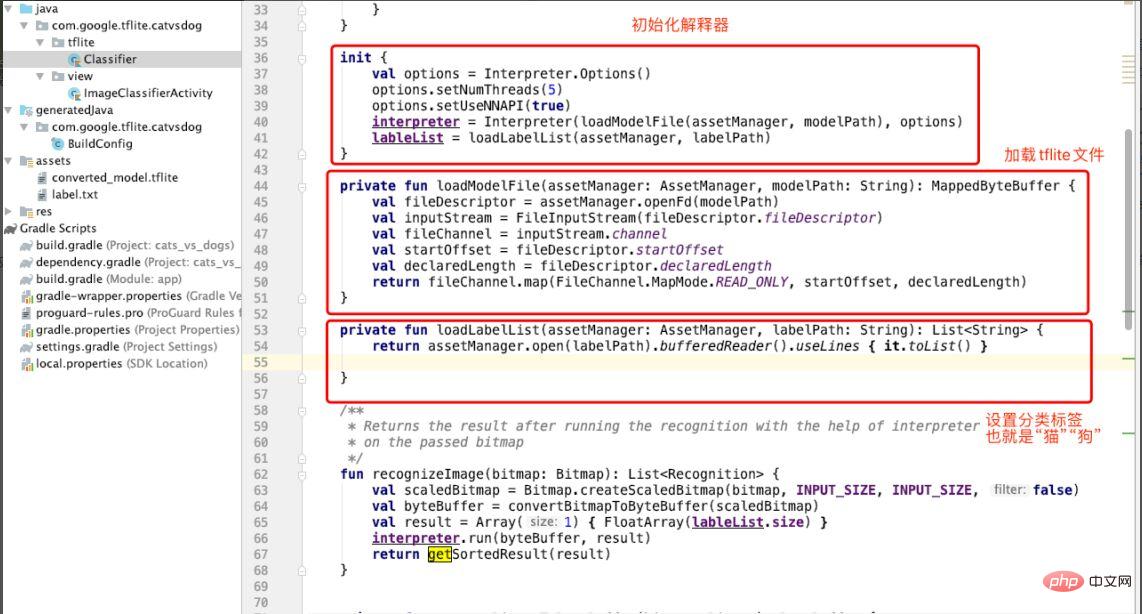
Figure 10 Initializing the interpreter
After creating the classifier, the cat and dog classification model is used to identify the image. That is, in the Classifier class, as shown in Figure 10, the input parameter of the convertBitmapToByteBuffer method is bitmap. This is the picture of the cat and dog we input. It will be converted in this method. Pay special attention to the red in the for loop. Convert the green and blue channels, put the conversion result into a byteBuffer and return it. The recoginzeImage method calls convertBitmapToByteBuffer and uses the run method of the interpreter to perform image recognition work, that is, using a machine learning model to identify images of cats and dogs.
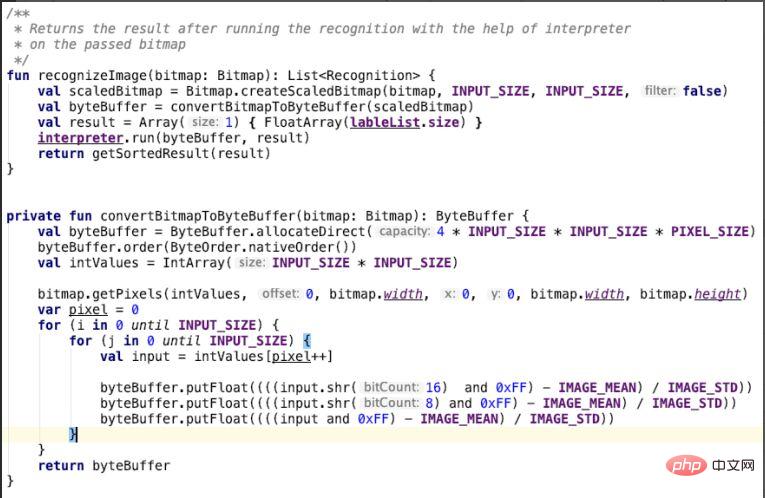
Figure 11 Recognizing pictures
The above graphic transformation process is too abstract, we will The details are shown in Figure 12. The image we input is the 395*500 image in the upper left corner of the picture, which will convert the image in the imageView into bitmap form. Since our model input requires a 224*224 format, a conversion is required. Next, the pixels are put into a 224*224 ByteBuffer array and saved, and finally the RGB (red, green, and blue) pixels are normalized (divided by 255) as the input parameters of the model.
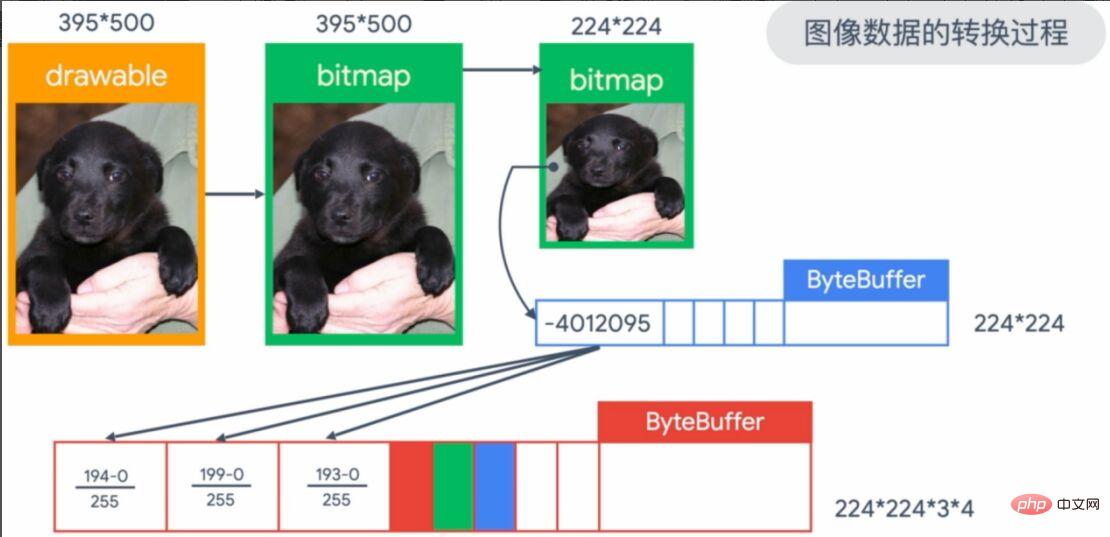
Figure 12 Conversion process of input image
At this point, the loading and application of the machine learning model is complete Complete, of course, the input files and layout are indispensable. As shown in Figure 13, we store the pictures that need to be predicted (cat and dog pictures) under the drawable folder. Then create the activity_image_classifier.xml file under the layout to build and store the ImageView.
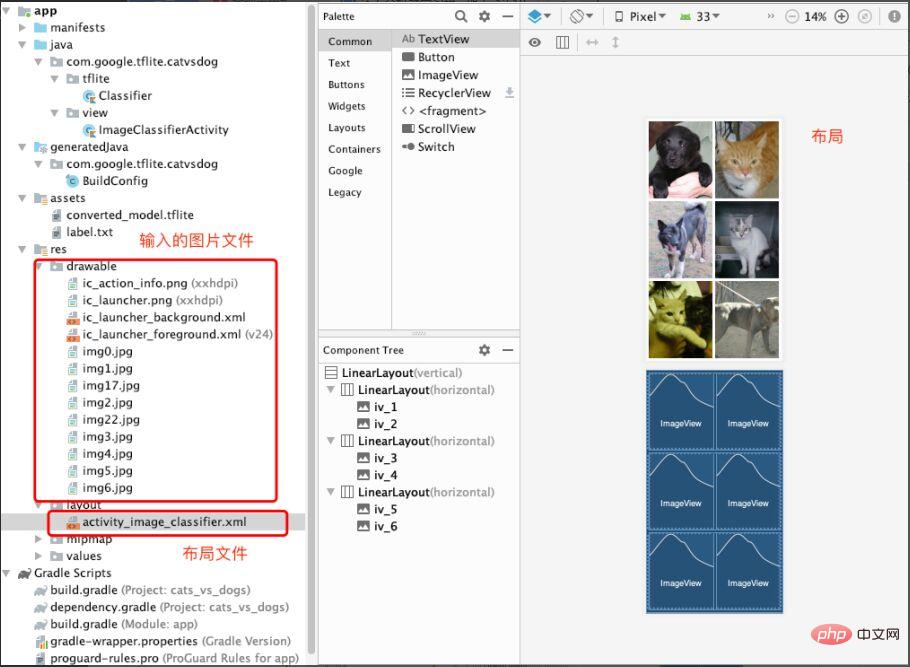
Figure 13 Input image files and layout files
Finally, create ImageClassifierActivity to display images and Respond to events that identify images. As shown in Figure 14, bind the onclick event of each image in the initViews method, and then call the recoginzie Image method in the onclick method to identify the image.
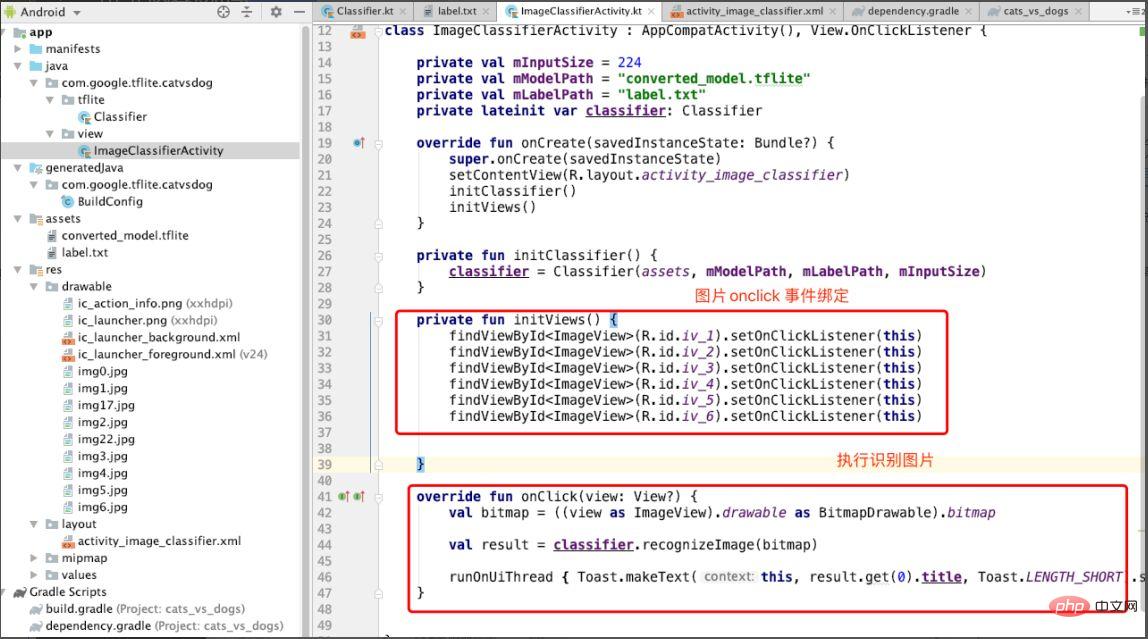
Figure 14 Perform image recognition in onclick
Let’s take a look at the effect. As shown in Figure 15, when the corresponding picture is clicked, a "dog" prompt will be displayed, indicating the prediction result.
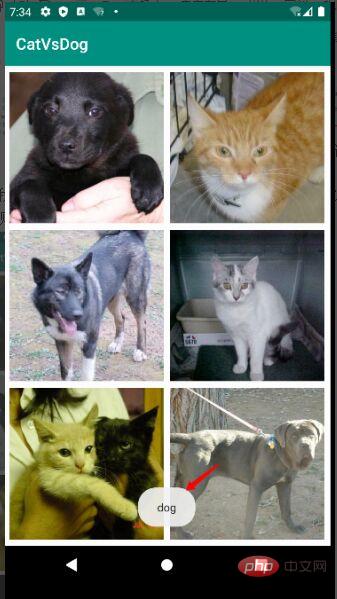
Figure 15 Demonstration effect
Reviewing the whole process is not complicated, I will deploy the model with TensorFlow lite It is summarized in the following steps:
- Save the machine learning model.
- Convert the model to tflite format.
- Load the model in tflite format.
- Use the interpreter to load the model.
- Input parameter prediction results.
Students who want to further learn TensorFlow model deployment skills can learn TensorFlow’s official courses, register an account on the Chinese University MOOC, and learn for free: https://www.php.cn/link/1f5f6ad95cc908a20bb7e30ee28a5958
There are also Google developer experts to do it The online explanation and Q&A on deployment are very good. It is recommended that students who want to get a preliminary understanding of TensorFlow deployment function pay attention to https://www.php.cn/link /e046ede63264b10130007afca077877f
End
After Xiao Li listened to my explanation of machine learning model deployment and understood the process of TensorFlow deployment, he was even more eager to try the practical deployment. I think the deployment process using TensorFlow is logically clear, the method is simple and easy to implement, and it is easy for developers with 3-5 years of experience to get started. In addition, TensorFlow officially provides the "TensorFlow Introductory Practical Course", which is suitable for novices with zero foundation in machine learning: https://www.php.cn/link/bf2fe6582ed9ead9161a3d6f6b1d6858
Author Introduction
Cui Hao, 51CTO community editor, senior architect, has 20 years of architecture experience. He once served as a technical expert at HP, participated in multiple machine learning projects, and wrote and translated more than 20 popular technical articles on machine learning, NLP, etc. Author of "Principles and Practice of Distributed Architecture".
The above is the detailed content of Don't know how to deploy machine learning models? 15 pictures take you into the TensorFlow deployment framework!. For more information, please follow other related articles on the PHP Chinese website!
Related articles
See more- Technology trends to watch in 2023
- How Artificial Intelligence is Bringing New Everyday Work to Data Center Teams
- Can artificial intelligence or automation solve the problem of low energy efficiency in buildings?
- OpenAI co-founder interviewed by Huang Renxun: GPT-4's reasoning capabilities have not yet reached expectations
- Microsoft's Bing surpasses Google in search traffic thanks to OpenAI technology

