Home >Technology peripherals >AI >Jay Alammar releases another new work: Ultra-high-quality illustrations of Stable Diffusion. After reading it, you will completely understand the principle of 'image generation'
Jay Alammar releases another new work: Ultra-high-quality illustrations of Stable Diffusion. After reading it, you will completely understand the principle of 'image generation'
- WBOYWBOYWBOYWBOYWBOYWBOYWBOYWBOYWBOYWBOYWBOYWBOYWBforward
- 2023-04-11 11:13:021785browse
Do you still remember the graphic Transformer that became popular all over the Internet?
Recently, this big blogger Jay Alammar also wrote an illustration on the popular Stable Diffusion model on his blog, allowing you to completely build it from scratch. Understand the principles of image generation models, and come with super detailed video explanations!
##Article link: https://jalammar.github.io/illustrated-stable-diffusion/
Video link: https://www.youtube.com/watch?v=MXmacOUJUaw
Illustration of Stable DiffusionThe latest image generation capability demonstrated by the AI model far exceeds people's expectations. It can create images with amazing visual effects directly based on text descriptions. The operating mechanism behind it seems very mysterious and magical, but it does affect human beings. Way to create art.
The release of Stable Diffusion is a milestone in the development of AI image generation. It is equivalent to providing the public with a usable high-performance model. Not only does the generated image quality be very high, but the running speed is also very high. It is fast and has low resource and memory requirements.
I believe that anyone who has tried AI image generation will want to know how it works. This article will unveil the mystery of how Stable Diffusion works for you.
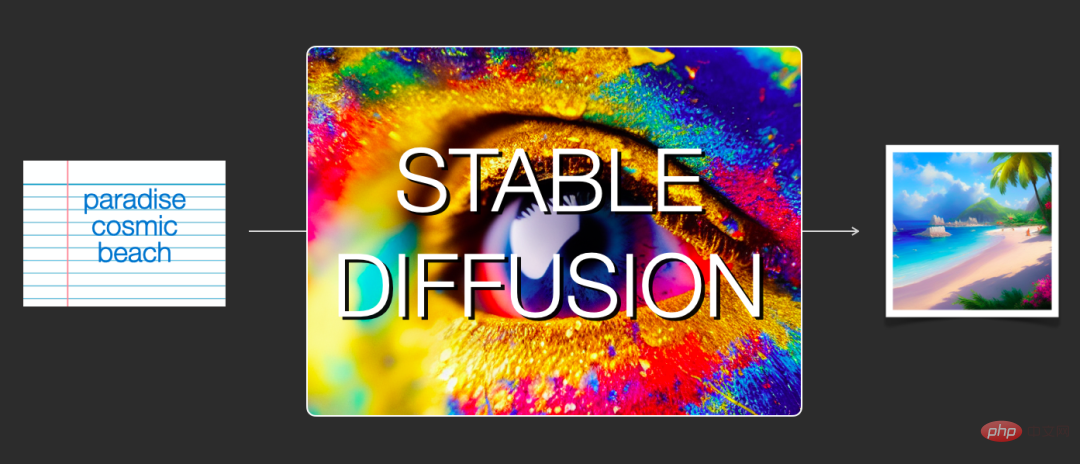
Stable Diffusion mainly includes two aspects in terms of function: 1) Its core function is to generate images based only on text prompts as input (text2img ); 2) You can also use it to modify images based on text descriptions (i.e. input as text images).
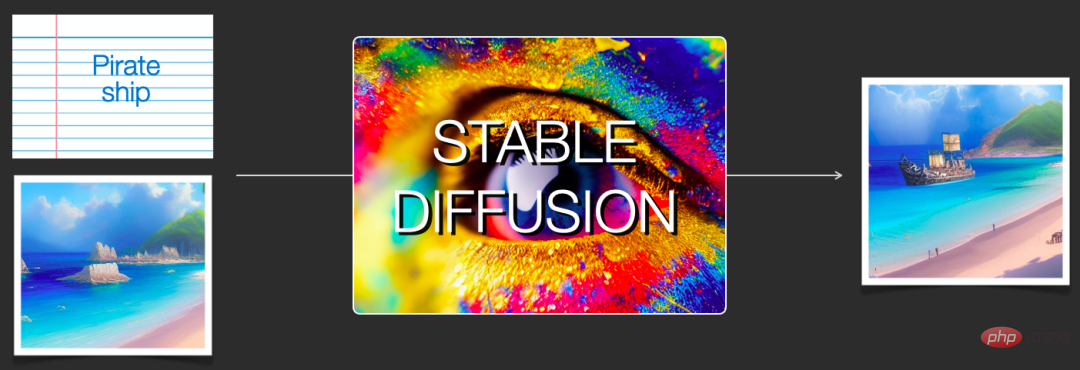
Illustrations will be used below to help explain the components of Stable Diffusion, how they interact with each other, and the meaning of image generation options and parameters.
Stable Diffusion ComponentStable Diffusion is a system composed of multiple components and models, not a single model.
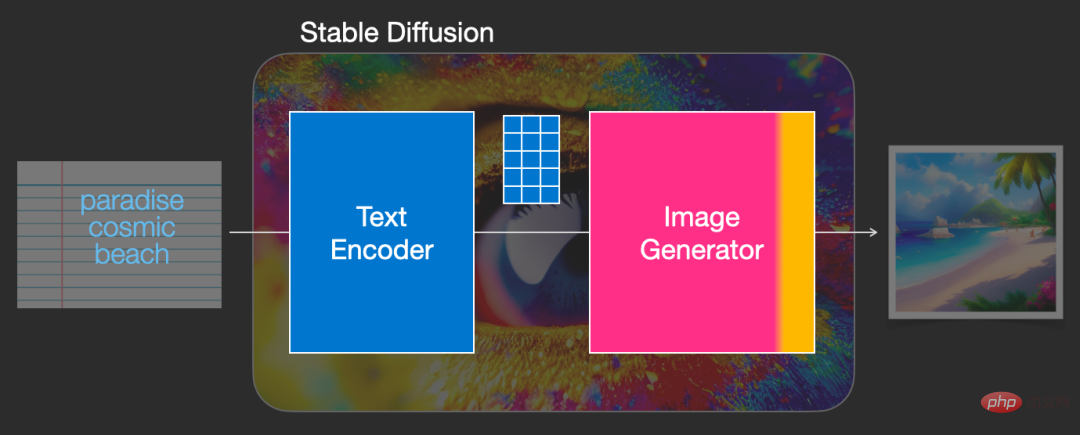
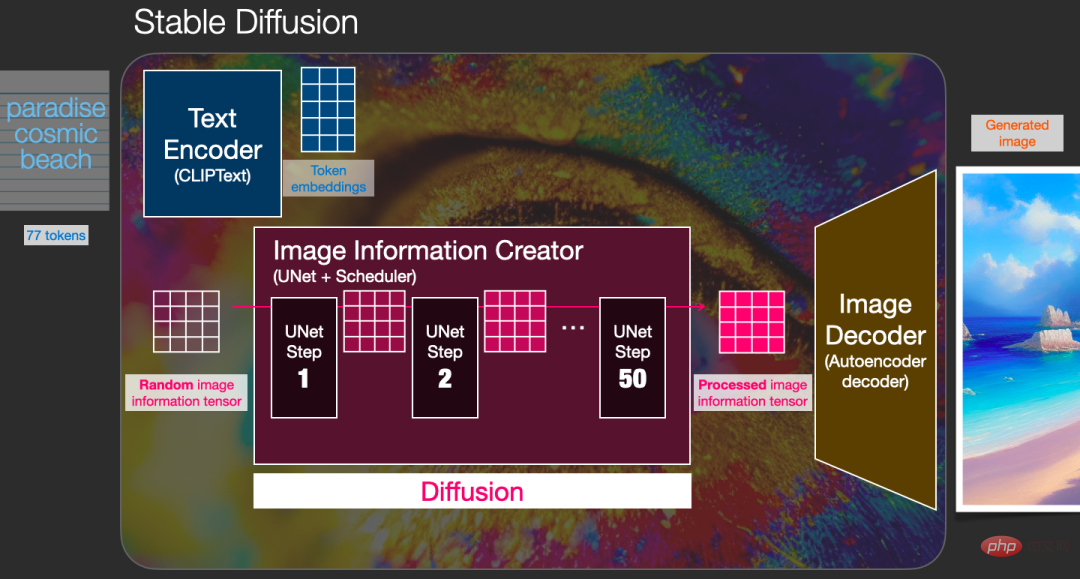
When we look inside the model from the perspective of the overall model, we can find that it contains a text understanding component for translating text information into numeric representation (numeric representation) to capture Semantic information in text.
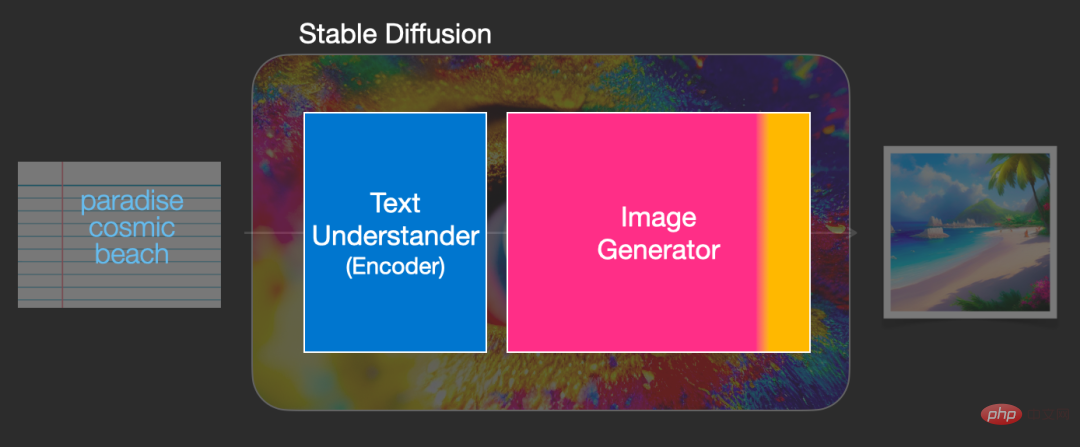
Although the model is still analyzed from a macro perspective, and there will be more model details later, we can also roughly speculate that this text encoder is A special Transformer language model (specifically a text encoder for the CLIP model).
The input of the model is a text string, and the output is a list of numbers used to represent each word/token in the text, that is, each token is converted into a vector.
This information will then be submitted to the image generator (image generator), which also contains multiple components internally.
The image generator mainly consists of two stages:
1. Image information creator
This component is the exclusive secret recipe of Stable Diffusion. Compared with the previous model, many of its performance gains are achieved here.
This component runs multiple steps to generate image information, where steps are also parameters in the Stable Diffusion interface and library, usually defaulting to 50 or 100.
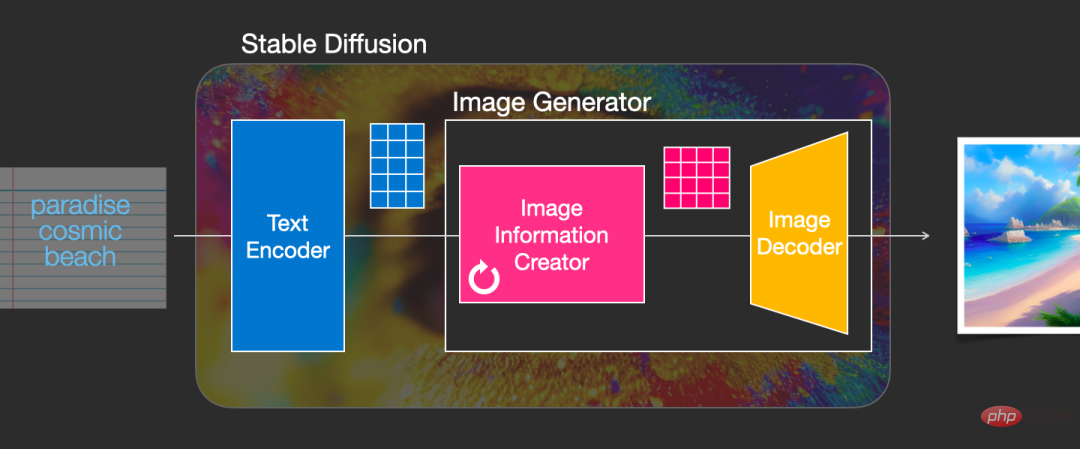
The image information creator operates entirely in the image information space (or latent space). This feature makes it better than others that work in pixel space. Diffusion models run faster; technically, the component consists of a UNet neural network and a scheduling algorithm.
The word diffusion describes what happens during the internal operation of this component, that is, the information is processed step by step and finally used by the next component (image decoder) Generate high-quality images.
2. Image decoder
The image decoder draws based on the information obtained from the image information creator For a painting, the entire process is run only once to produce the final pixel image.
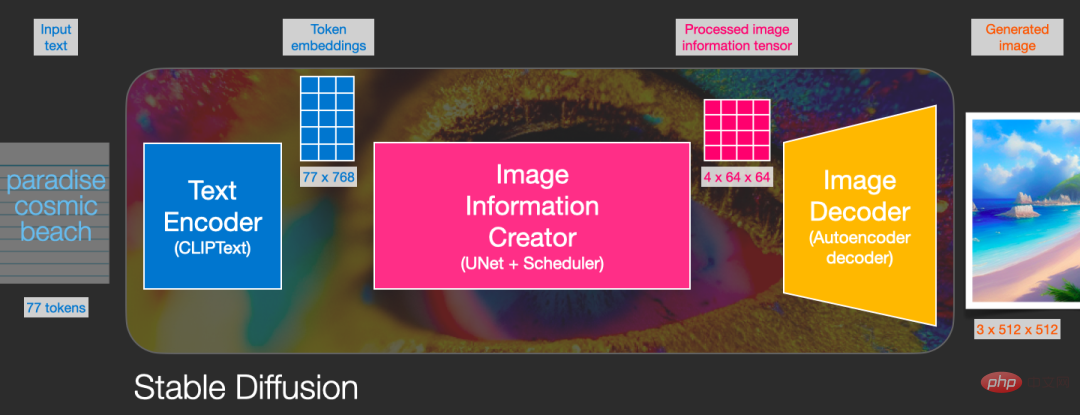
As you can see, Stable Diffusion contains a total of three main components, each of which has an independent neural network:
1) Clip Text is used for text encoding.
Input: text
Output: 77 token embedding vectors, each of which contains 768 dimensions
2) UNet SchedulerProcesses/diffuses information step by step in the information (latent) space.
Input: text embedding and an initial multi-dimensional array (structured list of numbers, also called tensor) composed of noise.
Output: a processed information array
3)Autoencoder Decoder(Autoencoder Decoder), use The processed information matrix is used by the decoder to draw the final image.
Input: processed information matrix, dimensions are (4, 64, 64)
Output: result image, each dimension is ( 3, 512, 512), that is (red/green/blue, width, height)
What is Diffusion?
Diffusion is the process that occurs in the pink image information creator component in the figure below. The process includes the token embedding that represents the input text, and the random initial image information matrix (also called latents ), this process will also require the use of an image decoder to draw the information matrix of the final image.
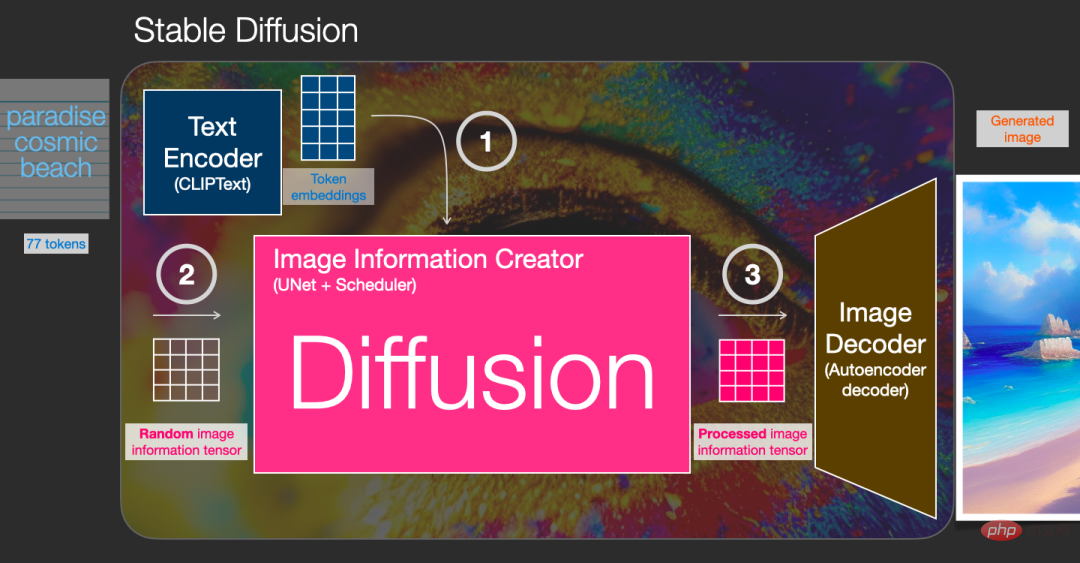
The entire running process is step by step, and more relevant information will be added at each step.
In order to feel the whole process more intuitively, you can view the random latents matrix halfway and observe how it is converted into visual noise, where the visual inspection is through the image decoder ongoing.
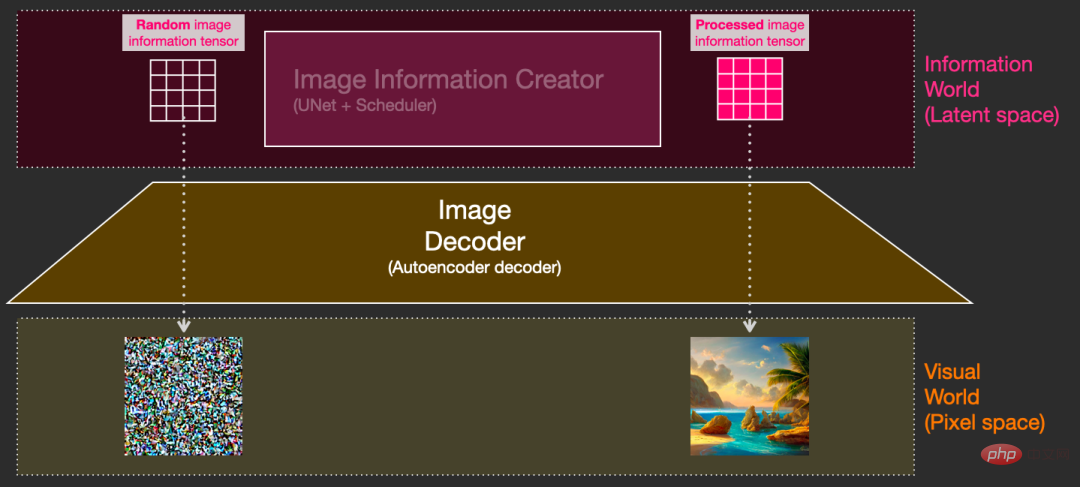
The entire diffusion process contains multiple steps, where each step operates based on the input latents matrix and generates another latents matrix to Better fit between "input text" and "visual information" obtained from model image sets.
Visualizing these latents allows you to see how this information is added up in each step.
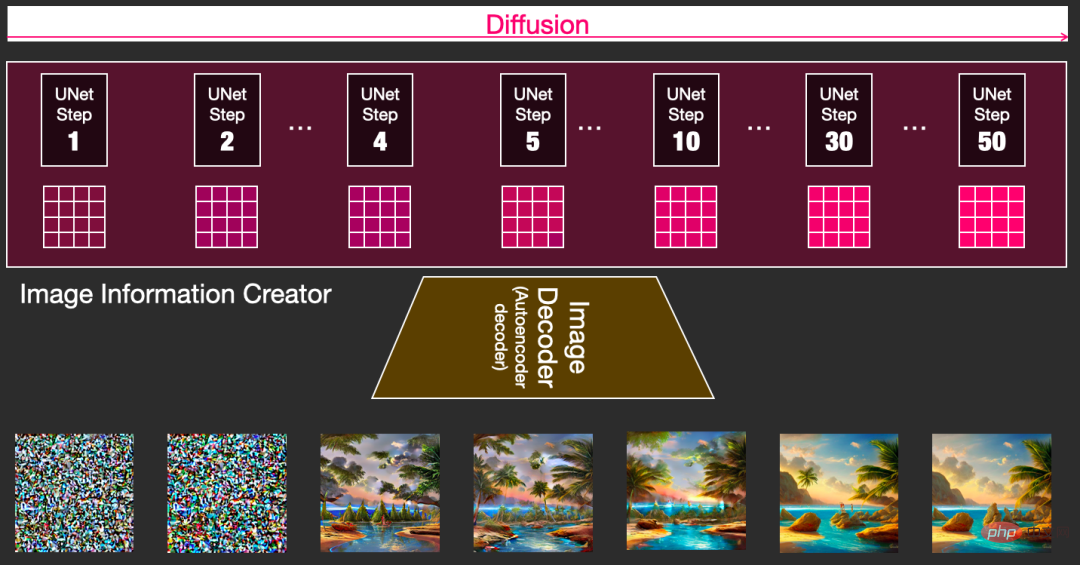
The whole process is from scratch, which looks quite exciting.
The process transition between steps 2 and 4 looks particularly interesting, as if the outlines of the picture are emerging from the noise.
How Diffusion works
The core idea of using the diffusion model to generate images is still based on the existing powerful computer vision models. As long as a large enough data set is input, these Models can learn arbitrarily complex operations.
Suppose we already have an image, generate some noise and add it to the image, and then the image can be regarded as a training example.
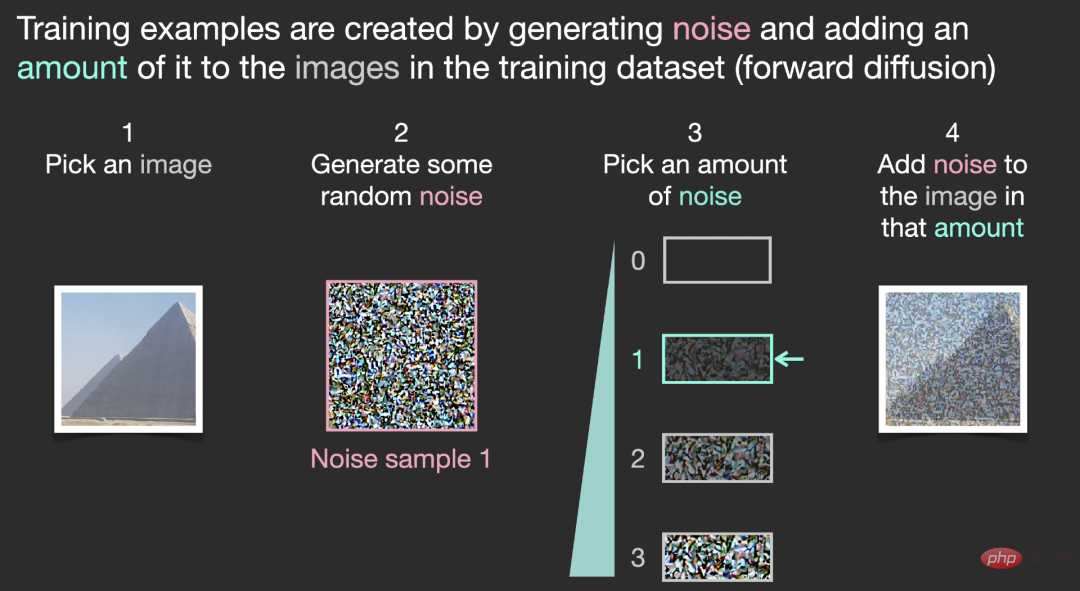
Using the same operation, a large number of training samples can be generated to train the core components in the image generation model.
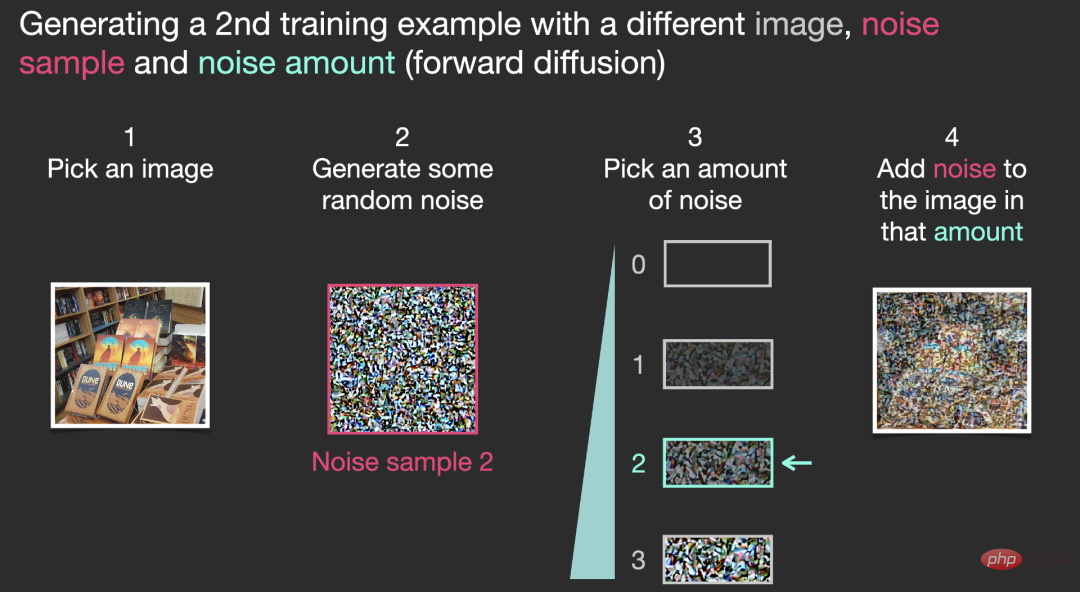
The above example shows some optional noise values, from the original image (level 0, no noise) to all noise added (level 4), making it easy to control how much noise is added to the image.
So we can spread this process over dozens of steps and generate dozens of training samples for each image in the data set.
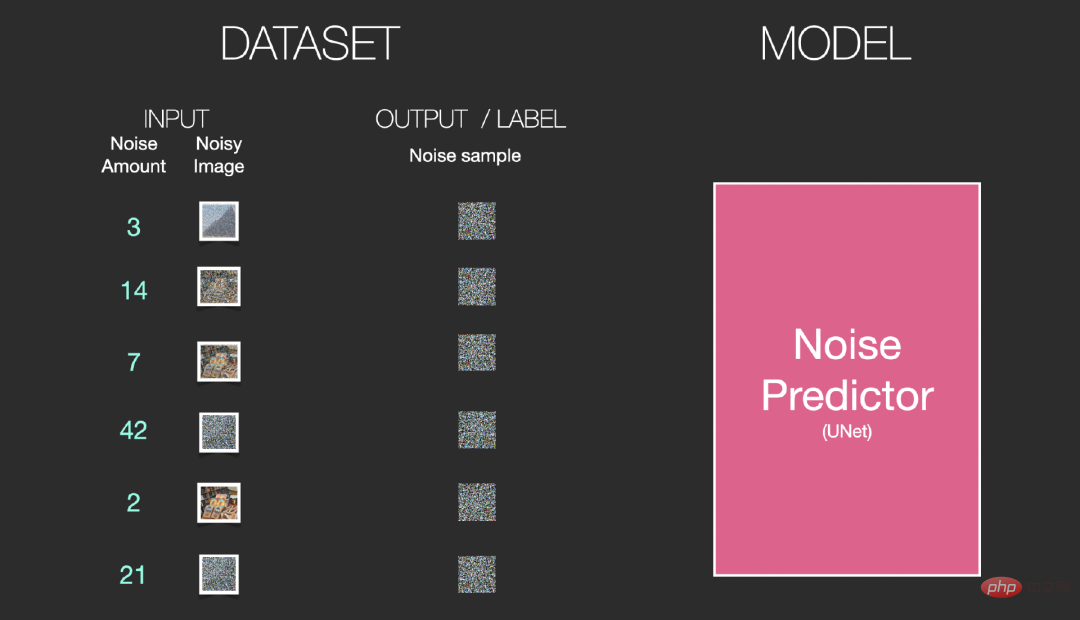
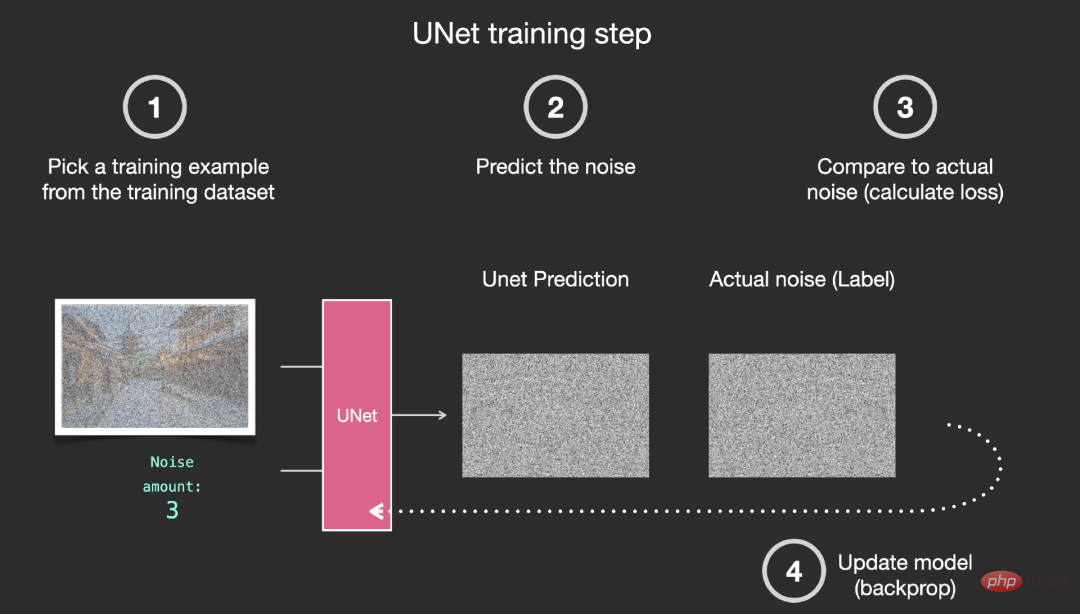
Based on the above data set, we can train a noise predictor with excellent performance. Each training step is similar to the training of other models. . When run in a certain configuration, the noise predictor can generate images.
Remove noise and draw the image
The trained noise predictor can denoise an image with added noise , the amount of noise added can also be predicted.
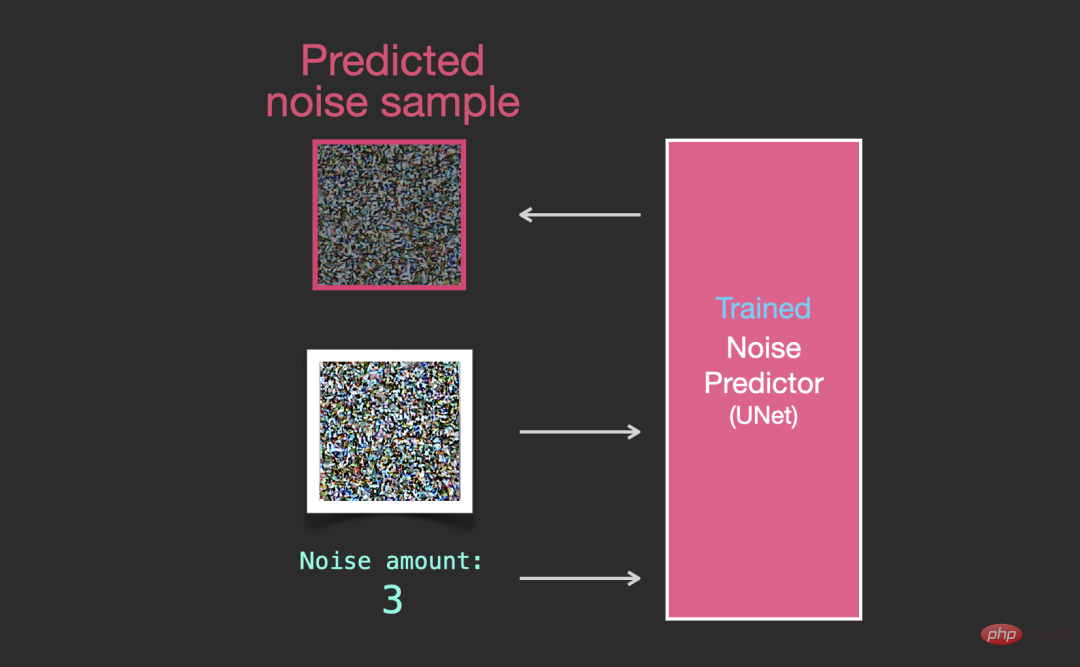
Since the noise of the sample is predictable, if the noise is subtracted from the image, the final image will be closer to the model trained Image.
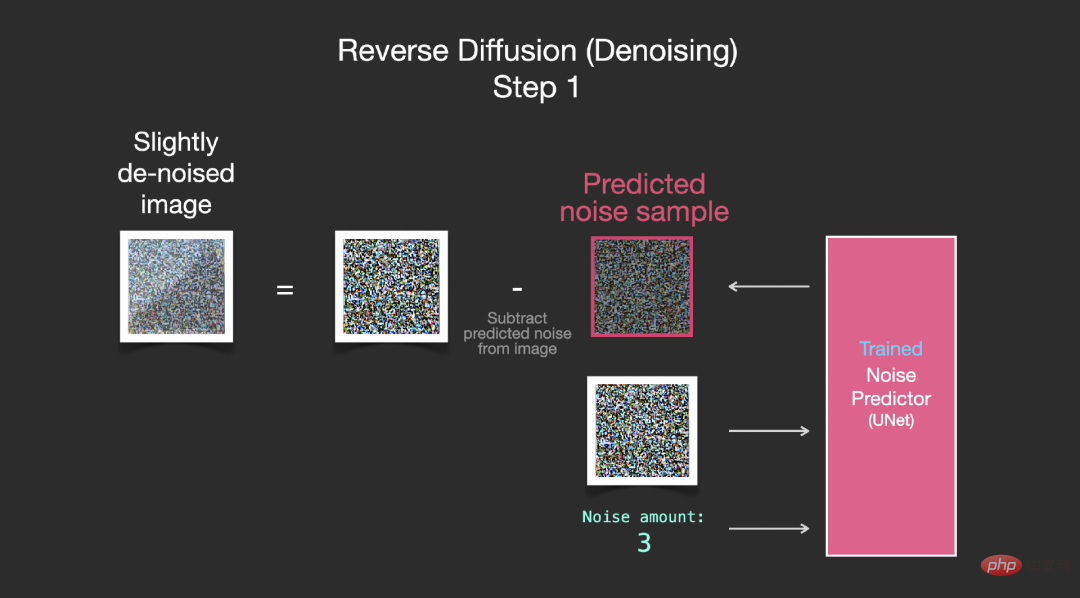
The obtained image is not an exact original image, but a distribution, that is, the arrangement of pixels in the world. For example, the sky is usually Blue, people have two eyes, cats have pointed ears, etc. The specific image style generated depends entirely on the training data set.
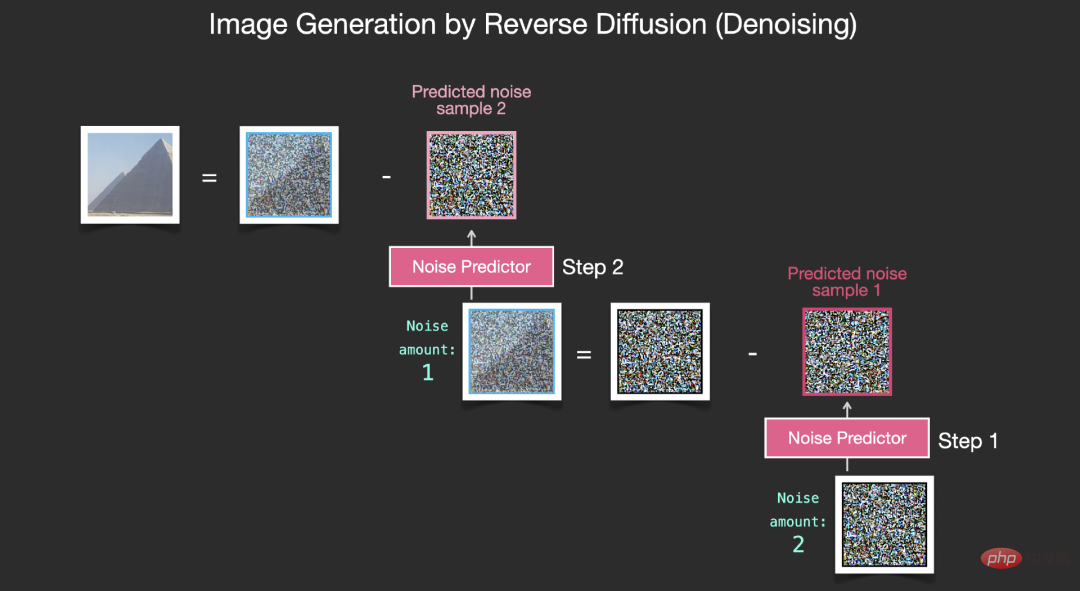
Not only Stable Diffusion generates images through denoising, but also DALL-E 2 and Google's Imagen model.
It is important to note that the diffusion process described so far does not use any text data to generate images. So, if we deploy this model, it can generate nice-looking images, but the user has no way to control what is generated.
In the following section, we will describe how to incorporate conditional text into the process to control the type of images generated by the model.
Acceleration: Diffusion on compressed data
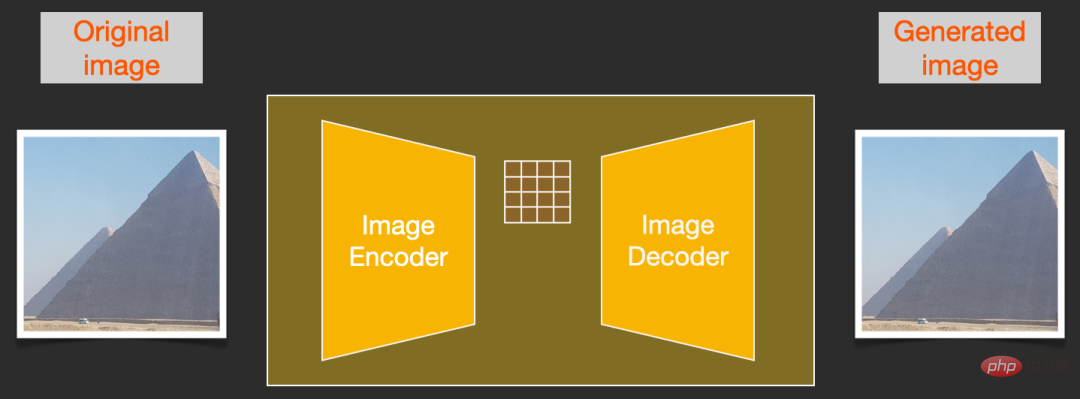
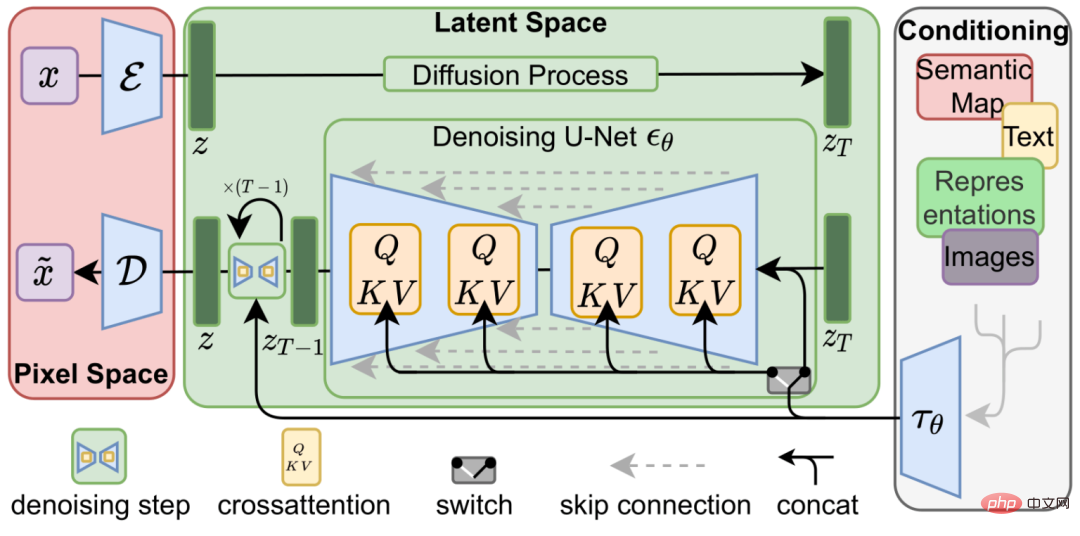
In order to speed up the image generation process, Stable Diffusion does not choose to run the diffusion process on the pixel image itself, but chooses to Run on the compressed version of the image, also called "Departure to Latent Space" in the paper.
The entire compression process, including subsequent decompression and drawing of images, is completed through the autoencoder, which compresses the image into the latent space, and then only uses the compressed information using the decoder to reconstruct.
The forward diffusion process is completed when compressing latents. Noise slices are noise applied to latents. rather than pixel images, so the noise predictor is actually trained to predict noise in the compressed representation (latent space).

Forward process, that is, using the encoder in the autoencoder to train the noise predictor. Once training is complete, images can be generated by running the reverse process (the decoder in the autoencoder).
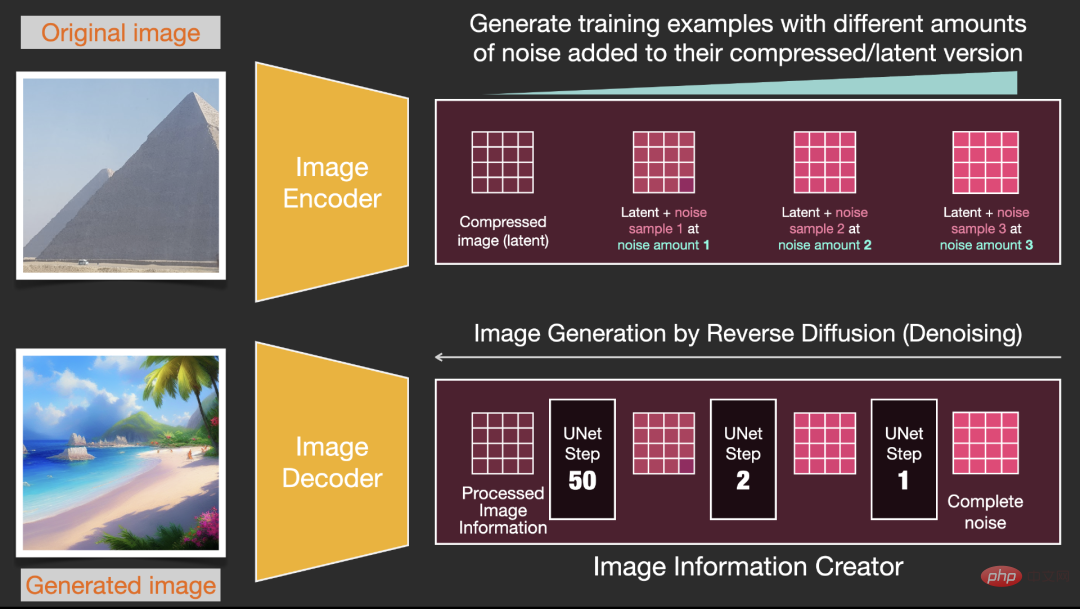
The forward and backward processes are shown below. The figure also includes a conditioning component to describe the text prompts of the image that the model should generate. .
Text encoder: a Transformer language model
The language understanding component in the model uses the Transformer language model, which can be The input text prompt is converted into a token embedding vector. The released Stable Diffusion model uses ClipText (GPT-based model). In this article, the BERT model is chosen for convenience.
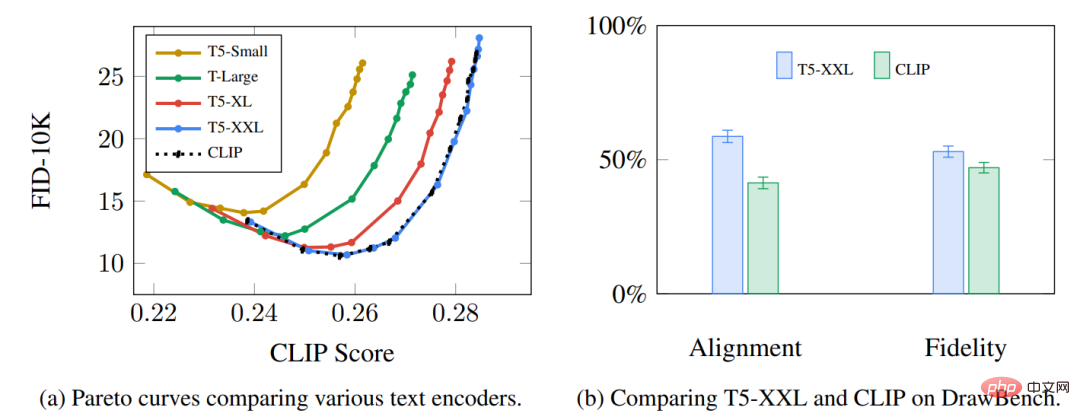
Experiments in the Imagen paper show that a larger language model can lead to more images than choosing a larger image generation component Quality improvement.
The early Stable Diffusion model used the pre-trained ClipText model released by OpenAI, but in Stable Diffusion V2, it has switched to the newly released, larger CLIP model variant. OpenClip.
#How is CLIP trained?
#The data required by CLIP is images and their titles. The data set contains approximately 400 million images and descriptions.
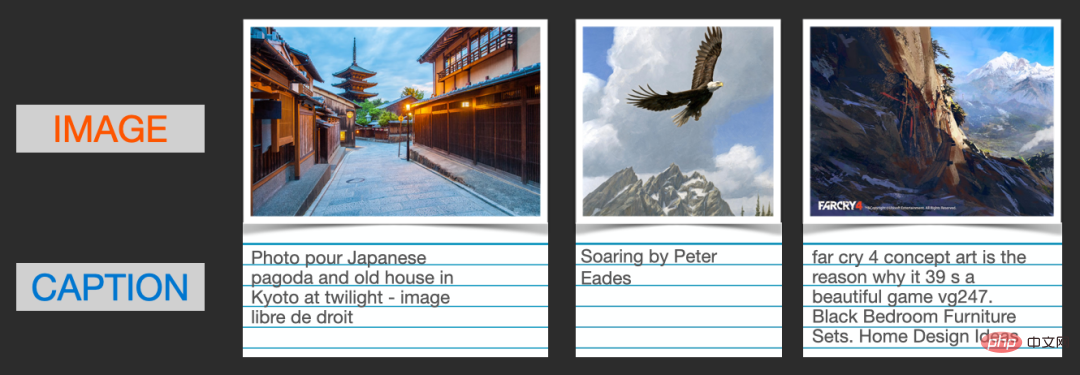
The data set is collected from images scraped from the Internet and the corresponding "alt" tag text.
CLIP is a combination of image encoder and text encoder. Its training process can be simplified to taking images and text descriptions, and using two encoders to encode the data separately.
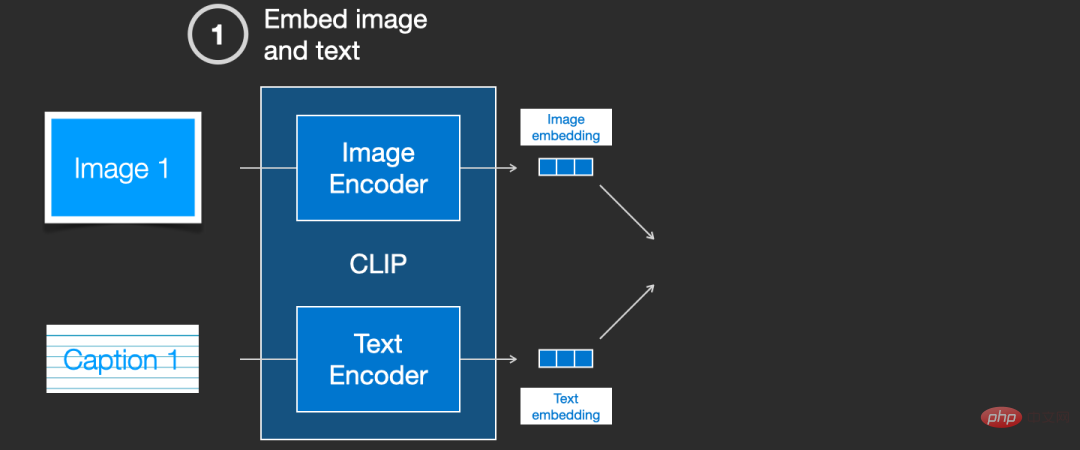
Then use cosine distance to compare the resulting embeddings. When you first start training, even if the text description and the image match, the similarity between them It's definitely very low.
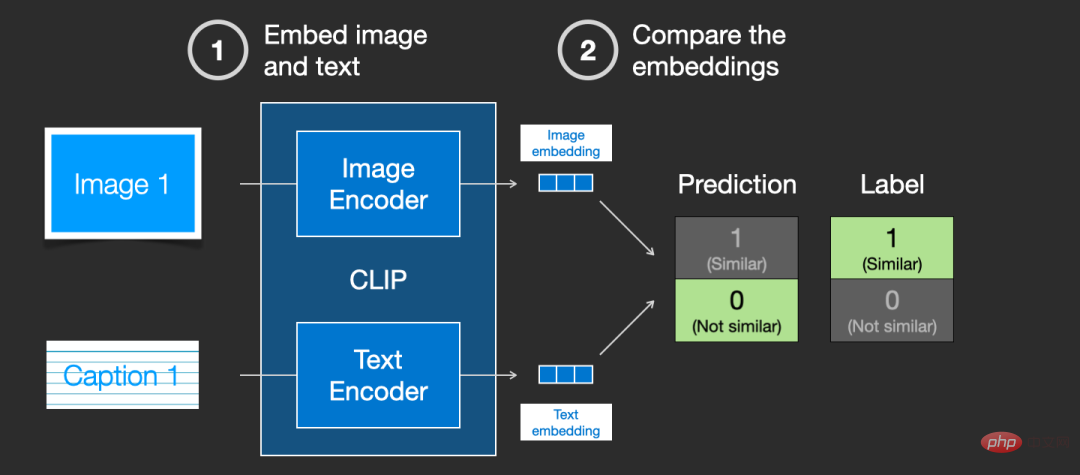
As the model is continuously updated, in subsequent stages, the embeddings obtained by the encoder encoding images and text will gradually become similar.
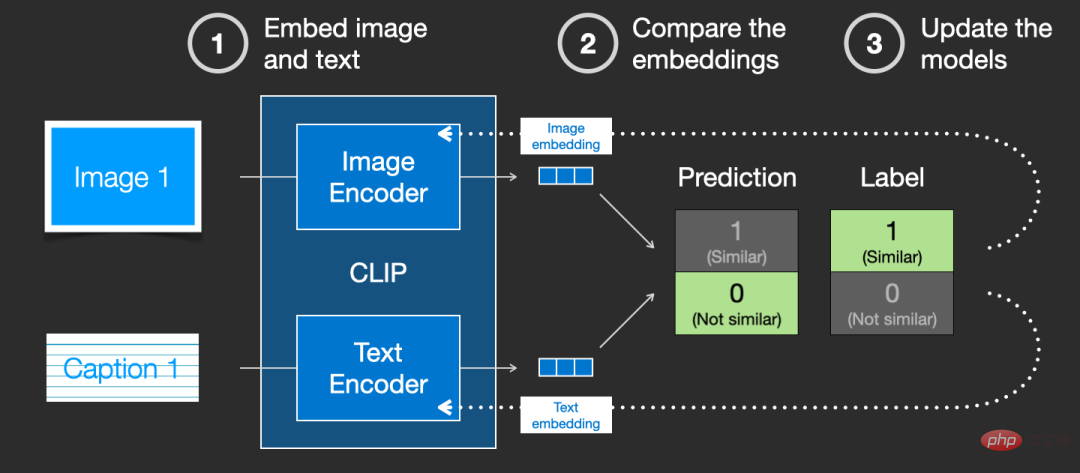
By repeating this process across the entire dataset and using an encoder with a large batch size, we are ultimately able to generate an embedding vector with an image of a dog It is similar to the sentence "picture of a dog".
Just like in word2vec, the training process also needs to include negative samples of mismatched images and captions, and the model needs to assign lower similarity scores to them.
Text information is fed into the image generation process
In order to incorporate text conditions as part of the image generation process, the input of the noise predictor must be adjusted to be text.
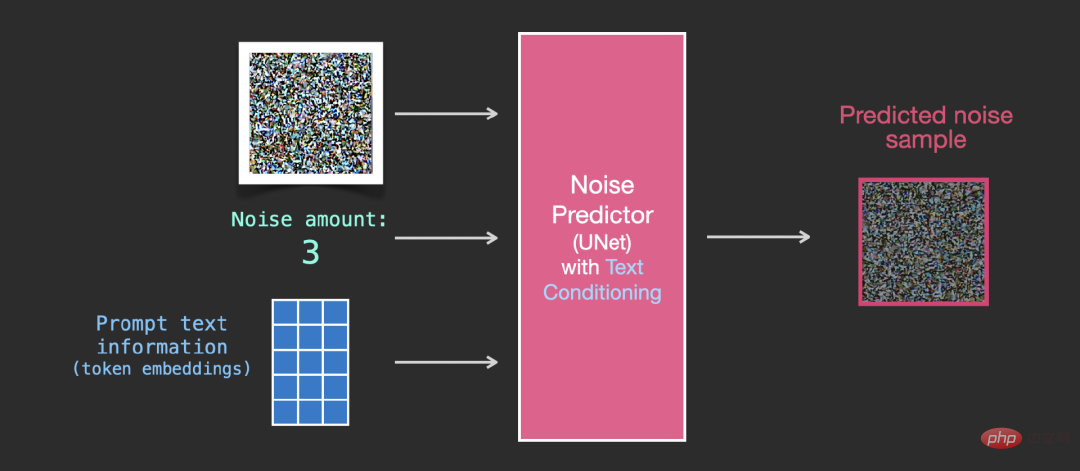
All operations are on the latent space, including encoded text, input images and prediction noise.
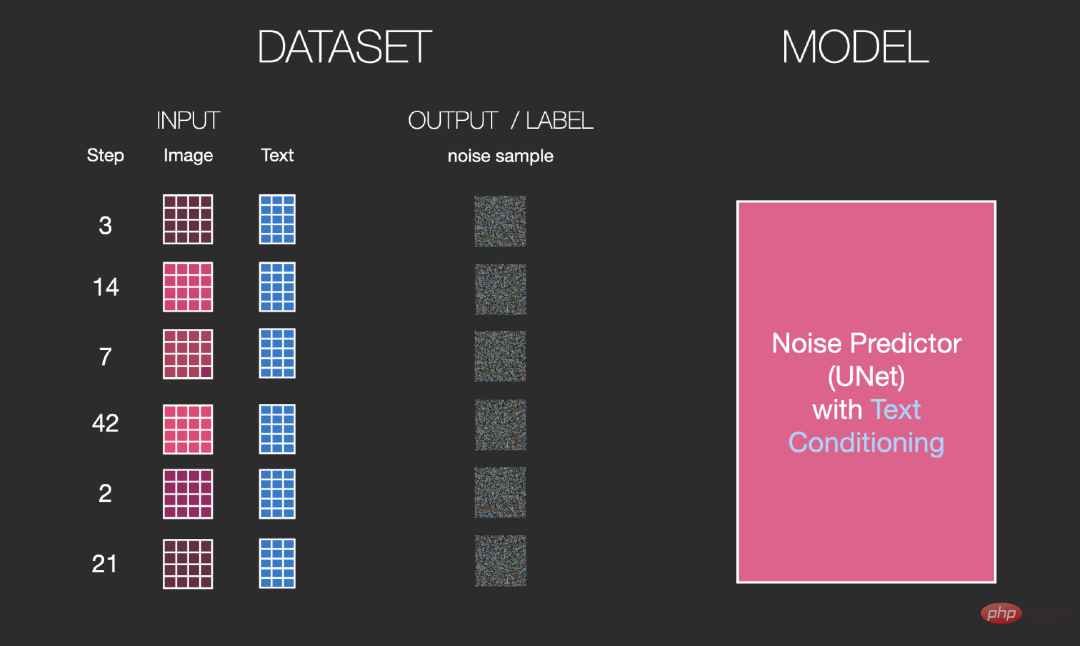
In order to better understand how text tokens are used in Unet, you need to first understand the Unet model.
Unet layer in noise predictor (no text)
One is not used Text diffusion Unet, its input and output are as follows:

Inside the model, you can see:
1. The layers in the Unet model are mainly used to convert latents;
2. Each layer operates on the output of the previous layer;
3. Certain outputs (via residual connections) feed them into processing behind the network
4. Convert time steps into time step embedding vectors, Can be used in layers.
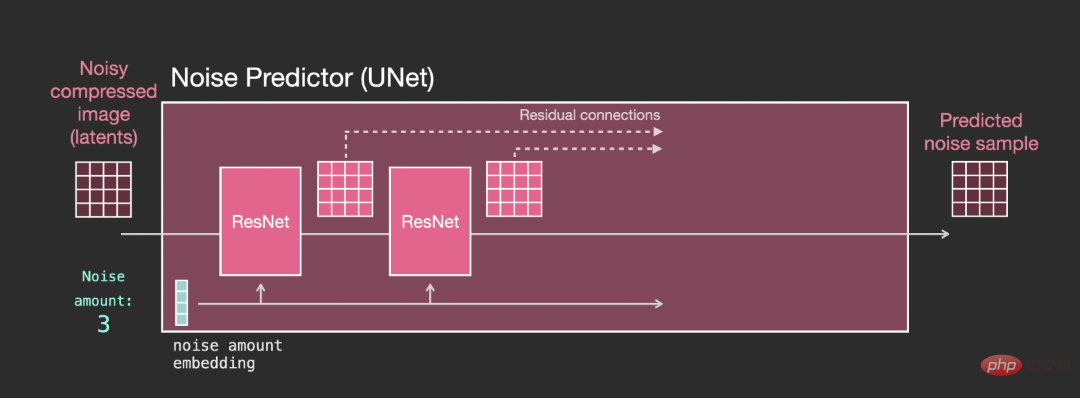
Layers in Unet noise predictor (with text)
Now it is necessary to convert the previous system into a text version.

#The main modification part is to add support for text input (term: text conditioning), that is, adding an attention layer between ResNet blocks .
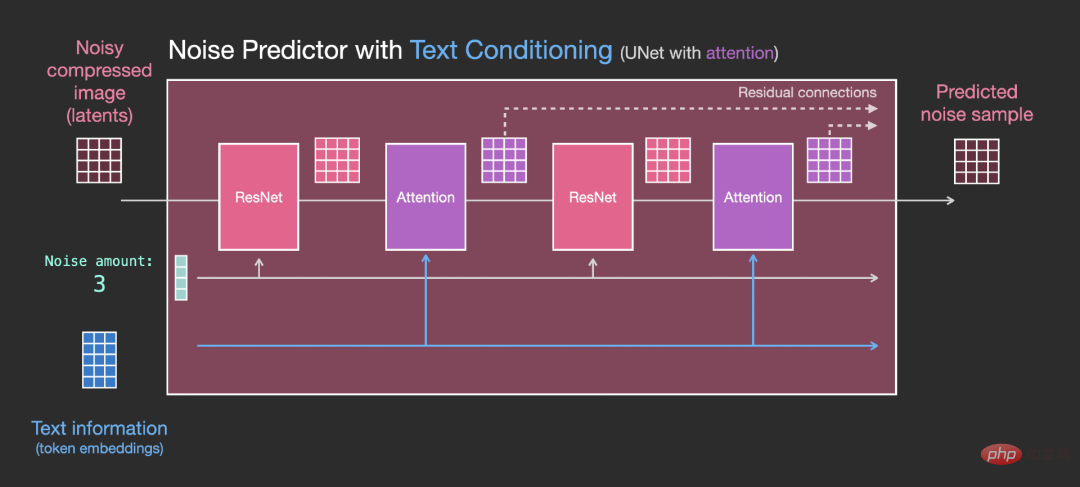
It should be noted that the ResNet block does not directly see the text content, but merges the representation of the text in latents through the attention layer , and then the next ResNet can utilize the above text information in this process.
The above is the detailed content of Jay Alammar releases another new work: Ultra-high-quality illustrations of Stable Diffusion. After reading it, you will completely understand the principle of 'image generation'. For more information, please follow other related articles on the PHP Chinese website!
Related articles
See more- Technology trends to watch in 2023
- How Artificial Intelligence is Bringing New Everyday Work to Data Center Teams
- Can artificial intelligence or automation solve the problem of low energy efficiency in buildings?
- OpenAI co-founder interviewed by Huang Renxun: GPT-4's reasoning capabilities have not yet reached expectations
- Microsoft's Bing surpasses Google in search traffic thanks to OpenAI technology

