Home >Web Front-end >Front-end Q&A >How to implement react axios request interception
How to implement react axios request interception
- 藏色散人Original
- 2022-11-09 15:49:473216browse
React axios request interception implementation method: 1. Download axios; 2. Create a utils folder in the src directory to store public js; 3. Create the http.js file in the utils directory; 4. Create an axios instance; 5. Add a request interceptor; 6. Determine whether the cookie stores token and process the request header.

The operating environment of this tutorial: Windows7 system, react17.0.1 version, Dell G3 computer.
How to implement axios request interception in react?
react encapsulates axios request interception, response interception, encapsulates post, get request
By default you have created a react project
First we need to download axios. I use react-cookie to store user information. You can choose to use local storage
npm i axios --save
npm i react-cookie --save
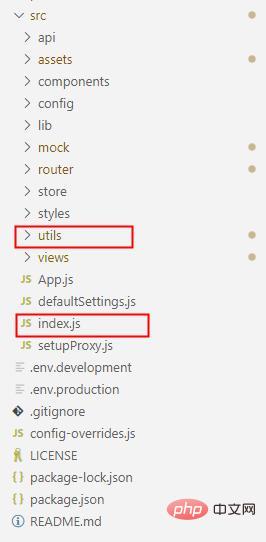
Then in the src directory Create a utils folder to store public js,
Continue to create the http.js file in the utils directory.
The other marked index.js is the entry file mentioned below

Open the http.js file, we have to start doing business
If you have downloaded axios and cookies, you need to introduce them. Axios is necessary and cookie is not
import axios from "axios";
import cookie from 'react-cookies'

//这是使用代理的路径,如果你想了解的话可以看我之前的文章或者~~问我
let baseUrl = '/api'

// 创建axios实例,在这里可以设置请求的默认配置
const instance = axios.create({
    timeout: 10000, // 设置超时时间10s,如果10秒没有返回结果则中断请求,认为连接超时
    baseURL: baseUrl // 根据自己配置的代理去设置不同环境的baseUrl
})

// 文档中的统一设置post请求头
instance.defaults.headers.post['Content-Type'] = 'application/json';

// 如果你是上传文件的话需要设置为
// instance.defaults.headers.post['Content-Type'] = 'multipart/form-data';
Start the request interception part
Request interception is when your request is still Before sending, you can make some modifications to your request
/** 添加请求拦截器 **/
instance.interceptors.request.use(config => {
    var token = cookie.load('token')//获取你登录时存储的token
// 判断cookie有没有存储token,有的话加入到请求头里
    if (token) {
        config.headers['token'] = token//在请求头中加入token
    }
// 如果还需要在请求头内添加其他内容可以自己添加 "[]" 内为自定义的字段名 "=" 后的内容为字段名对应的内容
    // config.headers['自定义键'] = '自定义内容'
// 如果此时觉得某些参数不合理,你可以删除它,删除后将不会发送给服务器
// delete config.data.userName
// userName是你传递的参数名,或许你可以试着在控制台输出config看看它包含了什么

// 对应可以删除也可以在此添加一些参数
// config.data.userName = '天道酬勤'
    return config
}, error => {
    // 对请求错误做些什么
    return Promise.reject(error)
})
Start the response interception part
Response interception means that after your interface returns the data, the interceptor will obtain it first, and you can judge Whether it is normal or the data is intact, the data will be returned to the place where the request was initiated.
/** 添加响应拦截器  **/
instance.interceptors.response.use(response => {
    if (response.statusText === 'OK') {
        return Promise.resolve(response.data)
    } else {
        return Promise.reject(response.data.msg)
    }
}, error => {
// 请求报错的回调可以和后端协调返回什么状态码,在此根据对应状态码进行对应处理
    if (error.response) {
// 如401我就让用户返回登录页
        if (error.response.status === 401) {
            this.props.history.push('/login');
        }
// 比如返回报错你的页面可能会崩溃,你需要在它崩溃之前做一些操作的话,可以在这里
        return Promise.reject(error)
    } else {
        return Promise.reject('请求超时, 请刷新重试')
    }
})
If you add a request interceptor, you must use a custom request, otherwise the interceptor will be meaningless.
Generally I Both encapsulate two requests. One post and one get are enough.
/* 统一封装get请求 */
export const get = (url, params, config = {}) => {
    return new Promise((resolve, reject) => {
        instance({
            method: 'get',
            url,
            params,
            ...config
        }).then(response => {
            resolve(response)
        }).catch(error => {
            reject(error)
        })
    })
}

/* 统一封装post请求  */
export const post = (url, data, config = {}) => {
    return new Promise((resolve, reject) => {
        instance({
            method: 'post',
            url,
            data,
            ...config
        }).then(response => {
            resolve(response)
        }).catch(error => {
            reject(error)
        })
    })
}
The encapsulated request method has been thrown out here. It needs to be referenced in the entry file and set as a global variable. You can also Import it where needed, but I don’t recommend that
The entry file is the index.js file in the src directory. If you are not sure, the above picture is marked
import React, { Component } from 'react';
import { get, post } from './utils/http';
Component.prototype.get = get;
Component.prototype.post = post;
If you use it
let data = {
userName: 'admin',
password: '123456'
}
// post请求实例
this.post("url",data).then(res=>{
// 这里是成功回调
console.log(res)
}).catch(err=>{
// 这里是错误回调
console.log(err)
})
// get请求实例
this.get("url",data).then(res=>{
// 这里是成功回调
console.log(res)
}).catch(err=>{
// 这里是错误回调
console.log(err)
})
Thank you for seeing this, the complete code is here
import axios from "axios";
import cookie from 'react-cookies'
let baseUrl = '/api'
// 创建axios实例,在这里可以设置请求的默认配置
const instance = axios.create({
    timeout: 20000, // 设置超时时间10s
    // baseURL: baseUrl // 根据自己配置的反向代理去设置不同环境的baseUrl
})
// 文档中的统一设置post请求头。下面会说到post请求的几种'Content-Type'
instance.defaults.headers.post['Content-Type'] = 'application/json'
/** 添加请求拦截器 **/
instance.interceptors.request.use(config => {
    var token = cookie.load('token')//获取本地存储的token
// 判断cookie有没有存储token,有的话加入到请求头里
    if (token) {
        config.headers['token'] = token//在请求头中加入token
    }
// 如果还需要在请求头内添加其他内容可以自己添加 [] 内为自定义的字段名 = 后的内容为字段名对应的内容
    // config.headers['api'] = api
    return config
}, error => {
    // 对请求错误做些什么
    return Promise.reject(error)
})
/** 添加响应拦截器  **/
instance.interceptors.response.use(response => {
    if (response.statusText === 'OK') {
        return Promise.resolve(response.data)
    } else {
        return Promise.reject(response.data.msg)
    }
}, error => {
// 请求报错的回调可以和后端协调返回什么状态码,在此根据对应状态码进行对应处理
    if (error.response) {
// 如401我就让用户返回登录页
        if (error.response.status === 401) {
            this.props.history.push('/login');
        }
        return Promise.reject(error)
    } else {
        return Promise.reject('请求超时, 请刷新重试')
    }
})
/* 统一封装get请求 */
export const get = (url, params, config = {}) => {
    return new Promise((resolve, reject) => {
        instance({
            method: 'get',
            url,
            params,
            ...config
        }).then(response => {
            resolve(response)
        }).catch(error => {
            reject(error)
        })
    })
}
/* 统一封装post请求  */
export const post = (url, data, config = {}) => {
    return new Promise((resolve, reject) => {
        instance({
            method: 'post',
            url,
            data,
            ...config
        }).then(response => {
            resolve(response)
        }).catch(error => {
            reject(error)
        })
    })
}
Recommended learning: "react video tutorial"
The above is the detailed content of How to implement react axios request interception. For more information, please follow other related articles on the PHP Chinese website!
Related articles
See more- Summary Vue creates responsive data objects (reactive, ref, toRef, toRefs)
- Detailed explanation of the difference between reactive and ref in vue3 (source code analysis)
- Detailed explanation of the principle: the difference between reactive and ref in Vue3
- What are React higher-order components? How does it create a breadcrumb navigation?
- 7 great and practical React component libraries (shared under pressure)

