Home >Web Front-end >Vue.js >9 Vue tips to improve development efficiency and performance
9 Vue tips to improve development efficiency and performance
- 青灯夜游forward
- 2022-06-07 11:55:442754browse
This article will share with you several tips that I have learned during my study of Vue to improve development efficiency and performance. I hope it will be helpful to everyone!

1. Use $attrs and $listeners
## skillfully #$attrs is used to record all parameters passed from the parent component to the child component that are not captured by props and are not class and style, but $listeners is used to record all events passed in from the parent component without the .native modifier. (Learning video sharing: vuejs video tutorial)
Vue.component('child', {
props: ['title'],
template: '<h3>{{ title }}</h3>'
})
new Vue({
data:{a:1,title:'title'},
methods:{
handleClick(){
// ...
},
handleChange(){
// ...
}
},
template:'
<child class="child-width" :a="a" b="1" :title="title" @click.native="handleClick" @change="handleChange">',
}) is in The value of
- attrs
is{a:1,b:"1"} - listeners
The value is{change: handleChange}
$attrs and $listeners for component communication. It is more efficient when used in sub-encapsulated components, such as:
Vue.component("custom-dialog", {
  // 通过v-bind="$attrs"和v-on="$listeners"把父组件传入的参数和事件都注入到el-dialog实例上
  template: '<el-dialog></el-dialog>',
});

new Vue({
  data: { visible: false },
  // 这样子就可以像在el-dialog一样用visible控制custom-dialog的显示和消失
  template: '<custom-dialog>',
});</custom-dialog>
Another example: Vue.component("custom-select", {
template: `<el-select v-bind="$attrs" v-on="$listeners">
<el-option value="选项1" label="黄金糕"/>
<el-option value="选项2" label="双皮奶"/>
</el-select>`,
});
new Vue({
data: { value: "" },
// v-model在这里其实是v-bind:value和v-on:change的组合,
// 在custom-select里,通过v-bind="$attrs" v-on="$listeners"的注入,
// 把父组件上的value值双向绑定到custom-select组件里的el-select上,相当于<el-select v-model="value">
// 与此同时,在custom-select注入的size变量也会通过v-bind="$attrs"注入到el-select上,从而控制el-select的大小
template: '<custom-select v-model="value" size="small">',
});
2. Clever use of $props
$porps is used to record all the props passed from the parent component to the child component that are captured by props and are not class and style parameters. For example,
Vue.component('child', {
props: ['title'],
template: '<h3>{{ title }}</h3>'
})
new Vue({
data:{a:1,title:'title'},
methods:{
handleClick(){
// ...
},
handleChange(){
// ...
}
},
template:'
<child class="child-width" :a="a" b="1" :title="title">',
}) is in , and the value of $props is {title:'title'}. $props can be used when the props defined by the self component and the grandchild component are the same, such as:
Vue.component('grand-child', {
props: ['a','b'],
template: '<h3>{{ a + b}}</h3>'
})
// child和grand-child都需要用到来自父组件的a与b的值时,
// 在child中可以通过v-bind="$props"迅速把a与b注入到grand-child里
Vue.component('child', {
props: ['a','b'],
template: `
<div>
{{a}}加{{b}}的和是:
<grand-child v-bind="$props"/>
</div>
`
})
new Vue({
template:'
<child class="child-width" :a="1" :b="2">',
})
3. Use functional components
The biggest difference between functional components and generalvue components is that they are non-responsive. It does not listen to any data and has no instances (so no state, meaning there is no life cycle such as created, mounted). The advantage is that since it is just a function, the rendering overhead is much lower.
<script>
export default {
name: "anchor-header",
functional: true, // 以functional:true声明该组件为函数式组件
props: {
level: Number,
name: String,
content: String,
},
// 对于函数式组件,render函数会额外传入一个context参数用来表示上下文,即替代this。函数式组件没有实例,故不存在this
render: function (createElement, context) {
const anchor = {
props: {
content: String,
name: String,
},
template: '<a :id="name" :href="`#${name}`"> {{content}}</a>',
};
const anchorEl = createElement(anchor, {
props: {
content: context.props.content, //通过context.props调用props传入的变量
name: context.props.name,
},
});
const el = createElement(`h${context.props.level}`, [anchorEl]);
return el;
},
};
</script>
4. Use Vue.config.devtools wonderfully
In fact, we are in production You can also callvue-devtools for debugging in the environment. Just change the Vue.config.devtools configuration, as shown below:
// 务必在加载 Vue 之后,立即同步设置以下内容
// 该配置项在开发版本默认为 `true`,生产版本默认为 `false`
Vue.config.devtools = true;
We can pass the detection Use the user role information in
cookie to decide whether to enable this configuration item, thereby improving the convenience of online bug finding.
5. Use the method in methods
Vue to assign the result returned by a higher-order function, for example:
<script>
  import { debounce } from "lodash";

  export default {
    methods: {
      search: debounce(async function (keyword) {
        // ... 请求逻辑
      }, 500),
    },
  };
</script>
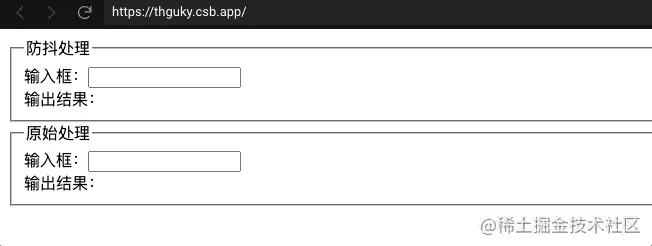
The above search function is assigned the result returned by debounce, which is the request function with anti-shake function. This method can avoid us having to write the anti-shake logic ourselves in the component.
sandbox. You can click on it to see the difference between the method processed by the high-order function and the original method. As shown below:

method can also be defined as a generator, if we have a function that needs The order is emphasized during execution, and variables need to be defined in data to record the last status, then you can consider using a generator.
call time. This call time requires every second Update once, that is, the function to obtain call time needs to be executed once per second. If written as a normal function, the variable recording the time needs to be stored in data. But if you use a generator, it can be solved very cleverly, as shown below:
<template>
  <div id="app">
    <h3>{{ timeFormat }}</h3>
  </div>
</template>

<script>
  export default {
    name: "App",
    data() {
      return {
        // 用于显示时间的变量,是一个HH:MM:SS时间格式的字符串
        timeFormat: "",
      };
    },
    methods: {
      genTime: function* () {
        // 声明存储时、分、秒的变量
        let hour = 0;
        let minute = 0;
        let second = 0;
        while (true) {
          // 递增秒
          second += 1;
          // 如果秒到60了,则分加1,秒清零
          if (second === 60) {
            second = 0;
            minute += 1;
          }
          // 如果分到60了,则时加1,分清零
          if (minute === 60) {
            minute = 0;
            hour += 1;
          }
          // 最后返回最新的时间字符串
          yield `${hour}:${minute}:${second}`;
        }
      },
    },
    created() {
      // 通过生成器生成迭代器
      const gen = this.genTime();
      // 设置计时器定时从迭代器获取最新的时间字符串
      const timer = setInterval(() => {
        this.timeFormat = gen.next().value;
      }, 1000);
      // 在组件销毁的时候清空定时器和迭代器以免发生内存泄漏
      this.$once("hook:beforeDestroy", () => {
        clearInterval(timer);
        gen = null;
      });
    },
  };
</script>
The page effect is as follows:

Code address: https://codesandbox.io/s/jovial-williams-nkouf?file=/src/App.vue
But it should be noted that method cannot be an arrow function
Note that arrow functions should not be used to definemethod
functions (for example,plus: () => this.a). The reason is that arrow functions are bound to the context of the parent scope, sothiswill not point to the Vue instance as expected,this.awill beundefined.
6. Use the array format of watch wisely
Many developers will use thehandler# of a certain variable in watch ## Call multiple operations, as shown below: <pre class="brush:js;toolbar:false;"><script>
export default {
data() {
return {
value: "",
};
},
methods: {
fn1() {},
fn2() {},
},
watch: {
value: {
handler() {
fn1();
fn2();
},
immediate: true,
deep: true,
},
},
};
</script></pre><p>虽然<code>fn1和fn2都需要在value变动的时候调用,但两者的调用时机可能不同。fn1可能仅需要在deep为false的配置下调用既可。因此,Vue在watch的值添加了Array类型来针对上面所说的情况,如果用watch为Array的写法处理可以写成下面这种形式:
<script>
watch:{
'value':[
{
handler:function(){
fn1()
},
immediate:true
},
{
handler:function(){
fn2()
},
immediate:true,
deep:true
}
]
}
</script>7. 妙用$options
$options是一个记录当前Vue组件的初始化属性选项。通常开发中,我们想把data里的某个值重置为初始化时候的值,可以像下面这么写:
this.value = this.$options.data().value;
这样子就可以在初始值由于需求需要更改时,只在data中更改即可。
这里再举一个场景:一个el-dialog中有一个el-form,我们要求每次打开el-dialog时都要重置el-form里的数据,则可以这么写:
<template>
<div>
<el-button @click="visible=!visible">打开弹窗</el-button>
<el-dialog @open="initForm" title="个人资料" :visible.sync="visible">
<el-form>
<el-form-item label="名称">
<el-input v-model="form.name"/>
</el-form-item>
<el-form-item label="性别">
<el-radio-group v-model="form.gender">
<el-radio label="male">男</el-radio>
<el-radio label="female">女</el-radio>
</el-radio-group>
</el-form-item>
</el-form>
</el-dialog>
</div>
</template>
<script>
export default {
name: "App",
data(){
return {
visible: false,
form: {
gender: 'male',
name: 'wayne'
}
}
},
methods:{
initForm(){
this.form = this.$options.data().form
}
}
};
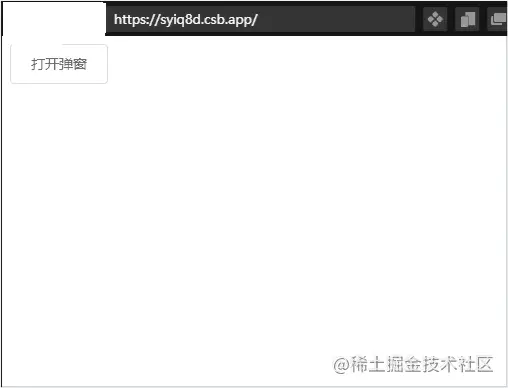
</script>每次el-dialog打开之前都会调用其@open中的方法initForm,从而重置form值到初始值。如下效果所示:

以上代码放在sanbox里
如果要重置data里的所有值,可以像下面这么写:
Object.assign(this.$data, this.$options.data());
// 注意千万不要写成下面的样子,这样子就更改this.$data的指向。使得其指向另外的与组件脱离的状态
this.$data = this.$options.data();
8. 妙用 v-pre,v-once
v-pre
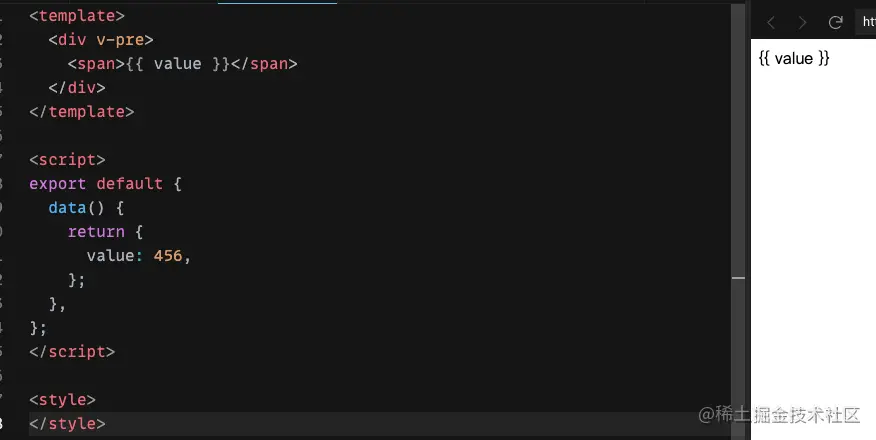
v-pre用于跳过被标记的元素以及其子元素的编译过程,如果一个元素自身及其自元素非常打,而又不带任何与Vue相关的响应式逻辑,那么可以用v-pre标记。标记后效果如下:

v-once
只渲染元素和组件一次。随后的重新渲染,元素/组件及其所有的子节点将被视为静态内容并跳过。这可以用于优化更新性能。
对于部分在首次渲染后就不会再有响应式变化的元素,可以用v-once属性去标记,如下:
<el-select>
  <el-option
    v-for="item in options"
    v-once
    :key="item.value"
    :label="item.label"
    :value="item.value"
    >{{i}}</el-option
  >
</el-select>如果上述例子中的变量options很大且不会再有响应式变化,那么如例子中用上v-once对性能有提升。
9. 妙用 hook 事件
如果想监听子组件的生命周期时,可以像下面例子中这么做:
<template>
  <child @hook:mounted="removeLoading" />
</template>
这样的写法可以用于处理加载第三方的初始化过程稍漫长的子组件时,我们可以加loading动画,等到子组件加载完毕,到了mounted生命周期时,把loading动画移除。
初次之外hook还有一个常用的写法,在一个需要轮询更新数据的组件上,我们通常在created里开启定时器,然后在beforeDestroy上清除定时器。而通过hook,开启和销毁定时器的逻辑我们都可以在created里实现:
<script>
  export default {
    created() {
      const timer = setInterval(() => {
        // 更新逻辑
      }, 1000);
      // 通过$once和hook监听实例自身的beforeDestroy,触发该生命周期时清除定时器
      this.$once("hook:beforeDestroy", () => {
        clearInterval(timer);
      });
    },
  };
</script>
像上面这种写法就保证了逻辑的统一,遵循了单一职责原则。
The above is the detailed content of 9 Vue tips to improve development efficiency and performance. For more information, please follow other related articles on the PHP Chinese website!
Related articles
See more- Let's talk in depth about Router routing in Vue
- Learn more about debugging tools and directives in Vue
- A brief analysis of watch listeners, calculated properties, Vue-cli and components in Vue
- A brief analysis of life cycle and data sharing in Vue
- What are dynamic components? Learn more about dynamic components in Vue
- What is a custom directive? Learn more about custom directives in Vue

