Home >Web Front-end >Vue.js >Learn more about debugging tools and directives in Vue
Learn more about debugging tools and directives in Vue
- 青灯夜游forward
- 2022-05-26 11:11:013075browse
This article will take you to continue learningVue, and introduce in detail the debugging tools and instructions that are essential knowledge for getting started with Vue. I hope it will be helpful to everyone!

vue debugging tool
(1) Install vue-devtools debugging tool
vue The vue-devtools debugging tool officially provided by vue can facilitate developers to debug and develop vue projects. (Learning video sharing: vue video tutorial)
1️⃣ Chrome browser online installation vue-devtools:
- vue 2.x Debugging tools:
https://chrome.google.com/webstore/detail/vuejs-devtools/nhdogjmejiglipccpnnnanhbledajbpd - vue 3.x debugging tools:
https://chrome.google.com/webstore/detail/vuejs-devtools/ljjemllljcmogpfapbkkighbhhppjdbg
If you cannot install it online using the Chrome browser, I will do the following Two resource packages are given, click on the address to download immediately!! !
- vue 2.x debugging tool:
-
https:// download.csdn.net/download/battledao/85047060 vue 3.x debugging tool: -
https://download.csdn.net/download/battledao/85047073
(2) Configure vue-devtools in the Chrome browser
Click the three-dot button in the upper right corner of the Chrome browser and select More Tools → Extensions → Vue.js devtools detailed information, and check the following two options: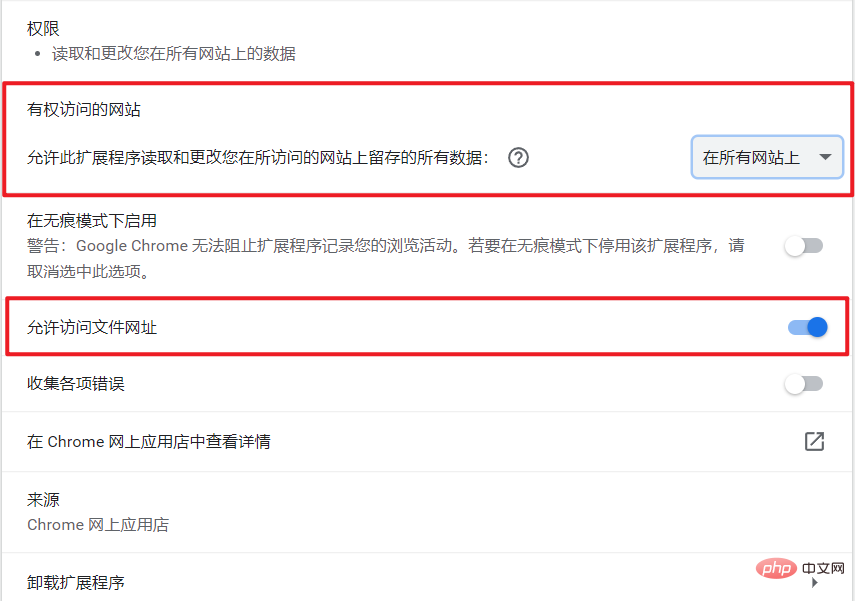
(3) Use vue-devtools to debug the vue page
Visit a page using vue in the browser, open the browser's developer tools, switch to the Vue panel, and usevue-devtools to debug the current page.

4. Vue instructions
(1) Concept of instructions
1️⃣ Directives is the template syntax provided by vue for developers, which is used to assist developers in rendering the basic structure of the page.
2️⃣ The instructions in vuecan be divided into the following 6 categories according to different uses:
- Content rendering
- Instructions Attribute binding
- Instruction Event binding
- Instruction Two-way binding
- Instruction Conditional rendering
- Instructions List rendering
- Instructions ?Warm reminder?: Instructions are the most basic and commonly used in vue development. The simplest knowledge point.
Content rendering instructions
are used to assist developersrender the text content of DOM elements . There are three commonly used content rendering instructions:
v-text- { { }}
- v-html
The code demonstration is as follows:
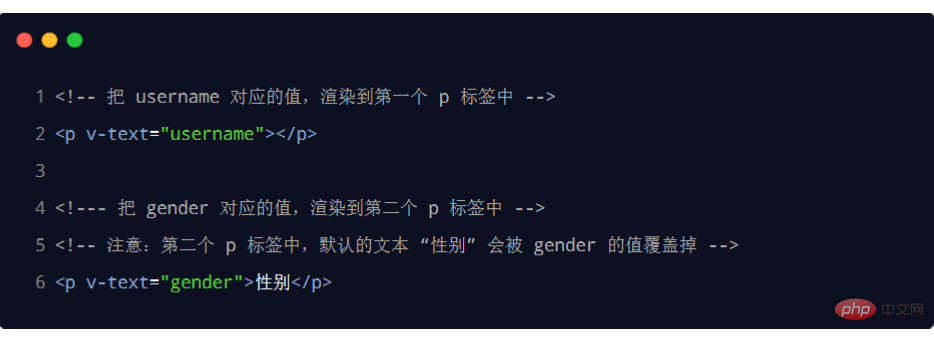 ?Warm reminder?:
command Will overwrite the default value within the element.
{ }} Syntax
{{ }} Syntax provided by vue , specifically used to solve the problem that v-text will overwrite the default text content. The professional name of this <!-- -->{{ }} syntax is <!-- -->interpolation expression (English name: Mustache). The code demonstration is as follows:
?Warm reminder?: Compared with the  v-text
instruction, interpolation expressions are more commonly used in development Some! Because it does not overwrite the default text content in the element.
v-text directives and interpolation expressions can only render plain text content. If you want to
render a string containing HTML tags into the HTML element of the page, you need to use the v-html directive. The code demonstration is as follows:
<!-- 假设data 中定义了名为 desc 的数据,数据的值为包含 HTML 标签的字符串 --> <!-- info: '<h4 style="color: red; font-weight: bold;">欢迎大家来学习 vue.js</h4>' --> <p v-html="info"></p>
2.4 Content rendering instructions - complete code demonstration
<!DOCTYPE html>
<html>
<head>
<meta charset="UTF-8">
<meta http-equiv="X-UA-Compatible" content="IE=edge">
<meta name="viewport" content="width=device-width, initial-scale=1.0">
<title>Document</title>
</head>
<body>
<!-- 希望 Vue 能够控制下面的这个 div,帮我们在把数据填充到 div 内部 -->
<div id="app">
<p v-text="username"></p>
<p v-text="gender">性别:</p>
<hr>
<p>姓名:{{ username }}</p>
<p>性别:{{ gender }}</p>
<hr>
<div v-text="info"></div>
<div>{{ info }}</div>
<div v-html="info"></div>
</div>
<!-- 1. 导入 Vue 的库文件,在 window 全局就有了 Vue 这个构造函数 -->
<script src="./lib/vue-2.6.12.js"></script>
<!-- 2. 创建 Vue 的实例对象 -->
<script>
// 创建 Vue 的实例对象
const vm = new Vue({
// el 属性是固定的写法,表示当前 vm 实例要控制页面上的哪个区域,接收的值是一个选择器
el: '#app',
// data 对象就是要渲染到页面上的数据
data: {
username: 'battledao',
gender: '男',
info: '<h4 style="color: red; font-weight: bold;">欢迎大家来学习 vue.js</h4>'
}
})
</script>
</body>
</html>(3) Attribute binding instructions
If necessary dynamically bind the attributes of the element If the attribute value is , you need to use the v-bind attribute binding instruction. Usage examples are as follows:
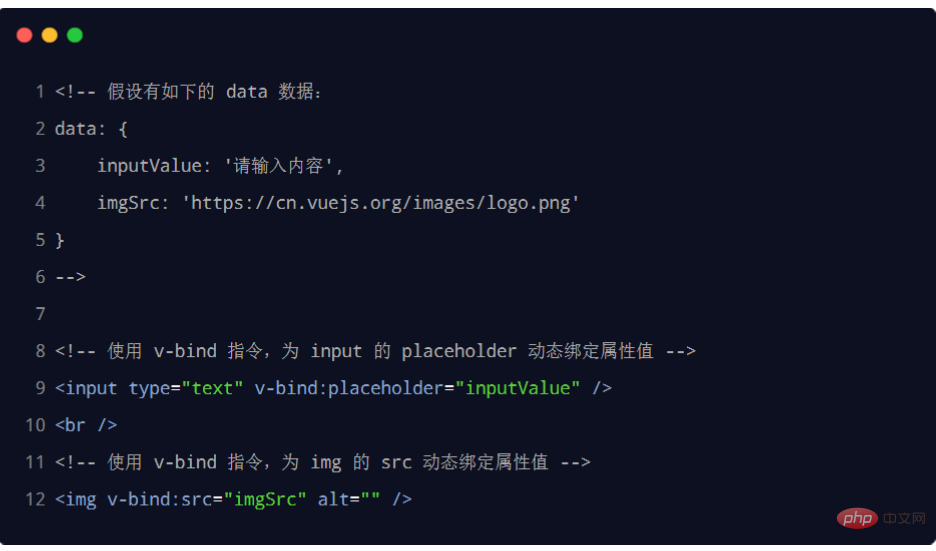
##3.1 Short form of attribute binding directive
Due tov-bind directive It is used very frequently in development, so Vue officially provides it with the abbreviation form (abbreviation is : in English).
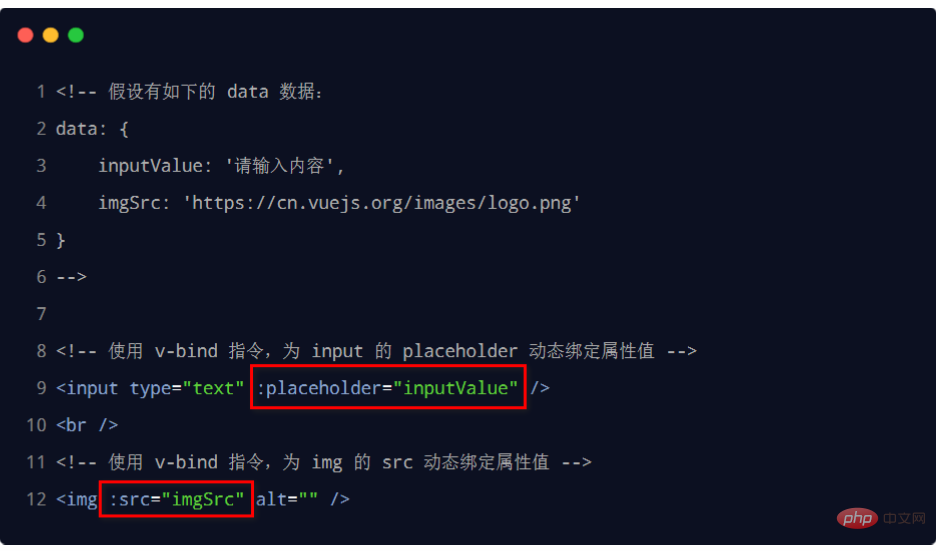
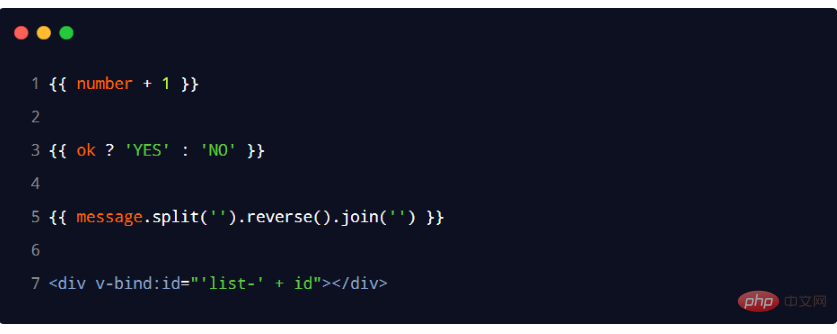
In the template rendering syntax provided by vue, in addition to supporting
binding simple In addition to data values , it also supports the operation of Javascript expressions , for example:
<!DOCTYPE html>
<html>
<head>
<meta charset="UTF-8">
<meta http-equiv="X-UA-Compatible" content="IE=edge">
<meta name="viewport" content="width=device-width, initial-scale=1.0">
<title>Document</title>
</head>
<body>
<!-- 希望 Vue 能够控制下面的这个 div,帮我们在把数据填充到 div 内部 -->
<div id="app">
<input type="text" :placeholder="tips">
<hr>
<!-- vue 规定 v-bind: 指令可以简写为 : -->
<img :src="photo" alt="" style="width: 150px;">
<hr>
<div>1 + 2 的结果是:{{ 1 + 2 }}</div>
<div>{{ tips }} 反转的结果是:{{ tips.split('').reverse().join('') }}</div>
<div :title="'box' + index">这是一个 div</div>
</div>
<!-- 1. 导入 Vue 的库文件,在 window 全局就有了 Vue 这个构造函数 -->
<script src="./lib/vue-2.6.12.js"></script>
<!-- 2. 创建 Vue 的实例对象 -->
<script>
// 创建 Vue 的实例对象
const vm = new Vue({
// el 属性是固定的写法,表示当前 vm 实例要控制页面上的哪个区域,接收的值是一个选择器
el: '#app',
// data 对象就是要渲染到页面上的数据
data: {
tips: '请输入用户名',
photo: 'https://cn.vuejs.org/images/logo.svg',
index: 3
}
})
</script>
</body>
</html>
(4) Event binding instructions1️⃣ vue provides
v-on event binding instructions for Assist programmers to bind event listeners to DOM elements. The syntax format is as follows:
 ?Warm reminder?: The native DOM object has native events such as onclick, oninput, and onkeyup. After replacing them with vue's event binding form, they are: v-on:click, v-on:input, v-on:keyup
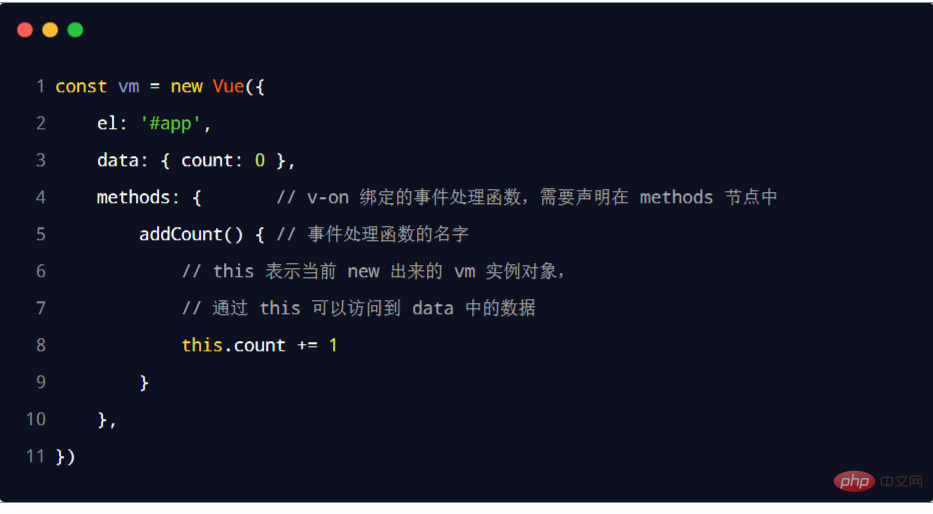
2️⃣ The event processing function bound by
v-on needs to be in the methods node Statement :
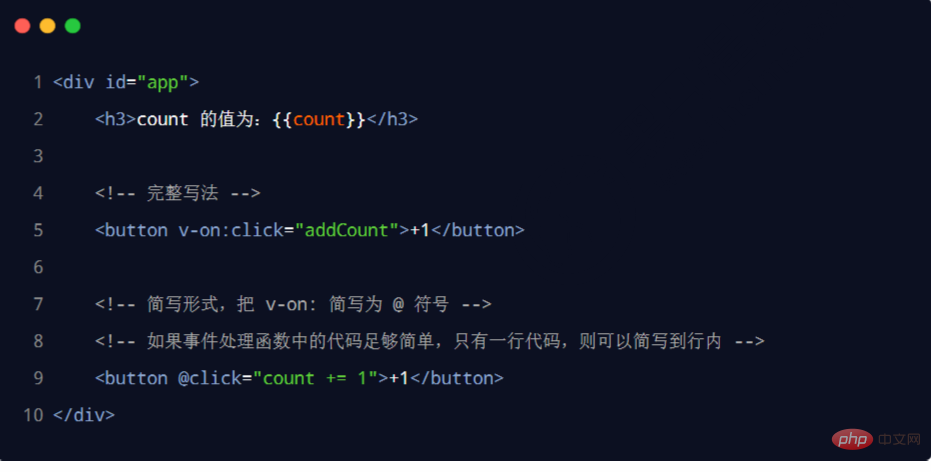
due to the
v-on directive It is used frequently in development, so Vue officially provides the abbreviation form (abbreviated as @ in English).
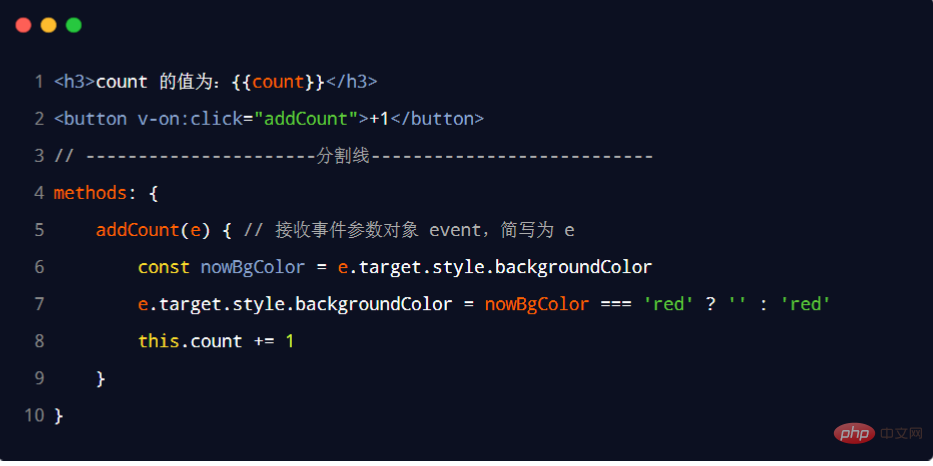
In native DOM event binding, you can use the formal parameter of the event processing function, Receive event parameter object event. Similarly, in the event processing function bound to the
v-on instruction (abbreviated as @), can also receive the event parameter object event, example The code is as follows:
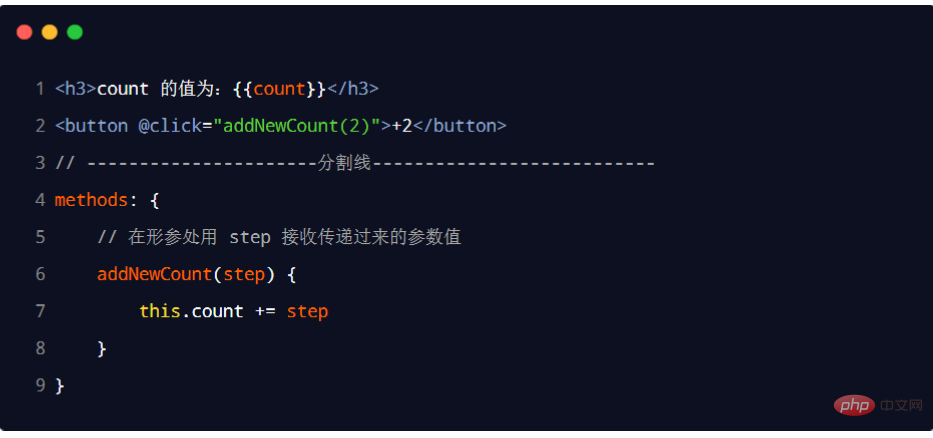
 ##4.3 Bind events and pass parameters
Use the v-on
command to bind When specifying an event, you can use( ) to pass parameters. The sample code is as follows:
 4.4 Event Binding Instructions - Complete Code Demonstration
<!DOCTYPE html>
<html>
<head>
<meta charset="UTF-8">
<meta http-equiv="X-UA-Compatible" content="IE=edge">
<meta name="viewport" content="width=device-width, initial-scale=1.0">
<title>Document</title>
</head>
<body>
<!-- 希望 Vue 能够控制下面的这个 div,帮我们在把数据填充到 div 内部 -->
<div id="app">
<p>count 的值是:{{ count }}</p>
<!-- 在绑定事件处理函数的时候,可以使用 () 传递参数 -->
<!-- v-on: 指令可以被简写为 @ -->
<button @click="add(1)">+1</button>
<button @click="sub">-1</button>
</div>
<!-- 1. 导入 Vue 的库文件,在 window 全局就有了 Vue 这个构造函数 -->
<script src="./lib/vue-2.6.12.js"></script>
<!-- 2. 创建 Vue 的实例对象 -->
<script>
// 创建 Vue 的实例对象
const vm = new Vue({
// el 属性是固定的写法,表示当前 vm 实例要控制页面上的哪个区域,接收的值是一个选择器
el: '#app',
// data 对象就是要渲染到页面上的数据
data: {
count: 0
},
// methods 的作用,就是定义事件的处理函数
methods: {
add(n) {
// 在 methods 处理函数中,this 就是 new 出来的 vm 实例对象
// console.log(vm === this)
console.log(vm)
// vm.count += 1
this.count += n
},
sub() {
// console.log('触发了 sub 处理函数')
this.count -= 1
}
}
})
</script>
</body>
</html>4.5 $event
$event
is a special variable provided by vue, used to represent the native event parameter object event.$event can solve the problem of event parameter object event being overwritten. Example usage is as follows: The complete code demonstration is as follows:
<!DOCTYPE html>
<html>
<head>
<meta charset="UTF-8">
<meta http-equiv="X-UA-Compatible" content="IE=edge">
<meta name="viewport" content="width=device-width, initial-scale=1.0">
<title>Document</title>
</head>
<body>
<!-- 希望 Vue 能够控制下面的这个 div,帮我们在把数据填充到 div 内部 -->
<div id="app">
<p>count 的值是:{{ count }}</p>
<!-- 如果 count 是偶数,则 按钮背景变成红色,否则,取消背景颜色 -->
<!-- <button @click="add">+N</button> -->
<!-- vue 提供了内置变量,名字叫做 $event,它就是原生 DOM 的事件对象 e -->
<button @click="add($event, 1)">+N</button>
</div>
<!-- 1. 导入 Vue 的库文件,在 window 全局就有了 Vue 这个构造函数 -->
<script src="./lib/vue-2.6.12.js"></script>
<!-- 2. 创建 Vue 的实例对象 -->
<script>
// 创建 Vue 的实例对象
const vm = new Vue({
// el 属性是固定的写法,表示当前 vm 实例要控制页面上的哪个区域,接收的值是一个选择器
el: '#app',
// data 对象就是要渲染到页面上的数据
data: {
count: 0
},
methods: {
add(e, n) {
this.count += n
console.log(e)
// 判断 this.count 的值是否为偶数
if (this.count % 2 === 0) {
// 偶数
e.target.style.backgroundColor = 'red'
} else {
// 奇数
e.target.style.backgroundColor = ''
}
}
},
})
</script>
</body>
</html>
4.6 Event modifier
Call event.preventDefault in the event processing function ()
orevent.stopPropagation() are very common requirements. Therefore, vue provides the concept of event modifiers to assist programmers to more conveniently control the triggering of events. The five commonly used event modifiers are as follows:
Prevent the default behavior (for example: prevent the jump of a connection, prevent the submission of the form, etc.) |
.stop | ||||||||||||
Stop event bubbling |
.capture | ||||||||||||
| .once | |||||||||||||
| .self | |||||||||||||
|
完整代码演示如下: <!DOCTYPE html>
<html>
<head>
<meta charset="UTF-8">
<meta http-equiv="X-UA-Compatible" content="IE=edge">
<meta name="viewport" content="width=device-width, initial-scale=1.0">
<title>Document</title>
</head>
<body>
<!-- 希望 Vue 能够控制下面的这个 div,帮我们在把数据填充到 div 内部 -->
<div id="app">
<a href="http://www.baidu.com" @click.prevent="show">跳转到百度首页</a>
<hr>
<div style="height: 150px; background-color: pink; padding-left: 100px; line-height: 150px;"
@click="divHandler">
<button @click.stop="btnHandler">按钮</button>
</div>
</div>
<!-- 1. 导入 Vue 的库文件,在 window 全局就有了 Vue 这个构造函数 -->
<script src="./lib/vue-2.6.12.js"></script>
<!-- 2. 创建 Vue 的实例对象 -->
<script>
// 创建 Vue 的实例对象
const vm = new Vue({
// el 属性是固定的写法,表示当前 vm 实例要控制页面上的哪个区域,接收的值是一个选择器
el: '#app',
// data 对象就是要渲染到页面上的数据
data: {},
methods: {
show() {
console.log('点击了 a 链接')
},
btnHandler() {
console.log('btnHandler')
},
divHandler() {
console.log('divHandler')
}
},
})
</script>
</body>
</html>4.7 按键修饰符在监听键盘事件时,我们经常需要判断详细的按键。此时,可以为键盘相关的事件添加按键修饰符。 完整代码演示如下: <!DOCTYPE html>
<html>
<head>
<meta charset="UTF-8">
<meta http-equiv="X-UA-Compatible" content="IE=edge">
<meta name="viewport" content="width=device-width, initial-scale=1.0">
<title>Document</title>
</head>
<body>
<!-- 希望 Vue 能够控制下面的这个 div,帮我们在把数据填充到 div 内部 -->
<div id="app">
<input type="text" @keyup.esc="clearInput" @keyup.enter="commitAjax">
</div>
<!-- 1. 导入 Vue 的库文件,在 window 全局就有了 Vue 这个构造函数 -->
<script src="./lib/vue-2.6.12.js"></script>
<!-- 2. 创建 Vue 的实例对象 -->
<script>
// 创建 Vue 的实例对象
const vm = new Vue({
// el 属性是固定的写法,表示当前 vm 实例要控制页面上的哪个区域,接收的值是一个选择器
el: '#app',
// data 对象就是要渲染到页面上的数据
data: {},
methods: {
clearInput(e) {
console.log('触发了 clearInput 方法')
e.target.value = ''
},
commitAjax() {
console.log('触发了 commitAjax 方法')
}
},
})
</script>
</body>
</html>(5)双向绑定指令vue 提供了 v-model 双向数据绑定指令,用来辅助开发者在不操作 DOM 的前提下,快速获取表单的数据。 完整代码演示如下: <!DOCTYPE html>
<html>
<head>
<meta charset="UTF-8">
<meta http-equiv="X-UA-Compatible" content="IE=edge">
<meta name="viewport" content="width=device-width, initial-scale=1.0">
<title>Document</title>
</head>
<body>
<!-- 希望 Vue 能够控制下面的这个 div,帮我们在把数据填充到 div 内部 -->
<div id="app">
<p>用户的名字是:{{ username }}</p>
<input type="text" v-model="username">
<hr>
<input type="text" :value="username">
<hr>
<select v-model="city">
<option value="">请选择城市</option>
<option value="1">北京</option>
<option value="2">上海</option>
<option value="3">广州</option>
</select>
</div>
<!-- 1. 导入 Vue 的库文件,在 window 全局就有了 Vue 这个构造函数 -->
<script src="./lib/vue-2.6.12.js"></script>
<!-- 2. 创建 Vue 的实例对象 -->
<script>
// 创建 Vue 的实例对象
const vm = new Vue({
// el 属性是固定的写法,表示当前 vm 实例要控制页面上的哪个区域,接收的值是一个选择器
el: '#app',
// data 对象就是要渲染到页面上的数据
data: {
username: 'battledao',
city: '2'
}
})
</script>
</body>
</html>5.1 v-model 指令的修饰符为了方便对用户输入的内容进行处理,vue 为
完整代码演示如下: <!DOCTYPE html>
<html>
<head>
<meta charset="UTF-8">
<meta http-equiv="X-UA-Compatible" content="IE=edge">
<meta name="viewport" content="width=device-width, initial-scale=1.0">
<title>Document</title>
</head>
<body>
<!-- 希望 Vue 能够控制下面的这个 div,帮我们把数据填充到 div 内部 -->
<div id="app">
<input type="text" v-model.number="n1"> + <input type="text" v-model.number="n2"> = <span>{{ n1 + n2 }}</span>
<hr>
<input type="text" v-model.trim="username">
<button @click="showName">获取用户名</button>
<hr>
<input type="text" v-model.lazy="username">
</div>
<!-- 1. 导入 Vue 的库文件,在 window 全局就有了 Vue 这个构造函数 -->
<script src="./lib/vue-2.6.12.js"></script>
<!-- 2. 创建 Vue 的实例对象 -->
<script>
// 创建 Vue 的实例对象
const vm = new Vue({
// el 属性是固定的写法,表示当前 vm 实例要控制页面上的哪个区域,接收的值是一个选择器
el: '#app',
// data 对象就是要渲染到页面上的数据
data: {
username: 'battledao',
n1: 1,
n2: 2
},
methods: {
showName() {
console.log(`用户名是:"${this.username}"`)
}
},
})
</script>
</body>
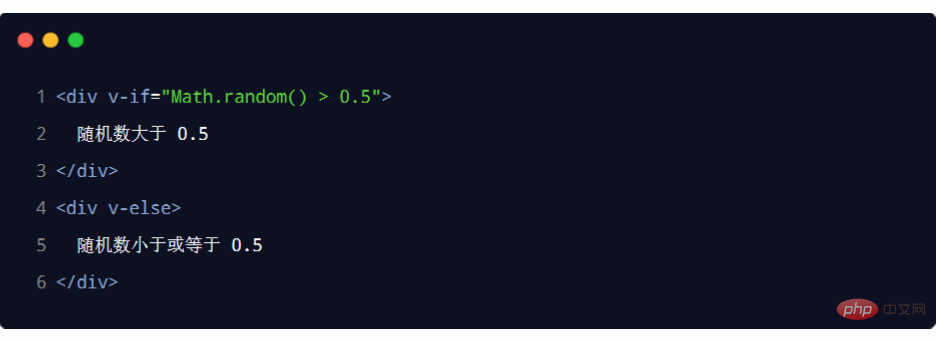
</html>(6)条件渲染指令条件渲染指令用来辅助开发者按需控制 DOM 的显示与隐藏。条件渲染指令有如下两个,分别是:
代码演示如下:
6.1 v-if 和 v-show 的区别(面试常问)实现原理不同:
性能消耗不同:
6.2 v-else
?温馨提醒?: 6.3 v-else-ifv-else-if 指令,顾名思义,充当 v-if 的“else-if 块”,可以连续使用: ?温馨提醒?: 6.4 条件渲染指令 - 完整代码演示<!DOCTYPE html>
<html>
<head>
<meta charset="UTF-8">
<meta http-equiv="X-UA-Compatible" content="IE=edge">
<meta name="viewport" content="width=device-width, initial-scale=1.0">
<title>Document</title>
</head>
<body>
<!-- 希望 Vue 能够控制下面的这个 div,帮我们把数据填充到 div 内部 -->
<div id="app">
<p v-if="flag">这是被 v-if 控制的元素</p>
<p v-show="flag">这是被 v-show 控制的元素</p>
<hr>
<div v-if="type === 'A'">优秀</div>
<div v-else-if="type === 'B'">良好</div>
<div v-else-if="type === 'C'">一般</div>
<div v-else>差</div>
</div>
<!-- 1. 导入 Vue 的库文件,在 window 全局就有了 Vue 这个构造函数 -->
<script src="./lib/vue-2.6.12.js"></script>
<!-- 2. 创建 Vue 的实例对象 -->
<script>
// 创建 Vue 的实例对象
const vm = new Vue({
// el 属性是固定的写法,表示当前 vm 实例要控制页面上的哪个区域,接收的值是一个选择器
el: '#app',
// data 对象就是要渲染到页面上的数据
data: {
// 如果 flag 为 true,则显示被控制的元素;如果为 false 则隐藏被控制的元素
flag: false,
type: 'A'
}
})
</script>
</body>
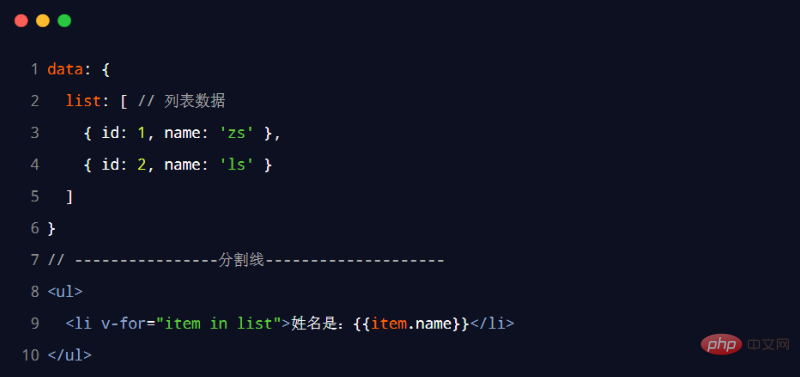
</html>(7)列表渲染指令vue 提供了
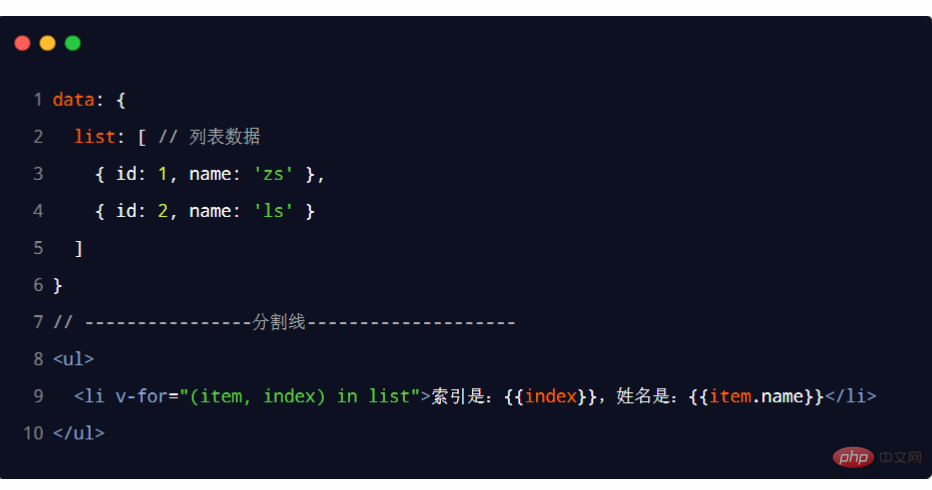
代码演示如下:
7.1 v-for 中的索引
?温馨提醒?:v-for 指令中的 7.2 列表渲染指令 - 完整代码演示<!DOCTYPE html>
<html>
<head>
<meta charset="UTF-8">
<meta http-equiv="X-UA-Compatible" content="IE=edge">
<meta name="viewport" content="width=device-width, initial-scale=1.0">
<title>Document</title>
<link rel="stylesheet" href="./lib/bootstrap.css">
</head>
<body>
<!-- 希望 Vue 能够控制下面的这个 div,帮我们把数据填充到 div 内部 -->
<div id="app">
<table class="table table-bordered table-hover table-striped">
<thead>
<th>索引</th>
<th>Id</th>
<th>姓名</th>
</thead>
<tbody>
<!-- 官方建议:只要用到了 v-for 指令,那么一定要绑定一个 :key 属性 -->
<!-- 而且,尽量把 id 作为 key 的值 -->
<!-- 官方对 key 的值类型,是有要求的:字符串或数字类型 -->
<!-- key 的值是千万不能重复的,否则会终端报错:Duplicate keys detected -->
<tr v-for="(item, index) in list" :key="item.id">
<td>{{ index }}</td>
<td>{{ item.id }}</td>
<td>{{ item.name }}</td>
</tr>
</tbody>
</table>
</div>
<!-- 1. 导入 Vue 的库文件,在 window 全局就有了 Vue 这个构造函数 -->
<script src="./lib/vue-2.6.12.js"></script>
<!-- 2. 创建 Vue 的实例对象 -->
<script>
// 创建 Vue 的实例对象
const vm = new Vue({
// el 属性是固定的写法,表示当前 vm 实例要控制页面上的哪个区域,接收的值是一个选择器
el: '#app',
// data 对象就是要渲染到页面上的数据
data: {
list: [
{ id: 1, name: '张三' },
{ id: 2, name: '李四' },
{ id: 3, name: '王五' },
{ id: 4, name: '张三' },
]
}
})
</script>
</body>
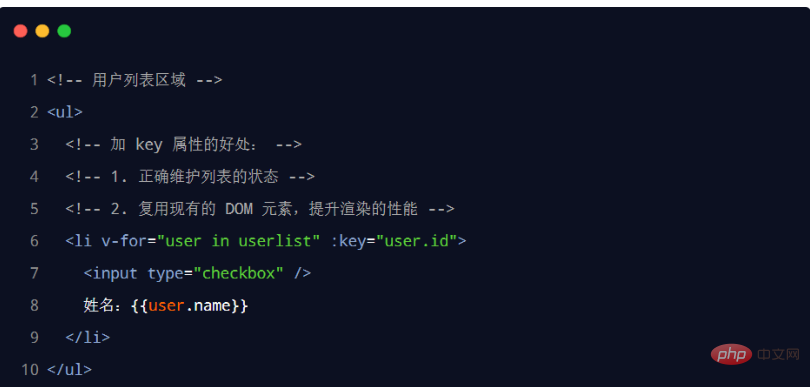
</html>7.3 使用 key 维护列表的状态1️⃣ 当列表的数据变化时,默认情况下,vue 会尽可能的复用已存在的DOM 元素,从而提升渲染的性能。但这种默认的性能优化策略,会导致有状态的列表无法被正确更新。 2️⃣ 为了给 vue 一个提示,以便它能跟踪每个节点的身份,从而在保证有状态的列表被正确更新的前提下,提升渲染的性能。此时,需要为每项提供一个唯一的 key 属性:
完整代码演示如下: <!DOCTYPE html>
<html>
<head>
<meta charset="UTF-8">
<meta name="viewport" content="width=device-width, initial-scale=1.0">
<title>Document</title>
</head>
<body>
<!-- 在页面中声明一个将要被 vue 所控制的 DOM 区域 -->
<div id="app">
<!-- 添加用户的区域 -->
<div>
<input type="text" v-model="name">
<button @click="addNewUser">添加</button>
</div>
<!-- 用户列表区域 -->
<ul>
<li v-for="(user, index) in userlist" :key="user.id">
<input type="checkbox" />
姓名:{{user.name}}
</li>
</ul>
</div>
<script src="./lib/vue-2.6.12.js"></script>
<script>
const vm = new Vue({
el: '#app',
data: {
// 用户列表
userlist: [
{ id: 1, name: 'zs' },
{ id: 2, name: 'ls' }
],
// 输入的用户名
name: '',
// 下一个可用的 id 值
nextId: 3
},
methods: {
// 点击了添加按钮
addNewUser() {
this.userlist.unshift({ id: this.nextId, name: this.name })
this.name = ''
this.nextId++
}
},
})
</script>
</body>
</html>7.4 key 的注意事项
(Learning video sharing: web front-end development, Basic programming video) |
The above is the detailed content of Learn more about debugging tools and directives in Vue. For more information, please follow other related articles on the PHP Chinese website!
Related articles
See more- Let's talk about the new features in Vue3 style (summary)
- A brief analysis of the difference between hash and history in Vue front-end routing
- How to override component library styles? A brief analysis of solutions to React and Vue projects
- How to communicate between Vue parent and child components? (with examples)
- 20+ Vue classic interview questions (with detailed source code-level explanations)
- What is Key in vue? What is the difference between setting the key and not setting it?


