Home >Web Front-end >JS Tutorial >Explanation of the operating mechanism of Node Stream (with examples)
Explanation of the operating mechanism of Node Stream (with examples)
- 不言forward
- 2018-10-23 16:07:242874browse
This article brings you an explanation of the operating mechanism of Node Stream (with examples). It has certain reference value. Friends in need can refer to it. I hope it will be helpful to you.
If you are learning Node, then streams must be a concept you need to master. If you want to become a Node master, then flow must be an indispensable part of the martial arts secrets.
Quoted from Stream-Handbook. This shows the importance of streams for in-depth learning of Node.
What is a stream?
You can understand streaming as a transmission capability. Through streams, data can be transferred to the destination in a smooth manner and without side effects. In Node, the streams created by Node Stream are dedicated to String and Buffer. Generally, Buffer is used. Stream represents a transmission capability, and Buffer is the carrier for transmitting content ( can be understood like this, Stream: the takeaway brother, Buffer: your takeaway). Set ObjectMode to true when creating a stream. Stream can also transmit any type of JS object (except null, which has special uses in streams).
Why use streams?
Now there is a requirement, we want to transfer a large file to the client. If the following method is used
const fs = require('fs');
const server = require('http').createServer();

server.on('request', (req, res) => {
  fs.readFile('./big.file', (err, data) => {
    if (err) throw err;
    res.end(data);
  });
});

server.listen(8000);
Every time a request is received, the large file must be read into the memory and then transferred to the client. This approach may have the following three consequences:
Memory exhaustion
Slow down other processes
Increase the load on the garbage collector
So this method is not a good solution when transferring large files. The amount of concurrency is large, and hundreds of requests can easily exhaust the memory.
What if we use streams?
const fs = require('fs');
const server = require('http').createServer();

server.on('request', (req, res) => {
  const src = fs.createReadStream('./big.file');
  src.pipe(res);
});

server.listen(8000);
In this way, it will not take up too much memory. Just read and transfer a little. The whole process proceeds smoothly and is very elegant. If you want to process the files during the transmission process, such as compression, encryption, etc., it is also easy to expand (will be introduced in detail later).
Streams are everywhere in Node. As can be seen from the picture below:
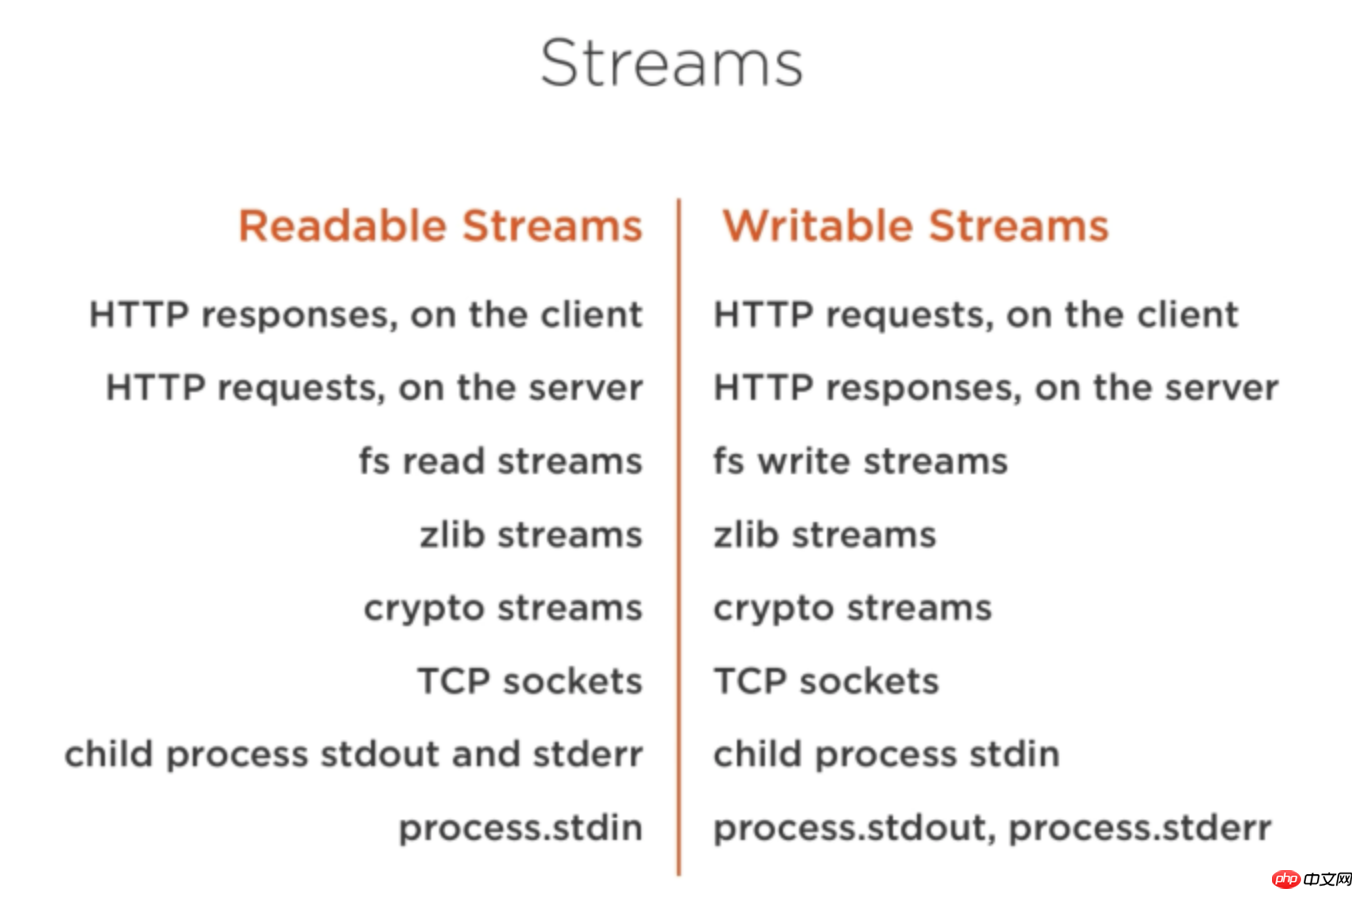
Stream classification
Stream is divided into four major categories:
Readable (readable stream)
Writable (writable stream)
Duplex (duplex stream)
Transform (conversion stream)
Readable
Data in the readable stream can be generated in the following two modes data.
Flowing Mode
Non-Flowing Mode
Triggering methods in both modes And the way of consumption is different.
Flowing Mode: Data will be continuously produced, forming a "flowing" phenomenon. This mode can be entered by listening to the data event of the stream.
In Non-Flowing Mode: You need to explicitly call the read() method to obtain data.
The two modes can be converted to each other
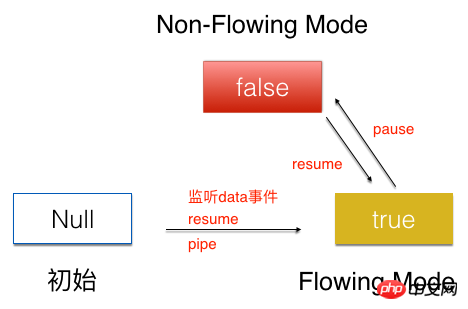
The initial state of the stream is Null, by listening to the data event , or the pipe method, call the resume method to transfer the flow to the Flowing Mode state. Call the pause method in the Flowing Mode state to set the flow to the Non-Flowing Mode state. Calling the resume method in the Non-Flowing Mode state can also set the flow to the Flowing Mode state.
The following is a detailed introduction to the operating mechanism of the Readable stream in the two modes.
Flowing Mode
In the Flowing Mode state, the myReadable read stream created directly monitors the data event, and the data continuously flows out for consumption.
myReadable.on('data',function(chunk){
      consume(chunk);//消费流
})
Once the data event is listened to, the internal process of Readable is as shown in the figure below
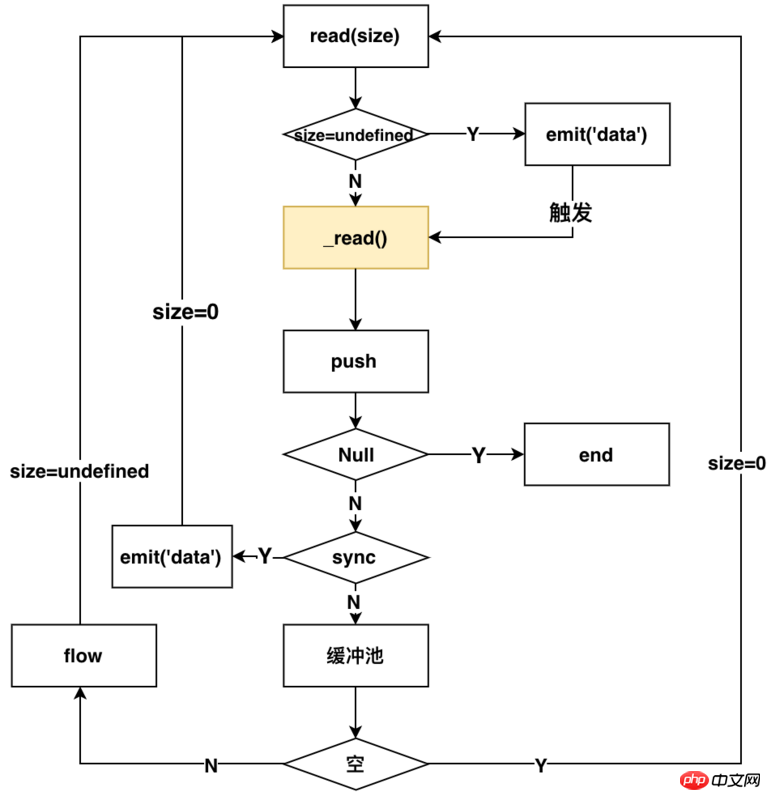
The core method is read inside the stream Method, which triggers different operations when the parameter n is different values. hightwatermark in the description below represents the size of the buffer pool inside the stream.
n=undefined (consumes data and triggers a readable stream)
n=0 (triggers a readable stream but does not Will consume)
n>hightwatermark (modify the value of hightwatermark)
- ##n
- n>buffer (can return null or all the data in the buffer (the last time it was read))
图中黄色标识的_read(),是用户实现流所需要自己实现的方法,这个方法就是实际读取流的方式(可以这样理解,外卖平台给你提供外卖的能力,那_read()方法就相当于你下单点外卖)。后面会详细介绍如何实现_read方法。
以上的流程可以描述为:监听data方法,Readable内部就会调用read方法,来进行触发读流操作,通过判断是同步还是异步读取,来决定读取的数据是否放入缓冲区。如果为异步的,那么就要调用flow方法,来继续触发read方法,来读取流,同时根据size参数判定是否emit('data')来消费流,循环读取。如果是同步的,那就emit('data')来消费流,同时继续触发read方法,来读取流。一旦push方法传入的是null,整个流就结束了。
从使用者的角度来看,在这种模式下,你可以通过下面的方式来使用流
const fs = require('./fs');
const readFile = fs.createReadStream('./big.file');
const writeFile = fs.createWriteStream('./writeFile.js');
readFile.on('data',function(chunk){
      writeFile1.write(chunk);
})
Non-Flowing Mode
相对于Flowing mode,Non-Flowing Mode要相对简单很多。
消费该模式下的流,需要使用下面的方式
myReadable.on(‘readable’,function(){
     const chunk = myReadable.read()
     consume(chunk);//消费流
})
在Non-Flowing Mode下,Readable内部的流程如下图:
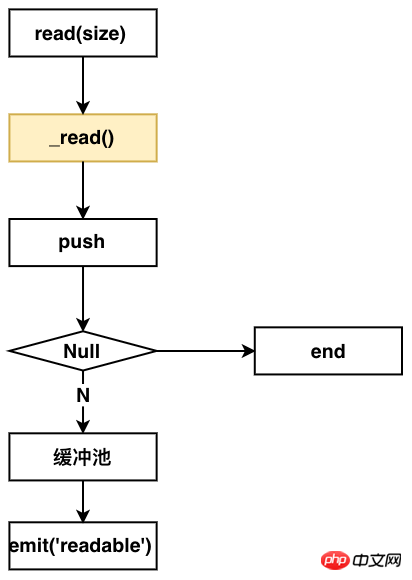
从这个图上看出,你要实现该模式的读流,同样要实现一个_read方法。
整个流程如下:监听readable方法,Readable内部就会调用read方法。调用用户实现的_read方法,来push数据到缓冲池,然后发送emit readable事件,通知用户端消费。
从使用者的角度来看,你可以通过下面的方式来使用该模式下的流
const fs = require('fs');
const readFile = fs.createReadStream('./big.file');
const writeFile = fs.createWriteStream('./writeFile.js');

readFile.on('readable',function(chunk) {
    while (null !== (chunk = myReadable.read())) {
        writeFile.write(chunk);
    }
});
Writable
相对于读流,写流的机制就更容易理解了。
写流使用下面的方式进行数据写入
myWrite.write(chunk);
调用write后,内部Writable的流程如下图所示
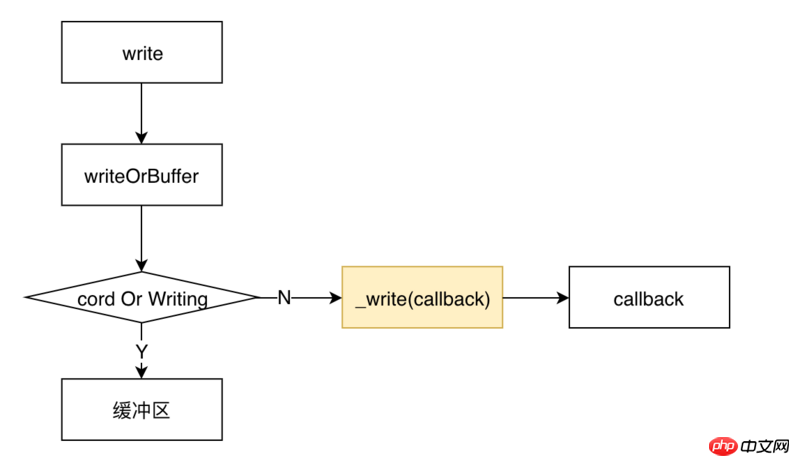
类似于读流,实现一个写流,同样需要用户实现一个_write方法。
整个流程是这样的:调用write之后,会首先判定是否要写入缓冲区。如果不需要,那就调用用户实现的_write方法,将流写入到相应的地方,_write会调用一个writeable内部的一个回调函数。
从使用者的角度来看,使用一个写流,采用下面的代码所示的方式。
const fs = require('fs');
const readFile = fs.createReadStream('./big.file');
const writeFile = fs.createWriteStream('./writeFile.js');

readFile.on('data',function(chunk) {
    writeFile.write(chunk);
})
可以看到,使用写流是非常简单的。
我们先讲解一下如何实现一个读流和写流,再来看Duplex和Transform是什么,因为了解了如何实现一个读流和写流,再来理解Duplex和Transform就非常简单了。
实现自定义的Readable
实现自定义的Readable,只需要实现一个_read方法即可,需要在_read方法中调用push方法来实现数据的生产。如下面的代码所示:
const Readable = require('stream').Readable;

class MyReadable extends Readable {
    constructor(dataSource, options) {
        super(options);
        this.dataSource = dataSource;
    }
    _read() {
        const data = this.dataSource.makeData();
        setTimeout(()=>{
            this.push(data);
        });
    }
}

// 模拟资源池
const dataSource = {
    data: new Array(10).fill('-'),
    makeData() {
        if (!dataSource.data.length) return null;
        return dataSource.data.pop();
    }
};

const myReadable = new MyReadable(dataSource,);

myReadable.on('readable', () => {
    let chunk;
    while (null !== (chunk = myReadable.read())) {
        console.log(chunk);
    }
});
实现自定义的writable
实现自定义的writable,只需要实现一个_write方法即可。在_write中消费chunk写入到相应地方,并且调用callback回调。如下面代码所示:
const Writable = require('stream').Writable;
class Mywritable extends  Writable{
    constuctor(options){
        super(options);
    }
    _write(chunk,endcoding,callback){
        console.log(chunk);
        callback && callback();
    }
}
const myWritable = new Mywritable();
Duplex
双工流:简单理解,就是讲一个Readable流和一个Writable流绑定到一起,它既可以用来做读流,又可以用来做写流。
实现一个Duplex流,你需要同时实现_read和_write方法。
有一点需要注意的是:它所包含的 Readable流和Writable流是完全独立,互不影响的两个流,两个流使用的不是同一个缓冲区。通过下面的代码可以验证
// 模拟资源池1
const dataSource1 = {
    data: new Array(10).fill('a'),
    makeData() {
        if (!dataSource1.data.length) return null;
        return dataSource1.data.pop();
    }
};
// 模拟资源池2
const dataSource2 = {
    data: new Array(10).fill('b'),
    makeData() {
        if (!dataSource2.data.length) return null;
        return dataSource2.data.pop();
    }
};

const Readable = require('stream').Readable;
class MyReadable extends Readable {
    constructor(dataSource, options) {
        super(options);
        this.dataSource = dataSource;
    }
    _read() {
        const data = this.dataSource.makeData();
        setTimeout(()=>{
            this.push(data);
        })

    }
}

const Writable = require('stream').Writable;
class MyWritable extends Writable{
    constructor(options){
        super(options);
    }
    _write(chunk, encoding, callback) {
        console.log(chunk.toString());
        callback && callback();
    }
}

const Duplex = require('stream').Duplex;
class MyDuplex extends Duplex{
    constructor(dataSource,options) {
        super(options);
        this.dataSource = dataSource;
    }
    _read() {
        const data = this.dataSource.makeData();
        setTimeout(()=>{
            this.push(data);
        })
    }
    _write(chunk, encoding, callback) {
        console.log(chunk.toString());
        callback && callback();
    }
}

const myWritable = new MyWritable();
const myReadable = new MyReadable(dataSource1);
const myDuplex = new MyDuplex(dataSource1);
myReadable.pipe(myDuplex).pipe(myWritable);
打印的结果是
abababababababababab
从这个结果可以看出,myReadable.pipe(myDuplex),myDuplex充当的是写流,写入的内容是a;myDuplex.pipe(myWritable),myDuplex充当的是读流,往myWritable写的却是b;所以说它所包含的 Readable流和Writable流是完全独立的。
Transform
理解了Duplex,就更好理解Transform了。Transform是一个转换流,它既有读的功能又有写的功能,但是它和Duplex不同的是,它的读流和写流共用同一个缓冲区;也就是说,通过它读入什么,那它就能写入什么。
实现一个Transform,你只需要实现一个_transform方法。比如最简单的Transform:PassThrough,其源代码如下所示
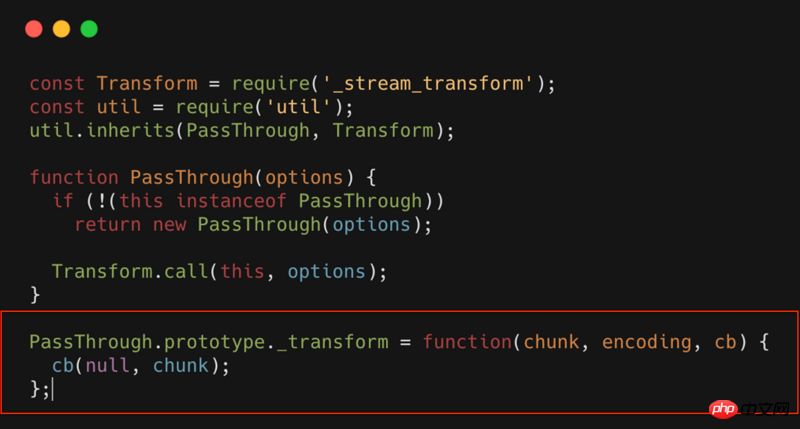
PassThrough就是一个Transform,但是这个转换流,什么也没做,相当于一个透明的转换流。可以看到_transform中什么都没有,只是简单的将数据进行回调。
如果我们在这个环节做些扩展,只需要在_transform中直接扩展就行了。比如我们可以对流进行压缩,加密,混淆等等操作。
BackPress
最后介绍一个流中非常重要的一个概念:背压。要了解这个,我们首先来看下pipe和highWaterMaker是什么。
pipe
首先看下下面的代码
const fs = require('./fs');
const readFile = fs.createReadStream('./big.file');
const writeFile = fs.createWriteStream('./writeFile.js');
readFile.pipe(writeFile);
上面的代码和下面是等价的
const fs = require('./fs');
const readFile = fs.createReadStream('./big.file');
const writeFile = fs.createWriteStream('./writeFile.js');
readFile.on('data',function(data){
    var flag = ws.write(data);
    if(!flag){ // 当前写流缓冲区已满,暂停读数据
        readFile.pause();
    }
})
writeFile.on('drain',function()){
    readFile.resume();// 当前写流缓冲区已清空,重新开始读流
}
readFile.on('end',function(data){
    writeFile.end();//将写流缓冲区的数据全部写入,并且关闭写入的文件
})
pipe所做的操作就是相当于为写流和读流自动做了速度的匹配。
读写流速度不匹配的情况下,一般情况下不会造成什么问题,但是会造成内存增加。内存消耗增加,就有可能会带来一系列的问题。所以在使用的流的时候,强烈推荐使用pipe。
highWaterMaker
highWaterMaker说白了,就是定义缓冲区的大小。
默认16Kb(Readable最大8M)
可以自定义
背压的概念可以理解为:为了防止读写流速度不匹配而产生的一种调整机制;背压该调整机制的触发时机,受限于highWaterMaker设置的大小。
如上面的代码 var flag = ws.write(data);,一旦写流的缓冲区满了,那flag就会置为false,反向促进读流的速度调整。
Stream的应用场景
主要有以下场景
文件操作(复制,压缩,解压,加密等)
下面的就很容易就实现了文件复制的功能。
const fs = require('fs');
const readFile = fs.createReadStream('big.file');
const writeFile = fs.createWriteStream('big_copy.file');
readFile.pipe(writeFile);
那我们想在复制的过程中对文件进行压缩呢?
const fs = require('fs');
const readFile = fs.createReadStream('big.file');
const writeFile = fs.createWriteStream('big.gz');
const zlib = require('zlib');
readFile.pipe(zlib.createGzip()).pipe(writeFile);
实现解压、加密也是类似的。
静态文件服务器
比如需要返回一个html,可以使用如下代码。
var http = require('http');
var fs = require('fs');
http.createServer(function(req,res){
    fs.createReadStream('./a.html').pipe(res);
}).listen(8000);
The above is the detailed content of Explanation of the operating mechanism of Node Stream (with examples). For more information, please follow other related articles on the PHP Chinese website!
Related articles
See more- An in-depth analysis of the Bootstrap list group component
- Detailed explanation of JavaScript function currying
- Complete example of JS password generation and strength detection (with demo source code download)
- Angularjs integrates WeChat UI (weui)
- How to quickly switch between Traditional Chinese and Simplified Chinese with JavaScript and the trick for websites to support switching between Simplified and Traditional Chinese_javascript skills

