
Home >Web Front-end >H5 Tutorial >Detailed explanation of the usage of HTML5 FormData and explanation of the file upload implementation process
Detailed explanation of the usage of HTML5 FormData and explanation of the file upload implementation process
- 巴扎黑Original
- 2017-09-13 10:10:275127browse
This article mainly introduces the introduction of the HTML5 FormData method and the implementation of file upload examples. It has certain reference value. Those who are interested can learn about it.
XMLHttpRequest is a browser interface, through which we can make Javascript for HTTP(S) communication. XMLHttpRequest is a commonly used way to interact data between front and back in modern browsers. In February 2008, the XMLHttpRequest Level 2 draft was proposed. Compared with the previous generation, it has some new features. Among them, FormData is a new object in XMLHttpRequest Level 2. Use it to submit forms and simulate form submissions. Of course, the biggest The advantage is that you can upload binary files. Here is a detailed introduction on how to use FormData to upload files.
FormData Upload File Example
First, let’s take a look at the basic usage of formData: the FormData object can combine the name and value of all form elements into a queryString and submit it to the background. You only need to pass the form form as a parameter into the FormData constructor:
var form = document.getElementById("form1");
var fd = new FormData(form);
In this way, the fd can be sent to the background directly through the send() method of ajax.
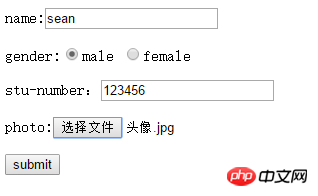
The following creates a form form. In addition to ordinary data, there is also file upload in the form. We directly pass the form object as a parameter into the FormData object:
<form name="form1" id="form1">
        <p>name:<input type="text" name="name" /></p>
        <p>gender:<input type="radio" name="gender" value="1" />male <input type="radio" name="gender" value="2" />female</p>
        <p>stu-number:<input type="text" name="number" /></p>
        <p>photo:<input type="file" name="photo" id="photo"></p>
        <p><input type="button" name="b1" value="submit" onclick="fsubmit()" /></p>
</form>
<p id="result"></p>
The above code creates a form, simply fills in some information, selects a picture as the avatar, and sets a p to store the returned results.
For simplicity, we still use jquery-encapsulated ajax to transmit data to the background:
function fsubmit() {
var form=document.getElementById("form1");
var fd =new FormData(form);
$.ajax({
url: "server.php",
type: "POST",
data: fd,
processData: false, // 告诉jQuery不要去处理发送的数据
contentType: false, // 告诉jQuery不要去设置Content-Type请求头
success: function(response,status,xhr){
console.log(xhr);
var json=$.parseJSON(response);
var result = '';
result +="个人信息:<br/>name:"+json['name']+"<br/>gender:"+json['gender']+"<br/>number:"+json['number'];
result += '<br/>头像:<img src="' + json['photo'] + '" style="max-width:90%" style="border-radius: 50%;" / alt="Detailed explanation of the usage of HTML5 FormData and explanation of the file upload implementation process" >';
$('#result').html(result);
}
});
return false;
}In the above code The server.php is a server-side file that receives ajax requests and returns the received results. The specific code is as follows:
<?php
$name = isset($_POST['name'])? $_POST['name'] : '';
$gender = isset($_POST['gender'])? $_POST['gender'] : '';
$number = isset($_POST['number'])? $_POST['number'] : '';
$filename = time().substr($_FILES['photo']['name'], strrpos($_FILES['photo']['name'],'.'));
$response = array();
if(move_uploaded_file($_FILES['photo']['tmp_name'], $filename)){
$response['isSuccess'] = true;
$response['name'] = $name;
$response['gender'] = $gender;
$response['number'] = $number;
$response['photo'] = $filename;
}else{
$response['isSuccess'] = false;
}
echo json_encode($response);
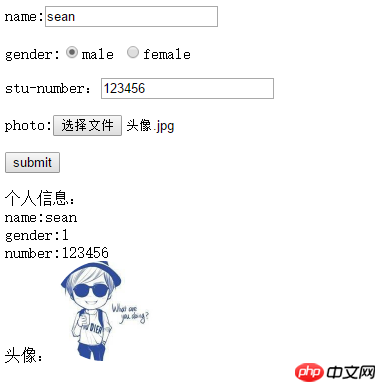
?>After filling in the information, click submit, and the page can The following effect is obtained. You can also find the uploaded images in the corresponding folder on the server side.
If you are a native JavaScript enthusiast, of course you can also achieve the above functions. The following is a simple JavaScript implementation code:
function fsubmit() {
var form=document.getElementById("form1");
var formData=new FormData(form);
alert(formData.name);
var oReq = new XMLHttpRequest();
oReq.onreadystatechange=function(){
if(oReq.readyState==4){
if(oReq.status==200){
console.log(typeof oReq.responseText);
var json=JSON.parse(oReq.responseText);
var result = '';
result +="个人信息:<br/>name:"+json['name']+"<br/>gender:"+json['gender']+"<br/>number:"+json['number'];
result += '<br/>头像:<img src="' + json['photo'] + '" style="max-width:90%" style="border-radius: 50%;" / alt="Detailed explanation of the usage of HTML5 FormData and explanation of the file upload implementation process" >';
$('#result').html(result);
}
}
};
oReq.open("POST", "server.php");
oReq.send(formData);
return false;
}FormData object method introduction
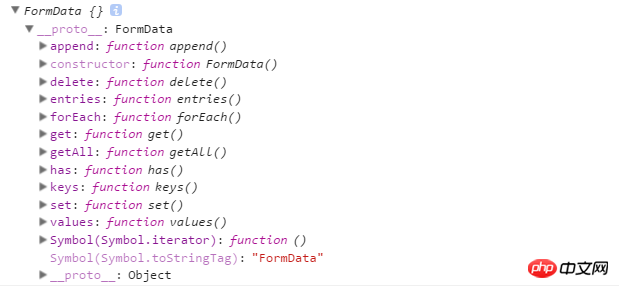
FormData In addition to directly passing form as a parameter when creating a new object above, it also has other functions. Most articles about FormData on the Internet only mention the append() method, so what methods does the FormData object have? We console will know at a glance:

1. append()
The append() method is used to add key-value pairs to the FormData object:fd.append('key1',"value1"); fd.append('key2',"value2");fd is a FormData object, which can be a newly created empty object, or it can already contain a form form or other key-value pairs.
Set the corresponding key key and the corresponding value value(s)
#########fd.set('key1',"value1"); fd.set('key2',"value2");## #It looks a bit similar to the append() method. The difference between the two is that when the specified key value exists, the append() method will add all the newly added key-value pairs to the end, while the set() method will Key-value pairs that will overwrite previous settings. Still comparing through examples, we append() or set() new key-value pairs based on the previous form: ############
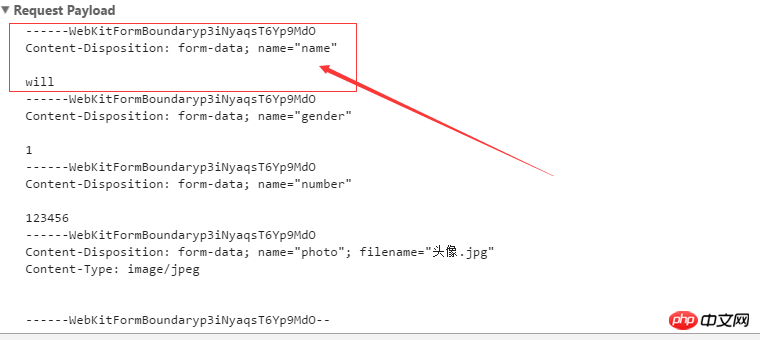
fd.append('name',"will");###There are two keys with name Key-value pair: ####################
fd.set('name',"will");### There is only one key-value pair with key name: ########### ####The above is the difference between append() and set(). If the set key value does not exist, the effect of the two is the same. #########3. delete()#########Receives a parameter indicating the name of the key value you want to delete. If there are multiple identical key values, they will be deleted together: ############
fd.append('name','will');
fd.delete('name');
###The name information in the form and the name information added through append() are deleted. #########4. get() and getAll()#########Receive a parameter, indicating the name of the key to be found, and return the first value corresponding to the key. If there are multiple identical keys, all values corresponding to this key should be returned. ######Similarly based on the above form: ############
fd.append('name','will');
console.log(fd.get('name')); // sean
#########
fd.append('name','will');
console.log(fd.getAll('name')); // ["sean", "will"]
######5, has()# #####
该方法也接收一个参数,同样是 key 的名称,返回一个Boolean 值, 用来判断FormData 对象是否含有该 key。以上面的form为例:
console.log(fd.has('name')); // true
console.log(fd.has('Name')); // false
6、keys()
该方法不需要接收参数,返回一个迭代器,通过这个迭代器,我们可以遍历FormData 对象中所有的 key。以上面的form为例:
for (var key of fd.keys()) {
           console.log(key);
        }
结果为:
name
gender
number
photo
7、values()
有遍历 key 的迭代,当然也就少不了遍历 value 的迭代器了。values()就是遍历value 的迭代器,用法与 keys() 类似:
for (var value of fd.values()) {
           console.log(value);
        }
结果:

8、entries()
有遍历 key 的迭代器,也有遍历 value 的迭代器,为何不搞一个两者一起的呢!entries()就是返回一个包含键值对的迭代器:
for(var pair of fd.entries()) {
           console.log(pair[0]+ ', '+ pair[1]);
        }
结果:

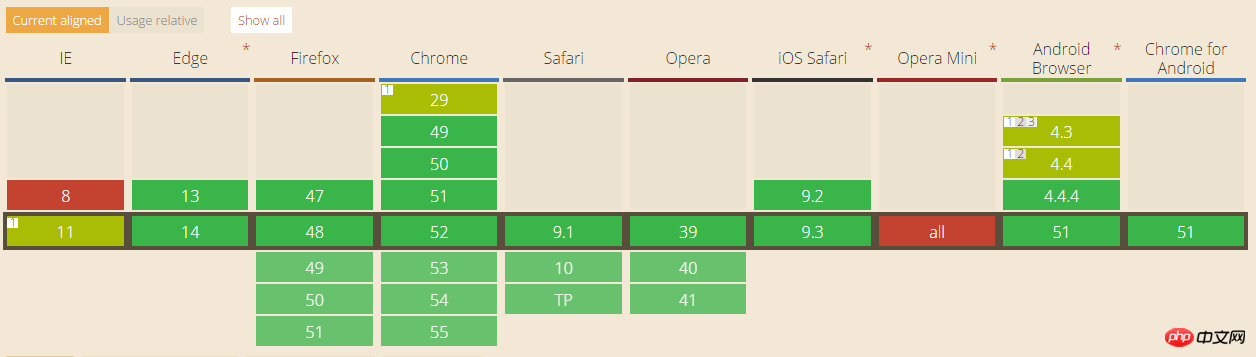
FormData兼容性问题
由于 FormData 是 XMLHttpRequest Level 2 新增的接口,现在 低于IE10 的IE浏览器不支持 FormData ,至于 上面介绍的 FormData 对象的方法经过测试,在 IE 浏览器中都不支持,具体的各大浏览器的支持情况可以参照下图:
The above is the detailed content of Detailed explanation of the usage of HTML5 FormData and explanation of the file upload implementation process. For more information, please follow other related articles on the PHP Chinese website!
Related articles
See more- AlloyTouch full-screen scrolling plug-in creates a smooth H5 page in 30 seconds
- HTML5 actual combat and analysis of touch events (touchstart, touchmove and touchend)
- Detailed explanation of image drawing examples in HTML5 canvas 9
- Regular expressions and new HTML5 elements
- How to combine NodeJS and HTML5 to drag and drop multiple files to upload to the server