Home >Database >Mysql Tutorial >Example tutorial on installation, testing and use of tpcc-mysql
Example tutorial on installation, testing and use of tpcc-mysql
- PHP中文网Original
- 2017-06-20 14:24:481640browse
1:下载tpcc-mysql的压缩包,从下面的网站进行下载
也可直接从叶总博客直接下载:
我这边使用的就是后者。
2:安装tpcc-mysql
[root@mxqmongodb2 tpccmysql]# gunzip tpcc-mysql-src.tgz[root@mxqmongodb2 tpccmysql]# tar xf tpcc-mysql-src.tar[root@mxqmongodb2 tpcc-mysql-master]# cd src/[root@mxqmongodb2 src]# make[root@mxqmongodb2 src]# cd ..[root@mxqmongodb2 tpcc-mysql-master]# ls
add_fkey_idx.sql count.sql create_table.sql Dockerfile drop_cons.sql load_multi_schema.sh load.sh README.md schema2 scripts src tpcc_load tpcc_start
我们看到,安装完成以后是会有 tpcc_load tpcc_start两个可执行文件的。基本上已经安装完成了,下面看一下测试
3:测试:上面是基本的安装,安装以后在进行测试,mysql版本.
首先安装完成以后就要做初始化:
mysql> create database tpcc1000;
Query OK, 1 row affected (0.04 sec)
mysql> use tpcc1000;Database changed
mysql> source /home/tpccmysql/tpcc-mysql-master/create_table.sql;
mysql> source /home/tpccmysql/tpcc-mysql-master/add_fkey_idx.sql;
然后开始往数据库当中追加数据:
在这里,需要注意的是 tpcc 默认会读取 /var/lib/mysql/mysql.sock 这个socket 文件。因此,如果你的 socket 文件不在相应路径的话,可以做个软连接,或者通过TCP/IP的方式连接测试服务器。真实测试场景中,仓库数一般不建议少于100个,视服务器硬件配置而定。
执行下面的命令,开始灌入测试数据:(本人的是虚拟机,仓库数就弄了30,省得压死了)
[root@mxqmongodb2 tpcc-mysql-master]# ./tpcc_load -h10.103.16.35 -P3306 -d tpcc1000 -u root -p 123456 30
下面就要开始测试了,看一下tpcc_start的一些参数:
-w 指定仓库数量 -c 指定并发连接数 -r 指定开始测试前进行warmup的时间,进行预热后,测试效果更好 -l 指定测试持续时间 -i 指定生成报告间隔时长 -f 指定生成的报告文件名
看一下帮助:
[root@mxqmongodb2 tpcc-mysql-master]# ./tpcc_start --help****************************************** ###easy### TPC-C Load Generator ******************************************./tpcc_start: invalid option -- '-'Usage: tpcc_start -h server_host -P port -d database_name -u mysql_user -p mysql_password -w warehouses -c connections -r warmup_time -l running_time -i report_interval -f report_file -t trx_file
然后直接开始测试:
./tpcc_start -h10.103.16.35 -P3306 -dtpcc1000 -uroot -p123456 -w30 -c50 -r300 -l600
真实测试场景中,建议预热时间不小于5分钟,持续压测时长不小于30分钟,否则测试数据可能不具参考意义(我们预热1分钟,压测10分钟),下面看一下结果:
[root@mxqmongodb2 tpcc-mysql]# ./tpcc_start -h127.0.0.1 -P3306 -d tpcc -u root -p123456 -w 10 -c 50 -r 30 -l 300****************************************** ###easy### TPC-C Load Generator ******************************************option h with value '127.0.0.1'option P with value '3306'option d with value 'tpcc'option u with value 'root'option p with value '123456'option w with value '10'option c with value '50'option r with value '30'option l with value '300'<Parameters>[server]: 127.0.0.1[port]: 3306[DBname]: tpcc[user]: root[pass]: 123456[warehouse]: 10[connection]: 50[rampup]: 30 (sec.)[measure]: 300 (sec.)

RAMP-UP TIME.(30 sec.)

MEASURING START.
10, 140(0):3.055|3.476, 141(0):0.693|0.975, 14(0):0.326|0.334, 11(0):3.550|3.593, 15(0):9.091|9.11920, 240(0):3.092|3.143, 242(0):0.668|0.730, 24(0):0.320|0.356, 26(0):3.533|3.596, 23(0):8.280|8.48030, 232(0):2.981|3.110, 233(0):0.680|1.052, 23(0):0.329|0.360, 24(0):3.591|3.596, 23(0):9.042|9.40740, 137(0):3.148|3.968, 136(0):0.658|0.713, 14(0):0.329|0.353, 13(0):3.677|3.682, 15(0):8.660|9.28950, 149(0):2.984|3.334, 145(0):0.662|0.665, 14(0):0.310|0.334, 14(0):3.572|3.687, 13(0):9.155|9.49760, 137(0):2.863|3.152, 142(0):0.674|0.689, 15(0):0.247|0.262, 14(0):3.308|3.548, 15(0):8.362|9.23670, 157(0):3.144|3.410, 152(0):0.619|0.681, 15(0):0.339|0.414, 16(0):3.546|3.610, 16(0):8.440|9.62780, 184(0):3.073|3.221, 182(0):0.678|0.707, 18(0):0.352|0.352, 18(0):3.693|3.766, 19(0):8.643|9.02090, 192(0):3.035|3.668, 196(0):0.658|0.793, 20(0):0.298|0.400, 19(0):3.572|4.125, 18(0):8.267|9.535100, 156(0):3.041|3.301, 153(0):0.647|0.679, 15(0):0.276|0.279, 16(0):3.436|3.497, 17(0):8.379|8.510110, 167(0):2.900|3.178, 168(0):0.663|0.674, 17(0):0.294|0.297, 16(0):3.517|3.625, 16(0):8.262|8.626120, 188(0):3.094|3.217, 190(0):0.638|0.740, 19(0):0.276|0.288, 20(0):3.472|3.697, 19(0):8.589|8.891130, 161(0):3.295|3.617, 163(0):0.668|0.717, 16(0):0.346|0.393, 15(0):3.421|3.730, 16(0):9.250|10.387140, 171(0):2.938|3.343, 168(0):0.683|0.714, 17(0):0.312|0.321, 18(0):3.471|3.513, 18(0):8.190|8.602150, 179(0):3.029|3.250, 178(0):0.694|0.813, 18(0):0.329|0.331, 16(0):3.571|3.623, 16(0):8.097|8.610160, 123(0):2.938|3.333, 119(0):0.606|0.621, 12(0):0.278|0.293, 13(0):3.497|3.506, 13(0):8.327|8.454170, 175(0):3.130|3.595, 179(0):0.666|0.778, 17(0):0.274|0.277, 18(0):3.638|4.027, 18(0):8.762|9.156180, 187(0):3.146|3.427, 187(0):0.704|0.743, 20(0):0.312|0.322, 19(0):3.562|3.593, 18(0):8.282|9.524190, 146(0):2.926|3.112, 143(0):0.641|0.701, 14(0):0.301|0.339, 14(0):3.475|3.592, 15(0):7.896|8.596200, 189(0):3.028|3.277, 200(0):0.661|0.730, 19(0):0.300|0.319, 20(0):3.550|3.595, 20(0):8.361|8.659210, 191(0):2.910|3.196, 184(0):0.618|0.720, 19(0):0.324|0.329, 17(0):3.448|3.463, 18(0):8.372|8.558220, 143(0):3.057|3.116, 162(0):0.655|0.691, 15(0):0.259|0.355, 15(0):3.519|3.547, 14(0):8.816|8.893230, 189(0):2.930|3.057, 169(0):0.630|0.682, 18(0):0.331|0.349, 19(0):3.575|3.864, 19(0):8.359|8.391240, 131(0):2.958|3.035, 130(0):0.643|0.681, 14(0):0.273|0.326, 12(0):3.490|3.520, 13(0):8.671|9.160250, 125(0):2.939|3.237, 124(0):0.659|0.707, 12(0):0.301|0.367, 12(0):3.464|3.527, 13(0):8.643|8.774260, 127(0):2.895|2.983, 131(0):0.669|0.704, 13(0):0.328|0.360, 16(0):3.468|3.665, 12(0):8.433|8.562270, 177(0):2.962|3.375, 174(0):0.686|0.722, 17(0):0.302|0.364, 16(0):3.548|3.629, 18(0):8.309|8.354280, 139(0):2.874|3.047, 142(0):0.675|0.935, 15(0):0.280|0.294, 16(0):3.483|3.628, 14(0):8.154|8.730290, 163(0):3.132|3.213, 162(0):0.636|0.663, 15(0):0.282|0.313, 15(0):3.654|3.925, 17(0):8.172|8.245300, 147(0):3.024|3.230, 142(0):0.692|1.405, 16(0):0.265|0.300, 15(0):3.452|3.475, 14(0):8.518|9.214
 STOPPING THREADS..................................................
<Raw Results> -- 第一次统计结果[0] sc:4942 lt:0 rt:0 fl:0 -- New-Order,新订单业务成功(success,简写sc)次数,延迟(late,简写lt)次数,重试(retry,简写rt)次数,失败(failure,简写fl)次数[1] sc:4937 lt:0 rt:0 fl:0 -- Payment,支付业务统计[2] sc:495 lt:0 rt:0 fl:0 -- Order-Status,订单状态业务统计[3] sc:493 lt:0 rt:0 fl:0 -- Delivery,发货业务统计[4] sc:495 lt:0 rt:0 fl:0 -- Stock-Level,库存业务统计in 300 sec.
<Raw Results2(sum ver.)> -- 第二次统计结果[0] sc:4944 lt:0 rt:0 fl:0[1] sc:4940 lt:0 rt:0 fl:0[2] sc:495 lt:0 rt:0 fl:0[3] sc:493 lt:0 rt:0 fl:0[4] sc:495 lt:0 rt:0 fl:0
 <Constraint Check> (all must be [OK]) -- 下面所有业务逻辑结果都必须为 OK 才行[transaction percentage]Payment: 43.45% (>=43.0%) [OK]Order-Status: 4.36% (>= 4.0%) [OK]Delivery: 4.34% (>= 4.0%) [OK]Stock-Level: 4.36% (>= 4.0%) [OK][response time (at least 90% passed)]New-Order: 100.00% [OK]Payment: 100.00% [OK]Order-Status: 100.00% [OK]Delivery: 100.00% [OK]Stock-Level: 100.00% [OK]
 <TpmC>988.400 TpmC-- TpmC结果值(每分钟事务数,该值是第一次统计结果中的新订单事务数除以总耗时分钟数)
4:统计结果分析
我们看一下自己的INNODB配置:
mysql> show variables like 'innodb_buffer_pool_size';+-------------------------+------------+| Variable_name | Value |+-------------------------+------------+| innodb_buffer_pool_size | 2147483648 |+-------------------------+------------+1 row in set (0.17 sec)
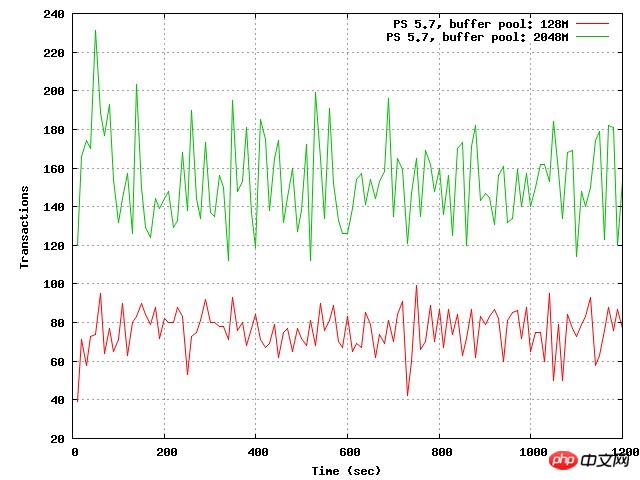
大小是2048M,我们现在把innodb_buffer_pool_size 为2048修改为128,并且保留两者的压测的数据,重定向到一个文件:
[root@mxqmongodb2 tpcc-mysql]# ./tpcc_start -h127.0.0.1 -P3306 -d tpcc -u root -p123456 -w 10 -c 50 -r 10 -l 120 >/home/sa/tpcc_output_2048.log
修改innodb_buffer_pool_size:
mysql> set global innodb_buffer_pool_size=134217728;
Query OK, 0 rows affected (0.05 sec)
mysql> show variables like 'innodb_buffer_pool_size';+-------------------------+------------+| Variable_name | Value |+-------------------------+------------+| innodb_buffer_pool_size | 134217728|+-------------------------+------------+1 row in set (0.01 sec)[root@mxqmongodb2 tpcc-mysql]# ./tpcc_start -h127.0.0.1 -P3306 -d tpcc -u root -p123456 -w 10 -c 50 -r 10 -l 1200 >/home/sa/tpcc_output_128.log
然后将两个文件进行处理
[root@mxqmongodb2 sa]# cat tpcc_output_128.log | grep '(0)' | grep -v HY000 | grep -v payment | grep -v neword | awk -F ':' '{print $1}' |awk -F ',' '{print $1 $2}'|sed 's/(0)//g'|sed 's/(1)//g'>tpcc_output_1128.txt[root@mxqmongodb2 sa]# cat tpcc_output_2048.log | grep '(0)' | grep -v HY000 | grep -v payment | grep -v neword | awk -F ':' '{print $1}' |awk -F ',' '{print $1 $2}'|sed 's/(0)//g'|sed 's/(1)//g'>tpcc_output_2048.txt
合并两个文件:
[root@mxqmongodb2 sa]# paste tpcc_output_128.txt tpcc_output_2048.txt > tpcc-graph-data128.txt[root@mxqmongodb2 sa]# ./tpcc-graph-build.sh tpcc-graph-data128.txt tpcc-graph128-2048.jpg
然后将tpcc-graph.jpg拷贝出来,看一下具体效果如下:

下面看一下tpcc-graph-build脚本:
#!/bin/bash
### goto user homedir and remove previous filerm -f '$2'gnuplot << EOP
### set data source filedatafile = '$1'### set graph type and size
set terminal jpeg size 640,480### set titles
set grid x y
set xlabel "Time (sec)"set ylabel "Transactions"### set output filename
set output '$2'### build graph
# plot datafile with lines
plot datafile title "PS 5.7, buffer pool: 128M" with lines,datafile using 3:4 title "PS 5.7, buffer pool: 2048M" with lines axes x1y1
EOP
The above is the detailed content of Example tutorial on installation, testing and use of tpcc-mysql. For more information, please follow other related articles on the PHP Chinese website!
Statement:
The content of this article is voluntarily contributed by netizens, and the copyright belongs to the original author. This site does not assume corresponding legal responsibility. If you find any content suspected of plagiarism or infringement, please contact admin@php.cn

