
Home >Operation and Maintenance >Windows Operation and Maintenance >Detailed tutorial on how to use test code for Windows 8 development
Detailed tutorial on how to use test code for Windows 8 development

- 零下一度Original
- 2017-05-24 15:00:512008browse
This article introduces how to use test code for Windows 8 development. Friends who need it can refer to
1. Create solutions and unit testsprojects
1). Select "New" on the "File" menu, and then select "New Project".
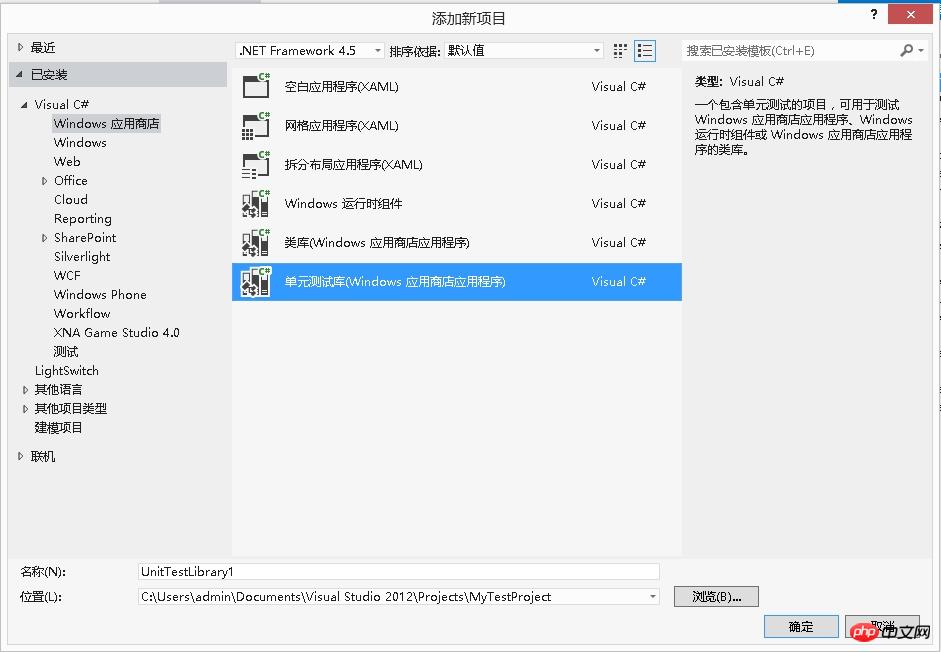
2). In the "New Project" dialog box, expand "Installed", "Visual C#", and select "Windows Store". Then select "Blank Application" from the list of project templates.
3). Name the project MyTestProject and make sure "Create solution directory" is selected.
4). In Solution Explorer, select the solution name, select "Add" from the shortcut menu, and then select "New Project".
5). In the "New Project" dialog box, expand "Installed", "Visual C#", and then select "Windows Store". Then select Unit Test Library (Windows Store App) from the list of project templates.
Note: Create a project first, and then add a test project to the project. This meets our need to test our project during development.
6).Open UnitTest1.cs in the Visual Studio editor.
The code is as follows:
namespace UnitTestLibraryTest{    [TestClass]    public class UnitTest1    {            [TestMethod]        public void TestMethod1()        {</p>
<p>        }    }}
Note the following:
a. Each test is defined using [TestMethod]. Test methods must return void and cannot have any parameters. In the line before the class name, add the declaration of [TestClass].
b. The test method must be located in a class decorated with the [TestMethod] attribute. When running tests, an instance of each test class is created. Test methods will be called in an unspecified order.
c. You can define specific methods that are called before and after each module, each class, or each method.
d. Add a reference to using Microsoft.VisualStudio.TestPlatform.UnitTestFramework; in the head of the file.
7). Initialization before testing and cleaning after testing. The usage and code are as follows:
The code is as follows:
namespace UnitTestLibraryTest
{
    [TestClass]
    public class UnitTest1
    {
        private int a;
        private int b;</p>
<p>        // 当前测试类运行第一个测试方法之前执行,类似于
构造函数
        [ClassInitialize]
        public
static
 void MyClassInit(TestContext context)
        {
        }
        // 所有测试方法运行完毕后执行,类似于
析构函数
        [ClassCleanup]
        public static void MyClass
End
()
        {
        }</p>
<p>        //每个测试方法运行之前执行
        [TestInitialize]
        public void Init()
        {
            a = 1;
            b = 1;
        }
        //每个测试方法运行之后执行
        [TestCleanup]
        public void End()
        {
            a = 0;
            b = 0;
        }</p>
<p>    }
}
Note: For the above method, the method name can be customized and has no return value, except for the [ClassInitialize] function. Except for the parameters of TestContext, there are no other parameters.
2. Verify whether the test is running in the test management resourcer
1). Insert some test code in TestMethod1 of the UnitTest1.cs file:
Code As follows:
[TestMethod]
        public void AddTestMethod()
        {
            int a = 1;
            int b = 2;
            int sum = a+b;
            Assert.AreEqual(3,sum);
        }
Note that several static methods provided by the Assert class can be used to verify the results of the test method.
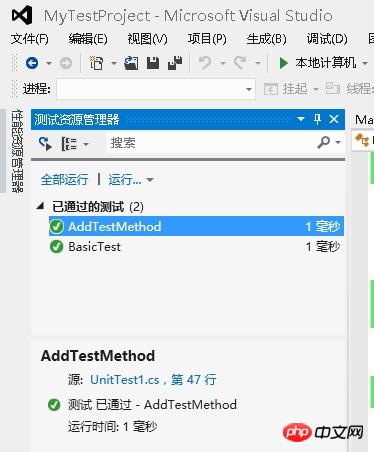
2). On the "Test" menu, select "Run" and then select "Run All".
The test project will be generated and run. The Test Explorer window appears and the tests are listed under Passed Tests. The Summary pane at the bottom of the window will provide additional details about the selected test.
3. Add the Rooter class to the MyTestProject project
1). In the "Solution Explorer", select the "MyTestProject" project name. Select Add from the shortcut menu, and then select Class.
2). Name the class file Rooter.cs.
3). Add the following code to the Rooter class Rooter.cs file:
The code is as follows:
public class Rooter
    {
        public Rooter()
        {
        }
        public double SquareRoot(double x)
        {

return
 0.0;
        }
    }
The Rooter class declares a constructor and SqareRoot estimator method.
4).SqareRoot method is just a minimal implementation, enough to set up the basic test structure for testing.
4. Merge test projects into application projects
1). Add a reference to the "MyTestProject" application to the UnitTestLibraryTest project.
2). Add a using statement to the UnitTest1.cs file:
a. Open UnitTest1.cs.
b. Add code under the using Microsoft.VisualStudio.TestPlatform.UnitTestFramework; line: using MyTestProject;
3). Add a test using the Rooter function. Add the following code to UnitTest1.cs:
The code is as follows:
[TestMethod]
        public void BasicTest()
        {
            Rooter rooter =
new
 Rooter();
            double expected = 0.0;
            double actual = rooter.SquareRoot(expected * expected);
            double tolerance = .001;
            Assert.AreEqual(expected, actual, tolerance);
        }
4). Generate the solution.
The new test will appear in the "Unrun Tests" node of the Test Explorer.
5). In the test explorer, select "Run All". Basic Test Passed
You have set up your tests and code project and verified that you can run tests that run functions in your code project. Now you can start writing real tests and code.
5. Iteratively add tests and make those tests pass.
1). Add a new test:
The code is as follows:
[TestMethod]
        public void
Range
Test()
        {
            Rooter rooter = new Rooter();
            for (double v = 1e-6; v < 1e6; v = v * 3.2)
            {
                double expected = v;
                double actual = rooter.SquareRoot(v * v);
                double tolerance = ToleranceHelper(v);
                Assert.AreEqual(expected, actual, tolerance);
            }
        }</p>
<p>        private double ToleranceHelper(double expected)
        {
            return expected / 3.2;
}提示:建议您不要更改已通过的测试。而是添加新测试,更新代码以便测试通过,然后添加其他测试等。 当您的用户更改其要求时,请禁用不再正确的测试。编写新测试并使它们以相同的增量方式一次运行一个。
2).在测试资源管理器中,选择“全部运行”。
3).测试将不会通过。 RangeTest 未通过
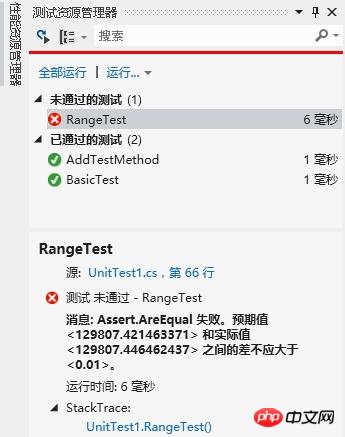
提示:编写测试后,立即验证每个测试是否都将失败。这帮助您避免易犯的错误,不会编写从不失败的测试。
4).增强受测代码,以便新测试通过。将 Rooter.cs 中的 SqareRoot 函数更改为:
代码如下:
public double SquareRoot(double x)
        {
            double estimate = x;
            double d
if
f = x;

while
 (diff > estimate / 1000)
            {
                double
prev
iousEstimate = estimate;
                estimate = estimate - (estimate * estimate - x) / (2 * estimate);
                diff = Math.Abs(previousEstimate - estimate);
            }
            return estimate;
        }
5).生成解决方案,然后在测试资源管理器中,选择“全部运行”。
现在所有三个测试都将通过。
提示:通过添加测试的方式一次性开发代码。确保所有测试在每次迭代后都通过。
6.调用未通过的测试
1).向 UnitTest1.cs 添加另一个测试:
代码如下:
[TestMethod]        public void NegativeRangeTest()        {            string message;            Rooter rooter = new Rooter();            for (double v = -0.1; v > -3.0; v = v - 0.5)            {                try                {                    // Should raise an exception:                    double actual = rooter.SquareRoot(v);</p>
<p>                    message = String.Format("No exception for input {0}", v);                    Assert.Fail(message);                }                catch (ArgumentOutOfRangeException ex)                {                    continue; // Correct exception.                }                catch (Exception e)                {                    message = String.Format("Incorrect exception for {0}", v);                    Assert.Fail(message);                }            }        }
2).在测试资源管理器中,选择“全部运行”。
测试将不会通过。在测试资源管理器中选择测试名称。将突出显示失败的断言。失败消息将在测试资源管理器的细节窗格中可见。NegativeRangeTests 未通过。
3).若要查看测试未通过的原因,请单步执行以下函数:
a.在 SquareRoot 函数的开头设置断点。
b.在未通过测试的快捷菜单上,选择“调试选定的测试”。 当运行在断点处停止时,请单步执行以下代码。
c.向 Rooter 方法添加代码以捕获异常,将SquareRoot方法修改如下(对x进行判断捕获异常):
代码如下:
public double SquareRoot(double x)
        {
            if (x < 0.0)
            {
                throw new ArgumentOutOfRangeException();
            }
            double estimate = x;
            double diff = x;
            while (diff > estimate / 1000)
            {
                double previousEstimate = estimate;
                estimate = estimate - (estimate * estimate - x) / (2 * estimate);
                diff = Math.Abs(previousEstimate - estimate);
            }
            return estimate;
        }
在测试资源管理器中,选择“全部运行”以测试已纠正的方法,并确保您未引入回归测试。所有测试都将通过。
【相关推荐】
4. 教你如何在Windows环境下安装python2和python3两个版本
The above is the detailed content of Detailed tutorial on how to use test code for Windows 8 development. For more information, please follow other related articles on the PHP Chinese website!
Related articles
See more- Tutorial on turning off the blurry frosted glass effect in Win10 NEON
- Share two solutions to the problem of computer crash when opening IE browser in windowsxp
- How to solve the problem that the value cannot be created in Win7 system when installing the software?
- Use bat batch file to operate windows example code
- Detailed tutorial on how to use test code for Windows 8 development