Home >Backend Development >C#.Net Tutorial >Detailed explanation of examples of filters and model binding in ASP.NET
Detailed explanation of examples of filters and model binding in ASP.NET
- Y2JOriginal
- 2017-05-11 10:38:121739browse
This article mainly introduces in detail the common extension points of ASP.NET MVC: filters and model binding. It is of great practical value. Friends in need can refer to it
1. Filter
Every request in ASP.NET MVC will be assigned to a specific Action (hereinafter referred to as the "Method") under the corresponding Controller (hereinafter referred to as the "Controller") ) processing, under normal circumstances just write the code directly in the method, but if you want to process some logic before or after the method is executed, you need to use filters here.
There are three commonly used filters: Authorize (authorization filter), HandleError (exception filter), ActionFilter (custom filter), the corresponding classes are: AuthorizeAttribute, HandleErrorAttribute and ActionFilterAttribute, Inherit these classes and override their methods to achieve different functions.
1.Authorize authorization filter
As the name suggests, the authorization filter is used for authorization. The authorization filter is executed before the method is executed to limit whether the request can enter this Method, create a new method:
public JsonResult AuthorizeFilterTest()
{
 return Json(new ReturnModel_Common { msg = "hello world!" });
}
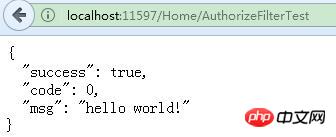
Direct access to get the result:

Now assume that this AuthorizeFilterTest method is a background method, the user must have a valid Token can be accessed. The conventional method is to receive and verify the token in the AuthorizeFilterTest method. However, once there are too many methods, it is obviously impractical to write verification code in each method. At this time, an authorization filter must be used. :
public class TokenValidateAttribute : AuthorizeAttribute
  {
    /// <summary>
    /// 授权验证的逻辑处理。返回true则通过授权,false则相反
    /// </summary>
    /// <param name="httpContext"></param>
    /// <returns></returns>
    protected override bool AuthorizeCore(HttpContextBase httpContext)
    {
      string token = httpContext.Request["token"];
      if (string.IsNullOrEmpty(token))
      {
        return false;
      }
      else
      {
        return true;
      }
    }
  }
Create a new class that inherits AuthorizeAttribute, and rewrites the AuthorizeCore method in it. What this pseudo code implements is that if the token has a value, it returns true, if not, it returns false, and it is marked to require authorization. Above the access method:
[TokenValidate]
public JsonResult AuthorizeFilterTest()
{
  return Json(new ReturnModel_Common { msg = "hello world!" })
}
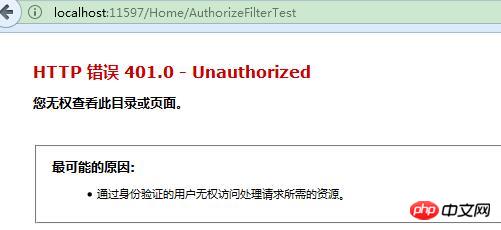
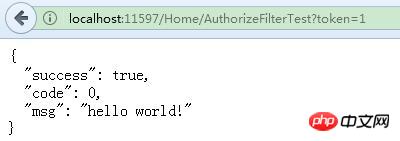
After marking TokenValidate, the AuthorizeCore method is executed before AuthorizeFilterTest. If AuthorizeCore returns true, then the authorization successfully executes the code in AuthorizeFilterTest, otherwise the authorization fails. Not passing token:

Passing token:

Without passing token, when authorization fails, it enters the MVC default unauthorized mode. page. An improvement is made here: regardless of whether the authorization is successful or failed, the return value format is guaranteed to be consistent, which facilitates front-end processing. At this time, just rewrite the HandleUnauthorizedRequest method in the AuthorizeAttribute class:
/// <summary>
/// 授权失败处理
/// </summary>
/// <param name="filterContext"></param>
protected override void HandleUnauthorizedRequest(AuthorizationContext filterContext)
{
  base.HandleUnauthorizedRequest(filterContext);

  var json = new JsonResult();
  json.Data = new ReturnModel_Common
  {
    success = false,
    code = ReturnCode_Interface.Token过期或错误,
    msg = "token expired or error"
  };
  json.JsonRequestBehavior = JsonRequestBehavior.AllowGet;
  filterContext.Result = json;
}
Effect:

Practical: The most widely used application of authorization filter is in Permission management system. User login After successful user login, the server outputs an encrypted token. Subsequent All requests will bring this token. The server unlocks the token in the AuthorizeCore method to get the user ID. Based on the user ID, it goes to the database to check whether there is permission to request the current interface . If so, it returns true, otherwise it returns false. . The advantage of using this method for authorization compared to Cookie and Session if the login is successful is that one interface can be used both on the PC side and the App side.
2.HandleError exception filter
The exception filter handles code exceptions and is executed when the system code throws an error. MVC has implemented exception filtering by default. and registered to FilterConfig.cs in the App_Start directory:
filters.Add(new HandleErrorAttribute());
This is effective for the entire system. Any interface or page error will execute MVC's default Exception handling and return a default Error page: Views/Shared/Error (this page can only be seen when the program is sent to the server to report an error. The local debugging has high permissions, so you can still see the specific error information)
@{
  Layout = null;
}
<!DOCTYPE html>
<html>
<head>
  <meta http-equiv="Content-Type" content="text/html; charset=utf-8" />
  <meta name="viewport" content="width=device-width" />
  <title>错误</title>
</head>
<body>
  <hgroup>
    <h1>错误。</h1>
    <h2>处理你的请求时出错。</h2>
  </hgroup>
</body>
</html>
The default exception filter obviously cannot meet the usage requirements. The exception filter has been rewritten to meet the actual needs of the project:
1) When reporting an error, you can record the controller and method where the error code is located, as well as the # when reporting the error. ##Request parameters and time;
2) Return JSON in a specific format to facilitate front-end processing. Because most of the system now uses ajax requests, if an error is reported, it returns to the MVC default error page, which is difficult to handle on the front end. Create a new class LogExceptionAttribute that inherits HandleErrorAttribute, and overrides the internal OnException method: public override void OnException(ExceptionContext filterContext)
{
if (!filterContext.ExceptionHandled)
{
string controllerName = (string)filterContext.RouteData.Values["controller"];
string actionName = (string)filterContext.RouteData.Values["action"];
string param = Common.GetPostParas();
string ip = HttpContext.Current.Request.UserHostAddress;
LogManager.GetLogger("LogExceptionAttribute").Error("Location:{0}/{1} Param:{2}UserIP:{3} Exception:{4}", controllerName, actionName, param, ip, filterContext.Exception.Message);
filterContext.Result = new JsonResult
{
Data = new ReturnModel_Common { success = false, code = ReturnCode_Interface.服务端抛错, msg = filterContext.Exception.Message },
JsonRequestBehavior = JsonRequestBehavior.AllowGet
};
}
if (filterContext.Result is JsonResult)
filterContext.ExceptionHandled = true;//返回结果是JsonResult,则设置异常已处理
else
base.OnException(filterContext);//执行基类HandleErrorAttribute的逻辑,转向错误页面
}
异常过滤器就不像授权过滤器一样标注在方法上面了,直接到App_Start目录下的FilterConfig.cs注册下,这样所有的接口都可以生效了:
filters.Add(new LogExceptionAttribute());
异常过滤器里使用了NLog作为日志记录工具,Nuget安装命令:
Install-Package NLog
Install-Package NLog.Config
相比Log4net,NLog配置简单,仅几行代码即可,NLog.config:
<?xml version="1.0" encoding="utf-8" ?>
<nlog xmlns="http://www.nlog-project.org/schemas/NLog.xsd" xmlns:xsi="http://www.w3.org/2001/XMLSchema-instance">
 <targets>
  <target xsi:type="File" name="f" fileName="${basedir}/log/${shortdate}.log" layout="${uppercase:${level}} ${longdate} ${message}" />
  <target xsi:type="File" name="f2" fileName="D:\log\MVCExtension\${shortdate}.log" layout="${uppercase:${level}} ${longdate} ${message}" />
 </targets>
 <rules>
  <logger name="*" minlevel="Debug" writeTo="f2" />
 </rules>
</nlog>
如果报错,日志就记录在D盘的log目录下的MVCExtension目录下,一个项目一个日志目录,方便管理。全部配置完成,看下代码:
public JsonResult HandleErrorFilterTest()
{
  int i = int.Parse("abc");
  return Json(new ReturnModel_Data { data = i });
}字符串强转成int类型,必然报错,页面响应:

同时日志也记录下来了:

3.ActionFilter自定义过滤器
自定义过滤器就更加灵活了,可以精确的注入到请求前、请求中和请求后。继承抽象类ActionFilterAttribute并重写里面的方法即可:
public class SystemLogAttribute : ActionFilterAttribute
{
  public string Operate { get; set; }

  public override void OnActionExecuted(ActionExecutedContext filterContext)
  {
    filterContext.HttpContext.Response.Write("<br/>" + Operate + ":OnActionExecuted");
    base.OnActionExecuted(filterContext);
  }

  public override void OnActionExecuting(ActionExecutingContext filterContext)
  {
    filterContext.HttpContext.Response.Write("<br/>" + Operate + ":OnActionExecuting");
    base.OnActionExecuting(filterContext);
  }

  public override void OnResultExecuted(ResultExecutedContext filterContext)
  {
    filterContext.HttpContext.Response.Write("<br/>" + Operate + ":OnResultExecuted");
    base.OnResultExecuted(filterContext);
  }

  public override void OnResultExecuting(ResultExecutingContext filterContext)
  {
    filterContext.HttpContext.Response.Write("<br/>" + Operate + ":OnResultExecuting");
    base.OnResultExecuting(filterContext);
  }
}
这个过滤器适合做系统操作日志记录功能:
[SystemLog(Operate = "添加用户")]
public string CustomerFilterTest()
{
  Response.Write("<br/>Action 执行中...");
  return "<br/>Action 执行结束";
}
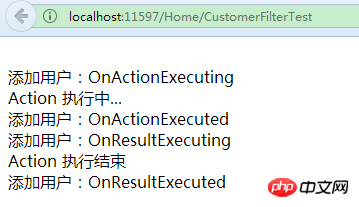
看下结果:

四个方法执行顺序:OnActionExecuting—>OnActionExecuted—>OnResultExecuting—>OnResultExecuted,非常精确的控制了整个请求过程。
实战中记录日志过程是这样的:在OnActionExecuting方法里写一条操作日志到数据库里,全局变量存下这条记录的主键,到OnResultExecuted方法里说明请求结束了,这个时候自然知道用户的这个操作是否成功了,根据主键更新下这条操作日志的是否成功字段。
二、模型绑定(ModelBinder)
先看一个普通的方法:
public ActionResult Index(Student student)
{
  return View();
}这个方法接受的参数是一个Student对象,前端传递过来的参数跟Student对象里的属性保持一直,那么就自动被绑定到这个对象里了,不需要在方法里new Student这个对象并挨个绑定属性了,绑定的过程由MVC中的DefaultModelBinder完成的,DefaultModelBinder同时继承了IModelBinder接口,现在就利用IModelBinder接口和DefaultModelBinder来实现更加灵活的模型绑定。
场景一、前端传过来了一个加密的字符串token,方法里需要用token里的某些字段,那就得在方法里接收这个字符串、解密字符串、转换成对象,这样一个方法还好说,多了的话重复代码非常多,就算提取通用方法,还是要在方法里调用这个通用方法,有没有办法直接在参数里就封装好这个对象?
模型绑定的对象:
public class TokenModel
{
  /// <summary>
  /// 主键
  /// </summary>
  public int Id { get; set; }

  /// <summary>
  /// 姓名
  /// </summary>
  public string Name { set; get; }

  /// <summary>
  /// 简介
  /// </summary>
  public string Description { get; set; }

}
新建一个TokenBinder继承IModelBinder接口并实现其中的BindModel方法:
public class TokenBinder : IModelBinder
{
  public object BindModel(ControllerContext controllerContext, ModelBindingContext bindingContext)
  {
    var token = controllerContext.HttpContext.Request["token"];
    if (!string.IsNullOrEmpty(token))
    {
      string[] array = token.Split(':');
      if (array.Length == 3)
      {
        return new TokenModel() { Id = int.Parse(array[0]), Name = array[1], Description = array[2] };
      }
      else
      {
        return new TokenModel() { Id = 0 };
      }
    }
    else
    {
      return new TokenModel() { Id = 0 };
    }
  }
}
这个方法里接收了一个token参数,并对token参数进行了解析和封装。代码部分完成了需要到Application_Start方法里进行下注册:
ModelBinders.Binders.Add(typeof(TokenModel), new TokenBinder());
现在模拟下这个接口:
public JsonResult TokenBinderTest(TokenModel tokenModel)
{
  var output = "Id:" + tokenModel.Id + ",Name:" + tokenModel.Name + ",Description:" + tokenModel.Description;
  return Json(new ReturnModel_Common { msg = output });
}
调用下:

可以看出,“1:汪杰:oppoic.cnblogs.com”已经被绑定到tokenModel这个对象里面了。但是如果稍复杂的模型绑定IModelBinder就无能为力了。
场景二、去除对象某个属性的首位空格
public class Student
{
  public int Id { get; set; }

  public string Name { get; set; }

  public string Class { get; set; }
}
如果前端传来的Name属性有空格,如何去除呢?利用DefaultModelBinder即可实现更灵活的控制
public class TrimModelBinder : DefaultModelBinder
{
  protected override object GetPropertyValue(ControllerContext controllerContext, ModelBindingContext bindingContext, PropertyDescriptor propertyDescriptor, IModelBinder propertyBinder)
  {
    var obj = base.GetPropertyValue(controllerContext, bindingContext, propertyDescriptor, propertyBinder);
    if (obj is string && propertyDescriptor.Attributes[typeof(TrimAttribute)] != null)//判断是string类型且有[Trim]标记
    {
      return (obj as string).Trim();
    }
    return obj;
  }
}
标注下需要格式化首位属性的实体:
[ModelBinder(typeof(TrimModelBinder))]
public class Student
{
  public int Id { get; set; }

  [Trim]
  public string Name { get; set; }

  public string Class { get; set; }
}
好了,测试下:
public JsonResult TrimBinderTest(Student student)
{
  if (string.IsNullOrEmpty(student.Name) || string.IsNullOrEmpty(student.Class))
  {
    return Json(new ReturnModel_Common { msg = "未找到参数" });
  }
  else
  {
    return Json(new ReturnModel_Common { msg = "Name:" + student.Name + ",长度:" + student.Name.Length + " Class:" + student.Class + ",长度:" + student.Class.Length });
  }
}
可见,标注了Trim属性的Name长度是去除空格的长度:7,而没有标注的Class属性的长度则是6。

【相关推荐】
2. ASP.NET教程
The above is the detailed content of Detailed explanation of examples of filters and model binding in ASP.NET. For more information, please follow other related articles on the PHP Chinese website!

