





在css组件化开发中,避免第三方库盒模型重置污染全局的最佳实践是使用shadow dom结合`@layer`指令。通过web components将样式隔离在影子树内,并利用css层叠顺序中的层(layer)机制,确保组件内的样式优先级可控且不会泄漏到文档流中。这样既保留了组件的独立性,又防止了全局样式的意外覆盖。

如何配置Shadow DOM以隔离第三方样式
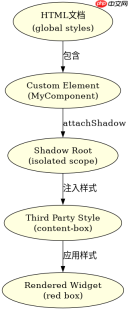
使用Shadow DOM可以将组件的DOM和样式完全隔离,第三方库的样式无法穿透进入影子树,从而避免污染。具体做法是创建一个自定义元素,并在其`connectedCallback`中附加一个影子根节点,然后将第三方组件渲染到该影子根中。由于影子树的样式作用域限制,外部全局样式不会影响内部组件,反之亦然。
    <meta charset="UTF-8"><title>Shadow DOM Isolation;/title>
    <style>
        /* 全局样式 */
        body {
            font-family: sans-serif;
        }
        .global-box {
            box-sizing: border-box;
            padding: 20px;
            background: lightblue;
        }
    </style>
</title><div class="global-box">
        Global Content
        <my-component id="comp"></my-component>
</div>

    <script>
        class MyComponent extends HTMLElement {
            constructor() {
                super();
                this.attachShadow({ mode: 'open' });
            }

            connectedCallback() {
                // 模拟第三方库样式注入
                const style = document.createElement('style');
                style.textContent = `
                    :host {
                        display: block;
                        margin: 10px;
                    }
                    .third-party-widget {
                        box-sizing: content-box; /* 第三方库可能使用的非标准盒模型 */
                        width: 100px;
                        height: 100px;
                        background: red;
                        color: white;
                        text-align: center;
                        line-height: 100px;
                    }
                `;
                this.shadowRoot.appendChild(style);

                // 渲染第三方组件内容
                const widget = document.createElement('div');
                widget.className = 'third-party-widget';
                widget.textContent = 'Widget';
                this.shadowRoot.appendChild(widget);
            }
        }

        customElements.define('my-component', MyComponent);
    </script>
上述代码创建了一个名为`MyComponent`的自定义元素。在其`connectedCallback`中,我们附加了一个影子根,并动态注入了包含`.third-party-widget`类的样式。由于影子树的隔离特性,全局的`.global-box`样式不会影响影子树内的元素,而影子树内的`box-sizing: content-box`也不会影响全局。运行此代码后,全局盒子保持`border-box`,而组件内的红色盒子保持`content-box`,两者互不干扰。
如何利用@layer管理层叠冲突
当无法使用Shadow DOM时,可以使用CSS `@layer`指令来显式定义样式层叠顺序。通过将第三方库的样式放入特定的层,并确保该层的优先级低于或高于你的应用样式,可以有效控制盒模型的最终计算方式。具体做法是在CSS文件中声明`@layer`,并将第三方库的reset样式放在一个低优先级的层中,而将应用的reset放在高优先级层中。

    <meta charset="UTF-8"><title>CSS Layer Management</title><style>
        /* 定义层顺序:先声明的层优先级低,后声明的层优先级高 */
        @layer reset, third-party, app;

        /* 1. Reset层:基础重置 */
        @layer reset {
            *, *::before, *::after {
                box-sizing: border-box;
            }
        }

        /* 2. Third-party层:模拟第三方库样式 */
        @layer third-party {
            .widget {
                box-sizing: content-box;
                width: 100px;
                height: 100px;
                background: green;
                color: white;
                text-align: center;
                line-height: 100px;
            }
        }

        /* 3. App层:应用样式,优先级最高 */
        @layer app {
            .widget {
                box-sizing: border-box;
                padding: 10px;
            }
        }
    </style><div class="widget">Widget</div>
这段代码展示了如何使用`@layer`来管理样式优先级。首先声明了三个层:`reset`、`third-party`和`app`。根据CSS规范,后声明的层具有更高的优先级。因此,`app`层中的样式会覆盖`third-party`层中的同名属性。在这个例子中,尽管第三方库设置了`box-sizing: content-box`,但应用层的`box-sizing: border-box`会生效,从而确保组件遵循应用的盒模型标准。运行此代码后,绿色盒子将表现为`border-box`,并且包含10px的内边距,符合应用预期。
当第三方库强制使用!important时会发生什么
如果第三方库在样式中使用了`!important`来强制指定盒模型,即使使用了`@layer`,也需要特别注意层的优先级设置。在`@layer`中,高优先级层中的`!important`可以覆盖低优先级层中的`!important`。具体做法是将应用的关键样式放在最高优先级的层中,并使用`!important`来确保其生效。然而,这种做法应谨慎使用,因为它会增加维护成本。
    <meta charset="UTF-8"><title>Handling !important</title><style>
        @layer third-party, app;

        @layer third-party {
            .force-widget {
                box-sizing: content-box !important;
                width: 100px;
                height: 100px;
                background: orange;
                color: black;
                text-align: center;
                line-height: 100px;
            }
        }

        @layer app {
            .force-widget {
                box-sizing: border-box !important;
                padding: 5px;
            }
        }
    </style><div class="force-widget">Force Widget</div>
在此示例中,第三方库使用`!important`强制设置`box-sizing: content-box`。为了覆盖这一行为,我们在`app`层中也使用了`!important`来设置`box-sizing: border-box`。由于`app`层的优先级高于`third-party`层,因此应用层的样式将生效。运行此代码后,橙色盒子将表现为`border-box`,并包含5px的内边距。需要注意的是,频繁使用`!important`会导致样式难以调试和维护,因此应尽量避免这种情况,优先考虑使用Shadow DOM或重构第三方库。
前端入门到VUE实战笔记:立即使用
在学习笔记中,你将探索 前端 的入门与实战技巧!