


This article is created in collaboration with Buddy. Thank you for supporting the partners who made SitePoint possible.
This article will guide you on how to set up a continuous integration/deployment pipeline for branch workflows. We will use the Buddy CI/CD service to set up these pipelines. We will use a basic JavaScript project where we will set up several development branches. I'll show you how to automate tests on each type of branch. I'll also introduce the concept of branch workflow and show some examples you can take in your project.
Key Points
- Git branches are crucial in software development because they allow developers to handle different features or bug fixes simultaneously without affecting the main code base. This improves efficiency and reduces the risk of introducing errors into production code.
- Different Git branch policies include zero branch policies, development branch policies, feature branch policies, and Gitflow branch policies. Each strategy has its pros and cons, and the choice depends on the size of the project, the number of developers, and the complexity of the project.
- Buddy CI/CD service can be used to set up a continuous integration/deployment pipeline for your branch workflow. This makes it possible to automate tasks such as running tests and deploying to web servers.
- Using Buddy, you can set up pipelines for different Git branch policies, including the master branch, development/integration branch, feature branch, and hot repair branch. Each pipeline can be configured to run specific actions based on the role of the branch.
- It is recommended to set up long-term branches on the shared repository first to create pipelines efficiently. Additionally, you can use wildcards to set up pipes for multiple functions and hot repair branches.
Prerequisites
To learn this tutorial, you only need basic Node.js skills. You also need to be familiar with Git. Here are some articles that can help you:
- Beginner of Git
- Git Team Collaboration
- Our book, "Jump Start Git"
In order to set up our pipeline, we will need to write some tests using Jest. If you are not familiar with Jest, you don't need to learn it - the focus of this article is to learn how to set up a pipeline that will automatically select new branches and build them for you. Before we get started, we should look at the various branching strategies we can use.
Zero branch strategy
 Zero branch strategy is just a saying that "you are not using any branch strategy". It is also known as the basic workflow. You only have one master branch where you can commit and build your version directly. This strategy is convenient and good if the project meets the following conditions:
- Small and simple
- Empty updates are almost unnecessary
- Managed by a single developer
This type of projects includes tutorials, demonstrations, prototypes, introductory project templates, and personal projects. However, this method has several disadvantages:
- If more than one person is working on the project, multiple merge conflicts are likely to occur
- You will not be able to develop multiple functions at the same time and fix the problem
- Delete and restore functions will be a difficult task
- Your team will spend too much time dealing with version control issues instead of developing new features
All of these problems can be solved by adopting branching strategies. This should provide you with:
- Ability to work independently and push changes to a shared repository without affecting your team members
- Ability to merge teammates' code with your changes and quickly resolve any conflicts that may arise
- Ensure that code standards are maintained and collaboration work goes smoothly regardless of team size
Please note that you are free to choose from many types of branch workflows. You can also create custom branch workflows that suit you. Let's start with the simplest branching strategy.
Develop branch strategy
 In this policy, you will set up a long-term branch called develop that runs in parallel with the main branch. All work is first committed to the develop branch. This is a safe place where you can introduce code that can break your project. You need a test strategy to ensure that errors are not introduced into the main branch when the changes are merged.
The advantages of this workflow are:
- Easy to implement
- As long as you perform experimental work on the develop branch, the main branch will remain stable and healthy
- Hot repair can be implemented on the main branch at any time while the function is currently being implemented
The disadvantages of this workflow are:
- Not to develop multiple functions at the same time
- Only one developer (up to two) can actively participate in the project
- Using only develop branch deletion and recovery features is a challenge
Let's look at another workflow that can alleviate these challenges.
Function branch strategy
 In this workflow, you set up a new feature branch every time you want to develop a new feature. If there is a problem, you can always apply hot fixes on the main branch. Developers need to extract the latest fix from the main branch before they can merge their feature branches into the main branch.
To keep track of the features and bug fixes currently under development, you need to make a naming convention for the branch. Here are some format suggestions you can find on the internet:
- users/username/description
- users/username/workitem
- bugfix/description
- features/feature-name
- features/feature-area/feature-name
- features/id ("id" is generated by project management tools)
- hotfix/description
The advantages of this strategy are:
- You can have a large number of developers involved in your project at the same time and handle multiple functions
- If you change your mind, it's easy to delete features and restore them later
- You can easily track what each developer is working on
The disadvantages of this strategy are:
- Simultaneous development of functions is not always feasible for implementing one function that depends on another undeveloped function. This means that the function cannot be pushed to the main branch until all dependencies are completed
Let's look at the next strategy and see how we can mitigate this problem.
Gitflow branch strategy

If you can combine the "development" and "features" branch workflows, you will get a solution that can eliminate each other's shortcomings. Vincent Driessen wrote a blog post that describes an advanced git branching model that helps large teams collaborate efficiently on complex projects and minimize version control issues.
Gitflow is a customizable model that allows you to choose the features that best suit your project and team. If you use Gitflow, you can take Daniel Kummer's git extension for git. These tools allow developers to perform advanced repository operations based on Vincent's model. I won't go into this in depth, but here are some things you need to know.
Pros:
- For large teams working on complex projects
- Easy to track activity features and organizational versions
Disadvantages:
- It's too complicated for small projects
Now let's see how to use the Buddy CI service to automate tasks on our branch.
Branch model pipeline
We first need to set up a simple project and use it to set up our pipeline. We will create a pipeline that automatically extracts changes and runs tests. First, create a new GitHub repository. Name it buddy-demo.

Next, download the following entry project and push it to your repository:
<code>$ git clone git@github.com:brandiqa/react-parcel-starter.git buddy-demo
$ git remote rm origin
# 将`username`替换为您自己的用户名
$ git remote add origin git@github.com:username/buddy-demo.git
$ git config master.remote origin
$ git config master.merge refs/heads/master
$ git push -u origin master
</code>
This project is a simple React project built using Parcel. You can run the following command to make sure it is running:
<code>$ npm install
$ npm start
</code>
If you are using Visual Studio Code, press F5 to launch the browser. Otherwise, open the browser page and navigate to localhost:1234.

As you can see, nothing special. Before we deploy it to Buddy CI, we need to write a test. We will use the Jest test framework for this:
<code>$ git clone git@github.com:brandiqa/react-parcel-starter.git buddy-demo
$ git remote rm origin
# 将`username`替换为您自己的用户名
$ git remote add origin git@github.com:username/buddy-demo.git
$ git config master.remote origin
$ git config master.merge refs/heads/master
$ git push -u origin master
</code>
Update the package.json script section to run jest when the npm test command is executed.
<code>$ npm install
$ npm start
</code>
Let's update a little bit srcApp.jsx:
<code>$ npm install -D jest
</code>
Next, let's write a passable test. Create the file App.test.js and insert this code:
<code> "scripts": {
   //...
    "test": "jest"
  },
</code>
Execute npm test command to confirm that our test has passed.

Submit your changes and push them to your GitHub repository. Next, we will set up our CI pipeline on Buddy. If you are not familiar with the platform, just sign up for a free account using your GitHub account. Please note that Buddy supports many remote repository services other than GitHub:
 No matter which service provider you choose, Buddy lists repositories for which you can set up automation. In this example, we will select the buddy-demo project. Click the "Add New Pipeline" button and fill in the following details on the next page:
- Name – Main branch
- Trigger Mode – When Pushing
- Brand – Single branch: Master branch
 In our main branch pipeline, we will set up actions for:
- Run test
- Bundle app
- Deploy to web server
In the next page, you will see different ways to define the action. Select Node.js, and on the next page, make sure the following command is specified:
<code><div>>
  <h1 id="gt">></h1>React Parcel Starter Kit>
  <p>></p>This page is on master branch!>
</div>>
</code>
 You can rename the operation name to Run Test in the Actions tab. What I want to point out is that if your test requires database services, you can set one through the Services tab:

Most popular databases are already supported. Just select the database type and provide connection details and credentials. When finished, click the Add This button. On the next page, click the plus button at the bottom to add the Bundle Resource action. Select Node.js again and enter the following command on the next page:
<code>$ git clone git@github.com:brandiqa/react-parcel-starter.git buddy-demo
$ git remote rm origin
# 将`username`替换为您自己的用户名
$ git remote add origin git@github.com:username/buddy-demo.git
$ git config master.remote origin
$ git config master.merge refs/heads/master
$ git push -u origin master
</code>
Rename the action to Bundle Resources in the Actions tab. Click Add this when you are finished. Click the plus sign again to add the Deploy to Production action. Buddy native support for deploying projects to different types of hosting vendors:
 If you have an account in any of these services, feel free to use any deployment options. If you don't have one, select a provider that allows you to set up a free account to deploy your application. In my case, I already have a shared web hosting plan account that I can use. Typically, you will have your main website www.domainname.com to host a live production version of your project.
You need to have a separate staging site (usually hidden from the public) that is deployed from your development or integration branch pipeline. A staging site can be just a subdomain and search engines should not index it. The staging site will allow developers, project managers, and testers to confirm that new features are working properly before pushing to the live production site.
To deploy your application to a shared or dedicated web hosting server (using CPanel), just use the FTP method. Buddy also provides an sFTP method that encrypts your project resource package when uploaded to the server. Here is an example of how I set up my:
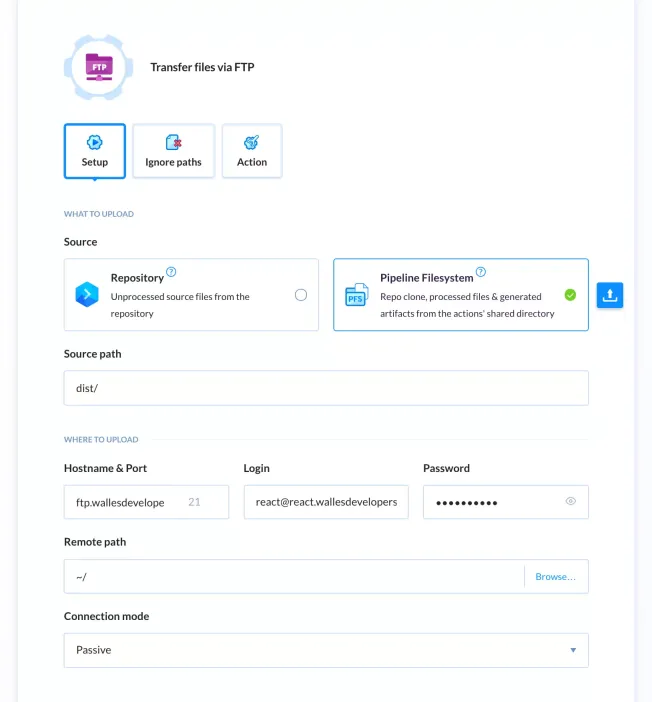 You need to set up a new FTP account using your CPanel. Make sure that the home directory of your new FTP user account points directly to the www or subdomain folder. Otherwise, you may not be able to access the correct managed directory via FTP. After setting up all three operations in the pipeline, you can:
- Run your pipeline manually
- Push new code to your remote repository and Buddy will automatically run it for you
After completion, the complete pipeline looks like this:
 Suppose you are using a Gitflow workflow or something similar, you may need to set up another pipeline for:
- Development/Integration Branch
- Function branch
- Hot repair branch
The development branch pipeline is almost the same as the main branch pipeline. However, you need to provide a different configuration for the deployment in order to deploy the code to the staging site. Functional and hot repair branch pipes only need to be configured at least for testing operations. You may want to limit the number of tests you can run in the feature branch pipeline. You can easily do this in Jest by simply adding this to the test command: jest --coverage --changedSince=master. This will only test new code that has not been pushed to the main branch.
Since there will be multiple features and hot fix branches, you may want to know how to set up a pipeline for this situation. Very simple - just use the wildcard option:
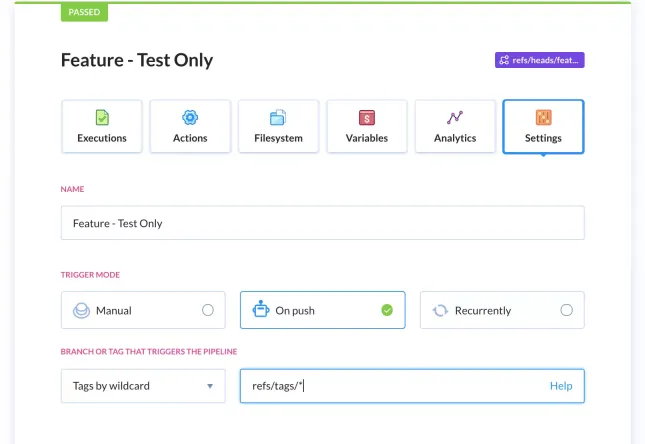 To confirm that your develop/feature*/hotfix* pipeline is working, just create a branch on your computer. In this example, let's create a random feature branch:
<code>$ git clone git@github.com:brandiqa/react-parcel-starter.git buddy-demo
$ git remote rm origin
# 将`username`替换为您自己的用户名
$ git remote add origin git@github.com:username/buddy-demo.git
$ git config master.remote origin
$ git config master.merge refs/heads/master
$ git push -u origin master
</code>
Then create a new test in App.test.js:
<code>$ npm install
$ npm start
</code>
Next, commit the changes and push the branch to your GitHub repository:
<code>$ npm install -D jest
</code>
If you quickly switch to your Buddy account dashboard, you should see your pipeline pick up your new branch and run the action you defined. This is how we set up pipelines for any branch policy workflow that the project has adopted.
Summary
The last thing to note is that if you plan to have long-term branches, it is best to set them up in the shared repository first. This way, when you start creating a new pipeline, you can simply use the Select Branch option to select your long-term branch.
We have now completed this tutorial. As a challenge, continue to set up pipelines for hot repairs and development. Create some branches and write some failed tests to see what happens. You can also continue to research more about Git branching strategies. You can even install git-flow and use the tool to customize your own branch workflow. Then, set up your Buddy pipeline to support your custom git branch workflow.
FAQs about using Git branching (FAQ)
What is the significance of using Git branch in software development?
Git branch is a critical part of any software development process. They allow developers to handle different features or bug fixes simultaneously without affecting the main code base. This means developers can experiment with new ideas in a secure environment without risking breaking existing code. If the new feature or bug fix is successful, you can merge it back to the main code base. This makes the development process more efficient and reduces the risk of introducing errors into production code.
How to create a new branch in Git?
Creating a new branch in Git is simple. You can use the git branch command followed by the name of the new branch. For example, git branch new-feature will create a new branch called "new-feature". After creating a branch, you can switch to that branch using the git checkout command as follows: git checkout new-feature.
How to merge changes from one branch to another?
Merging changes from one branch to another is done in Git using the git merge command. First, you need to switch to the branch you want to merge the changes to. This can be done using the git checkout command. Once you are on the correct branch, you can use git merge
What is Git branch conflict and how to resolve it?
Git branch conflict occurs when two or more developers make changes to the same part of the code base in different branches and then try to merge those changes. Git doesn't know what changes to keep and what changes to discard, resulting in conflicts. To resolve conflicts, you need to manually edit the conflicting files to decide which changes to keep. After the conflict is resolved, you can use git add to add the resolved files to the staging area and then use git commit to commit the changes.
How to delete a branch in Git?
Deleting branches in Git is done using the git branch -d command followed by the name of the branch. For example, git branch -d old-feature will delete the branch named "old-feature". However, if the branch has changes that have not been merged, Git will not allow you to delete the branch. If you are sure you want to delete branches and lose these changes, you can use the -D option instead, as shown below: git branch -D old-feature.
How to view all branches in Git repository?
You can use the git branch command (without any parameters) to view all branches in the Git repository. This lists all branches in the repository, the current branch is highlighted and marked with an asterisk.
What is the difference between a local branch and a remote branch in Git?
The local branch in Git is a branch that only exists on the local machine, while the remote branch is a branch that exists on the remote repository. When cloning the repository, Git creates local branches for all remote branches. You can handle these local branches and then push changes to the remote branch when ready.
How to rename a Git branch?
Renaming a Git branch is done using the git branch -m command followed by the old branch name and the new branch name. For example, git branch -m old-name new-name will rename the branch "old-name" to "new-name". If you are currently on the branch you want to rename, you can omit the old branch name as follows: git branch -m new-name.
How to restore changes in Git branch?
You can use the git revert command followed by a commit hash to restore changes in the Git branch. This creates a new commit, undoing changes made in the specified commit. For example, git revert a867b4af will create a new commit, undoing changes made in a commit that hashed to "a867b4af".
How to view the commit history of Git branch?
You can use the git log command to view the commit history of the Git branch. This will display a list of all commits made on the current branch in reverse chronological order. If you want to view the commit history for different branches, you can specify the branch name as follows: git log branch-name.
The above is the detailed content of How to Use Git Branches & Buddy to Organize Project Code. For more information, please follow other related articles on the PHP Chinese website!

 Serverless Image Processing Pipeline with AWS ECS and LambdaApr 18, 2025 am 08:28 AM
This tutorial guides you through building a serverless image processing pipeline using AWS services. We'll create a Next.js frontend deployed on an ECS Fargate cluster, interacting with an API Gateway, Lambda functions, S3 buckets, and DynamoDB. Th
 CNCF Arm64 Pilot: Impact and InsightsApr 15, 2025 am 08:27 AM
This pilot program, a collaboration between the CNCF (Cloud Native Computing Foundation), Ampere Computing, Equinix Metal, and Actuated, streamlines arm64 CI/CD for CNCF GitHub projects. The initiative addresses security concerns and performance lim
 Building a Network Vulnerability Scanner with GoApr 01, 2025 am 08:27 AM
This Go-based network vulnerability scanner efficiently identifies potential security weaknesses. It leverages Go's concurrency features for speed and includes service detection and vulnerability matching. Let's explore its capabilities and ethical
 Top 10 Best Free Backlink Checker Tools in 2025Mar 21, 2025 am 08:28 AM
Website construction is just the first step: the importance of SEO and backlinks Building a website is just the first step to converting it into a valuable marketing asset. You need to do SEO optimization to improve the visibility of your website in search engines and attract potential customers. Backlinks are the key to improving your website rankings, and it shows Google and other search engines the authority and credibility of your website. Not all backlinks are beneficial: Identify and avoid harmful links Not all backlinks are beneficial. Harmful links can harm your ranking. Excellent free backlink checking tool monitors the source of links to your website and reminds you of harmful links. In addition, you can also analyze your competitors’ link strategies and learn from them. Free backlink checking tool: Your SEO intelligence officer


Hot AI Tools

Undresser.AI Undress
AI-powered app for creating realistic nude photos

AI Clothes Remover
Online AI tool for removing clothes from photos.

Undress AI Tool
Undress images for free

Clothoff.io
AI clothes remover

AI Hentai Generator
Generate AI Hentai for free.

Hot Article
Hot Tools

MinGW - Minimalist GNU for Windows
This project is in the process of being migrated to osdn.net/projects/mingw, you can continue to follow us there. MinGW: A native Windows port of the GNU Compiler Collection (GCC), freely distributable import libraries and header files for building native Windows applications; includes extensions to the MSVC runtime to support C99 functionality. All MinGW software can run on 64-bit Windows platforms.

SublimeText3 English version
Recommended: Win version, supports code prompts!

SublimeText3 Chinese version
Chinese version, very easy to use

SAP NetWeaver Server Adapter for Eclipse
Integrate Eclipse with SAP NetWeaver application server.

PhpStorm Mac version
The latest (2018.2.1) professional PHP integrated development tool

