


Protecting your WordPress site from cyberattacks is crucial. One effective strategy is to restrict access to your login page using IP address limitations. This guide explains how to implement this security measure for both static and dynamic IP addresses.

Key Concepts:
- Limiting login access to pre-approved IP addresses significantly reduces vulnerability to brute-force attacks.
- Static IP addresses are suitable for users who access the site from a limited number of locations.
- Dynamic IP addresses are necessary for users who access the site from various locations due to factors like remote work or frequent travel.
- IP restrictions are implemented by modifying the
.htaccessfile in your site's root directory. Always back up this file before making any changes. - While effective, IP restrictions are not a standalone solution. Combine them with strong passwords, two-factor authentication, and regular software/plugin updates for optimal security.
WordPress Security Threats:
Before proceeding, understand common threats:
- Brute-force attacks: Automated attempts to guess login credentials.
- Informative login failures: WordPress's default feedback (e.g., "incorrect password") aids brute-force attempts.
- Known WordPress versions: Exploiting vulnerabilities specific to your WordPress version.
- Global registration: Enabling global registration increases the attack surface.
- Unrestricted theme/plugin access: File editing access can be exploited by hackers.
Safety Precautions:
Before modifying your site's files:
- Back up your
.htaccessfile. - Consider backing up your entire website. Plugins like VaultPress can assist.
Static IP Address Restriction:
Use this method if you access your site from a consistent set of locations.
Steps:
- Identify your IP address (e.g., using whatismyipaddress.com).
- Locate your
.htaccessfile (in your site's root directory). - Open the file using a text editor (cPanel's built-in editor or a desktop editor like Notepad).
- Add the following code to the top of the
.htaccessfile:
<code>RewriteEngine on

RewriteCond %{REQUEST_URI} ^(.*)?wp-admin$

RewriteCond %{REMOTE_ADDR} !^12.345.678.90

RewriteCond %{REMOTE_ADDR} !^YOUR_IP_ADDRESS_HERE$

RewriteCond %{REMOTE_ADDR} !^ANOTHER_IP_ADDRESS_HERE$

RewriteRule ^(.*)$ - [R=403,L]</code>
Replace YOUR_IP_ADDRESS_HERE and ANOTHER_IP_ADDRESS_HERE with your allowed IP addresses. Add more RewriteCond lines as needed for additional authorized IPs.
- Save the
.htaccessfile.
Dynamic IP Address Restriction:
Use this if you or your team access the site from multiple, changing locations.
Steps:
- Locate your
.htaccessfile. - Open it with a text editor.
- Add the following code to the top:
<code>RewriteEngine on

RewriteCond %{REQUEST_URI} ^(.*)?wp-admin$

RewriteCond %{REMOTE_ADDR} !^12.345.678.90

RewriteCond %{REMOTE_ADDR} !^YOUR_IP_ADDRESS_HERE$

RewriteCond %{REMOTE_ADDR} !^ANOTHER_IP_ADDRESS_HERE$

RewriteRule ^(.*)$ - [R=403,L]</code>
Replace your-site's-name.com with your website's URL.
- Save the
.htaccessfile.
This method prevents external access, ensuring only internal site navigation can reach the login page.
Conclusion:
Implementing IP restrictions enhances WordPress security. Remember that this is one layer of protection; combine it with other best practices for comprehensive security.

Frequently Asked Questions (FAQs): (The original FAQs are paraphrased and consolidated for brevity and clarity)
- Benefits of IP restrictions: Increased security against unauthorized access and brute-force attacks.
- Finding your IP address: Search "What is my IP address" on Google.
-
Multiple users: Add each user's IP address to the
.htaccessfile. -
Accidental self-block: Access your site files via FTP and remove your IP from the
.htaccessfile. - Access from different locations (dynamic IP): Use the dynamic IP method.
- Other security measures: Strong passwords, two-factor authentication, regular updates are essential.
-
Changing IP address: Update the
.htaccessfile with your new IP. - WordPress.com sites: IP restrictions are not possible on WordPress.com.
-
Removing IP restrictions: Remove the relevant code from the
.htaccessfile and clear your cache. -
Specific page restrictions: Modify the
.htaccessfile in the target page's directory.
Remember to always back up your files before making any changes.
The above is the detailed content of Setting IP Restrictions for the WordPress Login Page. For more information, please follow other related articles on the PHP Chinese website!

 How to easily move your blog from WordPress.com to WordPress.orgApr 18, 2025 am 11:33 AM
Do you want to move your blog from WordPress.com to WordPress.org? Many beginners start with WordPress.com but quickly realize their limitations and want to switch to the self-hosted WordPress.org platform. In this step-by-step guide, we will show you how to properly move your blog from WordPress.com to WordPress.org. Why migrate from WordPress.com to WordPress.org? WordPress.com allows anyone to create an account
 How to Automate WordPress and Social Media with IFTTT (and more)Apr 18, 2025 am 11:27 AM
Are you looking for ways to automate your WordPress website and social media accounts? With automation, you will be able to automatically share your WordPress blog posts or updates on Facebook, Twitter, LinkedIn, Instagram and more. In this article, we will show you how to easily automate WordPress and social media using IFTTT, Zapier, and Uncanny Automator. Why Automate WordPress and Social Media? Automate your WordPre
 How to Fix Custom Menu Item Limits in WordPressApr 18, 2025 am 11:18 AM
Just a few days ago, one of our users reported an unusual problem. The problem is that he reaches the limit of custom menu items. Any content he saves after reaching the menu item limit will not be saved at all. We've never heard of this issue, so we decided to give it a try on our local installation. More than 200 menu items were created and saved. The effect is very good. Move 100 items to the drop-down list and save them very well. Then we knew it had to do with the server. After further research, it seems that many others have encountered the same problem. After digging deeper, we found a trac ticket ( #14134 ) that highlighted this issue. Read very
 How to add custom metafields to custom classification in WordPressApr 18, 2025 am 11:11 AM
Do you need to add custom metafields to custom taxonomy in WordPress? Custom taxonomy allows you to organize content besides categories and tags. Sometimes it is useful to add other fields to describe them. In this article, we will show you how to add other metafields to the taxonomy they create. When should custom metafields be added to custom taxonomy? When you create new content on your WordPress site, you can organize it using two default taxonomy (category and tag). Some websites benefit from the use of custom taxonomy. These allow you to sort content in other ways. For example,
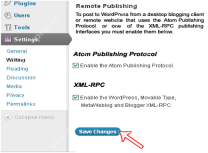 How to Remotely Publish to WordPress using Windows Live WriterApr 18, 2025 am 11:02 AM
Windows live writer is a versatile tool that allows you to post posts directly from your desktop to your WordPress blog. This means you don't need to log in to the WordPress admin panel to update your blog at all. In this tutorial, I will show you how to enable desktop publishing for your WordPress blog using Windows Live Writer. How to set up Windows Live Writer on WordPress Step 1: To use Windows Live Writer in WordPr
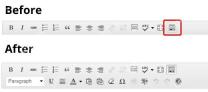 How to Fix White Text and Missing Buttons in WordPress Visual EditorApr 18, 2025 am 10:52 AM
Recently, one of our users reported a very strange installation problem. When writing a post, they can’t see anything they write. Because the text in the post editor is white. What's more, all the visual editor buttons are missing, and the ability to switch from visual to HTML doesn't work either. In this article, we will show you how to fix the white text and missing button issues in the WordPress visual editor. Be a Beginner Note: If you are looking for hidden buttons that may be seen in screenshots of other websites, you may be looking for a kitchen sink. You have to click on the kitchen sink icon to see other options such as underline, copy from word, etc.
 How to display avatar in user email in WordPressApr 18, 2025 am 10:51 AM
Do you want to display avatars in user emails in WordPress? Gravatar is a network service that connects a user's email address to an online avatar. WordPress automatically displays visitors’ profile pictures in the comments section, but you may also want to add them to other areas of the site. In this article, we will show you how to display avatars in user emails in WordPress. What is Gravatar and why should I display it? Gravatar stands for globally recognized avatars, which allows people to link images to their email addresses. If the website supports
 How to change the default media upload location in WordPressApr 18, 2025 am 10:47 AM
Do you want to change the default media upload location in WordPress? Moving media files to other folders can improve website speed and performance and help you create backups faster. It also gives you the freedom to organize your files in the way that suits you best. In this article, we will show you how to change the default media upload location in WordPress. Why change the default media upload location? By default, WordPress stores all images and other media files in the /wp-content/uploads/ folder. In this folder you will find children of different years and months


Hot AI Tools

Undresser.AI Undress
AI-powered app for creating realistic nude photos

AI Clothes Remover
Online AI tool for removing clothes from photos.

Undress AI Tool
Undress images for free

Clothoff.io
AI clothes remover

AI Hentai Generator
Generate AI Hentai for free.

Hot Article
Hot Tools

MinGW - Minimalist GNU for Windows
This project is in the process of being migrated to osdn.net/projects/mingw, you can continue to follow us there. MinGW: A native Windows port of the GNU Compiler Collection (GCC), freely distributable import libraries and header files for building native Windows applications; includes extensions to the MSVC runtime to support C99 functionality. All MinGW software can run on 64-bit Windows platforms.

SAP NetWeaver Server Adapter for Eclipse
Integrate Eclipse with SAP NetWeaver application server.

Dreamweaver Mac version
Visual web development tools

EditPlus Chinese cracked version
Small size, syntax highlighting, does not support code prompt function

Safe Exam Browser
Safe Exam Browser is a secure browser environment for taking online exams securely. This software turns any computer into a secure workstation. It controls access to any utility and prevents students from using unauthorized resources.

