


Printing an Excel spreadsheet perfectly can sometimes be more difficult than creating it. Data could get cut off or move to a different page, which wastes your time and incurs extra costs for reprinting. If you frequently encounter this issue, here are some tips to ensure you get it right the first time.
1 Adjust Page Layout and Orientation
Excel lets you print documents in two orientations: Portrait (vertical) and Landscape (horizontal). Selecting the right orientation is important to get a clean printout. Portrait is best for spreadsheets with more rows than columns, while Landscape works well for wider spreadsheets containing large tables or graphs. You can also use both orientations for different pages.
Adjusting the orientation offers two key benefits: it ensures your data won’t be cut off and prevents unnecessary use of extra pages with awkward space. This makes your printout look more polished. To change the orientation, navigate to the "Page Layout" tab, click on "Orientation," and choose either "Portrait" for taller sheets or "Landscape" for wider ones.

2 Scale to Fit for Perfect Page Sizing
Changing the orientation alone won’t solve everything. If your data is too tall or wide, printing without proper scaling can cause it to spill over onto extra sheets or create awkward page breaks. To avoid these issues, you must scale your Excel sheet to fit neatly on a page. Properly resizing your data ensures everything fits on one page.
To do this, navigate to the "Page Layout" tab. In the "Scale to Fit" group, adjust the "Width" and "Height" settings to fit your data on a single page or the specific number of pages you intend to print it on. This helps control the page count and ensures your printout looks clean and professional.

3 Use Print Area to Print Selective Data
Sometimes, I only need to print a specific section of my spreadsheet, and Excel allows me to define a print area to control exactly which part gets printed. This helps avoid printing unnecessary sections, saving both paper and ink. Plus, I don’t have to modify my entire spreadsheet to print a few selected rows and columns, especially if it contains a large dataset.
To set a print area in Excel, highlight the cells you want to include, go to the "Page Layout" tab, click on "Print Area," and select "Set Print Area."

4 Use Page Breaks for Better Control
Using page breaks in a spreadsheet is a smart way to prevent awkward splits in your data and control how your printed document is structured. This feature lets you decide where the data on a new page starts, keeping key sections at the top of the next page instead of awkwardly in the middle of the previous one.
If you want a graph to appear on a specific page, you can simply insert page breaks before and after. To do this, select the row or column where you'd like the break, go to the "Page Layout" tab, click on "Breaks," and choose "Insert Page Break." This feature helps improve the readability and overall presentation of your printed Excel spreadsheets.

5 Preview the Spreadsheet Before Printing
Previewing your spreadsheet before printing is one of the most crucial steps to ensure your data prints exactly as intended. This allows you to spot any issues with layout, alignment, or data visibility and make necessary adjustments, such as scaling or rearranging data, to achieve the desired printout.
To preview how your spreadsheet will appear on paper, click "File" in the top menu and select "Print" to open the print preview window. Review all pages to catch any formatting issues before hitting the print button. This simple step can save you time, paper, and ink by avoiding unnecessary reprints.

6 Save as PDF for Better Formatting
No matter how carefully you format your data in Excel, small adjustments or opening the file in a different Excel version can easily disrupt the layout. To preserve my Excel spreadsheet's formatting, I save it as a PDF, which ensures the layout remains intact. It also helps me confirm how the data will appear on each printed page.
I often use this method when sharing spreadsheets with others, especially if I need them to print the spreadsheet for me. This also restricts them from making any unintended changes to the data. To save a spreadsheet as a PDF, click "File" in the top menu, select "Save As," choose your location, and in the "Save as Type" dropdown, select "PDF." Then, click "Save."

7 Use Custom Margins for Specific Needs
One common mistake Excel beginners make when printing spreadsheets is neglecting to adjust the space between the data and the edges of the paper. This step is important for clean and professional printouts. Using custom margins, you can fit more data on each page or leave space for notes and binding.
This simple adjustment greatly improves both the readability and appearance of your printout. To set built-in or custom margins, go to the "Page Layout" tab, click "Margins," and select "Custom Margins." Then, adjust the top, bottom, left, and right margins to fit your needs. Just be careful not to reduce the margins too much.

8 Print Titles for Multi-Page Spreadsheets
I use the print titles feature in Excel. This ensures that important headers or labels appear on every page of a multi-page spreadsheet, keeping the data easy to follow and interpret throughout. This makes it easier for the recipient of my spreadsheet to understand the data without constantly flipping back to the first page.
To set print titles, go to the "Page Layout" tab, click on "Print Titles," and in the "Rows to repeat at top" or "Columns to repeat at left" box, select the row or column you want to be repeated on every page. If you haven't used this feature before, it will significantly improve the readability of your Excel printouts.

9 Adjust Column Width and Row Height
Finally, you should adjust the column width and row height to ensure that data isn't cut off or wrapped in a way that makes it difficult to read. I always ensure that text, numbers, and other information are clearly visible and there is no overlapping or awkward spacing between the data in the cells.
For columns or rows containing longer text or numbers, you can selectively resize those areas to maintain readability while keeping the overall layout neat and organized. To adjust the column width or row height, highlight the relevant columns or rows, right-click, and choose "Column Width" or "Row Height." Enter your desired dimensions and click "OK."

These are the tips I consistently follow when printing Excel spreadsheets. If your printouts often look messy, I highly recommend using these strategies. By carefully following these steps and previewing your sheets before printing, you'll be able to achieve flawless printouts with confidence.
If the print doesn’t turn out as expected, avoid making hasty adjustments, which can further disrupt formatting. Take your time to fix any issues before attempting another print.
The above is the detailed content of 9 Tips to Get Perfect Excel Printouts. For more information, please follow other related articles on the PHP Chinese website!

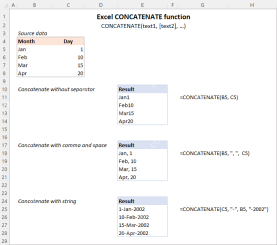 Excel CONCATENATE function to combine strings, cells, columnsApr 30, 2025 am 10:23 AM
This article explores various methods for combining text strings, numbers, and dates in Excel using the CONCATENATE function and the "&" operator. We'll cover formulas for joining individual cells, columns, and ranges, offering solutio
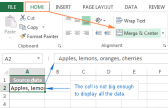 Merge and combine cells in Excel without losing dataApr 30, 2025 am 09:43 AM
This tutorial explores various methods for efficiently merging cells in Excel, focusing on techniques to retain data when combining cells in Excel 365, 2021, 2019, 2016, 2013, 2010, and earlier versions. Often, Excel users need to consolidate two or
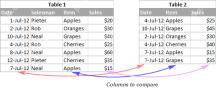 Excel: Compare two columns for matches and differencesApr 30, 2025 am 09:22 AM
This tutorial explores various methods for comparing two or more columns in Excel to identify matches and differences. We'll cover row-by-row comparisons, comparing multiple columns for row matches, finding matches and differences across lists, high
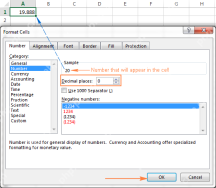 Rounding in Excel: ROUND, ROUNDUP, ROUNDDOWN, FLOOR, CEILING functionsApr 30, 2025 am 09:18 AM
This tutorial explores Excel's rounding functions: ROUND, ROUNDUP, ROUNDDOWN, FLOOR, CEILING, MROUND, and others. It demonstrates how to round decimal numbers to integers or a specific number of decimal places, extract fractional parts, round to the
 Consolidate in Excel: Merge multiple sheets into oneApr 29, 2025 am 10:04 AM
This tutorial explores various methods for combining Excel sheets, catering to different needs: consolidating data, merging sheets via data copying, or merging spreadsheets based on key columns. Many Excel users face the challenge of merging multipl
 Calculate moving average in Excel: formulas and chartsApr 29, 2025 am 09:47 AM
This tutorial shows you how to quickly calculate simple moving averages in Excel, using functions to determine moving averages over the last N days, weeks, months, or years, and how to add a moving average trendline to your charts. Previous articles
 How to calculate average in Excel: formula examplesApr 29, 2025 am 09:38 AM
This tutorial demonstrates various methods for calculating averages in Excel, including formula-based and formula-free approaches, with options for rounding results. Microsoft Excel offers several functions for averaging numerical data, and this gui
 How to calculate weighted average in Excel (SUM and SUMPRODUCT formulas)Apr 29, 2025 am 09:32 AM
This tutorial shows you two simple ways to calculate weighted averages in Excel: using the SUM or SUMPRODUCT function. Previous articles covered basic Excel averaging functions. But what if some values are more important than others, impacting the f


Hot AI Tools

Undresser.AI Undress
AI-powered app for creating realistic nude photos

AI Clothes Remover
Online AI tool for removing clothes from photos.

Undress AI Tool
Undress images for free

Clothoff.io
AI clothes remover

Video Face Swap
Swap faces in any video effortlessly with our completely free AI face swap tool!

Hot Article
Hot Tools

SAP NetWeaver Server Adapter for Eclipse
Integrate Eclipse with SAP NetWeaver application server.

VSCode Windows 64-bit Download
A free and powerful IDE editor launched by Microsoft

SublimeText3 Linux new version
SublimeText3 Linux latest version

mPDF
mPDF is a PHP library that can generate PDF files from UTF-8 encoded HTML. The original author, Ian Back, wrote mPDF to output PDF files "on the fly" from his website and handle different languages. It is slower than original scripts like HTML2FPDF and produces larger files when using Unicode fonts, but supports CSS styles etc. and has a lot of enhancements. Supports almost all languages, including RTL (Arabic and Hebrew) and CJK (Chinese, Japanese and Korean). Supports nested block-level elements (such as P, DIV),

Dreamweaver CS6
Visual web development tools

