


Quick Links
- Syncing Microsoft Forms With Excel for the Web
- Syncing Microsoft Forms With Excel's Desktop App
Are you collecting data through Microsoft Forms and want to review and analyze the results in real time? Well, fortunately for you, Microsoft Forms syncs live with Microsoft Excel, meaning you can see and manipulate new entries as they come in.
If your Microsoft Form is still live, and you want to analyze the data as entries build up in the same way as you would when using Google Forms alongside Google Sheets, Microsoft lets you do this through both Excel for the web and the Microsoft Excel desktop app, though the method for each process varies slightly.
Syncing Microsoft Forms With Excel for the Web
If you prefer working online, after creating your form in Microsoft Forms, you can sync the responses to Excel for the web.
Step 1: Create and Share Your Microsoft Form
Start by creating your form using Microsoft Forms. Make sure you give your form a title and a description, and then choose from the various question types as you develop your questionnaire.

As you add information and type the questions, your form will save automatically to OneDrive.
When you have finished creating your form, confirm you're happy with the options available for each answer and make sure you've toggled the "Required" button for all mandatory questions. This is a crucial step to ensure that you can fully analyze the data for the questions that really matter when you review the results in Excel for the web.

Now, click "Collect Responses" and then choose how you will distribute your form, whether through a link, an email, a QR code, an embedded code on a website, or social media.

If you choose to send a URL, check "Shorten URL" to create a more condensed link. Also, if you send the form invitation via email, personalize the email content before typing an email address and clicking "Send."

Step 2: View, Edit, and Use the Responses in Excel for the Web
When you have started to receive entries, you'll see a number appear next to the View Responses button in the ribbon at the top of your Microsoft Forms editing window. Click "View Responses" to see the results in more detail.

As well as viewing the responses in your browser (see "1" in the screenshot below), you can open the results in table form in Excel for the web ("2" in the screenshot below), where you can manipulate and analyze your data in more depth. To do this, click the file name in the Insights And Actions section.

Your Internet browser will then open Excel for the web in a new tab, and your results will appear in a table. If your Microsoft Form is still open for new entries, they will appear automatically as additional rows at the bottom of your table as soon as they're submitted.

You can now amend your table to display the data you want to see in the format that works best for you. For example, in my table, I don't need to know the start or completion times, or the email addresses for each entry. I want the headers to be clearer, and I want to center-align the text in each cell.
You can undo (Ctrl Z) any actions you perform on your results table, but once you close the window, any changes you have made will be irreversible. When you reopen the spreadsheet, the changes you have made will remain in place.

Finally, with the data still coming in, you can visualize your responses by adding charts in your Excel for the web workbook as you would in the desktop app. Highlight the data or the column(s) you want to display in a chart, click "Insert" on the ribbon, and use the drop-down option to choose the appropriate one.

The beauty of this feature is that whenever a new entry is submitted to your Microsoft Form, any charts you have created that link to the data will update automatically. This means you can dynamically analyze your data without having to manually change anything within your Excel for the web spreadsheet.
Syncing Microsoft Forms With Excel's Desktop App
Towards the end of 2024, Microsoft expanded this syncing capability to the Excel desktop app. In fact, Microsoft Forms now has a dedicated section embedded within the Microsoft Excel ribbon, making the whole process much more streamlined by allowing you to build and analyze your form and its responses in one place.
You'll also prefer this method if you plan to use more advanced data manipulation tools, as Excel's desktop app is more sophisticated than its web-based counterpart. However, remember that you need to have subscribed to Microsoft 365 to use the latest version of the Excel desktop app.
In Microsoft Excel's desktop app, click "Insert," and select the "Forms" drop-down menu. Then, click "New Form."
The New Form option in the Forms drop-down of the Insert tab on the ribbon only becomes available once you have saved your Excel workbook and turned on AutoSave, since Microsoft uses OneDrive to activate the Forms-Excel integration.

After you click "New Form," a new window opens where you can create your Microsoft Forms form. As soon as you start typing your questions in this new Microsoft Forms window, Excel will start the sync, automatically adding the questions along the first row.

In your Excel responses worksheet, click the "Forms" icon again to open the form in preview mode ("Preview Form"), edit mode ("Edit Form"), or in a new tab with a dialog box that lets you send the form to respondents ("Send Form").

As soon as people start submitting their responses, you'll see them appear in your desktop spreadsheet.

As with the Excel for the web method outlined above, you can turn your data into charts and manipulate your table formatting to make the most of the information as it lands in your spreadsheet.
You can close and reopen this spreadsheet anytime, safe in the knowledge that it will continue syncing with Microsoft Forms (if it is open to new entries and you maintain AutoSave connectivity to OneDrive).
Whether you're creating your Microsoft Form in your browser or through the Forms-Excel integration, be sure to make the most of the program's many useful tools and features.
The above is the detailed content of How to Automatically Sync Microsoft Forms With Excel. For more information, please follow other related articles on the PHP Chinese website!

 How to Use AI Function in Google SheetsMay 03, 2025 am 06:01 AM
Google Sheets' AI Function: A Powerful New Tool for Data Analysis Google Sheets now boasts a built-in AI function, powered by Gemini, eliminating the need for add-ons to leverage the power of language models directly within your spreadsheets. This f
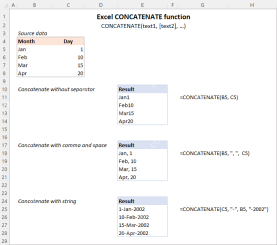 Excel CONCATENATE function to combine strings, cells, columnsApr 30, 2025 am 10:23 AM
This article explores various methods for combining text strings, numbers, and dates in Excel using the CONCATENATE function and the "&" operator. We'll cover formulas for joining individual cells, columns, and ranges, offering solutio
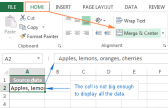 Merge and combine cells in Excel without losing dataApr 30, 2025 am 09:43 AM
This tutorial explores various methods for efficiently merging cells in Excel, focusing on techniques to retain data when combining cells in Excel 365, 2021, 2019, 2016, 2013, 2010, and earlier versions. Often, Excel users need to consolidate two or
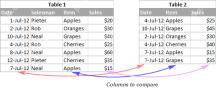 Excel: Compare two columns for matches and differencesApr 30, 2025 am 09:22 AM
This tutorial explores various methods for comparing two or more columns in Excel to identify matches and differences. We'll cover row-by-row comparisons, comparing multiple columns for row matches, finding matches and differences across lists, high
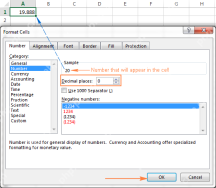 Rounding in Excel: ROUND, ROUNDUP, ROUNDDOWN, FLOOR, CEILING functionsApr 30, 2025 am 09:18 AM
This tutorial explores Excel's rounding functions: ROUND, ROUNDUP, ROUNDDOWN, FLOOR, CEILING, MROUND, and others. It demonstrates how to round decimal numbers to integers or a specific number of decimal places, extract fractional parts, round to the
 Consolidate in Excel: Merge multiple sheets into oneApr 29, 2025 am 10:04 AM
This tutorial explores various methods for combining Excel sheets, catering to different needs: consolidating data, merging sheets via data copying, or merging spreadsheets based on key columns. Many Excel users face the challenge of merging multipl
 Calculate moving average in Excel: formulas and chartsApr 29, 2025 am 09:47 AM
This tutorial shows you how to quickly calculate simple moving averages in Excel, using functions to determine moving averages over the last N days, weeks, months, or years, and how to add a moving average trendline to your charts. Previous articles
 How to calculate average in Excel: formula examplesApr 29, 2025 am 09:38 AM
This tutorial demonstrates various methods for calculating averages in Excel, including formula-based and formula-free approaches, with options for rounding results. Microsoft Excel offers several functions for averaging numerical data, and this gui


Hot AI Tools

Undresser.AI Undress
AI-powered app for creating realistic nude photos

AI Clothes Remover
Online AI tool for removing clothes from photos.

Undress AI Tool
Undress images for free

Clothoff.io
AI clothes remover

Video Face Swap
Swap faces in any video effortlessly with our completely free AI face swap tool!

Hot Article
Hot Tools

EditPlus Chinese cracked version
Small size, syntax highlighting, does not support code prompt function

SecLists
SecLists is the ultimate security tester's companion. It is a collection of various types of lists that are frequently used during security assessments, all in one place. SecLists helps make security testing more efficient and productive by conveniently providing all the lists a security tester might need. List types include usernames, passwords, URLs, fuzzing payloads, sensitive data patterns, web shells, and more. The tester can simply pull this repository onto a new test machine and he will have access to every type of list he needs.

MinGW - Minimalist GNU for Windows
This project is in the process of being migrated to osdn.net/projects/mingw, you can continue to follow us there. MinGW: A native Windows port of the GNU Compiler Collection (GCC), freely distributable import libraries and header files for building native Windows applications; includes extensions to the MSVC runtime to support C99 functionality. All MinGW software can run on 64-bit Windows platforms.

WebStorm Mac version
Useful JavaScript development tools

ZendStudio 13.5.1 Mac
Powerful PHP integrated development environment

