
Home >System Tutorial >Windows Series >How to enable secure boot in Win11 Tutorial on how to enable secure boot in Win11
How to enable secure boot in Win11 Tutorial on how to enable secure boot in Win11

- PHPzOriginal
- 2024-09-09 10:45:181291browse
How to enable secure boot? Secure Boot is a vital security feature that ensures your system loads only verified and unmodified system software at startup. However, many people have encountered a “Secure Boot is not supported” error when upgrading to Windows 11. Don’t worry, php editor Banana will provide you with a step-by-step guide on how to easily enable Secure Boot on your computer.
Tutorial on how to enable secure boot in Win11
1. First, we restart the computer, use the hotkey to open the bios setup when the logo appears, and then press "F10" to enter the bios setup.

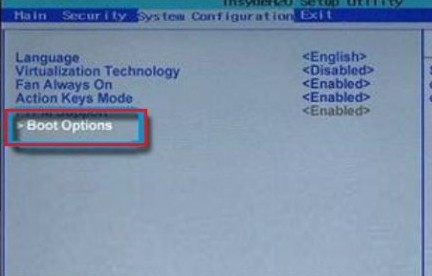
2. Then find "boot options" under the "configuration" option and select enter.
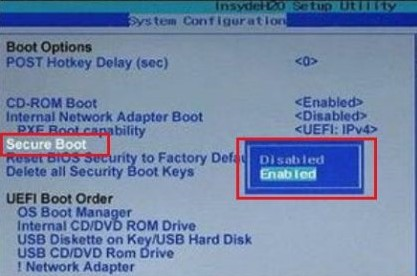
3. Then find "secure boot" and change it to "Enabled"
4. Finally press "F10" to save. If a dialog box pops up, select "Yes".

The above is the detailed content of How to enable secure boot in Win11 Tutorial on how to enable secure boot in Win11. For more information, please follow other related articles on the PHP Chinese website!
Related articles
See more- How to solve the problem of Windows 7 desktop rotating 90 degrees
- How to forcefully terminate a running process in Win7
- Win11 Build 25336.1010 preview version released today: mainly used for testing operation and maintenance pipelines
- Win11 Beta preview Build 22621.1610/22624.1610 released today (including KB5025299 update)
- Fingerprint recognition cannot be used on ASUS computers. How to add fingerprints? Tips for adding fingerprints to ASUS computers