
 Software TutorialOffice SoftwareHow to set up a Word document to print only part of the content? 3 methods are recommended!
How to set up a Word document to print only part of the content? 3 methods are recommended!

In daily work, many people need to print Word documents, but sometimes they only need to print specific content in the document, not all. Wondering how to achieve this? PHP editor Xinyi has summarized three practical methods for you to help you solve this problem quickly and easily. Continue reading the article to learn the detailed steps of these three methods.
Method 1: Use the print selection function
If there is less content to be printed, we can use the print selection function of the Word document.
1. Open the Word document and use the mouse or keyboard to select the specific content that needs to be printed, as shown in the picture below.

2. In the Word menu bar, click the [File] option, and then find the [Print] option.
In the [Settings] section of the print settings interface, the default is [Print all documents], re-select the [Print selected area only selected content] option.
After selecting, click the "Print" button to print only the previously selected content, and the unselected content will not be printed.

Method 2: Use the hidden function
If there is a lot of content to be printed and only a small part of the content does not need to be printed, you can use the hidden function of the Word document to hide this part of the content and only print the unhidden part.
1. Open the Word document and use the mouse or keyboard to select the content that needs to be hidden, that is, the part of the content that does not need to be printed, as shown in the picture below.

2. Click [Start] on the menu bar, find the [Font] option box, and then click the "arrow" icon in the lower right corner.

3. Check the [Hide] option in the [Font] dialog box, and then click [OK].

4. In the Word menu bar, click the [File] option and also find the [Print] option.
In the page preview area, you can see that the content originally chosen to be hidden is no longer visible. At this time, click the [Print] button, and the hidden part of the content will not be printed.

Notes:
If you find that the [Font] checkbox is grayed out when setting the content to be hidden, and you cannot select the [Font] option even when you right-click the mouse, it means that the Word document has been set to restrict editing and cannot be edited or changed. You need to lift the restriction. Hide content.

Follow the following methods to remove the "restricted editing" of Word documents:
In the Word document, click the menu tab [Review]-[Restrict Editing].
After opening the [Restrict Editing] dialog box, click the [Stop Protection] button below, and then enter the originally set password in the pop-up password field to remove the restriction.

If you forget your password, you will not be able to lift the "restrictions" in Word, but you can use other tools to solve the problem.
For example, Pepsi Niu Word Password Recovery Tool can directly remove the "restricted editing" of Word documents without entering the password.
Just select the [Unrestriction] module in the tool and then import the Word document.

Method 3: Use page number setting
If you need to print several pages of the Word document, you can print the content by setting the page number.
1. Click the menu tab [File]-[Print] to open the print settings interface, and find the "Page Range" option in the [Settings] section. Enter the page number range to be printed, for example "3-6" means printing pages 3 to 6.

2. ページのプレビュー領域で、選択したページ番号範囲のプレビューを表示できます。設定が正しいことを確認後、「印刷」ボタンをクリックして印刷してください。
The above is the detailed content of How to set up a Word document to print only part of the content? 3 methods are recommended!. For more information, please follow other related articles on the PHP Chinese website!

 How to Use AI Function in Google SheetsMay 03, 2025 am 06:01 AM
Google Sheets' AI Function: A Powerful New Tool for Data Analysis Google Sheets now boasts a built-in AI function, powered by Gemini, eliminating the need for add-ons to leverage the power of language models directly within your spreadsheets. This f
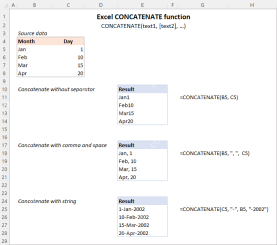 Excel CONCATENATE function to combine strings, cells, columnsApr 30, 2025 am 10:23 AM
This article explores various methods for combining text strings, numbers, and dates in Excel using the CONCATENATE function and the "&" operator. We'll cover formulas for joining individual cells, columns, and ranges, offering solutio
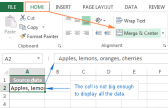 Merge and combine cells in Excel without losing dataApr 30, 2025 am 09:43 AM
This tutorial explores various methods for efficiently merging cells in Excel, focusing on techniques to retain data when combining cells in Excel 365, 2021, 2019, 2016, 2013, 2010, and earlier versions. Often, Excel users need to consolidate two or
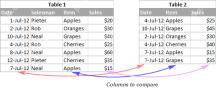 Excel: Compare two columns for matches and differencesApr 30, 2025 am 09:22 AM
This tutorial explores various methods for comparing two or more columns in Excel to identify matches and differences. We'll cover row-by-row comparisons, comparing multiple columns for row matches, finding matches and differences across lists, high
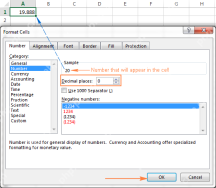 Rounding in Excel: ROUND, ROUNDUP, ROUNDDOWN, FLOOR, CEILING functionsApr 30, 2025 am 09:18 AM
This tutorial explores Excel's rounding functions: ROUND, ROUNDUP, ROUNDDOWN, FLOOR, CEILING, MROUND, and others. It demonstrates how to round decimal numbers to integers or a specific number of decimal places, extract fractional parts, round to the
 Consolidate in Excel: Merge multiple sheets into oneApr 29, 2025 am 10:04 AM
This tutorial explores various methods for combining Excel sheets, catering to different needs: consolidating data, merging sheets via data copying, or merging spreadsheets based on key columns. Many Excel users face the challenge of merging multipl
 Calculate moving average in Excel: formulas and chartsApr 29, 2025 am 09:47 AM
This tutorial shows you how to quickly calculate simple moving averages in Excel, using functions to determine moving averages over the last N days, weeks, months, or years, and how to add a moving average trendline to your charts. Previous articles
 How to calculate average in Excel: formula examplesApr 29, 2025 am 09:38 AM
This tutorial demonstrates various methods for calculating averages in Excel, including formula-based and formula-free approaches, with options for rounding results. Microsoft Excel offers several functions for averaging numerical data, and this gui


Hot AI Tools

Undresser.AI Undress
AI-powered app for creating realistic nude photos

AI Clothes Remover
Online AI tool for removing clothes from photos.

Undress AI Tool
Undress images for free

Clothoff.io
AI clothes remover

Video Face Swap
Swap faces in any video effortlessly with our completely free AI face swap tool!

Hot Article
Hot Tools

MantisBT
Mantis is an easy-to-deploy web-based defect tracking tool designed to aid in product defect tracking. It requires PHP, MySQL and a web server. Check out our demo and hosting services.

VSCode Windows 64-bit Download
A free and powerful IDE editor launched by Microsoft

WebStorm Mac version
Useful JavaScript development tools

mPDF
mPDF is a PHP library that can generate PDF files from UTF-8 encoded HTML. The original author, Ian Back, wrote mPDF to output PDF files "on the fly" from his website and handle different languages. It is slower than original scripts like HTML2FPDF and produces larger files when using Unicode fonts, but supports CSS styles etc. and has a lot of enhancements. Supports almost all languages, including RTL (Arabic and Hebrew) and CJK (Chinese, Japanese and Korean). Supports nested block-level elements (such as P, DIV),

SublimeText3 Linux new version
SublimeText3 Linux latest version

