


Word Document Encryption Protection Guide When working with sensitive Word documents, it is necessary to protect their contents from unauthorized access and modification. PHP editor Xinyi introduces to you four effective ways to encrypt and protect Word documents. This article explains each method in detail, including steps and considerations. By reading this article, you will learn how to protect your documents and ensure their confidentiality.
1. The document can be edited, but the format cannot be modified
Allow others to edit the document, but cannot modify the format. We can do this by setting a "restriction password":
First, after opening the Word document, click [Restrict Editing] in the menu tab [Review] list;

After the [Restrict Editing] interface appears, check [Restrict formatting to the selected style], and then click [Yes, start forced protection]. After the dialog box pops up, enter the password you want to set in the password field, and finally Click [OK] to set it up.

After the setting is completed, you can see that the tabs related to format are gray and cannot be clicked.

If you no longer need to set protection, you only need to click the menu tab [Review] - [Restrict Editing] again, and then click [Stop Protection] on the page. After the dialog box pops up, enter the originally set value in the password field. password, and then click [OK] to remove the password restriction.

2. The document can be viewed, but the document cannot be edited
If you only allow others to view the Word document, but cannot make any edits to the document, you can also use "restrict password" to achieve this.
First, after opening the Word document, click the menu tab [Review]-[Restrict Editing];
Then in the [Restrict Editing] interface, check [Allow only this type of editing in the document], and select [Do not allow any changes (read-only)] in the drop-down list, and then click [Yes, start force Protect】;
After the dialog box pops up, enter the password you want to set in the password field, and finally click [OK] to set it.

If you no longer need to set up protection, you only need to follow the cancellation method of "Method 1" to cancel it.
3. The document can be opened only by password
If you want to protect the document from being viewed at will and the document can only be opened through a password, we can set an "open password".
First, open the Word document, click the menu tab [File], and then click [Information] - [Protect Document] - [Encrypt with Password];

After the dialog box pops up, enter the password you want to set in the password field, click [OK] and enter it again. The "Open Password" of the Word document will be set.

Subsequently, whenever you open a Word document, a dialog box will pop up, prompting you to enter a password to open the document.

If password protection is no longer required, how can I cancel it?
First, open the Word document with a password, then follow the set operation process and click [File] - [Information] - [Protect Document] - [Encrypt with Password];
After the [Encrypted Document] dialog box pops up, you can see that there is already a password in the password field. This is the originally set password. Select and delete the password, and then click [OK]. The "Open Password" of the Word document will be released. Now, when you open the document again, you don’t need to enter the password.

It should be noted that whether it is "restrict password" or "open password", remember to remember or save the password after setting it. Because if you forget the password, you will not be able to edit or open the Word document, and there is no "" in the Word document. Forgot Password" related options.
What should I do if I accidentally forget it? In this case, we need to use other tools to help.
For example, the Pepsi Niu Word Password Recovery Tool used by the editor has two functional modules that can solve the above problems.
The [Retrieve Password] module provides 4 methods to retrieve the "open password" of a Word document; the [Remove Restriction] module can directly remove the "restriction password" of a Word document without a password.

4. Use "read-only mode" to prevent documents from being changed at will
If you want to prevent the document from being changed at will, you can set a "read-only" password, so that the document can be edited and modified only by entering the password, otherwise it will be opened in "read-only mode".
First, after opening the Word document, use [File]-[Save As] to bring up the [Save As] dialog box, and then click [General Options] in the [Tools] list;

After opening the [General Options] dialog box, enter the password you want to set in the [Password when modifying file] column, click [OK] and save, the "read-only mode" password of the Word document will be set. .

Open the Word document again, and a dialog box will pop up, prompting that you need to enter a password to modify the file, otherwise it will be opened in read-only mode.

If you no longer need the "read-only mode" later, you only need to save the Word document as a new document, but you need to modify the file name or modify the save address when saving.
Today’s sharing is here, I hope it will be helpful to everyone!
The above is the detailed content of 4 ways to encrypt Word documents. For more information, please follow other related articles on the PHP Chinese website!

 Excel WEEKNUM function – convert week number to date and vice versaMay 09, 2025 am 11:11 AM
Excel's WEEKNUM function: Your guide to week number calculations While Excel offers numerous functions for dates, the WEEKNUM function stands alone for week number calculations. This tutorial explores its syntax, arguments, and practical applications
 Excel MONTH function - month name from date, last day of month, etc.May 09, 2025 am 10:59 AM
This tutorial delves into the intricacies of Excel's MONTH and EOMONTH functions. Through numerous formula examples, you'll learn to extract month information from dates, determine the first and last days of any month, convert between month names an
 WEEKDAY formula in Excel to get day of week, weekends and workdaysMay 09, 2025 am 10:25 AM
If you are looking for an Excel function to get day of week from date, you've landed on the right page. This tutorial will teach you how to use the WEEKDAY formula in Excel to convert a date to a weekday name, filter, highlight and count
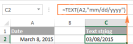 Convert date to text in Excel - TEXT function and no-formula waysMay 09, 2025 am 10:11 AM
This article explores several methods for converting Excel dates into text strings, offering both formula-based and non-formula solutions. Traditionally, we start with a formula solution and then explore a couple of non-formula alternatives. Using
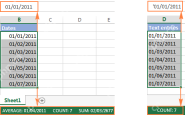 Excel: convert text to date and number to dateMay 09, 2025 am 09:36 AM
This tutorial demonstrates various Excel techniques for converting text and numbers into dates, including both formula-based and non-formula methods. You'll learn to efficiently transform text strings into usable date formats. Often, dates imported
 How to add and subtract dates in ExcelMay 08, 2025 am 11:36 AM
In this tutorial, you will find a variety of useful formulas to add and subtract dates in Excel, such as subtracting two dates, adding days, weeks, months and years to a date, and more. If you have been following our tutorials to working
 Excel WORKDAY and NETWORKDAYS functions to calculate working daysMay 08, 2025 am 10:49 AM
This tutorial demonstrates how to use Excel's WORKDAY, WORKDAY.INTL, NETWORKDAYS, and NETWORKDAYS.INTL functions to efficiently calculate weekdays, considering custom weekend settings and holidays. Microsoft Excel offers specialized functions for wor
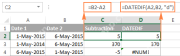
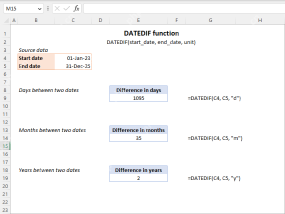 Excel DATEDIF function to get difference between two datesMay 08, 2025 am 10:45 AM
This tutorial provides a concise explanation of Excel's DATEDIF function and offers formula examples for calculating date differences in days, weeks, months, or years. We've previously covered date and time manipulation in Excel, including formattin


Hot AI Tools

Undresser.AI Undress
AI-powered app for creating realistic nude photos

AI Clothes Remover
Online AI tool for removing clothes from photos.

Undress AI Tool
Undress images for free

Clothoff.io
AI clothes remover

Video Face Swap
Swap faces in any video effortlessly with our completely free AI face swap tool!

Hot Article
Hot Tools

MantisBT
Mantis is an easy-to-deploy web-based defect tracking tool designed to aid in product defect tracking. It requires PHP, MySQL and a web server. Check out our demo and hosting services.

Atom editor mac version download
The most popular open source editor

MinGW - Minimalist GNU for Windows
This project is in the process of being migrated to osdn.net/projects/mingw, you can continue to follow us there. MinGW: A native Windows port of the GNU Compiler Collection (GCC), freely distributable import libraries and header files for building native Windows applications; includes extensions to the MSVC runtime to support C99 functionality. All MinGW software can run on 64-bit Windows platforms.

Dreamweaver Mac version
Visual web development tools

Zend Studio 13.0.1
Powerful PHP integrated development environment

