


在golang中,网络协议已经被封装的非常完好了,想要写一个Socket的Server,我们并不用像其他语言那样需要为socket、bind、listen、receive等一系列操作头疼,只要使用Golang中自带的net包即可很方便的完成连接等操作~
在这里,给出一个最最基础的基于Socket的Server的写法:
package main
import (
"fmt"
"net"
"log"
"os"
)
func main() {
//建立socket,监听端口
netListen, err := net.Listen("tcp", "localhost:1024")
CheckError(err)
defer netListen.Close()
Log("Waiting for clients")
for {
conn, err := netListen.Accept()
if err != nil {
continue
}
Log(conn.RemoteAddr().String(), " tcp connect success")
handleConnection(conn)
}
}
//处理连接
func handleConnection(conn net.Conn) {
buffer := make([]byte, 2048)
for {
n, err := conn.Read(buffer)
if err != nil {
Log(conn.RemoteAddr().String(), " connection error: ", err)
return
}
Log(conn.RemoteAddr().String(), "receive data string:\n", string(buffer[:n]))
}
}
func Log(v ...interface{}) {
log.Println(v...)
}
func CheckError(err error) {
if err != nil {
fmt.Fprintf(os.Stderr, "Fatal error: %s", err.Error())
os.Exit(1)
}
}
唔,抛除Go语言里面10行代码有5行error的蛋疼之处,你可以看到,Server想要建立并接受一个Socket,其核心流程就是
netListen, err := net.Listen("tcp", "localhost:1024")
conn, err := netListen.Accept()
n, err := conn.Read(buffer)
这三步,通过Listen、Accept 和Read,我们就成功的绑定了一个端口,并能够读取从该端口传来的内容~
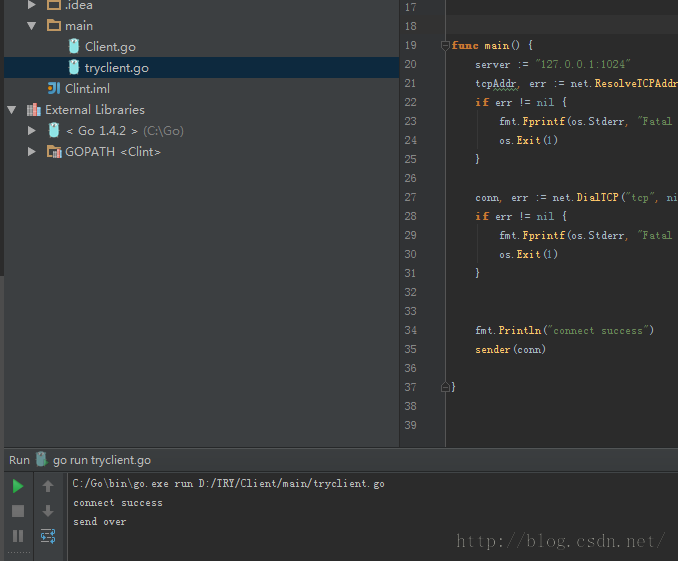
Server写好之后,接下来就是Client方面啦,我手写一个HelloWorld给大家:
package main
import (
"fmt"
"net"
"os"
)
func sender(conn net.Conn) {
words := "hello world!"
conn.Write([]byte(words))
fmt.Println("send over")
}
func main() {
server := "127.0.0.1:1024"
tcpAddr, err := net.ResolveTCPAddr("tcp4", server)
if err != nil {
fmt.Fprintf(os.Stderr, "Fatal error: %s", err.Error())
os.Exit(1)
}
conn, err := net.DialTCP("tcp", nil, tcpAddr)
if err != nil {
fmt.Fprintf(os.Stderr, "Fatal error: %s", err.Error())
os.Exit(1)
}
fmt.Println("connect success")
sender(conn)
}
可以看到,Client这里的关键在于
tcpAddr, err := net.ResolveTCPAddr("tcp4", server)
conn, err := net.DialTCP("tcp", nil, tcpAddr)
这两步,主要是负责解析端口和连接~
写好Server和Client之后,让我们运行一下看看:~~
成功运行,Console出现Server等待连接的提示:

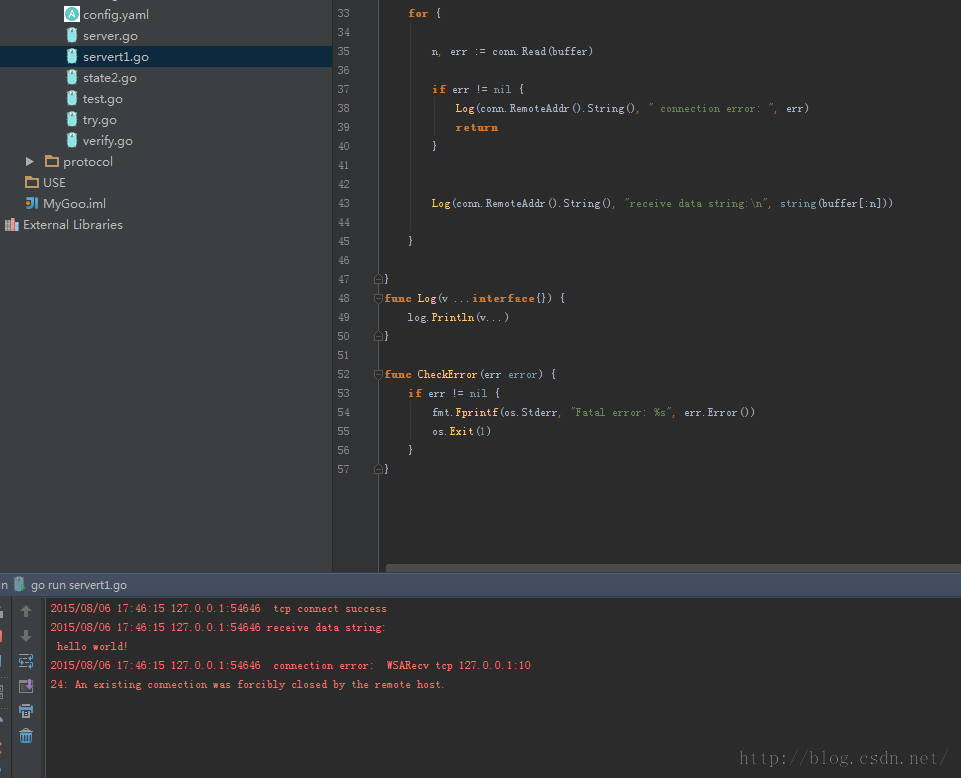
Server端成功的收到了我们的Hello-World啦,至于后面的那行红字,则是断开连接的提示~
到这里,一个最基础的使用Socket的Server-Client框架就出来啦~
如果想要让Server能够响应来自不同Client的请求,我们只要在Server端的代码的main入口中,
在 handleConnection(conn net.Conn) 这句代码的前面加上一个 go,就可以让服务器并发处理不同的Client发来的请求啦
自定义通讯协议
在上面我们做出来一个最基础的demo后,已经可以初步实现Server和Client之间的信息交流了~ 这一章我会介绍一下怎么在Server和Client之间实现一个简单的通讯协议,从而增强整个信息交流过程的稳定性。
在Server和client的交互过程中,有时候很难避免出现网络波动,而在通讯质量较差的时候,Client有可能无法将信息流一次性完整发送,最终传到Server上的信息很可能变为很多段。
如下图所示,本来应该是分条传输的json,结果因为一些原因连接在了一起,这时候就会出现问题啦,Server端要怎么判断收到的消息是否完整呢?~
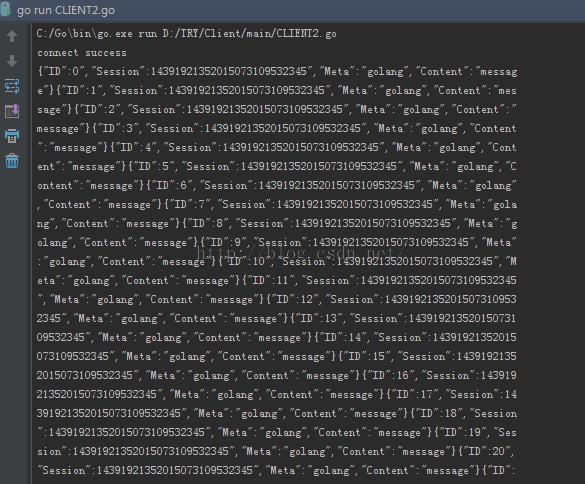
唔,答案就是这篇文章的主题啦:在Server和Client交互的时候,加入一个通讯协议(protocol),让二者的交互通过这个协议进行封装,从而使Server能够判断收到的信息是否为完整的一段。(也就是解决分包的问题)
因为主要目的是为了让Server能判断客户端发来的信息是否完整,因此整个协议的核心思路并不是很复杂:
协议的核心就是设计一个头部(headers),在Client每次发送信息的时候将header封装进去,再让Server在每次收到信息的时候按照预定格式将消息进行解析,这样根据Client传来的数据中是否包含headers,就可以很轻松的判断收到的信息是否完整了~
如果信息完整,那么就将该信息发送给下一个逻辑进行处理,如果信息不完整(缺少headers),那么Server就会把这条信息与前一条信息合并继续处理。
下面是协议部分的代码,主要分为数据的封装(Enpack)和解析(Depack)两个部分,其中Enpack用于Client端将传给服务器的数据封装,而Depack是Server用来解析数据,其中Const部分用于定义Headers,HeaderLength则是Headers的长度,用于后面Server端的解析。这里要说一下ConstMLength,这里代表Client传入信息的长度,因为在golang中,int转为byte后会占4长度的空间,因此设定为4。每次Client向Server发送信息的时候,除了将Headers封装进去意以外,还会将传入信息的长度也封装进去,这样可以方便Server进行解析和校验。
//通讯协议处理
package protocol
import (
"bytes"
"encoding/binary"
)
const (
ConstHeader = "Headers"
ConstHeaderLength = 7
ConstMLength = 4
)
//封包
func Enpack(message []byte) []byte {
return append(append([]byte(ConstHeader), IntToBytes(len(message))...), message...)
}
//解包
func Depack(buffer []byte, readerChannel chan []byte) []byte {
length := len(buffer)
var i int
for i = 0; i if length break
}
if string(buffer[i:i+ConstHeaderLength]) == ConstHeader {
messageLength := BytesToInt(buffer[i+ConstHeaderLength : i+ConstHeaderLength+ConstMLength])
if length break
}
data := buffer[i+ConstHeaderLength+ConstMLength : i+ConstHeaderLength+ConstMLength+messageLength]
readerChannel
}
}
if i == length {
return make([]byte, 0)
}
return buffer[i:]
}
//整形转换成字节
func IntToBytes(n int) []byte {
x := int32(n)
bytesBuffer := bytes.NewBuffer([]byte{})
binary.Write(bytesBuffer, binary.BigEndian, x)
return bytesBuffer.Bytes()
}
//字节转换成整形
func BytesToInt(b []byte) int {
bytesBuffer := bytes.NewBuffer(b)
var x int32
binary.Read(bytesBuffer, binary.BigEndian, &x)
return int(x)
}
协议写好之后,接下来就是在Server和Client的代码中应用协议啦,下面是Server端的代码,主要负责解析Client通过协议发来的信息流:
package main
import (
"protocol"
"fmt"
"net"
"os"
)
func main() {
netListen, err := net.Listen("tcp", "localhost:6060")
CheckError(err)
defer netListen.Close()
Log("Waiting for clients")
for {
conn, err := netListen.Accept()
if err != nil {
continue
}
//timeouSec :=10
//conn.
Log(conn.RemoteAddr().String(), " tcp connect success")
go handleConnection(conn)
}
}
func handleConnection(conn net.Conn) {
// 缓冲区,存储被截断的数据
tmpBuffer := make([]byte, 0)
//接收解包
readerChannel := make(chan []byte, 16)
go reader(readerChannel)
buffer := make([]byte, 1024)
for {
n, err := conn.Read(buffer)
if err != nil {
Log(conn.RemoteAddr().String(), " connection error: ", err)
return
}
tmpBuffer = protocol.Depack(append(tmpBuffer, buffer[:n]...), readerChannel)
}
defer conn.Close()
}
func reader(readerChannel chan []byte) {
for {
select {
case data := Log(string(data))
}
}
}
func Log(v ...interface{}) {
fmt.Println(v...)
}
func CheckError(err error) {
if err != nil {
fmt.Fprintf(os.Stderr, "Fatal error: %s", err.Error())
os.Exit(1)
}
}
然后是Client端的代码,这个简单多了,只要给信息封装一下就可以了~:
package main
import (
"protocol"
"fmt"
"net"
"os"
"time"
"strconv"
)
func send(conn net.Conn) {
for i := 0; i session:=GetSession()
words := "{\"ID\":"+ strconv.Itoa(i) +"\",\"Session\":"+session +"2015073109532345\",\"Meta\":\"golang\",\"Content\":\"message\"}"
conn.Write(protocol.Enpacket([]byte(words)))
}
fmt.Println("send over")
defer conn.Close()
}
func GetSession() string{
gs1:=time.Now().Unix()
gs2:=strconv.FormatInt(gs1,10)
return gs2
}
func main() {
server := "localhost:6060"
tcpAddr, err := net.ResolveTCPAddr("tcp4", server)
if err != nil {
fmt.Fprintf(os.Stderr, "Fatal error: %s", err.Error())
os.Exit(1)
}
conn, err := net.DialTCP("tcp", nil, tcpAddr)
if err != nil {
fmt.Fprintf(os.Stderr, "Fatal error: %s", err.Error())
os.Exit(1)
}
fmt.Println("connect success")
send(conn)
}
这样我们就成功实现在Server和Client之间建立一套自定义的基础通讯协议啦,让我们运行一下看下效果:
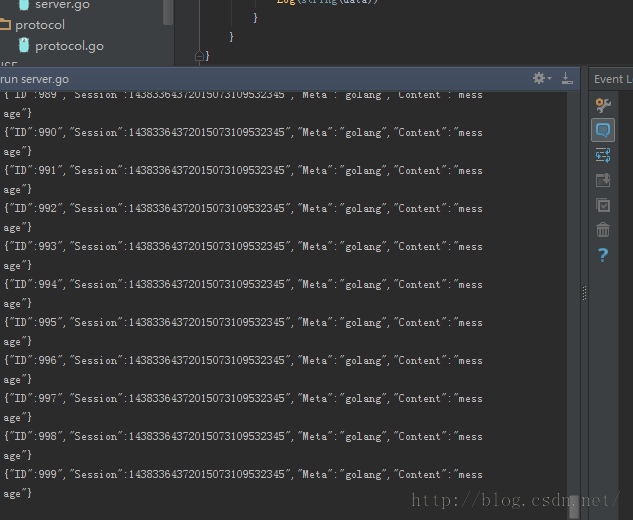
成功识别每一条Client发来的信息啦~~

 Python: compiler or Interpreter?May 13, 2025 am 12:10 AM
Python is an interpreted language, but it also includes the compilation process. 1) Python code is first compiled into bytecode. 2) Bytecode is interpreted and executed by Python virtual machine. 3) This hybrid mechanism makes Python both flexible and efficient, but not as fast as a fully compiled language.
 Python For Loop vs While Loop: When to Use Which?May 13, 2025 am 12:07 AM
Useaforloopwheniteratingoverasequenceorforaspecificnumberoftimes;useawhileloopwhencontinuinguntilaconditionismet.Forloopsareidealforknownsequences,whilewhileloopssuitsituationswithundeterminediterations.
 Python loops: The most common errorsMay 13, 2025 am 12:07 AM
Pythonloopscanleadtoerrorslikeinfiniteloops,modifyinglistsduringiteration,off-by-oneerrors,zero-indexingissues,andnestedloopinefficiencies.Toavoidthese:1)Use'i
 For loop and while loop in Python: What are the advantages of each?May 13, 2025 am 12:01 AM
Forloopsareadvantageousforknowniterationsandsequences,offeringsimplicityandreadability;whileloopsareidealfordynamicconditionsandunknowniterations,providingcontrolovertermination.1)Forloopsareperfectforiteratingoverlists,tuples,orstrings,directlyacces
 Python: A Deep Dive into Compilation and InterpretationMay 12, 2025 am 12:14 AM
Pythonusesahybridmodelofcompilationandinterpretation:1)ThePythoninterpretercompilessourcecodeintoplatform-independentbytecode.2)ThePythonVirtualMachine(PVM)thenexecutesthisbytecode,balancingeaseofusewithperformance.
 Is Python an interpreted or a compiled language, and why does it matter?May 12, 2025 am 12:09 AM
Pythonisbothinterpretedandcompiled.1)It'scompiledtobytecodeforportabilityacrossplatforms.2)Thebytecodeistheninterpreted,allowingfordynamictypingandrapiddevelopment,thoughitmaybeslowerthanfullycompiledlanguages.
 For Loop vs While Loop in Python: Key Differences ExplainedMay 12, 2025 am 12:08 AM
Forloopsareidealwhenyouknowthenumberofiterationsinadvance,whilewhileloopsarebetterforsituationswhereyouneedtoloopuntilaconditionismet.Forloopsaremoreefficientandreadable,suitableforiteratingoversequences,whereaswhileloopsoffermorecontrolandareusefulf
 For and While loops: a practical guideMay 12, 2025 am 12:07 AM
Forloopsareusedwhenthenumberofiterationsisknowninadvance,whilewhileloopsareusedwhentheiterationsdependonacondition.1)Forloopsareidealforiteratingoversequenceslikelistsorarrays.2)Whileloopsaresuitableforscenarioswheretheloopcontinuesuntilaspecificcond


Hot AI Tools

Undresser.AI Undress
AI-powered app for creating realistic nude photos

AI Clothes Remover
Online AI tool for removing clothes from photos.

Undress AI Tool
Undress images for free

Clothoff.io
AI clothes remover

Video Face Swap
Swap faces in any video effortlessly with our completely free AI face swap tool!

Hot Article
Hot Tools

Zend Studio 13.0.1
Powerful PHP integrated development environment

SublimeText3 Linux new version
SublimeText3 Linux latest version

DVWA
Damn Vulnerable Web App (DVWA) is a PHP/MySQL web application that is very vulnerable. Its main goals are to be an aid for security professionals to test their skills and tools in a legal environment, to help web developers better understand the process of securing web applications, and to help teachers/students teach/learn in a classroom environment Web application security. The goal of DVWA is to practice some of the most common web vulnerabilities through a simple and straightforward interface, with varying degrees of difficulty. Please note that this software

SAP NetWeaver Server Adapter for Eclipse
Integrate Eclipse with SAP NetWeaver application server.

SublimeText3 English version
Recommended: Win version, supports code prompts!

