
Heim >Web-Frontend >View.js >Lassen Sie uns darüber sprechen, warum Vue2 dadurch in verschiedenen Optionen auf Eigenschaften zugreifen kann
Lassen Sie uns darüber sprechen, warum Vue2 dadurch in verschiedenen Optionen auf Eigenschaften zugreifen kann

- 青灯夜游nach vorne
- 2022-12-08 20:22:392539Durchsuche
Dieser Artikel hilft Ihnen bei der Interpretation des Quellcodes von vue und stellt vor, warum Sie damit auf Attribute in verschiedenen Optionen in Vue2 zugreifen können. Ich hoffe, dass er für alle hilfreich ist!

Wenn Sie nicht daran interessiert sind, den folgenden Quellcode zu lesen, müssen Sie ihn nicht lesen. Sie können damit direkt zu [Quellcode-Analyse] navigieren Lesen Sie den Quellcode
Es gibt viele Artikel zum Lesen von Quellcode im Internet. Jeder hat seine eigene Methode, aber die Artikel im Internet sind alle verfeinert und sagen Ihnen, welche Datei, welche Funktion und welche Variable was tut ; [Verwandte Empfehlungen: vuejs-Video-Tutorial,
Web-Front-End-Entwicklung]Aber es gibt keine Erklärung, wie man diese findet, wie man sie versteht, wie man sie überprüft, wie man sie sich merkt und wie man sie erkennt wenden Sie sie an. Ich bin kein großartiger Mensch und habe im Laufe des Erkundungsprozesses nach und nach meinen eigenen Weg gefunden, in der Hoffnung, allen zu helfen.
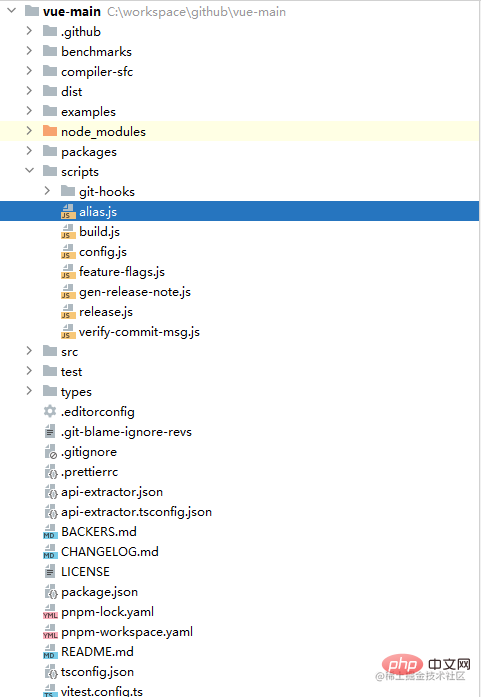
So finden Sie den StartpunktAm Anfang ist es am schwierigsten, den Startpunkt zu finden, normalerweise von in <code> package.json Suchen Sie nach dem Feld main. Das Feld main in package.json stellt normalerweise die Eintragsdatei dieses Pakets dar Wir können den Wert dieses Felds verwenden, um den Ausgangspunkt für das zu finden, was wir lesen möchten.
Aber für Vue ist dieses Feld dist/vue.runtime.common.js und wir können es nicht verstehen die Eingabedatei des Quellcodes; package.json中的main字段开始找;
package.json中的main字段代表的是这个包的入口文件,通常我们可以通过这个字段的值来找到我们要阅读的起点。
但是对于Vue来说,这个字段是dist/vue.runtime.common.js,这个文件是编译后的文件,我们是看不懂的,所以需要找到源码的入口文件;
这个时候我们就需要看package.json中的scripts字段:
{
"scripts": {
    "dev": "rollup -w -c scripts/config.js --environment TARGET:full-dev",
    "dev:cjs": "rollup -w -c scripts/config.js --environment TARGET:runtime-cjs-dev",
    "dev:esm": "rollup -w -c scripts/config.js --environment TARGET:runtime-esm",
    "dev:ssr": "rollup -w -c scripts/config.js --environment TARGET:server-renderer",
    "dev:compiler": "rollup -w -c scripts/config.js --environment TARGET:compiler ",
    "build": "node scripts/build.js",
    "build:ssr": "npm run build -- runtime-cjs,server-renderer",
    "build:types": "rimraf temp && tsc --declaration --emitDeclarationOnly --outDir temp && api-extractor run && api-extractor run -c packages/compiler-sfc/api-extractor.json",
    "test": "npm run ts-check && npm run test:types && npm run test:unit && npm run test:e2e && npm run test:ssr && npm run test:sfc",
    "test:unit": "vitest run test/unit",
    "test:ssr": "npm run build:ssr && vitest run server-renderer",
    "test:sfc": "vitest run compiler-sfc",
    "test:e2e": "npm run build -- full-prod,server-renderer-basic && vitest run test/e2e",
    "test:transition": "karma start test/transition/karma.conf.js",
    "test:types": "npm run build:types && tsc -p ./types/tsconfig.json",
    "format": "prettier --write --parser typescript "(src|test|packages|types)/**/*.ts"",
    "ts-check": "tsc -p tsconfig.json --noEmit",
    "ts-check:test": "tsc -p test/tsconfig.json --noEmit",
    "bench:ssr": "npm run build:ssr && node benchmarks/ssr/renderToString.js && node benchmarks/ssr/renderToStream.js",
    "release": "node scripts/release.js",
    "changelog": "conventional-changelog -p angular -i CHANGELOG.md -s"
  }
 }
可以看到Vue的package.json中有很多的scripts,这些相信大家都可以看得懂,这里我们只关注dev和build这两个脚本;
dev脚本是用来开发的,build脚本是用来打包的,我们可以看到dev脚本中有一个TARGET的环境变量,这个环境变量的值是full-dev,我们可以在scripts/config.js中找到这个值;
直接在scripts/config.js中搜索full-dev:
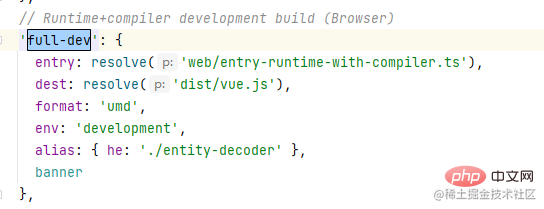
这样就可以找到这个值对应的配置:
var config = {
    'full-dev': {
        entry: resolve('web/entry-runtime-with-compiler.ts'),
        dest: resolve('dist/vue.js'),
        format: 'umd',
        env: 'development',
        alias: { he: './entity-decoder' },
        banner
    }
}
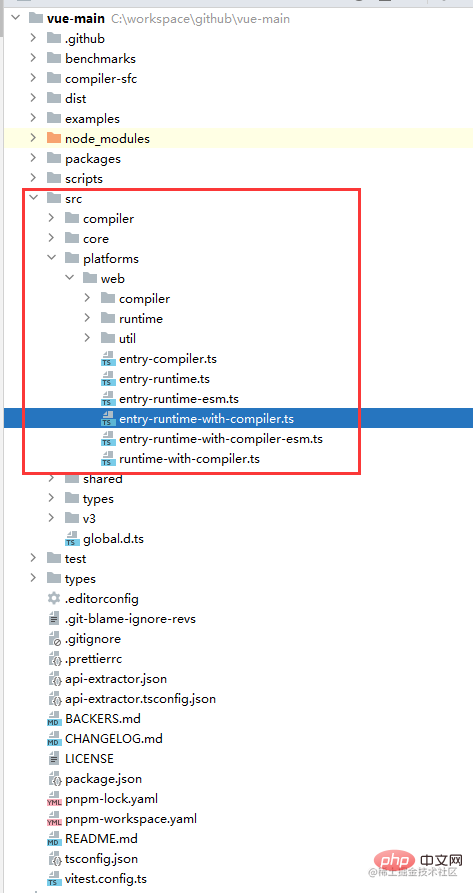
entry字段就是我们要找的入口文件,这个文件就是Vue的源码入口文件,后面的值是web/entry-runtime-with-compiler.ts,我们可以在web目录下找到这个文件;
但是并没有在根目录下找到web目录,这个时候我们就大胆猜测,是不是有别名配置,这个时候我也正好在scripts下看到了一个alias.js文件,打开这个文件,发现里面有一个web的别名;
代码如下:
module.exports = {
  vue: resolve('src/platforms/web/entry-runtime-with-compiler'),
  compiler: resolve('src/compiler'),
  core: resolve('src/core'),
  web: resolve('src/platforms/web'),
  weex: resolve('src/platforms/weex'),
  shared: resolve('src/shared')
}
为了验证我们的猜测,我们可以在config.js中搜一下alias,发现确实有引入这个文件:
const aliases = require('./alias')
const resolve = p => {
  const base = p.split('/')[0]
  if (aliases[base]) {
    return path.resolve(aliases[base], p.slice(base.length + 1))
  } else {
    return path.resolve(__dirname, '../', p)
  }
}
再搜一下aliases,发现确实有配置别名:
// 省略部分代码
const config = {
    plugins: [
        alias({
            entries: Object.assign({}, aliases, opts.alias)
        }),
    ].concat(opts.plugins || []),
}
这样我们就可以确认,web就是src/platforms/web这个目录,我们可以在这个目录下找到entry-runtime-with-compiler.ts这个文件;
这样我们就成功的找到了Vue的源码入口文件,接下来我们就可以开始阅读源码了;
如何阅读源码
上面找到了入口文件,但是还是不知道如何阅读源码,这个时候我们就需要一些技巧了,这里我就分享一下我自己的阅读源码的技巧;
像我们现在看的源码几乎都是使用esm模块化或者commonjs模块化的,这些都会有一个export或者module.exports,我们可以通过这个来看导出了什么;
只看导出的内容,其他的暂时不用管,直接找到最终导出的内容,例如Vue
scripts in package.json ansehen: 🎜import Vue from './runtime-with-compiler' export default Vue🎜Sie können
Vue sehen Es gibt viele <code>scripts in der package.json. Ich glaube, dass jeder diese verstehen kann. Hier konzentrieren wir uns nur auf dev und build Diese beiden Skripte; 🎜🎜dev-Skript wird für die Entwicklung verwendet, und build-Skript wird für die Verpackung verwendet code> Es gibt eine Umgebungsvariable TARGET im dev. Der Wert dieser Umgebungsvariablen ist full-dev. Wir können ihn in festlegen scripts/config.js; 🎜🎜 Suchen Sie direkt nach <code>full-dev in scripts/config.js: 🎜🎜 🎜🎜Auf diese Weise können Sie die entsprechende Konfiguration finden Wert: 🎜
import Vue from './runtime/index' export default Vue as GlobalAPI🎜entry ist die gesuchte Eintragsdatei. Diese Datei ist die Quellcode-Eintragsdatei von
Vue, und der folgende Wert ist web/entry-runtime-with-compiler.ts , wir finden diese Datei im Verzeichnis web 🎜🎜Aber das Verzeichnis web ist nicht zu finden Zu diesem Zeitpunkt vermuten wir mutig, dass es keine Alias-Konfiguration gibt. Zu diesem Zeitpunkt habe ich zufällig eine alias.js-Datei unter scripts gesehen. Als ich die Datei öffnete, stellte ich fest, dass sich ein web darin befand /024/8cfa3a574ddbc90b08d25a81092297fa-1.png" alt="Lassen Sie uns darüber sprechen, warum Vue2 dadurch in verschiedenen Optionen auf Eigenschaften zugreifen kann" loading="lazy"/ >🎜🎜Der Code lautet wie folgt:🎜import Vue from 'core/index' export default Vue🎜Um unsere Vermutung zu überprüfen, können wir nach
alias in <code>config.js und stellen Sie fest, dass diese Datei tatsächlich eingeführt wird: 🎜import Vue from './instance/index' export default Vue🎜again Nach der Suche nach
aliases haben wir festgestellt, dass es tatsächlich einen Konfigurationsalias gibt: 🎜function Vue(options) {
if (__DEV__ && !(this instanceof Vue)) {
warn('Vue is a constructor and should be called with the `new` keyword')
}
this._init(options)
}
export default Vue as unknown as GlobalAPI 🎜Auf diese Weise können wir bestätigen, dass web das Verzeichnis src/platforms/web ist. Wir können die Datei entry-runtime-with-compiler.ts finden. Code> in diesem Verzeichnis; 🎜🎜<img src="https://img.php.cn/upload/article/000/000%20/024/6b576450e311a756fcf2db56ccd053cf-2.png" alt="Lassen Sie uns darüber sprechen, warum Vue2 dadurch in verschiedenen Optionen auf Eigenschaften zugreifen kann" loading="lazy ">🎜🎜Auf diese Weise haben wir die Quellcode-Eintragsdatei von <code>Vue erfolgreich gefunden und können dann mit dem Lesen des Quellcodes beginnen; 🎜 🎜So liest man den Quellcode🎜🎜🎜Ich habe die Eintragsdatei oben gefunden, weiß aber immer noch nicht, wie man den Quellcode liest. Hier möchte ich meine eigenen Tipps zum Lesen des Quellcodes mitteilen Code; 🎜🎜 Fast der gesamte Quellcode, den wir uns ansehen, verwendet die Modularisierung esm oder die Modularisierung commonjs Mit code>module.exports
können wir sehen, was exportiert wird. 🎜🎜Sehen Sie sich nur den exportierten Inhalt an, ignorieren Sie vorerst die anderen und suchen Sie direkt nach dem endgültigen exportierten Inhalt, z. B. dem Quellcode von Vue: 🎜entry-runtime-with-compiler.ts的导出内容:
import Vue from './runtime-with-compiler'

export default Vue
这个时候就去找runtime-with-compiler.ts的导出内容:
runtime-with-compiler.ts的导出内容:
import Vue from './runtime/index'

export default Vue as GlobalAPI
这个时候就去找runtime/index.ts的导出内容:
runtime/index.ts的导出内容:
import Vue from 'core/index'

export default Vue
这个时候就去找core/index.ts的导出内容:
core/index.ts的导出内容:
import Vue from './instance/index'

export default Vue
这个时候就去找instance/index.ts的导出内容:
instance/index.ts的导出内容:
function Vue(options) {
    if (__DEV__ && !(this instanceof Vue)) {
        warn('Vue is a constructor and should be called with the `new` keyword')
    }
    this._init(options)
}

export default Vue as unknown as GlobalAPI这样我们就找到Vue的构造函数了,这个时候我们就可以开始阅读源码了;
带有目的的阅读源码
阅读源码的目的一定要清晰,当然你可以说目的就是了解Vue的实现原理,但是这个目的太宽泛了,我们可以把目的细化一下,例如:
Vue的生命周期是怎么实现的Vue的数据响应式是怎么实现的Vue的模板编译是怎么实现的Vue的组件化是怎么实现的Vue的插槽是怎么实现的等等...
例如我们的这次阅读计划就是了解Vue的this为什么可以访问到选项中的各种属性,这里再细分为:
Vue的this是怎么访问到data的Vue的this是怎么访问到methods的Vue的this是怎么访问到computed的Vue的this是怎么访问到props的
上面顺序不分先后,但是答案一定是在源码中。
源码分析
上面已经找到了Vue的入口文件,接下来我们就可以开始阅读源码了,这里我就以Vue的this为什么可以访问到选项中的各种属性为例,来分析Vue的源码;
首先看一下instance/index.ts的源码:
import { initMixin } from './init'
import { stateMixin } from './state'
import { renderMixin } from './render'
import { eventsMixin } from './events'
import { lifecycleMixin } from './lifecycle'
import { warn } from '../util/index'
import type { GlobalAPI } from 'types/global-api'

function Vue(options) {
  if (__DEV__ && !(this instanceof Vue)) {
    warn('Vue is a constructor and should be called with the `new` keyword')
  }
  this._init(options)
}

//@ts-expect-error Vue has function type
initMixin(Vue)
//@ts-expect-error Vue has function type
stateMixin(Vue)
//@ts-expect-error Vue has function type
eventsMixin(Vue)
//@ts-expect-error Vue has function type
lifecycleMixin(Vue)
//@ts-expect-error Vue has function type
renderMixin(Vue)

export default Vue as unknown as GlobalAPI有这么多东西,我们不用管,要清晰目的,我们在使用Vue的时候,通常是下面这样的:
const vm = new Vue({
  data() {
    return {
      msg: 'hello world'
    }
  },
  methods: {
    say() {
      console.log(this.msg)
    }
  }
});

vm.say();也就是Vue的构造函数接收一个选项对象,这个选项对象中有data和methods;
我们要知道Vue的this为什么可以访问到data和methods,那么我们就要找到Vue的构造函数中是怎么把data和methods挂载到this上的;
很明显构造函数只做了一件事,就是调用了this._init(options):
this._init(options)
那么我们就去找_init方法,这个方法在哪我们不知道,但是继续分析源码,我们可以看到下面会执行很多xxxMixin的函数,并且Vue作为参数传入:
//@ts-expect-error Vue has function type
initMixin(Vue)
//@ts-expect-error Vue has function type
stateMixin(Vue)
//@ts-expect-error Vue has function type
eventsMixin(Vue)
//@ts-expect-error Vue has function type
lifecycleMixin(Vue)
//@ts-expect-error Vue has function type
renderMixin(Vue)
盲猜一波,见名知意:
initMixin:初始化混入stateMixin:状态混入eventsMixin:事件混入lifecycleMixin:生命周期混入renderMixin:渲染混入
我们就去找这些混入的方法,一个一个的找,找到initMixin,直接就找了_init方法:
export function initMixin(Vue: typeof Component) {
Vue.prototype._init = function (options?: Record<string, any>) {
const vm: Component = this
// a uid
vm._uid = uid++
let startTag, endTag
/* istanbul ignore if */
if (__DEV__ && config.performance && mark) {
startTag = `vue-perf-start:${vm._uid}`
endTag = `vue-perf-end:${vm._uid}`
mark(startTag)
}
// a flag to mark this as a Vue instance without having to do instanceof
// check
vm._isVue = true
// avoid instances from being observed
vm.__v_skip = true
// effect scope
vm._scope = new EffectScope(true /* detached */)
vm._scope._vm = true
// merge options
if (options && options._isComponent) {
// optimize internal component instantiation
// since dynamic options merging is pretty slow, and none of the
// internal component options needs special treatment.
initInternalComponent(vm, options as any)
} else {
vm.$options = mergeOptions(
resolveConstructorOptions(vm.constructor as any),
options || {},
vm
)
}
/* istanbul ignore else */
if (__DEV__) {
initProxy(vm)
} else {
vm._renderProxy = vm
}
// expose real self
vm._self = vm
initLifecycle(vm)
initEvents(vm)
initRender(vm)
callHook(vm, 'beforeCreate', undefined, false /* setContext */)
initInjections(vm) // resolve injections before data/props
initState(vm)
initProvide(vm) // resolve provide after data/props
callHook(vm, 'created')
/* istanbul ignore if */
if (__DEV__ && config.performance && mark) {
vm._name = formatComponentName(vm, false)
mark(endTag)
measure(`vue ${vm._name} init`, startTag, endTag)
}
if (vm.$options.el) {
vm.$mount(vm.$options.el)
}
}
}代码这么多没必要全都看,记住我们的目的是找到data和methods是怎么挂载到this上的;
先简化代码,不看没有意义的代码:
export function initMixin(Vue) {
  Vue.prototype._init = function (options) {
    const vm = this
  }
}传递过来的Vue并没有做太多事情,只是把_init方法挂载到了Vue.prototype上;
在_init方法中,vm被赋值为this,这里的this就是Vue的实例,也就是我们的vm;
继续往下看,我们有目的的看代码,只需要看有vm和options组合出现的代码,于是就看到了:
if (options && options._isComponent) {
    initInternalComponent(vm, options)
} else {
    vm.$options = mergeOptions(
        resolveConstructorOptions(vm.constructor),
        options || {},
        vm
    )
}_isComponent前面带有_,说明是私有属性,我们通过new Vue创建的实例时走到现在是没有这个属性的,所以走到else分支;
resolveConstructorOptions(vm.constructor)中没有传递options,所以不看这个方法,直接看mergeOptions:
export function mergeOptions(parent, child, vm) {
  if (__DEV__) {
    checkComponents(child)
  }

  if (isFunction(child)) {
    // @ts-expect-error
    child = child.options
  }

  normalizeProps(child, vm)
  normalizeInject(child, vm)
  normalizeDirectives(child)

  // Apply extends and mixins on the child options,
  // but only if it is a raw options object that isn't
  // the result of another mergeOptions call.
  // Only merged options has the _base property.
  if (!child._base) {
    if (child.extends) {
      parent = mergeOptions(parent, child.extends, vm)
    }
    if (child.mixins) {
      for (let i = 0, l = child.mixins.length; i < l; i++) {
        parent = mergeOptions(parent, child.mixins[i], vm)
      }
    }
  }

  const options = {}
  let key
  for (key in parent) {
    mergeField(key)
  }
  for (key in child) {
    if (!hasOwn(parent, key)) {
      mergeField(key)
    }
  }
  function mergeField(key) {
    const strat = strats[key] || defaultStrat
    options[key] = strat(parent[key], child[key], vm, key)
  }
  return options
}记住我们的目的,只需要关心vm和options组合出现的代码,child就是options,vm就是vm,简化之后:
export function mergeOptions(parent, child, vm) {

  normalizeProps(child, vm)
  normalizeInject(child, vm)
  normalizeDirectives(child)

  return options
}可以看到只剩下了normalizeProps、normalizeInject、normalizeDirectives这三个方法,值得我们关注,但是见名知意,这三个方法可能并不是我们想要的,跟进去看一眼也确实不是;
虽然没有得到我们想要的,但是从这里我们也得到了一个重要信息,mergeOptions最后会返回一个options对象,这个对象就是我们的options,最后被vm.$options接收;
vm.$options = mergeOptions(
        resolveConstructorOptions(vm.constructor),
        options || {},
        vm
)现在我们分析要多一步了,参数只有vm的函数也是需要引起我们的注意的,继续往下看:
if (__DEV__) {
    initProxy(vm)
} else {
    vm._renderProxy = vm
}操作了vm,但是内部没有操作$options,跳过,继续往下看:
initLifecycle(vm)
initEvents(vm)
initRender(vm)
callHook(vm, 'beforeCreate', undefined, false /* setContext */)
initInjections(vm) // resolve injections before data/props
initState(vm)
initProvide(vm) // resolve provide after data/props
callHook(vm, 'created')
initLifecycle、initEvents、initRender、initInjections、initState、initProvide这些方法都是操作vm的;
盲猜一波:
-
initLifecycle:初始化生命周期 -
initEvents:初始化事件 -
initRender:初始化渲染 -
initInjections:初始化注入 -
initState:初始化状态 -
initProvide:初始化依赖注入 -
callHook:调用钩子
这里面最有可能是我们想要的是initState,跟进去看一下:
export function initState(vm) {
  const opts = vm.$options
  if (opts.props) initProps(vm, opts.props)

  // Composition API
  initSetup(vm)

  if (opts.methods) initMethods(vm, opts.methods)
  if (opts.data) {
    initData(vm)
  } else {
    const ob = observe((vm._data = {}))
    ob && ob.vmCount++
  }
  if (opts.computed) initComputed(vm, opts.computed)
  if (opts.watch && opts.watch !== nativeWatch) {
    initWatch(vm, opts.watch)
  }
}已经找到我们想要的了,现在开始正式分析initState。
initState
根据代码结构可以看到,initState主要做了以下几件事:
- 初始化
props - 初始化
setup - 初始化
methods - 初始化
data - 初始化
computed - 初始化
watch
我们可以用this来访问的属性是props、methods、data、computed;
看到这里也明白了,为什么在props中定义了一个属性,在data、methods、computed中就不能再定义了,因为props是最先初始化的,后面的也是同理。
initProps
initProps的作用是初始化props,跟进去看一下:
function initProps(vm, propsOptions) {
  const propsData = vm.$options.propsData || {}
  const props = (vm._props = shallowReactive({}))
  // cache prop keys so that future props updates can iterate using Array
  // instead of dynamic object key enumeration.
  const keys = (vm.$options._propKeys = [])
  const isRoot = !vm.$parent
  // root instance props should be converted
  if (!isRoot) {
    toggleObserving(false)
  }
  for (const key in propsOptions) {
    keys.push(key)
    const value = validateProp(key, propsOptions, propsData, vm)
    /* istanbul ignore else */
    if (__DEV__) {
      const hyphenatedKey = hyphenate(key)
      if (
        isReservedAttribute(hyphenatedKey) ||
        config.isReservedAttr(hyphenatedKey)
      ) {
        warn(
          `"${hyphenatedKey}" is a reserved attribute and cannot be used as component prop.`,
          vm
        )
      }
      defineReactive(props, key, value, () => {
        if (!isRoot && !isUpdatingChildComponent) {
          warn(
            `Avoid mutating a prop directly since the value will be ` +
              `overwritten whenever the parent component re-renders. ` +
              `Instead, use a data or computed property based on the prop's ` +
              `value. Prop being mutated: "${key}"`,
            vm
          )
        }
      })
    } else {
      defineReactive(props, key, value)
    }
    // static props are already proxied on the component's prototype
    // during Vue.extend(). We only need to proxy props defined at
    // instantiation here.
    if (!(key in vm)) {
      proxy(vm, `_props`, key)
    }
  }
  toggleObserving(true)
}代码很多,我们依然不用关心其他的代码,只关心props是怎么挂载到vm上的,根据我上面的方法,简化后的代码如下:
function initProps(vm, propsOptions) {
    vm._props = shallowReactive({})

    for (const key in propsOptions) {
        const value = validateProp(key, propsOptions, propsData, vm)

        if (!(key in vm)) {
            proxy(vm, `_props`, key)
        }
    }
}
这里真正有关的就两个地方:
validateProp:看名字就知道是验证props,跳过proxy:代理,很可疑,跟进去看一下:
export function proxy(target, sourceKey, key) {
    sharedPropertyDefinition.get = function proxyGetter() {
        return this[sourceKey][key]
    }
    sharedPropertyDefinition.set = function proxySetter(val) {
        this[sourceKey][key] = val
    }
    Object.defineProperty(target, key, sharedPropertyDefinition)
}这里的target就是vm,sourceKey就是_props,key就是props的属性名;
这里通过Object.defineProperty把vm的属性代理到_props上,这样就可以通过this访问到props了。
不是很好理解,那我们来自己就用这些代码实现一下:
var options = {
    props: {
        name: {
            type: String,
            default: 'default name'
        }
    }
}

function Vue(options) {
    const vm = this
    initProps(vm, options.props)
}

function initProps(vm, propsOptions) {
    vm._props = {}
    for (const key in propsOptions) {
        proxy(vm, `_props`, key)
    }
}

function proxy(target, sourceKey, key) {
    Object.defineProperty(target, key, {
        get() {
            return this[sourceKey][key]
        },
        set(val) {
            this[sourceKey][key] = val
        }
    })
}

const vm = new Vue(options)
console.log(vm.name);
console.log(vm._props.name);

vm.name = 'name'

console.log(vm.name);
console.log(vm._props.name);
上面的代码只是为了方便理解,所以会忽略一些细节,比如
props的验证等等,真实挂载在_props上的props是通过defineReactive实现的,我这里直接是空的,这些超出了本文的范围。
initMethods
initMethods的代码如下:
function initMethods(vm, methods) {
  const props = vm.$options.props
  for (const key in methods) {
    if (__DEV__) {
      if (typeof methods[key] !== 'function') {
        warn(
          `Method "${key}" has type "${typeof methods[
            key
          ]}" in the component definition. ` +
            `Did you reference the function correctly?`,
          vm
        )
      }
      if (props && hasOwn(props, key)) {
        warn(`Method "${key}" has already been defined as a prop.`, vm)
      }
      if (key in vm && isReserved(key)) {
        warn(
          `Method "${key}" conflicts with an existing Vue instance method. ` +
            `Avoid defining component methods that start with _ or $.`
        )
      }
    }
    vm[key] = typeof methods[key] !== 'function' ? noop : bind(methods[key], vm)
  }
}
跟着之前的思路,我们忽略无关代码,简化后的代码如下:
function initMethods(vm, methods) {
    for (const key in methods) {
        vm[key] = typeof methods[key] !== 'function' ? noop : bind(methods[key], vm)
    }
}
这里的
noop和bind在之前的文章中有出现过,可以去看一下:【源码共读】Vue2源码 shared 模块中的36个实用工具函数分析
这里的vm[key]就是methods的方法,这样就可以通过this访问到methods中定义的方法了。
bind的作用是把methods中定义的函数的this指向vm,这样就可以在methods中使用this就是vm了。
简单的实现一下:
var options = {
    methods: {
        say() {
            console.log('say');
        }
    }
}

function Vue(options) {
    const vm = this
    initMethods(vm, options.methods)
}

function initMethods(vm, methods) {
    for (const key in methods) {
        vm[key] = typeof methods[key] !== 'function' ? noop : bind(methods[key], vm)
    }
}

function noop() {}

function polyfillBind(fn, ctx) {
    function boundFn(a) {
        const l = arguments.length
        return l
            ? l > 1
                ? fn.apply(ctx, arguments)
                : fn.call(ctx, a)
            : fn.call(ctx)
    }

    boundFn._length = fn.length
    return boundFn
}

function nativeBind(fn, ctx) {
    return fn.bind(ctx)
}

const bind = Function.prototype.bind ? nativeBind : polyfillBind

const vm = new Vue(options)
vm.say()
initData
initData的代码如下:
function initData(vm) {
  let data = vm.$options.data
  data = vm._data = isFunction(data) ? getData(data, vm) : data || {}
  if (!isPlainObject(data)) {
    data = {}
    __DEV__ &&
      warn(
        'data functions should return an object:\n' +
          'https://v2.vuejs.org/v2/guide/components.html#data-Must-Be-a-Function',
        vm
      )
  }
  // proxy data on instance
  const keys = Object.keys(data)
  const props = vm.$options.props
  const methods = vm.$options.methods
  let i = keys.length
  while (i--) {
    const key = keys[i]
    if (__DEV__) {
      if (methods && hasOwn(methods, key)) {
        warn(`Method "${key}" has already been defined as a data property.`, vm)
      }
    }
    if (props && hasOwn(props, key)) {
      __DEV__ &&
        warn(
          `The data property "${key}" is already declared as a prop. ` +
            `Use prop default value instead.`,
          vm
        )
    } else if (!isReserved(key)) {
      proxy(vm, `_data`, key)
    }
  }
  // observe data
  const ob = observe(data)
  ob && ob.vmCount++
}
简化之后的代码如下:
function initData(vm) {
    let data = vm.$options.data

    // proxy data on instance
    const keys = Object.keys(data)
    let i = keys.length
    while (i--) {
        const key = keys[i]
        proxy(vm, `_data`, key)
    }
}这里的实现方式和initProps是一样的,都是通过proxy把data中的属性代理到vm上。
注意:
initData的获取值的地方是其他的不相同,这里只做提醒,不做详细分析。
initComputed
initComputed的代码如下:
function initComputed(vm, computed) {
  // $flow-disable-line
  const watchers = (vm._computedWatchers = Object.create(null))
  // computed properties are just getters during SSR
  const isSSR = isServerRendering()

  for (const key in computed) {
    const userDef = computed[key]
    const getter = isFunction(userDef) ? userDef : userDef.get
    if (__DEV__ && getter == null) {
      warn(`Getter is missing for computed property "${key}".`, vm)
    }

    if (!isSSR) {
      // create internal watcher for the computed property.
      watchers[key] = new Watcher(
        vm,
        getter || noop,
        noop,
        computedWatcherOptions
      )
    }

    // component-defined computed properties are already defined on the
    // component prototype. We only need to define computed properties defined
    // at instantiation here.
    if (!(key in vm)) {
      defineComputed(vm, key, userDef)
    } else if (__DEV__) {
      if (key in vm.$data) {
        warn(`The computed property "${key}" is already defined in data.`, vm)
      } else if (vm.$options.props && key in vm.$options.props) {
        warn(`The computed property "${key}" is already defined as a prop.`, vm)
      } else if (vm.$options.methods && key in vm.$options.methods) {
        warn(
          `The computed property "${key}" is already defined as a method.`,
          vm
        )
      }
    }
  }
}
简化之后的代码如下:
function initComputed(vm, computed) {
    for (const key in computed) {
        const userDef = computed[key]
        const getter = userDef

        defineComputed(vm, key, userDef)
    }
}这里的实现主要是通过defineComputed来定义computed属性,进去瞅瞅:
export function defineComputed(target, key, userDef) {
  const shouldCache = !isServerRendering()
  if (isFunction(userDef)) {
    sharedPropertyDefinition.get = shouldCache
      ? createComputedGetter(key)
      : createGetterInvoker(userDef)
    sharedPropertyDefinition.set = noop
  } else {
    sharedPropertyDefinition.get = userDef.get
      ? shouldCache && userDef.cache !== false
        ? createComputedGetter(key)
        : createGetterInvoker(userDef.get)
      : noop
    sharedPropertyDefinition.set = userDef.set || noop
  }
  if (__DEV__ && sharedPropertyDefinition.set === noop) {
    sharedPropertyDefinition.set = function () {
      warn(
        `Computed property "${key}" was assigned to but it has no setter.`,
        this
      )
    }
  }
  Object.defineProperty(target, key, sharedPropertyDefinition)
}仔细看下来,其实实现方式还是和initProps和initData一样,都是通过Object.defineProperty来定义属性;
不过里面的getter和setter是通过createComputedGetter和createGetterInvoker来创建的,这里不做过多分析。
动手时间
上面我们已经分析了props、methods、data、computed的属性为什么可以直接通过this来访问,那么我们现在就来实现一下这个功能。
上面已经简单了实现了initProps、initMethods,而initData和initComputed的实现方式和initProps的方式一样,所以我们直接复用就好了:
function Vue(options) {
    this._init(options)
}

Vue.prototype._init = function (options) {
    const vm = this
    vm.$options = options
    initState(vm)
}

function initState(vm) {
    const opts = vm.$options
    if (opts.props) initProps(vm, opts.props)
    if (opts.methods) initMethods(vm, opts.methods)
    if (opts.data) initData(vm)
    if (opts.computed) initComputed(vm, opts.computed)
}

function initProps(vm, propsOptions) {
    vm._props = {}
    for (const key in propsOptions) {
        vm._props[key] = propsOptions[key].default
        proxy(vm, `_props`, key)
    }
}

function proxy(target, sourceKey, key) {
    Object.defineProperty(target, key, {
        get() {
            return this[sourceKey][key]
        },
        set(val) {
            this[sourceKey][key] = val
        }
    })
}

function initMethods(vm, methods) {
    for (const key in methods) {
        vm[key] = typeof methods[key] !== 'function' ? noop : bind(methods[key], vm)
    }
}

function noop() {}

function polyfillBind(fn, ctx) {
    function boundFn(a) {
        const l = arguments.length
        return l
            ? l > 1
                ? fn.apply(ctx, arguments)
                : fn.call(ctx, a)
            : fn.call(ctx)
    }

    boundFn._length = fn.length
    return boundFn
}

function nativeBind(fn, ctx) {
    return fn.bind(ctx)
}

const bind = Function.prototype.bind ? nativeBind : polyfillBind

function initData(vm) {
    vm._data = {}
    for (const key in vm.$options.data) {
        vm._data[key] = vm.$options.data[key]
        proxy(vm, `_data`, key)
    }
}

function initComputed(vm, computed) {
    for (const key in computed) {
        const userDef = computed[key]
        const getter = userDef

        defineComputed(vm, key, bind(userDef, vm))
    }
}

function defineComputed(target, key, userDef) {
    Object.defineProperty(target, key, {
        get() {
            return userDef()
        },
    })
}

const vm = new Vue({
    props: {
        a: {
            type: String,
            default: 'default'
        }
    },
    data: {
        b: 1
    },
    methods: {
        c() {
            console.log(this.b)
        }
    },
    computed: {
        d() {
            return this.b + 1
        }
    }
})

console.log('props a: default',vm.a)
console.log('data b: 1', vm.b)
vm.c() // 1
console.log('computed d: 2', vm.d)
注意:上面的代码对比于文章中写的示例有改动,主要是为了实现最后打印结果正确,增加了赋值操作。
总结
通过上面的分析,让我们对构造函数的this有了更深的理解,同时对于this指向的问题也有了更深的理解。
Das obige ist der detaillierte Inhalt vonLassen Sie uns darüber sprechen, warum Vue2 dadurch in verschiedenen Optionen auf Eigenschaften zugreifen kann. Für weitere Informationen folgen Sie bitte anderen verwandten Artikeln auf der PHP chinesischen Website!
In Verbindung stehende Artikel
Mehr sehen- Was macht die Uhr von Vue?
- Ein Artikel über das Implementierungsprinzip von Vue-Router
- Warum sind Daten in der Vue-Komponente eine Funktion?
- Was sind die Vue-Routing-Modi?
- (Super detailliert) Wie führt man einen Routensprung in Vue durch? Drei Möglichkeiten zum Teilen
- Welche Vorteile bietet die Verwendung des Vue-Frameworks?