Heim >Web-Frontend >uni-app >So führen Sie Plug-ins in uni-app ein
So führen Sie Plug-ins in uni-app ein
- 藏色散人Original
- 2021-09-15 14:30:2310911Durchsuche
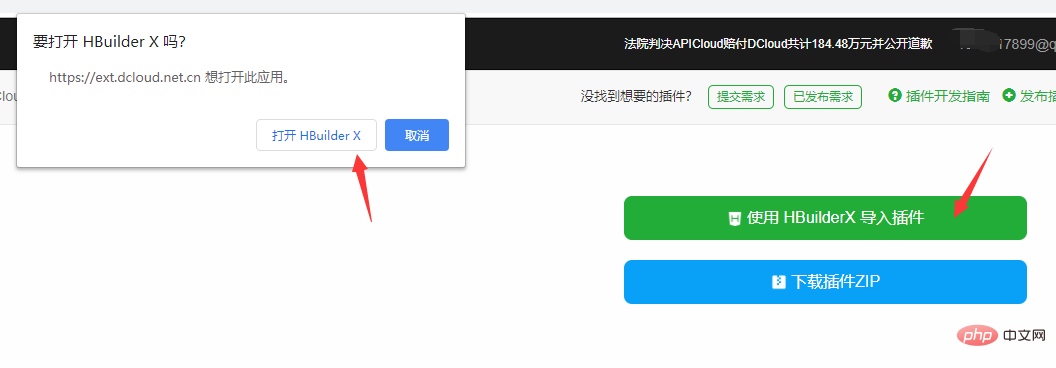
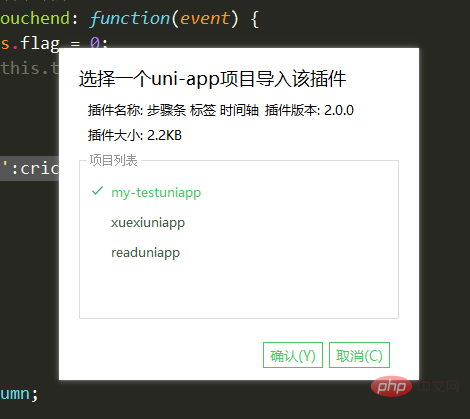
So führen Sie Plug-ins in uni-app ein: 1. Suchen Sie das benötigte Plug-in auf der offiziellen Website von uni-app. 2. Klicken Sie oben rechts auf [Importieren mit HX]. 3. Wählen Sie ein Projekt aus importieren in.

Die Betriebsumgebung dieses Artikels: Windows 7-System, Uni-App-Version 2.5.1, DELL G3-Computer
Wie führe ich Plug-Ins in Uni-App ein?
在uni-app中快速导入自己需要的插件
在uni-app的官网上;找到自己需要的插件;
然后点击右侧顶部的【使用HX导入】这一步的前提是你必须要用自己的账好登录;
然后选择你要导入哪一个项目 然后就可以了


Plug-in
<template>
<!-- 获取一个数组,结构为[{date:'时间',info:'内容内容'}] -->
<!-- @click事件返回点击标签元素的索引值 第一项为0 -->
<!--
在uni-app中快速导入自己需要的插件
在uni-app的官网上;找到自己需要的插件;
然后点击右侧顶部的【使用HX导入】这一步的前提是你必须要用自己的账好登录;
然后选择你要导入哪一个项目 然后就可以了
-->
<view class="bg">
<view class="steps">
<view class="steps_item" v-for="(i, index) in infoList">
<view class="s_r">
<view class="line" :style="{backgroundColor:index != 0?backgroundColor:'rgba(0,0,0,0)'}"></view>
<view class="index" :style="{backgroundColor:backgroundColor,color:color}">
{{ index + 1 }}
</view>
<view class="line" :style="{backgroundColor:index != infoList.length-1?backgroundColor:'rgba(0,0,0,0)'}"></view>
</view>
<view class="s_l">
<view class="info_item" @tap="topage(index)">
<text>{{ i.date }}</text>
<view :style="{WebkitLineClamp:lineNum!=0?lineNum:''}">{{ i.info }}</view>
</view>
</view>
</view>
</view>
</view>
</template>
<script>
export default {
name: 'YSteps',
props: {
infoList: {
type: Array,
default: []
},
color: {
type: String,
default: '#fff'
},
backgroundColor: {
type: String,
default: '#ff3838'
},
lineNum: {
type: Number,
default: 0
}
},
data() {
return {};
},
onLoad(e) {
//获取列表
},
methods: {
topage(e) {
this.$emit('click', e);
}
}
};
</script>
<style lang="scss" scoped>
page {
background-color: #f2f2f2;
}
.bg {
margin: 20upx 0;
background-color: #f2f2f2;
display: flex;
}
.steps {
display: flex;
flex-direction: column;
.steps_item {
display: flex;
.s_r {
padding: 0 20rpx;
display: flex;
flex-direction: column;
align-items: center;
.line {
flex: 1;
width: 5rpx;
background-color: #fff;
}
.index {
width: 40rpx;
height: 40rpx;
font-size: 12px;
text-align: center;
line-height: 40rpx;
border-radius: 50rpx;
}
}
.s_l {
display: flex;
flex-direction: column;
padding: 20rpx 0;
.info_item {
background-color: #FFFFFF;
margin-right: 30upx;
border-radius: 10upx;
display: flex;
flex-direction: column;
justify-content: center;
padding: 30upx;
box-shadow: 0 10rpx 30rpx #ddd;
width: 580rpx;
text {
font-size: 18px;
font-weight: 500;
color: rgba(51, 51, 51, 1);
line-height: 25px;
}
view {
font-size: 14px;
font-weight: 400;
color: rgba(102, 102, 102, 1);
line-height: 20px;
overflow: hidden;
text-overflow: ellipsis;
display: -webkit-box;
flex-direction: column;
}
}
.info_item:active {
background-color: #f4f4f4;
}
}
}
}
// .steps {
// display: flex;
// flex-direction: column;
// margin: 0 30upx;
// .steps_item {
// display: flex;
// align-items:center ;
// background-color: #fff;
// margin-top: 10rpx;
// .s_r {
// display: flex;
// flex-direction: column;
// align-items: center;
// height: 100%;
// background-color: #f3f;
// flex: 1;
// view {
// height: 100%;
// display: flex;
// flex: 1;
// height: 100%;
// width: 5upx;
// }
// text {
// display: flex;
// flex-direction: column;
// align-items: center;
// width: 40upx;
// line-height: 40upx;
// height: 40upx;
// border-radius: 50%;
// background-color: #ff3838;
// color: #ffffff;
// font-size: 10px;
// }
// }
// }
// }
// .info_list {
// display: flex;
// flex-direction: column;
// flex: 1;
// .info_item {
// background-color: #fff;
// height: 200upx;
// margin: 20upx 0;
// margin-right: 30upx;
// border-radius: 10upx;
// display: flex;
// flex-direction: column;
// justify-content: center;
// padding: 0 30upx;
// text {
// font-size: 18px;
// font-family: PingFangSC-Medium, PingFang SC;
// font-weight: 500;
// color: rgba(51, 51, 51, 1);
// line-height: 25px;
// }
// view {
// font-size: 14px;
// font-family: PingFangSC-Regular, PingFang SC;
// font-weight: 400;
// color: rgba(102, 102, 102, 1);
// line-height: 20px;
// overflow: hidden;
// text-overflow: ellipsis;
// display: -webkit-box;
// -webkit-line-clamp: 2;
// flex-direction: column;
// }
// }
// .info_item:active {
// opacity: 0.6;
// }
// }
</style>
Verwenden Sie [Empfohlenes Lernen: Uni-App-Tutorial]
<view style="background-color: #f2f2f2;padding-top: 100rpx;">
<YSteps lineNum='0' color='#fff' backgroundColor='#000fff' :infoList='list'></YSteps>
</view>
import YSteps from '../../components/Y-Steps/Y-Steps.vue'
list: [
{
date: '2020-1-4',
info: '我一次来到这个这个阅读网站'
},
{
date: '2020-2-4',
info: '我写下了自己的第一篇文章'
},
{
date: '2020-3-4',
info: '我的文章超阅读量过了10W'
},
{
date: '2020-4-4',
info: '我成为写作达人'
},
],
components:{
YSteps
}Das obige ist der detaillierte Inhalt vonSo führen Sie Plug-ins in uni-app ein. Für weitere Informationen folgen Sie bitte anderen verwandten Artikeln auf der PHP chinesischen Website!
Stellungnahme:
Der Inhalt dieses Artikels wird freiwillig von Internetnutzern beigesteuert und das Urheberrecht liegt beim ursprünglichen Autor. Diese Website übernimmt keine entsprechende rechtliche Verantwortung. Wenn Sie Inhalte finden, bei denen der Verdacht eines Plagiats oder einer Rechtsverletzung besteht, wenden Sie sich bitte an admin@php.cn
Vorheriger Artikel:Wofür kann uni_app genutzt werden?Nächster Artikel:Wofür kann uni_app genutzt werden?

