Heim >Web-Frontend >Bootstrap-Tutorial >Ausführliche Erläuterung häufig verwendeter Formularkomponenten beim Bootstrap-Lernen
Ausführliche Erläuterung häufig verwendeter Formularkomponenten beim Bootstrap-Lernen
- 青灯夜游nach vorne
- 2021-03-01 17:37:482733Durchsuche
In diesem Artikel werden Ihnen die gängigen Formularkomponenten in Bootstrap vorgestellt. Es hat einen gewissen Referenzwert. Freunde in Not können sich darauf beziehen. Ich hoffe, es wird für alle hilfreich sein.

Verwandte Empfehlungen: „Bootstrap-Tutorial“
Zu den allgemeinen Elementen von Formularen gehören hauptsächlich: Texteingabefeld, Dropdown-Auswahlfeld, Optionsfeld, Kontrollkästchen, Textfeld, Schaltfläche usw. Im Folgenden sind verschiedene Bootstrap-Versionen aufgeführt:
LESS: forms.less
SASS: _forms.scss
bootstrap passt nur die Feldsatz-, Legenden- und Beschriftungs-Tags im Formular an
fieldset {
min-width: 0;
padding: 0;
margin: 0;
border: 0;
}
legend {
display: block;
width: 100%;
padding: 0;
margin-bottom: 20px;
font-size: 21px;
line-height: inherit;
color: #333;
border: 0;
border-bottom: 1px solid #e5e5e5;
}

label {
display: inline-block;
margin-bottom: 5px;
font-weight: bold;
}
Zusätzlich zu diesen wenigen Elementen gibt es auch Es gibt Eingabe-, Auswahl-, Textbereichs- und andere Elemente. Der Effekt wird durch Anpassen eines Klassennamens erreicht. ccc) Der Rand
3. Mit 4 Pixel abgerundeten Ecken
4. Stellen Sie den Schatteneffekt ein, und wenn das Element den Fokus erhält, ändern sich die Schatten- und Randeffekte
5
Gemeinsames Formular
Wenn Sie vor der Eingabe eine Beschriftung hinzufügen möchten, wird die Eingabe in eine neue Zeile umgebrochen; wenn Sie eine solche Beschriftung hinzufügen müssen und nicht möchten, dass die Eingabe in eine neue Zeile umgebrochen wird Zeile müssen Sie die Beschriftung label in die Gruppe „container.form-“ einfügen, zum Beispiel: <div class="form-group ">
<label class="sr-only">邮箱地址</label>
</div>
<div class="form-group">
<input type="email" class="form-control" placeholder="请输入邮箱号">
</div>Um den Inline-Formulareffekt zu erzielen, fügen Sie einfach den Klassennamen .form-inline zum Formularelement hinzu: Legen Sie das Formularsteuerelement auf ein Inline-Blockelement fest (Anzeige: inline-block). Lassen Sie Formularsteuerelemente in einer Zeile erscheinen.
Beispiel:
<form class="form-inline">
        <div class="form-group">
            <label class="sr-only">邮箱</label>
            <input class="form-control" type="email" placeholder="请输入邮箱号">
        </div>
        <div class="form-group">
            <label class="sr-only">密码</label>
            <input type="password" class="form-control" placeholder="请输入密码">
        </div>
        <div class="checkbox">
            <label>
                <input type="checkbox" > 记住密码
            </label>
        </div>
        <div class="form-group">
            <button class="btn btn-default">进入邮箱</button>
        </div>
    </form>
Der Effekt ist wie folgt:
Als Sie den Effekt im obigen Bild gesehen haben, ist Ihnen aufgefallen, dass der Code ein Etikettenetikett enthält und dieses nicht im Container platziert ist.form- Gruppe, und die Eingabe wird nicht in neue Zeilen umgebrochen, was noch seltsamer ist, dass der Inhalt des Labels nicht angezeigt wird! Wenn Sie sich das Label label genauer ansehen, wird tatsächlich der Klassenname .sr-only hinzugefügt, der das Label verbirgt:.sr-only {
position: absolute;
width: 1px;
height: 1px;
padding: 0;
margin: -1px;
overflow: hidden;
clip: rect(0, 0, 0, 0);
border: 0;
}Nachdem das Label label hinzugefügt wurde, wird das Der Klassenname .sr-only wird ebenfalls hinzugefügt. Ist es unnötig, die Bezeichnung auszublenden? ? ? Aber genau das ist ein Vorteil des Bootstrap-Frameworks, wenn das Label nicht für die Eingabesteuerung festgelegt ist. Gleichzeitig wurden bestimmte Überlegungen für Menschen mit Behinderungen angestellt 
1 Verwenden Sie den Klassennamen .form-horizontal für das Formularelement 2 Das Bootstrap-Framework (Details: Detaillierte Erläuterung des Bootstrap-Rastersystems)
Im Formularelement Die Verwendung des Klassennamens .form-horizontal hat hauptsächlich die folgenden Funktionen: 1 Legen Sie die Abstands- und Randwerte der Formularsteuerung fest 2. Ändern Sie den Ausdruck von .from-group, ähnlich der Zeile des Gittersystems css-Quellcode:.form-horizontal .control-label,
.form-horizontal .radio,
.form-horizontal .checkbox,
.form-horizontal .radio-inline,
.form-horizontal .checkbox-inline {
padding-top: 7px;
margin-top: 0;
margin-bottom: 0;
}
.form-horizontal .radio,
.form-horizontal .checkbox {
min-height: 27px;
}
.form-horizontal .form-group {
margin-right: -15px;
margin-left: -15px;
}
.form-horizontal .form-control-static {
padding-top: 7px;
}
@media (min-width: 768px) {
.form-horizontal .control-label {
text-align: right;
}
}
.form-horizontal .has-feedback .form-control-feedback {
top: 0;
right: 15px;
}Beispiel:<form class="form-horizontal">
<div class="form-group">
<label class="col-sm-2 control-label">邮箱</label>
<div class="col-sm-10">
<input type="email" class="form-control" placeholder="请输入邮箱">
</div>
</div>
<div class="form-group">
<label class="col-sm-2 control-label">密码</label>
<div class="col-sm-10">
<input type="password" class="form-control" placeholder="请输入密码">
</div>
</div>
<div class="form-group">
<div class="col-sm-10 col-sm-offset-2">
<label>
<input type="checkbox">记住密码
</label>
</div>
</div>
<div class="form-group">
<div class="col-sm-10 col-sm-offset-2">
<button class="btn btn-default">进入邮箱</button>
</div>
</div>
</form>Der Effekt ist wie folgt:
Einzeiliges Eingabefeld

Damit das Steuerelement in verschiedenen Formularstilen gut aussieht, müssen Sie den Klassennamen .form-control
hinzufügen Dropdown-Auswahlfeld auswählen Mehrfachzeilenauswahl setzt den Wert des Mehrfachattributs auf mehrere<form role="form">
<div class="form-group">
<select class="form-control">
<option>1</option>
<option>2</option>
<option>3</option>
<option>4</option>
<option>5</option>
</select>
</div>
<div class="form-group">
<select multiple class="form-control">
<option>1</option>
<option>2</option>
<option>3</option>
<option>4</option>
<option>5</option>
</select>
</div>
</form>
Textbereich Textbereich

复选框checkbox和单选框radio
checkbox和radio与label标签配合使用会出现一些小问题(如对齐问题)
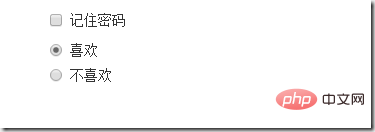
1、不管是checkbox还是radio都使用label包起来了
2、checkbox连同label标签放在一个名为.checkbox的容器内
3、radio连同label标签放在一个名为.radio的容器内,bootstrap主要借助.checkbox和.radio样式来处理复选框、单选按钮与标签的对齐方式
.radio,
.checkbox {
display: block;
min-height: 20px;
padding-left: 20px;
margin-top: 10px;
margin-bottom: 10px;
}
.radio label,
.checkbox label {
display: inline;
font-weight: normal;
cursor: pointer;
}
.radio input[type="radio"],
.radio-inline input[type="radio"],
.checkbox input[type="checkbox"],
.checkbox-inline input[type="checkbox"] {
float: left;
margin-left: -20px;
}
.radio + .radio,
.checkbox + .checkbox {
margin-top: -5px;
}
复选框和单选按钮水平排列
1、如果checkbox需要水平排列,只需要在label标签上添加类名.checkbox-inline
2、如果radio需要水平排列,只需在label标签上添加类名.radion-inline
下面是css源码:
.radio-inline,
.checkbox-inline {
display: inline-block;
padding-left: 20px;
margin-bottom: 0;
font-weight: normal;
vertical-align: middle;
cursor: pointer;
}
.radio-inline + .radio-inline,
.checkbox-inline + .checkbox-inline {
margin-top: 0;
margin-left: 10px;
}
<div>
        <label>
            <input> 男性
        </label>

        <label>
            <input> 女性
        </label>

        <label>
            <input>中性
        </label>
    </div>

表单控件状态
1、焦点状态:
焦点状态是通过伪类:focus来实现的,bootstrap表单控件中的焦点状态删除了outline的默认样式,重新添加阴影效果,下面是css源码:
.form-control:focus {
border-color: #66afe9;
outline: 0;
  -webkit-box-shadow: inset 0 1px 1pxrgba(0,0,0,.075), 0 0 8px rgba(102, 175, 233, .6);
box-shadow: inset 0 1px 1pxrgba(0,0,0,.075), 0 0 8px rgba(102, 175, 233, .6);
}
从源码中可以看出,要让控件在焦点状态下有上面的样式效果需要给控件添加类名.form-control
<form class="form-horizontal">
        <div class="form-group ">
            <div class="col-xs-6">
                <input type="text" class=" input-lg" placeholder="不是在焦点状态下的效果">
            </div>
            <div class="col-xs-6">
                <input type="text" class="form-control input-lg" placeholder="在焦点状态下的效果">
            </div>
        </div>
 </form>
file、radio、checkbox控件在焦点状态下的效果也与普通的input控件不太一样,下面是源码
input[type="file"]:focus,
input[type="radio"]:focus,
input[type="checkbox"]:focus {
outline: thin dotted;
outline: 5px auto -webkit-focus-ring-color;
outline-offset: -2px;
}
2、禁用状态:
在相应得表单控件上添加属性disabled即可,下面是css源码:
.form-control[disabled],
.form-control[readonly],
fieldset[disabled] .form-control {
cursor: not-allowed;
background-color: #eee;
opacity: 1;
}
input[type="radio"][disabled],
input[type="checkbox"][disabled],
.radio[disabled],
.radio-inline[disabled],
.checkbox[disabled],
.checkbox-inline[disabled],
fieldset[disabled] input[type="radio"],
fieldset[disabled] input[type="checkbox"],
fieldset[disabled] .radio,
fieldset[disabled] .radio-inline,
fieldset[disabled] .checkbox,
fieldset[disabled] .checkbox-inline {
cursor: not-allowed;
}例子:
<input>

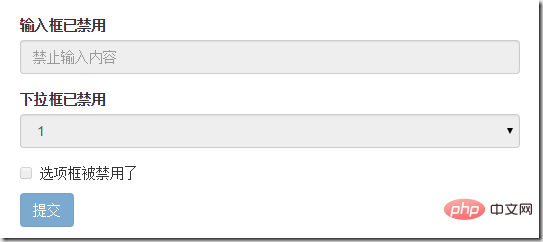
如果fieldset设置了disabled属性,整个域都会处于被禁用状态
例子:
<form role="form">
        <fieldset disabled>
            <div class="form-group">
                <label> 输入框已禁用</label>
                <input type="text" class="form-control" placeholder="禁止输入内容">
            </div>
            <div class="form-group">
                <label>下拉框已禁用</label>
                <select class="form-control">
                    <option>1</option>
                    <option>2</option>
                    <option>3</option>
                    <option>4</option>
                </select>
            </div>
            <div class="checkbox">
              <label >
                  <input type="checkbox">选项框被禁用了
              </label>
            </div>
            <button type="submit" class="btn btn-primary">提交</button>
        </fieldset>
</form>
效果如下:(鼠标移上去的时候出现禁用的图标,这里是直接截的图看不到这个效果)
3、验证状态
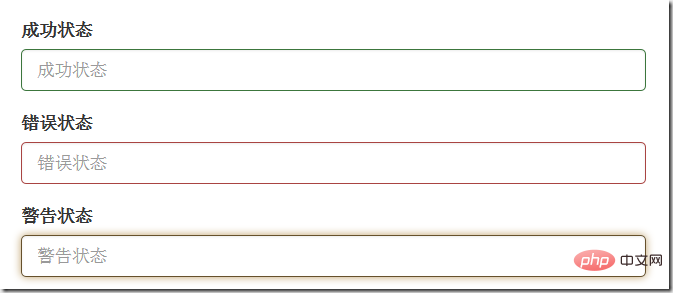
bootstrap提供下面这几种效果:
1)、.has-warning:警告状态 黄色
2)、 .has-error :错误状态 红色
3)、 .has-success:成功状态 绿色
使用的时候只需在form-group容器上对应添加状态类名,三种状态下效果都是一样的,只是颜色不一样而已
例子:
<form>
        <div class="form-group has-success">
          <label>成功状态</label>
          <input type="text" class="form-control" placeholder="成功状态">
        </div>
        <div class="form-group has-error">
            <label>错误状态</label>
            <input type="text" class="form-control" placeholder="错误状态">
        </div>
        <div class="form-group has-warning">
            <label>警告状态</label>
            <input type="text" class="form-control" placeholder="警告状态">
        </div>
    </form>
效果如下:
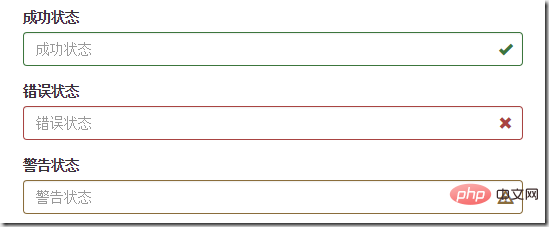
有时候,在表单验证的时不同的状态会提供不同的icon,如果要在对应的状态下显示icon出来,只需要在对应的状态下添加类名.has-feedback ,注意它要和.has-error,.has-success,.has-warning一起使用。
bootstrap的小图标都是使用@font-face来制作的。如:<span class="”glyphicon" glyphicon-warning form-control-feedback></span>
例子:
<form>
        <div class="form-group has-success has-feedback">
            <label> 成功状态</label>
            <input type="text" class="form-control" placeholder="成功状态">
            <span class="glyphicon glyphicon-ok form-control-feedback"></span>
        </div>
        <div class="form-group has-error has-feedback">
            <label>错误状态</label>
            <input type="text" class="form-control" placeholder="错误状态">
            <span class="glyphicon glyphicon-remove form-control-feedback"></span>
        </div>
        <div class="form-group has-warning has-feedback">
            <label>警告状态</label>
            <input type="text" class="form-control" placeholder="警告状态">
            <span class="glyphicon glyphicon-warning-sign form-control-feedback"></span>
        </div>
</form>
效果如下:
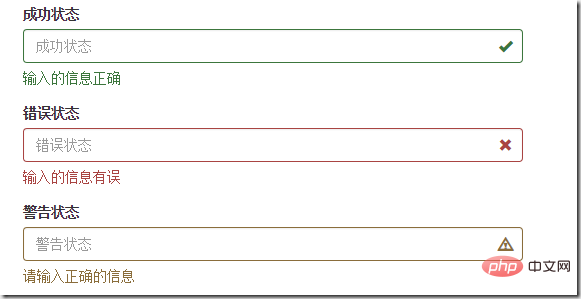
表单提示信息
一般在制作表单验证时,需要提供不同的提示信息,在bootstrap框架中使用.help-block,将提示信息以块状显示,并且显示在控件底部
下面是css源码:
.help-block {
display: block;
margin-top: 5px;
margin-bottom: 10px;
color: #737373;
}
例子:
<form>
        <div class="form-group has-success has-feedback">
            <label>成功状态</label>
            <input type="text" class="form-control" placeholder="成功状态">
            <span class="help-block">输入的信息正确</span>
            <span class="glyphicon glyphicon-ok form-control-feedback"></span>
        </div>
        <div class="form-group has-error has-feedback">
            <label>错误状态</label>
            <input type="text" class="form-control" placeholder="错误状态">
            <span class="help-block">输入的信息有误</span>
            <span class="glyphicon glyphicon-remove form-control-feedback"></span>
        </div>
        <div class="form-group has-warning has-feedback">
            <label>警告状态</label>
            <input type="text" class="form-control" placeholder="警告状态">
            <span class="help-block">请输入正确的信息</span>
            <span class="glyphicon glyphicon-warning-sign form-control-feedback"></span>
        </div>
 </form>
效果如下:
如果不想为bootstrap.css增加自己的代码,而且设计又有这种需要,可以借助bootstrap的网格系统,例如:
<form role="form">
  <div class="form-group">
    <label class="control-label" for="inputSuccess1">成功状态</label>
    <div class="row">
      <div class="col-xs-6">
        <input type="text" class="form-control" id="inputSuccess1" placeholder="成功状态" >
      </div>
       <span class="col-xs-6 help-block">你输入的信息是正确的</span>
    </div>
  </div>
</form>更多编程相关知识,请访问:编程视频!!
Das obige ist der detaillierte Inhalt vonAusführliche Erläuterung häufig verwendeter Formularkomponenten beim Bootstrap-Lernen. Für weitere Informationen folgen Sie bitte anderen verwandten Artikeln auf der PHP chinesischen Website!

