Heim >WeChat-Applet >Mini-Programmentwicklung >System – Detaillierte Erläuterung des Prozesses und Codes für die Anmeldung mithilfe des SMS-Bestätigungscodes im WeChat-Applet
System – Detaillierte Erläuterung des Prozesses und Codes für die Anmeldung mithilfe des SMS-Bestätigungscodes im WeChat-Applet
- php是最好的语言Original
- 2018-07-27 17:31:468648Durchsuche
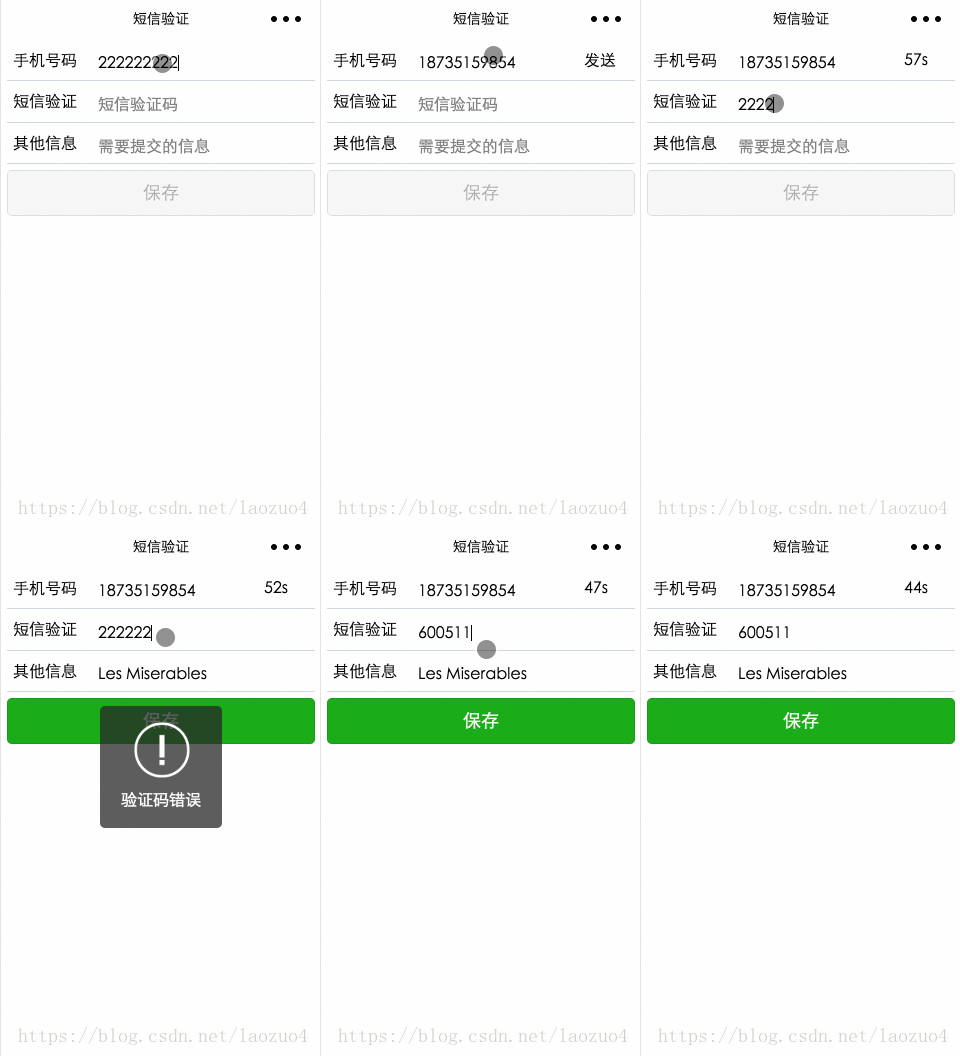
Wie erhalte ich den SMS-Bestätigungscode für die Anmeldung beim WeChat-Miniprogramm? Der folgende Code wird ausführlich erklärt und als Referenz für alle freigegeben. Schauen Sie sich die Auswirkungen des folgenden Bildes an. Der Implementierungsprozess für den SMS-Verifizierungscode wird später systematisch vorgestellt.

Ich bin ein Java-Entwickler und das Backend verwendet springMvc
SMS-Bestätigungscode-Implementierungsprozess
Erstellen Sie die Mobiltelefonüberprüfung Code, Generieren Sie eine 6-stellige Zufallszahlenzeichenfolge.
2. Senden Sie die Mobiltelefonnummer und den Bestätigungscode über die Schnittstelle an die SMS-Plattform. Anschließend sendet die SMS-Plattform den Bestätigungscode an die angegebene Mobiltelefonnummer 🎜> 3. Senden Sie den Bestätigungscode der Mobiltelefonnummer. Die Betriebszeit wird zur späteren Überprüfung gespeichert.
Empfangen Sie den Bestätigungscode, die Mobiltelefonnummer und andere vom Benutzer eingegebene Daten 5. Vergleichen Sie, ob der übermittelte Bestätigungscode mit dem Bestätigungscode in der Sitzung übereinstimmt. Gleichzeitig wird beurteilt, ob die Übermittlungsaktion innerhalb des Gültigkeitszeitraums liegt.
6. Der Bestätigungscode ist korrekt und innerhalb der Gültigkeit Nach Ablauf dieser Frist wird die Anfrage angenommen und das entsprechende Geschäft bearbeitet.
Miniprogrammcode
info.wxml
<!--info.wxml-->
<view class="container">

<view class="section">
<text>手机号码</text>
<input placeholder="请输入手机号码" type="number" maxlength="11" bindinput="inputPhoneNum" auto-focus />
<text wx:if="{{send}}" class="sendMsg" bindtap="sendMsg">发送</text>
<text wx:if="{{alreadySend}}" class="sendMsg" bindtap="sendMsg">{{second+"s"}}</text>
</view>

<view class="section">
<text>短信验证</text>
<input placeholder="短信验证码" type="number" bindinput="addCode" />
</view>

<view class="section">
<text>其他信息</text>
<input placeholder="需要提交的信息" bindinput="addOtherInfo" />
</view>

<button type="{{buttonType}}" disabled="{{disabled}}" bindtap="onSubmit">保存</button>

</view>
info.js
// info.js
const config = require('../../config/config.default.js')
Page({
data: {
send: false,
alreadySend: false,
second: 60,
disabled: true,
buttonType: 'default',
phoneNum: '',
code: '',
otherInfo: ''
},
onReady: function () {
wx.request({
url: `${config.api + '/getSessionId.html'}`,
header: {
"Content-Type": "application/x-www-form-urlencoded"
},
method: 'POST',
success: function (res) {
wx.setStorageSync('sessionId', 'JSESSIONID=' + res.data)
}
})
},
// 手机号部分
inputPhoneNum: function (e) {
let phoneNum = e.detail.value
if (phoneNum.length === 11) {
let checkedNum = this.checkPhoneNum(phoneNum)
if (checkedNum) {
this.setData({
phoneNum: phoneNum
})
console.log('phoneNum' + this.data.phoneNum)
this.showSendMsg()
this.activeButton()
}
} else {
this.setData({
phoneNum: ''
})
this.hideSendMsg()
}
},
checkPhoneNum: function (phoneNum) {
let str = /^1\d{10}$/
if (str.test(phoneNum)) {
return true
} else {
wx.showToast({
title: '手机号不正确',
image: '../../images/fail.png'
})
return false
}
},
showSendMsg: function () {
if (!this.data.alreadySend) {
this.setData({
send: true
})
}
},
hideSendMsg: function () {
this.setData({
send: false,
disabled: true,
buttonType: 'default'
})
},
sendMsg: function () {
var phoneNum = this.data.phoneNum;
var sessionId = wx.getStorageSync('sessionId');
wx.request({
url: `${config.api + '/sendSms.html'}`,
data: {
phoneNum: phoneNum
},
header: {
"Content-Type": "application/x-www-form-urlencoded",
"Cookie": sessionId
},
method: 'POST',
success: function (res) {
console.log(res)
}
})
this.setData({
alreadySend: true,
send: false
})
this.timer()
},
timer: function () {
let promise = new Promise((resolve, reject) => {
let setTimer = setInterval(
() => {
this.setData({
second: this.data.second - 1
})
if (this.data.second <= 0) {
this.setData({
second: 60,
alreadySend: false,
send: true
})
resolve(setTimer)
}
}
, 1000)
})
promise.then((setTimer) => {
clearInterval(setTimer)
})
},
// 其他信息部分
addOtherInfo: function (e) {
this.setData({
otherInfo: e.detail.value
})
this.activeButton()
console.log('otherInfo: ' + this.data.otherInfo)
},
// 验证码
addCode: function (e) {
this.setData({
code: e.detail.value
})
this.activeButton()
console.log('code' + this.data.code)
},
// 按钮
activeButton: function () {
let {phoneNum, code, otherInfo} = this.data
console.log(code)
if (phoneNum && code && otherInfo) {
this.setData({
disabled: false,
buttonType: 'primary'
})
} else {
this.setData({
disabled: true,
buttonType: 'default'
})
}
},
onSubmit: function () {
var phoneNum = this.data.phoneNum;
var code = this.data.code;
var otherInfo = this.data.otherInfo;
var sessionId = wx.getStorageSync('sessionId');
wx.request({
url: `${config.api + '/addinfo.html'}`,
data: {
phoneNum: phoneNum,
code: code,
otherInfo: otherInfo
},
header: {
"Content-Type": "application/x-www-form-urlencoded",
"Cookie": sessionId
},
method: 'POST',
success: function (res) {
console.log(res)
if ((parseInt(res.statusCode) === 200) && res.data.message === 'pass') {
wx.showToast({
title: '验证成功',
icon: 'success'
})
} else {
wx.showToast({
title: res.data.message,
image: '../../images/fail.png'
})
}
},
fail: function (res) {
console.log(res)
}
})
}
})Es ist zu beachten, dass das Miniprogramm nicht über das Konzept einer Sitzung verfügt , also benötigen wir eine virtuelle Out-of-HTTP-Sitzung:
1) Rufen Sie die serverseitige Sitzungs-ID in onReady ab und speichern Sie sie im lokalen Cache
2) Erstellen Sie bei jeder HTTP-Anfrage den Header wird initiiert: „Cookie“: sessionId
Serverseitiger Code
1. Sitzungs-ID abrufen
/**
	 * 获得sessionId
	 */
	@RequestMapping("/getSessionId")
	@ResponseBody
	public Object getSessionId(HttpServletRequest request) {
		try {
			HttpSession session = request.getSession();
			return session.getId();
		} catch (Exception e) {
			e.printStackTrace();
		}
		return null;
	}
2. SMS-Bestätigungscode senden
/**
	 * 发送短信验证码
	 * @param number接收手机号码
	 */
	@RequestMapping("/sendSms")
	@ResponseBody
	public Object sendSms(HttpServletRequest request, String phoneNum) {
		try {
			JSONObject json = null;
			//生成6位验证码
			String verifyCode = String.valueOf(new Random().nextInt(899999) + 100000);
			//发送短信
			ZhenziSmsClient client = new ZhenziSmsClient("你的appId", "你的appSecret");
			String result = client.send(phoneNum, "您的验证码为:" + verifyCode + ",该码有效期为5分钟,该码只能使用一次!【短信签名】");
			json = JSONObject.parseObject(result);
			if(json.getIntValue("code") != 0)//发送短信失败
				return "fail";
			//将验证码存到session中,同时存入创建时间
			//以json存放,这里使用的是阿里的fastjson
			HttpSession session = request.getSession();
			json = new JSONObject();
			json.put("verifyCode", verifyCode);
			json.put("createTime", System.currentTimeMillis());
			// 将认证码存入SESSION
			request.getSession().setAttribute("verifyCode", json);
			return "success";
		} catch (Exception e) {
			e.printStackTrace();
		}
		return null;
	}
3. Senden Sie Informationen und überprüfen Sie den SMS-Bestätigungscode Apache PHP MySQL
/**
	 * 注册
	 */
	@RequestMapping("/addinfo")
	@ResponseBody
	public Object addinfo(
			HttpServletRequest request,
			String phoneNum,
			String code,
			String otherInfo) {
		JSONObject json = (JSONObject)request.getSession().getAttribute("verifyCode");
		if(!json.getString("verifyCode").equals(code)){
			return "验证码错误";
		}
		if((System.currentTimeMillis() - json.getLong("createTime")) > 1000 * 60 * 5){
			return "验证码过期";
		}
		//将用户信息存入数据库
		//这里省略
		return "success";
	}
Verwandte Artikel:
Das obige ist der detaillierte Inhalt vonSystem – Detaillierte Erläuterung des Prozesses und Codes für die Anmeldung mithilfe des SMS-Bestätigungscodes im WeChat-Applet. Für weitere Informationen folgen Sie bitte anderen verwandten Artikeln auf der PHP chinesischen Website!
In Verbindung stehende Artikel
Mehr sehen- WeChat Mini-Programm Einfache DEMO-Layout-, Logik- und Stilübungen
- Ausführliche Erklärung und Beispiele des WeChat-Applets wx.request (Schnittstellenaufrufmethode)
- WeChat Mini-Programm – Detaillierte Erläuterung der WeChat-Anmeldung, WeChat-Zahlung und Vorlagennachrichten
- Einfache Beispielanwendung für das WeChat-Applet (Anwendungskonto) und ausführliche Erläuterung des Beispiels
- Detaillierte Erklärung des WeChat-Applets für die Schleife

