Heim >WeChat-Applet >Mini-Programmentwicklung >So implementieren Sie das Zuschneiden des Bildauswahlbereichs im WeChat-Applet
So implementieren Sie das Zuschneiden des Bildauswahlbereichs im WeChat-Applet
- 不言Original
- 2018-06-23 15:56:025094Durchsuche
In diesem Artikel wird hauptsächlich die Methode zum Zuschneiden des Bildschirms im ausgewählten Bereich des WeChat-Applet-Bildes vorgestellt. Der Herausgeber findet sie recht gut, daher werde ich sie jetzt mit Ihnen teilen und als Referenz verwenden. Folgen wir dem Editor und werfen wir einen Blick darauf.
Dieser Artikel stellt die Methode zum Bildschirmzuschneiden im ausgewählten Bereich von WeChat-Applet-Bildern vor und teilt sie mit allen. Die Details lauten wie folgt:
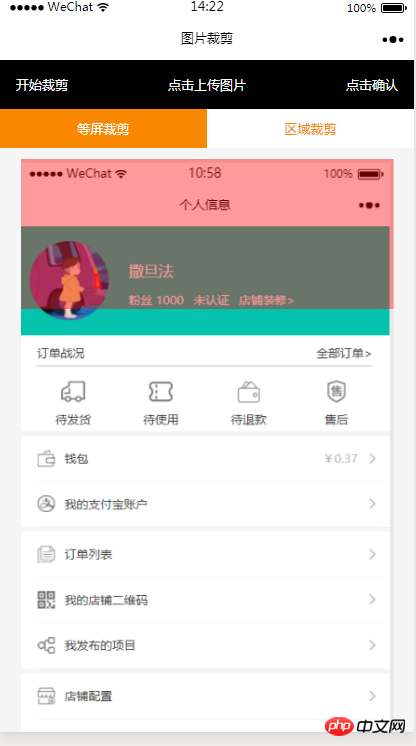
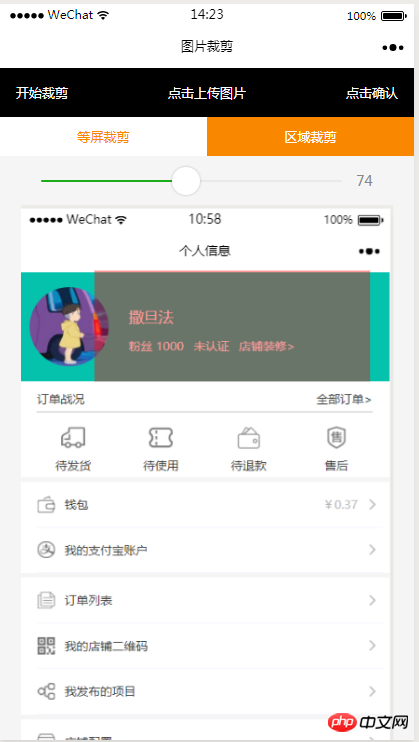
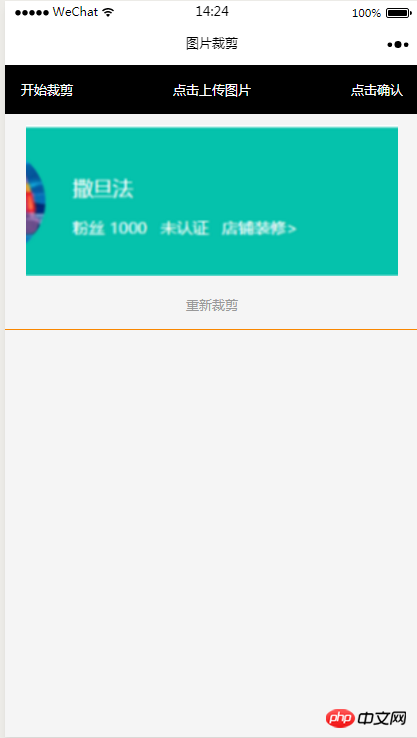
Rendering


HTML-Code
<view class="index_all_box">
<view class="imgCut_header">
<view class="imgCut_header_l" bindtap='okCutImg'>开始裁剪</view>
<view class="imgCut_header_m" bindtap='clickUpImg'>点击上传图片</view>
<view class="imgCut_header_r" bindtap='okBtn'>点击确认</view>
</view>
<!-- 选择裁剪模式 -->
<view class="selectCutMode" wx:if='{{alreay}}'>
<view class="selectCutMode_in {{cutType?'selectCutMode_in_act':''}}" bindtap='etcType'>
等屏裁剪
</view>
<view class="selectCutMode_in {{!cutType?'selectCutMode_in_act':''}}" bindtap='areaType'>
区域裁剪
</view>
</view>
<view class="areaSelct_box" wx:if='{{!cutType && alreay}}'>
<slider bindchange="areaChange" min="50" max="100" show-value value='{{propor}}'/>
</view>
<view class="cutImg_box" wx:if='{{!prienFlag}}'>
<view class="cutImg_box_t">
<image src="{{cutImgUrl}}" mode='widthFix'></image>
</view>
<view class="clickCutImg_txt" bindtap='againBtn'>重新裁剪</view>
</view>
<view class="allCavans" wx:if='{{prienFlag}}' style='width: {{canvasW}}px;height: {{canvasH}}px' >
<canvas class='canvasSty' style='width: {{canvasW}}px;height: {{canvasH}}px' canvas-id='cutImg' disable-scroll='true' bindtouchmove='canvasMove'></canvas>
<view class="allCavans_inbg" style='width: {{canvasW}}px;height:{{canvasH}}px; background: url({{img}});background-size: 100% 100%'></view>
</view>
</view>
CSS-Code
.imgCut_header{
 padding: 30rpx;
 display: flex;
 justify-content: space-between;
 align-items: center;
 background: #000;
 color: #fff;
 font-size: 24rpx;
}
.allCavans{
 margin: 20rpx auto;
 position: relative;
}
.canvasSty{
 position: absolute;
}
.cutImg_box{
 width: 100%;

 border-bottom: 2rpx #f98700 solid;
 padding-bottom: 20rpx;
}
.cutImg_box .cutImg_box_t{
 width: 90%;
 margin: 20rpx auto;
}
.cutImg_box image{
 width: 100%;
}
.cutImg_box .cutImg_box_b{
 margin-top: 20rpx;
 width: 80%;
 height: 80rpx;
 line-height: 80rpx;
 background: #f98700;
 color: #fff;
 border-radius: 10rpx;
 text-align: center;
 margin:0rpx auto;
}
.selectCutMode{
 background: #fff;
 display: flex;
 justify-content: space-between;
 align-items: center;
}
.selectCutMode .selectCutMode_in{
 width: 100%;
 text-align: center;
 background: #fff;
 color: #f98700;
 font-size: 24rpx;
 padding: 20rpx;
}
.selectCutMode .selectCutMode_in_act{
 background: #f98700;
 color: #fff;
 padding: 20rpx;
}
.areaSelct_box{
 width: 100%;
 display: flex;
 align-items: center;
 height: 50rpx;
 justify-content: center;
 margin-top: 20rpx;
}
.areaSelct_box slider{
 width: 80%;
}
.cutImg_box .clickCutImg_txt{
 width: 100%;
 text-align: center;
 height: 50rpx;
 font-size: 24rpx;
 line-height: 50rpx;
 color: #999;
}
JS-Codeteil
Beim ersten Laden wird der von der vorherigen Seite übernommene Parameterpfad eingefügt
onLoad: function (options) {
var that = this;
const ctx = wx.createCanvasContext('cutImg');
ctx.setGlobalAlpha(0.4)
var aa = 'https://pintuanqu.oss-cn-hangzhou.aliyuncs.com/Uploads/Picture/goodsShow/20171201/5a2125fc86566.png'<br /> //获取当前屏幕宽度
var phoneW = Number(util.nowPhoneWH()[0]*90)/100;
var cutH = 150;
wx.getImageInfo({
src: aa,
success: function (res) {
var w = phoneW;
var h = (phoneW/Number(res.width))*Number(res.height)
ctx.save()
ctx.drawImage(aa, 0, 0, w, h)
ctx.restore()
ctx.setFillStyle('red')
ctx.fillRect(0, 0, phoneW, cutH)
ctx.draw()
that.setData({
canvasW:w,
canvasH:h,
img:aa,
cutH:cutH
})
}
})
},
Bestätigen Sie den ausgewählten Bereich und beginnen Sie mit dem Zuschneiden
// 点击确认裁剪图片
 okCutImg:function(){
  var that = this;
  var canvasW = that.data.canvasW;
  var canvasH = that.data.canvasH;
  var nowCutW = that.data.cutType?canvasW:that.data.nowCutW;
  var nowCutH = that.data.cutType?that.data.cutH:that.data.nowCutH;
  var cutX = that.data.cutX;
  var cutY = that.data.cutY;
  const ctx = wx.createCanvasContext('cutImg');
  ctx.setGlobalAlpha(1)
  ctx.drawImage(that.data.img, 0, 0, canvasW, canvasH)
  ctx.draw()
  wx.canvasToTempFilePath({
   x: cutX,
   y: cutY,
   width: nowCutW,
   height: nowCutH,
   destWidth: nowCutW,
   destHeight: nowCutH,
   canvasId: 'cutImg',
   success: function(res) {
    var aa = res.tempFilePath
    that.setData({
     cutImgUrl:aa,
     prienFlag:false,
     alreay:false
    })
   }
  })
 },
Der rote Rahmen bewegt sich entsprechend der Fingerbewegungsmethode
// 点击红框开始移动
 canvasMove:function(e){
  var that = this;
  var canvasW = that.data.canvasW;
  var canvasH = that.data.canvasH;
  var nowCutW = that.data.cutType?canvasW:that.data.nowCutW;
  var nowCutH = that.data.cutType?that.data.cutH:that.data.nowCutH
  var touches = e.touches[0];
  var x = touches.x;
  var y = touches.y-(Number(nowCutH)/2);
  that.data.cutType?x=0:x=x-(Number(nowCutW)/2);
  that.setData({
   cutX:x,
   cutY:y
  })
  const ctx = wx.createCanvasContext('cutImg');
  ctx.setGlobalAlpha(0.4)
  ctx.drawImage(that.data.img, 0, 0, canvasW, canvasH)
  ctx.setFillStyle('red')
  ctx.fillRect(x, y, nowCutW, nowCutH)
  ctx.draw()
 },
Die beiden Schaltflächen oben zur Auswahl der Zuschneidemethode
Gleicher Bildschirmzuschnitt
//等屏裁剪
 etcType:function(){
  var that = this;
  var propor = 100;
  var canvasW = that.data.canvasW;
  var canvasH = that.data.canvasH;
  var cutH = that.data.cutH;
  var nowCutW = (Number(canvasW)*propor)/100
  var nowCutH = (Number(cutH)*propor)/100
  const ctx = wx.createCanvasContext('cutImg');
  ctx.setGlobalAlpha(0.4)
  ctx.drawImage(that.data.img, 0, 0, canvasW, canvasH)
  ctx.setFillStyle('red')
  ctx.fillRect(0, 0, nowCutW, nowCutH)
  ctx.draw()
  that.setData({
   nowCutW:nowCutW,
   nowCutH:nowCutH,
   cutType:true
  })
 },
Lokaler Zuschnitt
areaType:function(){
  var that = this;
  var propor = that.data.propor;
  var canvasW = that.data.canvasW;
  var canvasH = that.data.canvasH;
  var cutH = that.data.cutH;
  var nowCutW = (Number(canvasW)*propor)/100
  var nowCutH = (Number(cutH)*propor)/100
  const ctx = wx.createCanvasContext('cutImg');
  ctx.setGlobalAlpha(0.4)
  ctx.drawImage(that.data.img, 0, 0, canvasW, canvasH)
  ctx.setFillStyle('red')
  ctx.fillRect(0,0, nowCutW, nowCutH)
  ctx.draw()
  that.setData({
   nowCutW:nowCutW,
   nowCutH:nowCutH,
   cutType:false
  })
 },
Die gleitende Auswahl Das rote Kästchen über dem lokalen Zuschnitt basiert auf der Breite. Proportional skalieren
areaChange:function(e){
  var that = this;
  var propor = e.detail.value;
  var canvasW = that.data.canvasW;
  var canvasH = that.data.canvasH;
  var cutH = that.data.cutH;
  var nowCutW = (Number(canvasW)*propor)/100
  var nowCutH = (Number(cutH)*propor)/100
  const ctx = wx.createCanvasContext('cutImg');
  ctx.setGlobalAlpha(0.4)
  ctx.drawImage(that.data.img, 0, 0, canvasW, canvasH)
  ctx.setFillStyle('red')
  ctx.fillRect(that.data.cutX||0, that.data.cutY||0,nowCutW, nowCutH)
  ctx.draw()
  that.setData({
   nowCutW:nowCutW,
   nowCutH:nowCutH,
   propor:propor
  })
 },
Erneut auf die Seite zurückschneiden, auf der Sie das Bild ursprünglich ausgewählt haben
// 重新裁剪
 againBtn:function(){
  var that = this;
  var data = that.data
  this.setData({
   prienFlag:true,
   alreay:true
  })
  const ctx = wx.createCanvasContext('cutImg');
  ctx.setGlobalAlpha(0.4)
  ctx.drawImage(data.img, 0, 0, data.canvasW, data.canvasH)
  ctx.setFillStyle('red')
  ctx.fillRect(that.data.cutX||0, that.data.cutY||0, data.nowCutW||data.canvasW, data.nowCutH||data.cutH)
  ctx.draw()
 },
Es gibt immer noch einen Fehler in IOS, der nicht behoben werden kann, und ich weiß nicht, wann er behoben wird Oben finden Sie den gesamten Inhalt dieses Artikels. Ich hoffe, dass er für das Lernen aller hilfreich ist. Weitere verwandte Inhalte finden Sie auf der chinesischen PHP-Website.
Verwandte Empfehlungen:
Implementierung der Funktion zum Hochladen mehrerer Bilder im WeChat-AppletDas WeChat-Applet implementiert die schwebende Cloud-Ebene der Anmeldeseite AnimationseffektDas obige ist der detaillierte Inhalt vonSo implementieren Sie das Zuschneiden des Bildauswahlbereichs im WeChat-Applet. Für weitere Informationen folgen Sie bitte anderen verwandten Artikeln auf der PHP chinesischen Website!
In Verbindung stehende Artikel
Mehr sehen- WeChat Mini-Programm Einfache DEMO-Layout-, Logik- und Stilübungen
- Ausführliche Erklärung und Beispiele des WeChat-Applets wx.request (Schnittstellenaufrufmethode)
- WeChat Mini-Programm – Detaillierte Erläuterung der WeChat-Anmeldung, WeChat-Zahlung und Vorlagennachrichten
- Einfache Beispielanwendung für das WeChat-Applet (Anwendungskonto) und ausführliche Erläuterung des Beispiels
- Detaillierte Erklärung des WeChat-Applets für die Schleife

