Heim >Betrieb und Instandhaltung >Betrieb und Wartung von Linux >Wie stellt man ein PHP-Projekt unter Linux bereit?
Wie stellt man ein PHP-Projekt unter Linux bereit?
- PHP中文网Original
- 2018-05-26 15:48:0660536Durchsuche

Die Umgebung für die Bereitstellung von PHP-Projekten unter Linux kann in zwei Typen unterteilt werden: Die eine wird mithilfe komprimierter Pakete von Apache, PHP installiert, und MySQL; Verwenden Sie zum Installieren den Befehl yum.
Verwenden Sie zur Installation die komprimierten Pakete der drei Softwareprogramme, und Sie müssen die Beziehung zwischen den drei manuell konfigurieren. Die Konfiguration zwischen Apache und PHP ist nicht schwierig, aber bei der Konfiguration mit MySQL müssen Sie PHP verstehen.
Im Folgenden wird yum zum Konfigurieren der PHP-Umgebung unter Linux verwendet:
MySql
1.Es ist am besten, zuerst MySQL und Apache zu installieren, da Sie bei der Konfiguration von PHP verwandte MySQL und Apache konfigurieren und testen müssen
Laden Sie zuerst MySQL herunter- Sever-Datei, da die Linux-Umgebung des Bloggers die CentOS-Version ist und es in der Yum-Quelle keine MySQL-Sever-Datei für die normale Installation zu geben scheint. Sie müssen sie von der offiziellen Website herunterladen
1.下载mysql-service文件
[root@tele-1 ~]# wget
mysql-service
[root@tele-1 ~]# rpm -ivh mysql-community-release-el7-5.noarch.rpm
2. Installieren Sie MySQL
[root@tele-1 ~]# yum install mysql-community-server
3. Starten Sie nach der Installation den MySQL-Dienst
[root@tele-1 ~]# service mysqld restart
4. Vorläufig wird MySQL ohne Passwort installiert und der Standardbenutzername ist root. Wir müssen also das Passwort ändern und die MySQL-Befehlszeile verwenden, um es zu ändern
1. Geben Sie die MySQL-Befehlszeile ein
[root@tele-1 ~]# mysql -urootWelcome to the MySQL monitor.  Commands end with ; or \g.Your MySQL connection id is 474801Server version: 5.6.36 MySQL Community Server (GPL)

Copyright (c) 2000, 2017, Oracle and/or its affiliates. All rights reserved.Oracle is a registered trademark of Oracle Corporation and/or its
affiliates. Other names may be trademarks of their respective
owners.Type 'help;' or '\h' for help. Type '\c' to clear the current input statement.mysql>
2.使用命令进行密码修改
mysql> set password for 'root'@'localhost' = password('你要修改的密码');
Query OK, 0 rows affected (0.06 sec)
5. Da der Blogger die lokale Navicat-Software verwendet, um unter Linux eine Verbindung zu MySQL herzustellen, müssen Sie die Benutzertabelle in der MySQL-Datenbank ändern, wenn Sie lokal darauf zugreifen möchten
1.操作mysql数据库表
mysql> use mysql;
Reading table information for completion of table and column names
You can turn off this feature to get a quicker startup with -A

Database changedmysql>
2.查看user表中的数据(在mysql命令行中可以直接进行sql语句编写)
mysql> select * from user;+-----------+------+-----------------------------------+-------------+-------------+-------------+-------------+-------------+-----------+-------------+---------------+--------------+-----------+------------+-----------------+------------+------------+--------------+------------+-----------------------+------------------+--------------+-----------------+------------------+------------------+----------------+---------------------+--------------------+------------------+------------+--------------+------------------------+----------+------------+-------------+--------------+---------------+-------------+-----------------+----------------------+-----------------------+-----------------------+------------------+
| Host      | User | Password                                  | Select_priv | Insert_priv | Update_priv | Delete_priv | Create_priv | Drop_priv | Reload_priv | Shutdown_priv | Process_priv | File_priv | Grant_priv | References_priv | Index_priv | Alter_priv | Show_db_priv | Super_priv | Create_tmp_table_priv | Lock_tables_priv | Execute_priv | Repl_slave_priv | Repl_client_priv | Create_view_priv | Show_view_priv | Create_routine_priv | Alter_routine_priv | Create_user_priv | Event_priv | Trigger_priv | Create_tablespace_priv | ssl_type | ssl_cipher | x509_issuer | x509_subject | max_questions | max_updates | max_connections | max_user_connections | plugin                | authentication_string | password_expired |
+-----------+------+-----------------------------------+-------------+-------------+-------------+-------------+-------------+-----------+-------------+---------------+--------------+-----------+------------+-----------------+------------+------------+--------------+------------+-----------------------+------------------+--------------+-----------------+------------------+------------------+----------------+---------------------+--------------------+------------------+------------+--------------+------------------------+----------+------------+-------------+--------------+---------------+-------------+-----------------+----------------------+-----------------------+-----------------------+------------------+| %         | root | *3ce8dad2446975d8b0c771bd7e48d15b | Y           | Y           | Y           | Y           | Y           | Y         | Y           | Y             | Y            | Y         | Y          | Y               | Y          | Y          | Y            | Y          | Y                     | Y                | Y            | Y               | Y                | Y                | Y              | Y                   | Y                  | Y                | Y          | Y            | Y                      |          |            |             |              |             0 |           0 |               0 |                    0 | mysql_native_password |                       | N                || localhost | root | *3ce8dad2446975d8b0c771bd7e48d15b | Y           | Y           | Y           | Y           | Y           | Y         | Y           | Y             | Y            | Y         | Y          | Y               | Y          | Y          | Y            | Y          | Y                     | Y                | Y            | Y               | Y                | Y                | Y              | Y                   | Y                  | Y                | Y          | Y            | Y                      |          |            |             |              |             0 |           0 |               0 |                    0 | mysql_native_password |                       | N                |
| 127.0.0.1 | root | *3ce8dad2446975d8b0c771bd7e48d15b | Y           | Y           | Y           | Y           | Y           | Y         | Y           | Y             | Y            | Y         | Y          | Y               | Y          | Y          | Y            | Y          | Y                     | Y                | Y            | Y               | Y                | Y                | Y              | Y                   | Y                  | Y                | Y          | Y            | Y                      |          |            |             |              |             0 |           0 |               0 |                    0 | mysql_native_password |                       | N                |
| ::1       | root | *3ce8dad2446975d8b0c771bd7e48d15b | Y           | Y           | Y           | Y           | Y           | Y         | Y           | Y             | Y            | Y         | Y          | Y               | Y          | Y          | Y            | Y          | Y                     | Y                | Y            | Y               | Y                | Y                | Y              | Y                   | Y                  | Y                | Y          | Y            | Y                      |          |            |             |              |             0 |           0 |               0 |                    0 | mysql_native_password |                       | N                || tele-1    |      |                                           | N           | N           | N           | N           | N           | N         | N           | N             | N            | N         | N          | N               | N          | N          | N            | N          | N                     | N                | N            | N               | N                | N                | N              | N                   | N                  | N                | N          | N            | N                      |          |            |             |              |             0 |           0 |               0 |                    0 | mysql_native_password | NULL                  | N                |
+-----------+------+-----------------------------------+-------------+-------------+-------------+-------------+-------------+-----------+-------------+---------------+--------------+-----------+------------+-----------------+------------+------------+--------------+------------+-----------------------+------------------+--------------+-----------------+------------------+------------------+----------------+---------------------+--------------------+------------------+------------+--------------+------------------------+----------+------------+-------------+--------------+---------------+-------------+-----------------+----------------------+-----------------------+-----------------------+------------------+
5 rows in set (0.00 sec)mysql>
3. Wenn Sie einen Fernzugriff wünschen, benötigen Sie die oben rot markierten Daten Die IP-Adresse, die auf diese Datenbank zugreifen kann, % bedeutet, dass alle Anforderungen verbunden werden können.
Sie können ein Datenelement ändern oder ein Datenelement hinzufügen. Es ist jedoch am besten, die oben blau markierten Daten nicht zu ändern. Die geänderte Anweisung hat das folgende Format:
mysql> update user set Host = '%' where ???
4. Schließlich sind „exit“ oder „q“ die Möglichkeiten zum Beenden MySQL-Befehlszeile
mysql> \q
Bye
Apache installieren
1. Die Apache-Installationsmethode ist relativ einfach
[root@tele-2 ~]# yum install httpd
2 .Um vom externen Netzwerk aus auf die Adresse in der virtuellen Maschine zuzugreifen, müssen wir die Apache-Konfigurationsdatei /etc/httpd/conf/httpd.conf ändern

Suchen Sie #ServerName www.example.com:80 Ändern Sie zu ServerName localhost:80
Wie rechts gezeigt:

Finden Sie #Listen Listen:8080 (Portnummer 80XX offen unter Linux)
Wie im Bild rechts gezeigt: 3. Nachdem die Änderung abgeschlossen ist, müssen wir den httpd-Dienst erneut starten und den Startstatus überprüfen
4. Zu diesem Zeitpunkt können Sie auf Ihren Server zugreifen. Geben Sie localhost ein oder IP-Adresse, und eine Testseite der von Centos betriebenen Apache-Testseite wird angezeigt
[root@tele-2 ~]# service httpd startRedirecting to /bin/systemctl start  httpd.service
[root@tele-2 ~]# service httpd statusRedirecting to /bin/systemctl status  httpd.service
● httpd.service - The Apache HTTP Server
   Loaded: loaded (/usr/lib/systemd/system/httpd.service; enabled; vendor preset: disabled)
   Active: active (running) since Mon 2017-06-05 15:57:34 CST; 5s ago
     Docs: man:httpd(8)
           man:apachectl(8)
  Process: 54532 ExecStop=/bin/kill -WINCH ${MAINPID} (code=exited, status=0/SUCCESS)
  Process: 39046 ExecReload=/usr/sbin/httpd $OPTIONS -k graceful (code=exited, status=0/SUCCESS)
 Main PID: 54573 (httpd)
   Status: "Processing requests..."
   Memory: 15.8M
   CGroup: /system.slice/httpd.service
           ├─54573 /usr/sbin/httpd -DFOREGROUND
           ├─54576 /usr/sbin/httpd -DFOREGROUND
           ├─54577 /usr/sbin/httpd -DFOREGROUND
           ├─54578 /usr/sbin/httpd -DFOREGROUND
           ├─54579 /usr/sbin/httpd -DFOREGROUND
           └─54580 /usr/sbin/httpd -DFOREGROUND

Jun 05 15:57:34 tele-2 systemd[1]: Starting The Apache HTTP Server...Jun 05 15:57:34 tele-2 systemd[1]: Started The Apache HTTP Server.
PHP
1.php安装命令
[root@tele-2 ~]# yum install php
2.直接一路安装,安装完成之后再次重启httpd服务
[root@tele-2 ~]# service httpd startRedirecting to /bin/systemctl start httpd.service
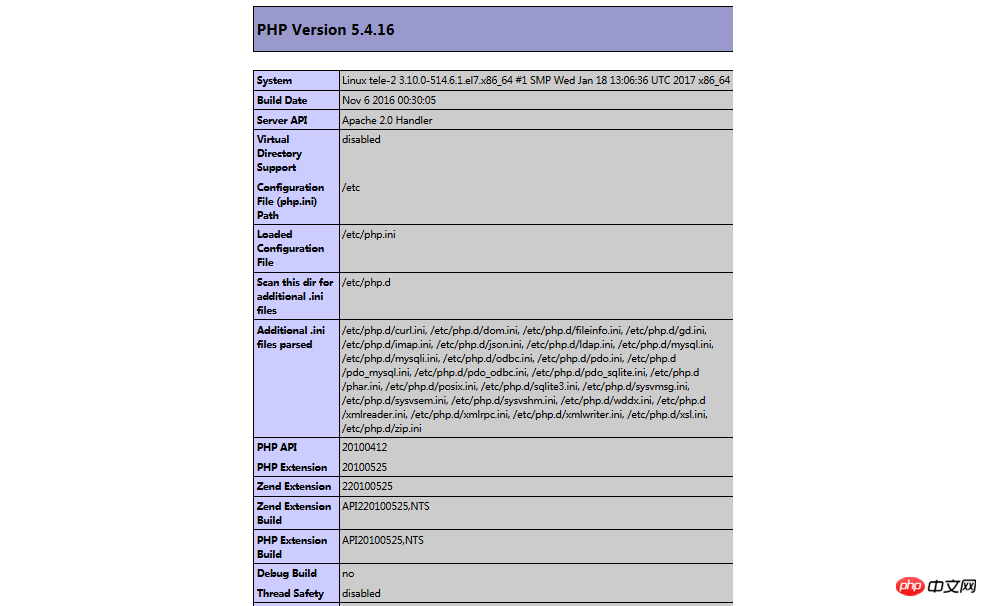
3.重启之后我们进行测试PHP相关信息,我们新建一个PHP界面进行测试
在apache默认页面路径/var/www/html下新建一个test.php页面,添加代码
<?php phpinfo();?>

4.访问这个页面,输入localhost/test.php,或者
ip:端口号/test.php就可以看见php环境的配置信息了。如右图:
关联php和mysql
1.搜索模块
[root@tele-2 ~]# yum search php
2.安装相关模块
[root@tele-2 ~]# yum install php-mysql php-gd php-imap php-ldap php-odbc php-pear php-xml php-xmlrpc

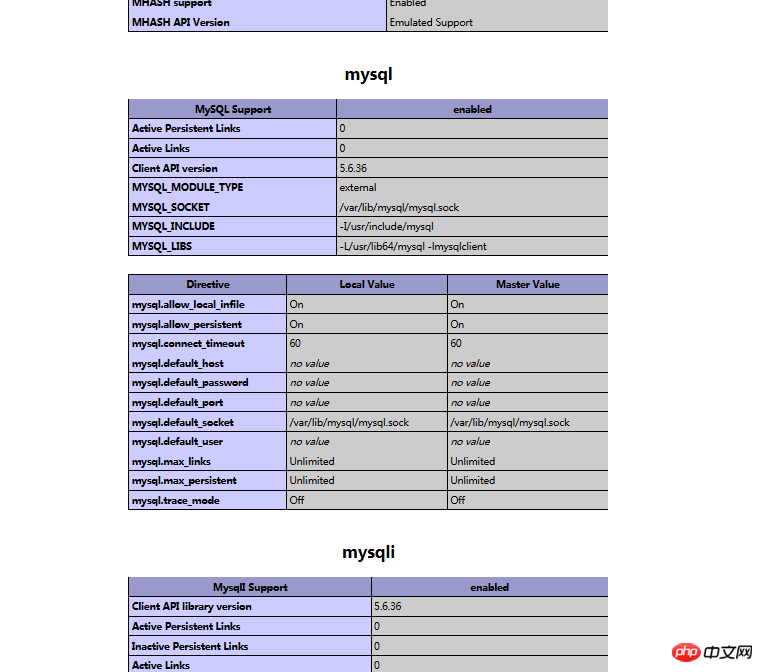
3.安装完成,重启mysqld,重启httpd
重新访问刚才的info.php,我们发现已经多了MySQL的相关信息。如右图:
至此,php在linux中的运行环境就已经成功配置完成了。
1.mysql yum安装默认文件夹及相关命令
/var/lib/mysql/

:/usr/share/mysql(mysql.server)

/usr/bin(mysqladmin mysqldump)

my.cnf: /etc/my.cnf

:/etc/rc.d/init.d/mysql
:service mysql start
停止命令:service mysql stop
运行状态:service mysql status
2.apache
配置文件路径:/etc/httpd/conf/httpd.conf
service httpd start
service httpd stop
运行状态:service httpd status
3.php
php默认页面路径:/var/www/html
Das obige ist der detaillierte Inhalt vonWie stellt man ein PHP-Projekt unter Linux bereit?. Für weitere Informationen folgen Sie bitte anderen verwandten Artikeln auf der PHP chinesischen Website!

