DOM操作与实战案例
时间:2018年9月14号 天气:台风天
1. 编程:实例演示 id,class,标签和css选择器获取元素的方法
id通过getElementByID(),class通过getELementsByClassName(),Tag通过getElementsByTagName(),css选择器通过querySelectorAll()与querySelecttor().
id:
实例
<!DOCTYPE html>
<html lang="en">
<head>
    <meta charset="UTF-8">
    <title>根据id选择元素</title>
    <style>
        ul{
            margin: 0;
            padding: 0;
            text-decoration: none;
        }
        li{
            display: block;
            float: left;
            margin-left: 10px;
            padding: 10px;
            border: 1px solid black;
            border-radius: 50%;
            color: #636363;
            font-size: 1rem;
        }
    </style>
</head>
<body>
<ul id="lists">
    <li id="item1">01</li>
    <li id="02">02</li>
    <li id="item2">03</li>
    <li id="04">04</li>
    <li id="item3">05</li>
</ul>
<script>
    //获取元素
   let item1 = document.getElementById('item1');
   let item2 = document.getElementById('item2');
   let item3 = document.getElementById('item3');
   //使用元素
    item1.style.backgroundColor = 'red';
    item2.style.backgroundColor = 'coral';
    item3.style.backgroundColor = 'blue';
    //动脑子想想怎么简化操作
    function getElements() {
        let Elements = {};
        for (let i=0;i<arguments.length;i++){
            let id = arguments[i];
            let  get =document.getElementById(id);
            if (get ===null){
                throw  new Error('该元素不存在'+id);
            }
            Elements[id] = get;
        }
        return Elements;
    }
    let elt = getElements('02','04');
    console.log(elt);

    // let json = JSON.parse(elt);
   //   let clor  =json.02;
  //    clor.style.backgroundColor ='green';
     //json.04.style.backgroundColor ='yellow';
    // for (let key in elt){
    //     elt[key].style.backgroundColor='lightgreen';
    // }
    elt['02'].style.backgroundColor='lightgreen';
    elt['04'].style.backgroundColor='yellow';

   // elt.style.backgroundColor='green';
</script>
</body>
</html>
运行实例 »
点击 "运行实例" 按钮查看在线实例
class:
实例
<!DOCTYPE html>
<html lang="en">
<head>
    <meta charset="UTF-8">
    <title>通过class属性来获取元素</title>
</head>
<style>
    .container{
        width: 450px;
        height: 450px;
        overflow: hidden;
        /*border: 1px solid red;*/
        /*background-color: whitesmoke;*/
        box-shadow: 2px 2px 2px black;
        margin: auto;
        position: relative;
     }
    .first{
    width:150px;
    height:150px;
    position: absolute;
    left: 150px;
    top:0px;

    }
    .two{
    width:150px;
    height:150px;
    position: absolute;
    left: 0px;
    top:150px;
    background-color:coral;
    }
    .third{
    width:150px;
    height:150px;
    position: absolute;
    left: 150px;
    top:150px;
    background-color:lightgreen;
    }
    .four{
    width:150px;
    height:150px;
    position: absolute;
    left: 300px;
    top:150px;
    background-color:lightblue;
    }
    .five{
    width:150px;
    height:150px;
    position: absolute;
    left: 150px;
    top:300px;
    background-color:lightpink;
    }

</style>
<body>
<div class="container">
    <div class="first"></div>
    <div class="two"></div>
    <div class="third"></div>
    <div class="four"></div>
    <div class="five"></div>
</div>
<script>
    let container = document.getElementsByClassName('container')[0];
    // console.log(container);
    container.style.backgroundColor ='wheat';
    let first = document.getElementsByClassName('first').item(0);
    first.style.backgroundColor = 'lime'
    let two = document.getElementsByClassName('two');
    two.item(0).style.backgroundColor = 'grey'
</script>
</body>
</html>
运行实例 »
点击 "运行实例" 按钮查看在线实例
css选择器来获取元素
实例
<!DOCTYPE html>
<html lang="en">
<head>
    <meta charset="UTF-8">
    <title>使用css选择器来获取元素</title>
</head>
<body>
<ul id="ul">
    <li class="red">列表项01</li>
    <li>列表项02</li>
    <li class="green">列表项03</li>
    <li class="green">列表项04</li>
    <li class="coral large">列表项05</li>
</ul>

<script>
    //我们选择页面元素的时候,大多使用css选择器来获取元素,例如
    // .red 获取 class="red"的元素,其实js也支持使用css选择器获取元素
    let lists = document.querySelectorAll('li');
    console.log(lists);     //返回节点列表数组,里面每个元素对应一个元素
    //可以使用
    lists[0].style.backgroundColor = 'coral';
    lists.item(1).style.backgroundColor = 'lightblue';

    //该方法还可以在元素上调用,这也根据标签和class类名获取元素是一样的
    let ul = document.querySelector('#ul'); // 获取满足条件的第一个元素
    console.log(ul);    // 只返回ul列表元素以及内部子元素
    let li = ul.querySelectorAll('.green');
    for (let i = 0; i < li.length; i++) {
        li[i].style.backgroundColor = 'green';
    }

</script>
</body>
</html>
运行实例 »
点击 "运行实例" 按钮查看在线实例
Tag标签名
实例
<!DOCTYPE html>
<html lang="en">
<head>
    <meta charset="UTF-8">
    <title>使用标签名和name属性选择的快捷方式</title>
</head>
<body>
<img src="inc/1.jpg" alt="" name="pic">
<form action="" name="register">
    <input type="text" placeholder="用户名">
    <input type="password" placeholder="密码不少于8位">
    <button>提交</button>
</form>
<p><a href="http://www.php.cn" name="php">php中文网</a></p>


<script>
    //根据name标签名和name属性选择元素的快捷方式:仅适用于极少的几个,这是历史原因造成的
    // images: 所有的<img>元素 图像,数组, 有三种访问方式
    document.images[0].style.width = '200px';       // 1.标签索引
    document.images['pic'].style.width = '200px';   // 2.name 属性
    document.images.pic.style.width = '300px';      // 3.将name视为元素对象的属性进行访问

    // forms: 所有的<forms>元素 表单,数组
    document.forms[0].style.backgroundColor = 'lightgreen';
    document.forms['register'].style.backgroundColor = 'lightblue';
    document.forms.register.style.backgroundColor = 'red';
    document.forms.item(0).style.backgroundColor = 'lightgreen';  // 类数组可用item()方法获取某个元素

    //a 链接: 所有的<a>元素,NodeList 数组
    document.links[0].style.backgroundColor = 'yellow';
    document.links['php'].style.backgroundColor = 'red';
    document.links.php.style.backgroundColor = 'green';

    // body: <body>元素,总有定义,只有一个
    document.body.style.backgroundColor = 'wheat';

    // head: <head>元素,总有定义,不写会自动添加,只有一个
    let style = document.createElement('style');
    document.head.appendChild(style);

    // documentElement: <html>元素,总有定义,同样一个页面只有一个
    console.log(document.documentElement);

    // doctype: 文档类型,同样也只有一个
    console.log(document.doctype);


</script>
</body>
</html>
运行实例 »
点击 "运行实例" 按钮查看在线实例
2. 实战: 在线聊天机器人
实例
<!DOCTYPE html>
<html lang="en">
<head>
    <meta charset="UTF-8">
    <title>智能在线***系统</title>
</head>
<style>
    .{
        margin: 0;
        padding: 0;
    }
    .main{
       background-image: url('../0913/inc/2.jpg');
        width: 450px;
        height: 650px;
        margin: 30px auto;
        color: #333333;
        box-shadow: 2px 2px 2px #000;


    }
    h2{
        text-align: center;
        color: #636363;
        padding-top:5px ;
    }
    .container{
        width: 400px;
        height: 500px;
        margin:0px auto;
        background-color: whitesmoke;
        padding: 0;
        overflow: hidden;
    }
    table{
        width: 450px;
        height: 100px;
        margin: auto;
    }
    ul{
        list-style-type: none;
    }

    textarea{
        resize: none;
        border: none;
    }
    button{
        line-height: 25px;
    }
    button:hover{
      cursor: pointer;
    }
</style>
<body>
<div class="main">
    <h2>在线***</h2>
    <div class="container">
        <div id="1" style="float: right"><p></p></div>
        <br><br><br>
        <div id="2" style="float: left"><p></p></div>
        <br><br><br>

    </div>
    <table>
        <tr>
            <td align="right"><textarea name="text"  cols="50" rows="4"></textarea></td>
            <td align="left"><button type="button">发送</button></td>
        </tr>
    </table>
</div>
</body>
</html>
<script>
    //获取元素
    let text =document.getElementsByName('text')[0];
    let div1 =document.getElementById('1');
    let div2 =document.getElementById('2');
    let btn = document.getElementsByTagName('button')[0];
    let num =0;
    //鼠标点击事件
    btn.onclick =function () {
        //alert(text.value);
        //获取用户提交的信息
        if (text.value.length === 0){
            alert('大佬,输点内容啊!!!');
            return false;
        }
        let userComment = text.value;
        //立即清空用户信息区
        text.value = '';
       let p =document.createElement('p');
   //    li.innerHTML =userComment;
       let userpic = '<img src="../0913/inc/lg.jpg" width="30px" style="border-radius:50%">';
       p.innerHTML =userComment  +' '+userpic;
       div1.appendChild(p);
       num +=1;

       //***自动回复内容
        setTimeout(function () {
            let info =[
                '真烦人,有话快说,别耽误我玩抖音',
                '除了退货,退款,咱们什么都可以聊',
                '说啥,张斌是傻逼吗?再说一遍',
                '在我方便的时候再回复你吧~~',
                '投诉我的人多了,你算老几~~~'
            ];
            let temp = info[Math.floor(Math.random()*3)];
            let kefuPic ='<img src="../0913/inc/4.jpg" width="30px" style="border-radius: 50%">';
            let reply =document.createElement('p');
            reply.innerHTML =kefuPic +' '+temp;
            div2.appendChild(reply);
            num +=1;
        },2000);
        if (num >10){
            div1.innerHTML ='';
            div2.innerHTML ='';
            num =0;
        }
    }
</script>
运行实例 »
点击 "运行实例" 按钮查看在线实例
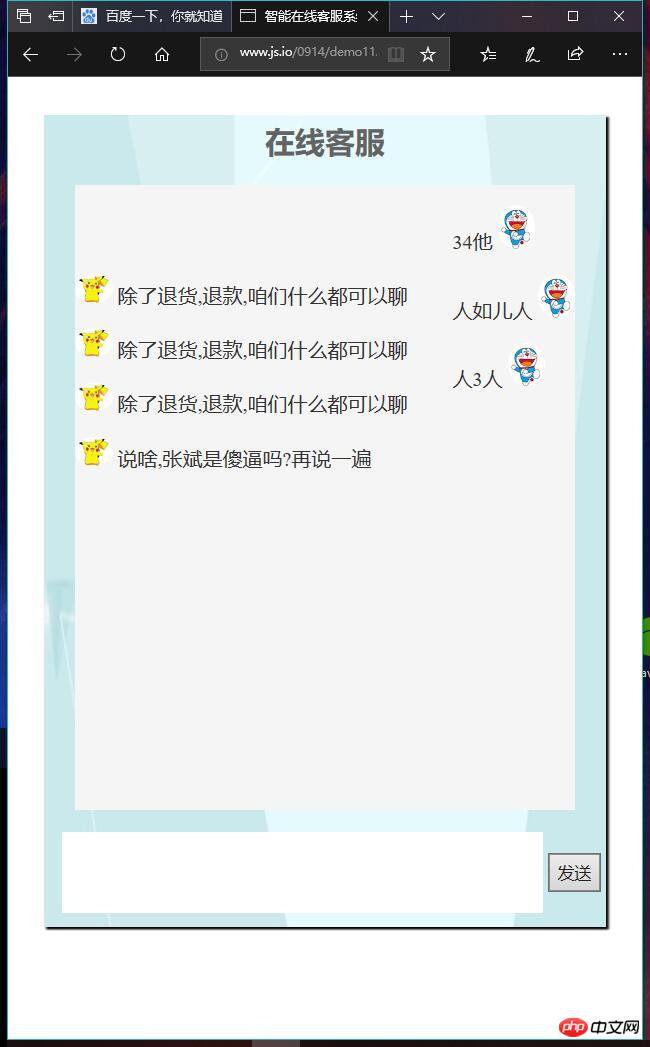
本机运行图:


