一、xhr与fetch异步编程的步骤,实例演示。
XHR与Fetch的区别:
1.xhr基于传统的ajax。
2.fetch是现代的异步请求,推荐使用,基于Promise对象。
<!DOCTYPE html><html lang="en"><head><meta charset="UTF-8"><meta http-equiv="X-UA-Compatible" content="IE=edge"><meta name="viewport" content="width=device-width, initial-scale=1.0"><title>Document</title></head><body style="display: grid;gap:2em;place-items: center center;"><button style="width: 200px;" onclick="getUser1(this)">XHR</button><button style="width: 200px;" onclick="getUser2(this)">Fetch</button><script>function getUser1(btn){// 创建对象const xhr = new XMLHttpRequest();// 响应类型xhr.responseType = "json";// 配置参数,true表示异步请求,可以省略。// 不传get参数,默认返回全部用户,用table显示。let url = "http://website.io/Study/0801/website/users.php";// 如果有get参数,用户id,用ul列表显示。// url = 'http://website.io/Study/0801/website/users.php?id=1';xhr.open("GET", url, true);// 请求回调xhr.onload = ()=> {console.log(xhr.response);//将数组渲染到页面render(xhr.response, btn);}// 失败回调xhr.onerror = ()=> console.log("Error!");// 发起请求xhr.send(null);}function getUser2(btn) {let url = "http://website.io/Study/0801/website/users.php";// fetch所有操作是异步的,但通过then的使用,顺序可控。fetch(url).then(function (response){return response.json();}).then(function(json){// 打印到控制台console.log(json);// 页面渲染render(json, btn);})}</script><script src="0801/js/function.js"></script></body></html>
点击XHR和Fetch获取数据效果: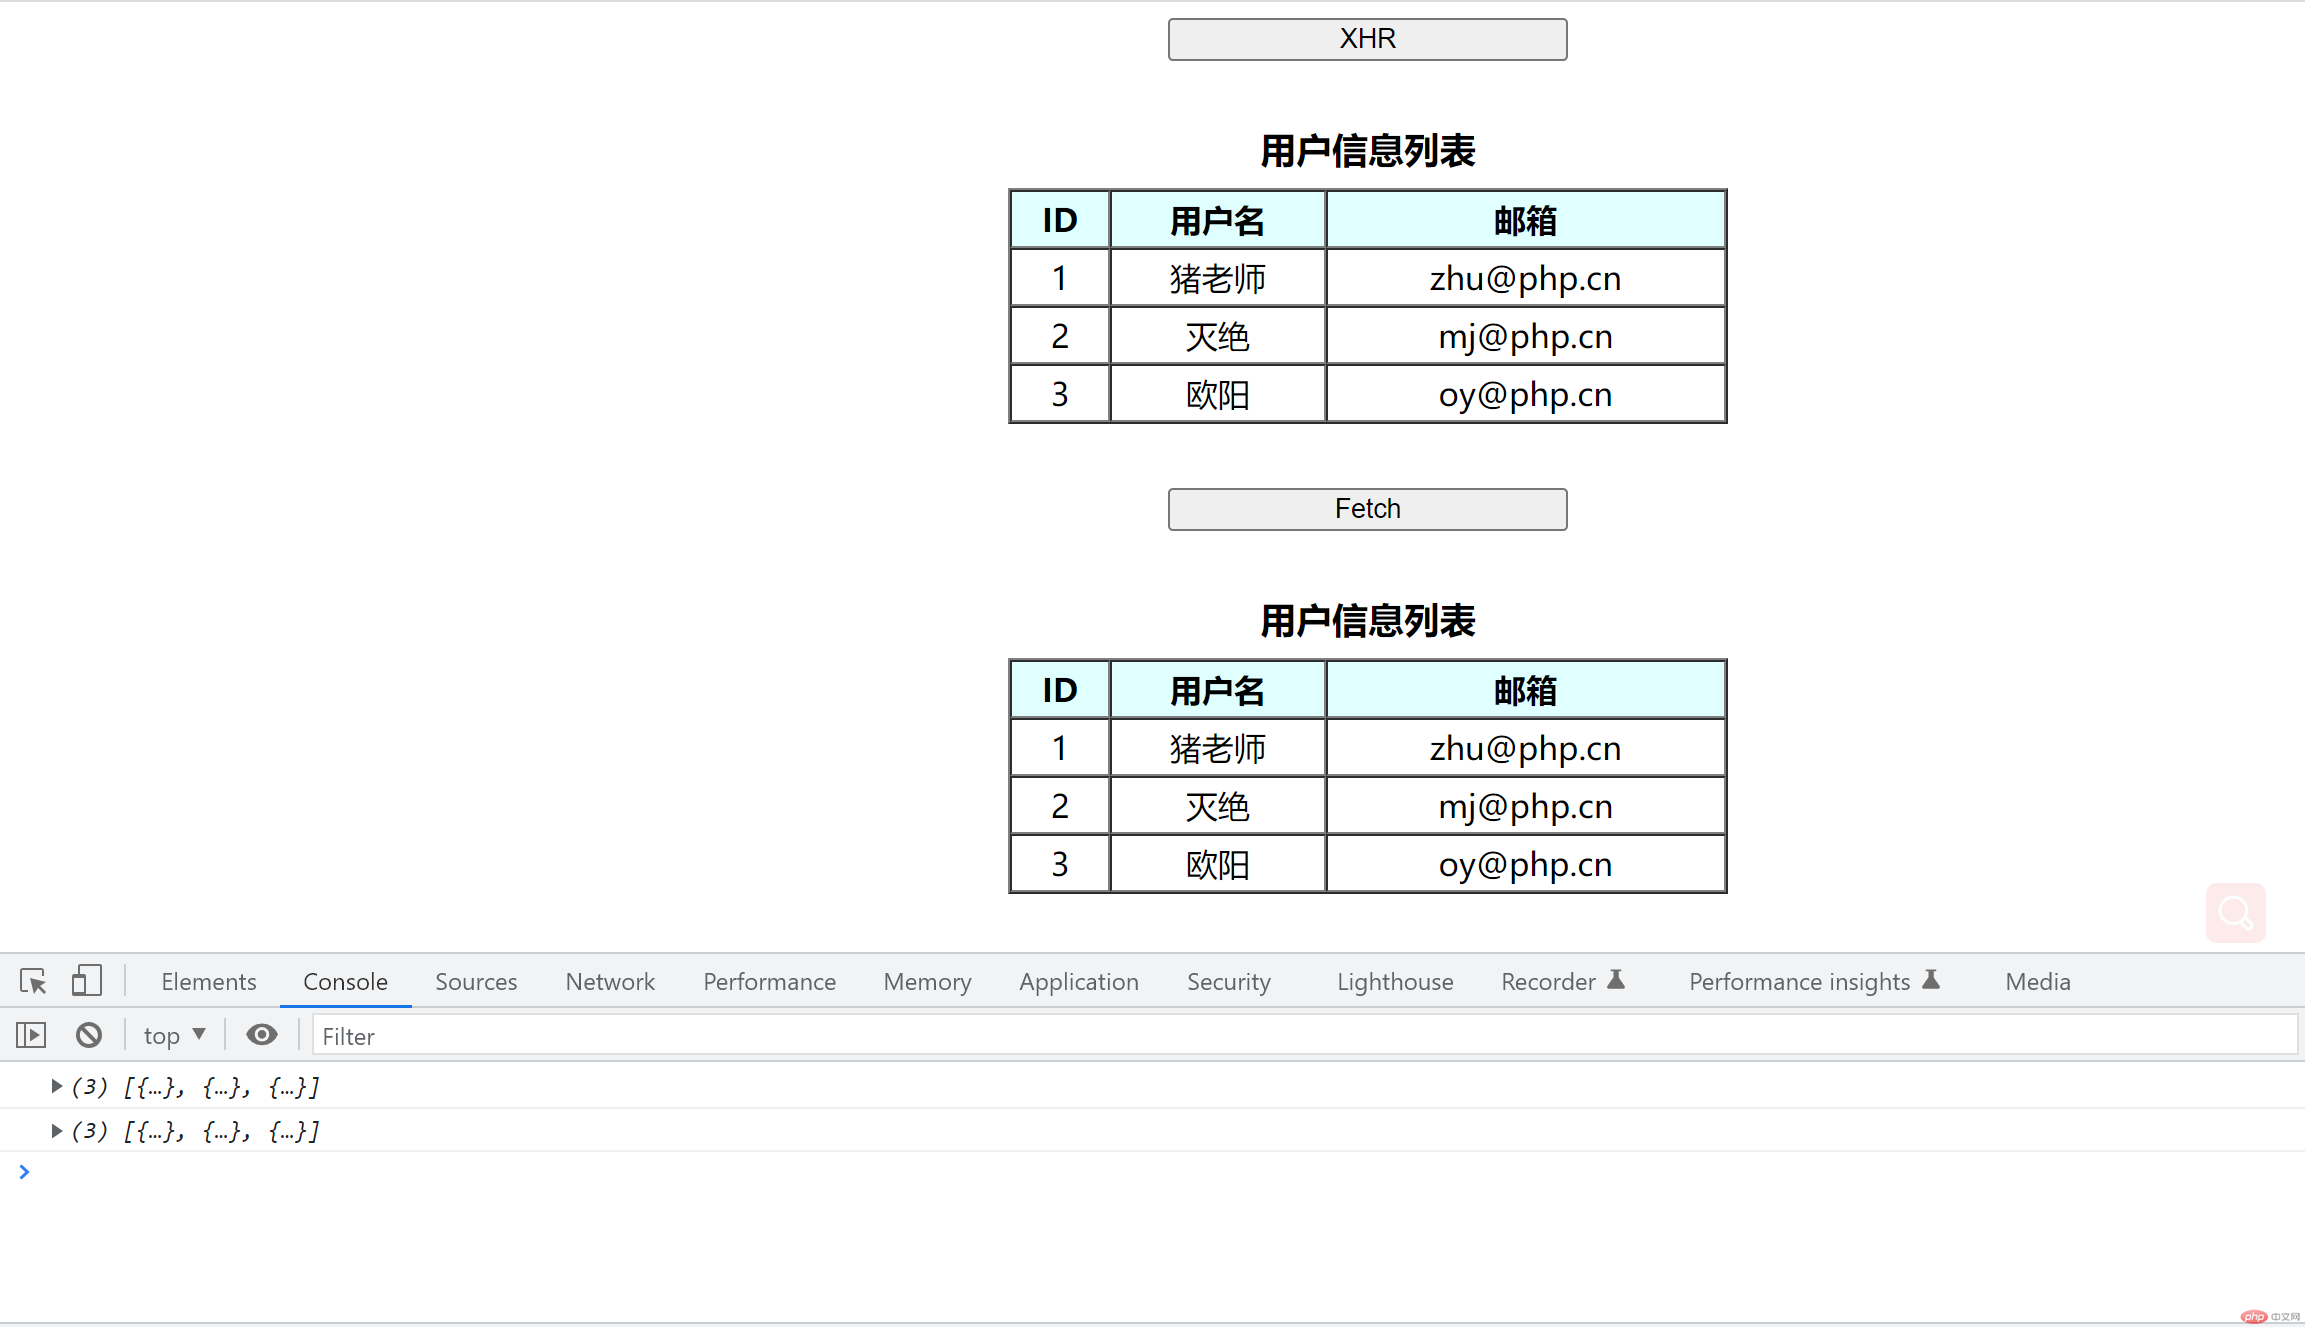
ECMA2017中简化回调
<script>// function getUser(btn) {// // 请求自己的接口// let url = "http://website.io/Study/0801/website/users.php";// fetch(url)// .then(response => response.json())// .then(json => {// console.log(json);// // 前端渲染// render(json, btn);// })//-----------以下非注释部分是简化的代码--------------// ECMA2017中,有async,await,用来简化异步回调方法async function getUser(btn) {// 请求自己的接口let url = "http://website.io/Study/0801/website/users.php";// 异步耗时,等待结果const response = await fetch(url);// 获取结果,转为jsonconst result = await response.json();console.log(result);// 前端渲染render(result, btn);}</script>
关于跨域
跨域:同源策略,仅允许协议相同,域名相同,端口相同,否则为跨域请求,一般是禁止的。图片和js脚本引用是可以跨域的,js脚本之内通常是不能发起跨域请求的。
// php中允许跨域请求,“”表示任何域名都可以过来跨域。
header(“access-control-allow-origin: “);
二、模块成员导出与导入,别名使用场景与命名空间演示
1. 模块的导入导出
为什么要用模块?
在js中,所有代码共用一个全局作用域:window,容易冲突。在js6中引入模块,来控制作用域。
作用域有哪些?
全局作用域
函数作用域
块作用域
模块作用域
js模块说明
一个模块就是一个js文档,模块有自己独立的作用域,模块中的成员默认都是私有,到处才能用。
———————模块成员的导出———————————————————
逐个导出
m1.js
// 逐个导出export let username = '用户1';export function hello(username) {return `Hello, ${username}`;}
test.html对导出的引用
<!-- 默认浏览器是不支持模块的,需要指定type --><script type="module">// 导入模块import {username, hello} from './m1.js';console.log(username);console.log(hello(username));</script>
统一导出
m1.js
// 统一导出(1)声明(2)导出// 声明let username = '用户1';function hello(username) {return `Hello, ${username}`;}// 导出export {username, hello};
test.html对导出的引用
<!-- 默认浏览器是不支持模块的,需要指定type --><script type="module">// 导入模块import {username, hello} from './m1.js';console.log(username);console.log(hello(username));</script>
别名使用场景,在有名字冲突或者想要隐藏真实命名的时候可以使用别名代替
m2.js
// 别名导出(1)声明(2)导出// 声明let username = '用户2';function hello(username) {return `Hello, ${username}`;}// 别名导出export {username as user, hello as getName};
test.html对导出的引用
<!-- 默认浏览器是不支持模块的,需要指定type --><script type="module">// 导入模块import {user, getName} from './m2.js';console.log(user);console.log(getName(user));</script>
2.命名空间
导入成员过多时可以挂在一个对象上,这个对象就叫命名空间。
命名空间使用
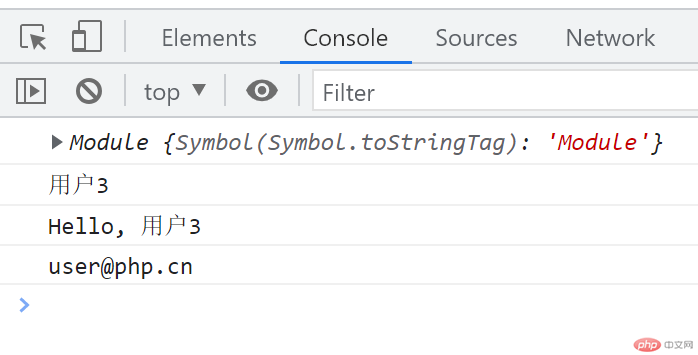
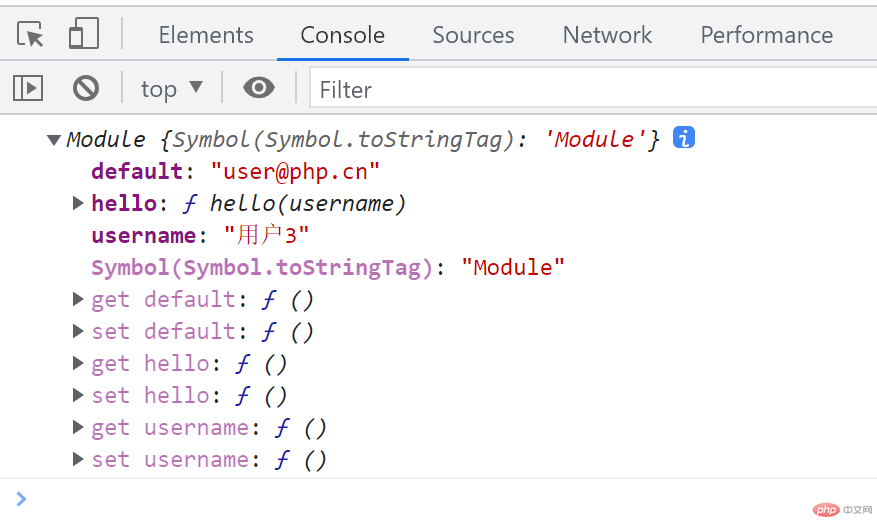
m3.js
// 默认成员(default表示)的导出,不是声明,导入时需要命名。let username = '用户3';function hello(username) {return `Hello, ${username}`;}let useremail = 'user@php.cn';// 私有成员不导出let sex = 'male';// 将useremail作为默认导出export {username, hello, useremail as default };
test.html对导出的引用
<!-- 默认浏览器是不支持模块的,需要指定type --><script type="module">// 导入模块import * as user from './m1.js';console.log(user);</script>
访问成员
<script type="module">...// 访问成员console.log(user.username);console.log(user.hello(user.username));console.log(user.default);</script>