一、页面自动加载数组构成的图片
HMTL代码,必要地方都有注释。
<!DOCTYPE html><html lang="en"><head><meta charset="UTF-8"><meta http-equiv="X-UA-Compatible" content="IE=edge"><meta name="viewport" content="width=device-width, initial-scale=1.0"><title>Document</title><link rel="stylesheet" href="test.css"></head><body><script>const divSlider = document.createElement('div');divSlider.classList.add('slider');const divImgs = document.createElement('div');divImgs.classList.add('imgs');const divBtns = document.createElement('div');divBtns.classList.add('btns');// 将所有图片放在一个数组中let imgGrps = ['./static/img/banner-1.jpg','./static/img/banner-2.jpg','./static/img/banner-3.jpg','./static/img/banner-4.jpg'];const a = document.createElement('a');function display(){document.body.append(divSlider);divSlider.append(divImgs);divSlider.append(divBtns);divImgs.append(a);// 根据图片数量,动态添加图片到页面中。for(i=0; i < imgGrps.length; i++){const img = document.createElement('img');img.src = imgGrps[i];img.dataset.index = i + 1;a.append(img);// 根据图片数量,动态创建按钮组,并动态添加到页面中。const span = document.createElement('span');span.dataset.index = i + 1;divBtns.append(span);span.addEventListener('click',setActive,false);if(i == 0){img.classList.add('active');span.classList.add('active');}}}// 在页面初始化时,自动加载内容,事件是 load。window.addEventListener('load',display,false);</script></body></html>
CSS(test.css)部分代码,必要地方都有注释。
* {margin:0;padding: 0;box-sizing: border-box;}a {color: #555;text-decoration: none;}li {list-style: none;}/* ! 3. 轮播图 */.slider {max-width: 750px;min-width: 320px;margin: auto;padding: 0 10px;}.slider .imgs {/* 图片容器必须要有高度,否则下面图片不能正常显示 */max-height: 235px;}.slider .imgs img {/* 图片完全充满父级空间显示 */height: 100%;width: 100%;/* 图片带有圆角 */border-radius: 10px;/* 默认图片全部隐藏,只有有active的图片才显示 */display: none;}/* 默认显示第一张 */.slider .imgs img.active {display: block;}/* 轮播图按钮组 */.slider .btns {/* 按钮水平一排显示,用flex,且水平居中 */display: flex;place-content: center;}.slider .btns span {/* 按钮宽高相同,确定显示成一个正圆 */width: 10px;height: 10px;/* 加上红色背景和数字是为了布局时可以看到,一会更去掉 */background-color: #333;/* 50%可确保显示为正圆 */border-radius: 50%;/* 按钮上外边距负值,可将它上移,可移动到图片中下方 */margin: -16px 5px 5px;}.slider .btns span.active {background-color: #fff;}.slider .btns span:hover {cursor: pointer;}
效果:
二、自动轮播图
没有使用load事件,使用函数每两秒触发一次点击。
<!DOCTYPE html><html lang="en"><head><meta charset="UTF-8"><meta http-equiv="X-UA-Compatible" content="IE=edge"><meta name="viewport" content="width=device-width, initial-scale=1.0"><title>Document</title><link rel="stylesheet" href="test.css"></head><body><script>const divSlider = document.createElement('div');divSlider.classList.add('slider');const divImgs = document.createElement('div');divImgs.classList.add('imgs');const divBtns = document.createElement('div');divBtns.classList.add('btns');// 将所有图片放在一个数组中let imgGrps = ['./static/img/banner-1.jpg','./static/img/banner-2.jpg','./static/img/banner-3.jpg','./static/img/banner-4.jpg'];const a = document.createElement('a');document.body.append(divSlider);divSlider.append(divImgs);divSlider.append(divBtns);divImgs.append(a);// 根据图片数量,动态添加图片到页面中。for(i=0; i < imgGrps.length; i++){const img = document.createElement('img');img.src = imgGrps[i];img.dataset.index = i + 1;a.append(img);// 根据图片数量,动态创建按钮组,并动态添加到页面中。const span = document.createElement('span');span.dataset.index = i + 1;divBtns.append(span);span.addEventListener('click',setActive,false);if(i == 0){img.classList.add('active');span.classList.add('active');}}//获取所有看图片和按钮const imgs = document.querySelectorAll('.slider .imgs img');// console.log(imgs);const btns = document.querySelectorAll('.slider .btns span');// console.log(btns);// 设置激活function setActive(){// console.log("进来了!",btns,imgs);// 清除掉图片和按钮当前的active状态btns.forEach(btn => btn.classList.remove('active'));// console.log(btns);imgs.forEach(img => img.classList.remove('active'));// console.log(imgs);event.target.classList.add('active');// console.log(btns);imgs.forEach(img => {if(img.dataset.index == event.target.dataset.index){img.classList.add('active');}});// console.log(imgs);}// 定时播放setInterval((arr) => {// 四张图轮播顺序,1234->2341 ->3412 ->4123 ->1234,始终循环取第一张图,放到最后。let index = arr.shift();// console.log(index);btns[index].dispatchEvent(new Event('click'));// console.log(btns[index]);arr.push(index);// console.log(arr);}, 2000, Object.keys('btns'));</script></body></html>
css代码与第一部分相同,不再重复。
轮播效果:


三、仿写php中文网编程词典选项卡
HTML代码,必要地方都有注释。
<!DOCTYPE html><html lang="en"><head><meta charset="UTF-8"><meta http-equiv="X-UA-Compatible" content="IE=edge"><meta name="viewport" content="width=device-width, initial-scale=1.0"><title>Document</title><link rel="stylesheet" href="test.css"><link rel="stylesheet" href="icon-font.css"></head><body><!-- 整个区域:搞个大盒子在浏览器中布局 --><div class="box"><!-- 菜单区域:搞个nav包起来菜单项,方便进行布局 --><nav class="menu"><!-- 第一个选项卡菜单class默认为激活,data-index用于后面辅助查找,以便更改class属性值。 --><a href="" class="active" data-index="1">词典查询<b></b></a><!-- 后面这两个没有class,后续通过js来增加并根据点击和悬停来修改对应的值。 --><a href="" data-index="2">全部词典<b></b></a><a href="" data-index="3">最近更新<b></b></a></nav><!-- 内容区域:搞得div布局 --><div class="content"><!-- 第一部分内容:对应菜单”词典查询“,class的active值也是对应菜单的active,需要js来同步操作 --><div class="content-block block1 active" data-index="1"><!-- 第一部分内容用dl来布局 --><dl><!-- 表头 --><dt><h2>编程词典</h2><span>服务码农的在线技术手册</span></dt><!-- 第一行 --><dd class="row1"><!-- 搞个div布局 --><div class="search"><span class="iconfont icon-fangdajing"></span><input type="text" value="请输入搜索内容" class="text1" name="keywords"onclick="if(this.value == '请输入搜索内容') this.value='';"onblur="if(this.value == '') this.value='请输入搜索内容'"><input type="submit" value="搜索" name="" onclick="alert('搜索测试成功')" class="submit1"><!-- <button onclick="alert('搜索测试成功')" class="submit2">搜索</button> --></div></dd><!-- 第二行 --><dd class="row2"><!-- 搞个div布局 --><div class="RMsearch"><em>热门搜索:</em><span><a href="">PHP</a><a href="">MySQL</a><a href="">jQuery</a><a href="">HTML</a><a href="">CSS</a></span></div></dd></dl></div><!-- 第二部分内容 --><div class="content-block block2" data-index="2"><!-- 第二部分内容用ul布局 --><ul><!-- 每个小块内容都用li包起来 --><li><!-- 小块内容放在一整个链接里 --><a target="_blank" href="" title="" class="aBlack"><!-- 链接内部放一个dl --><dl><dt>【学习 PHP】</dt><dd><span><img src="./static/img/php.png" alt="" style="display: block;"></span><em>PHP一种被广泛应用的开...</em></dd></dl></a></li><li><!-- 小块内容放在一整个链接里 --><a target="_blank" href="" title="" class="aBlack"><!-- 链接内部放一个dl --><dl><dt>【学习 ThinkPHP】</dt><dd><span><img src="./static/img/thinkphp.png" alt="" style="display: block;"></span><em>ThinkPHP 是一个...</em></dd></dl></a></li><li><!-- 小块内容放在一整个链接里 --><a target="_blank" href="" title="" class="aBlack"><!-- 链接内部放一个dl --><dl><dt>【学习 Laravel】</dt><dd><span><img src="./static/img/laravel.png" alt="" style="display: block;"></span><em>Laravel是一套简洁...</em></dd></dl></a></li><li><!-- 小块内容放在一整个链接里 --><a target="_blank" href="" title="" class="aBlack"><!-- 链接内部放一个dl --><dl><dt>【学习 HTML】</dt><dd><span><img src="./static/img/html.png" alt="" style="display: block;"></span><em>html是HyperTe...</em></dd></dl></a></li><li><!-- 小块内容放在一整个链接里 --><a target="_blank" href="" title="" class="aBlack"><!-- 链接内部放一个dl --><dl><dt>【学习 CSS】</dt><dd><span><img src="./static/img/css.png" alt="" style="display: block;"></span><em>层叠样式表(英文全称:C...</em></dd></dl></a></li><li><!-- 小块内容放在一整个链接里 --><a target="_blank" href="" title="" class="aBlack"><!-- 链接内部放一个dl --><dl><dt>【学习 MySQL】</dt><dd><span><img src="./static/img/mysql.png" alt="" style="display: block;"></span><em>PHP一种被广泛应用的开...</em></dd></dl></a></li><li><!-- 小块内容放在一整个链接里 --><a target="_blank" href="" title="" class="aBlack"><!-- 链接内部放一个dl --><dl><dt>【学习 HTML5】</dt><dd><span><img src="./static/img/html5.png" alt="" style="display: block;"></span><em>HTML5它的综合性功能...</em></dd></dl></a></li><li><!-- 小块内容放在一整个链接里 --><a target="_blank" href="" title="" class="aBlack"><!-- 链接内部放一个dl --><dl><dt>【学习 CSS3】</dt><dd><span><img src="./static/img/css3.png" alt="" style="display: block;"></span><em>CSS即层叠样式表(Ca...</em></dd></dl></a></li></ul></div><div class="content-block block3" data-index="3"><div><a target="_blank" href="">php array_diff_assoc()函数</a><a target="_blank" href="">php array_merge_recursive()函数</a><a target="_blank" href="">TCP/IP 邮件</a><a target="_blank" href="">TCP/IP 协议</a><a target="_blank" href="">TCP/IP 寻址</a><a target="_blank" href="">Web Forms - 数据库连接</a><a target="_blank" href="">Web Forms - ArrayList 对象</a><a target="_blank" href="">Web Forms - Button 控件</a></div></div></div></div><script>const menu = document.querySelector('.menu');// console.log(menu);menu.addEventListener('click', show, false);menu.addEventListener('mouseover', show, false);function show(){// 禁用超链接跳转event.preventDefault();const btns = [...event.currentTarget.children];const contents = document.querySelectorAll('.content-block');// console.log(ul);// 1. 标签间切换:去掉原来的高亮,增加新选择的标签高亮。btns.forEach(item => item.classList.remove('active'));event.target.classList.add('active');// 2. 内容切换与标签切换基本一直,多一个data-index查询过程contents.forEach(item => item.classList.remove('active'));// contents.forEach(item =>{// if(item.dataset.index === event.target.dataset.index){// item.classList.add('active');// }// });[...contents].find(item => item.dataset.index === event.target.dataset.index).classList.add('active');}</script></body></html>
CSS代码(test.css),必要地方都有注释。
* {margin:0;padding: 0;box-sizing: border-box;}a {color: #555;text-decoration: none;}li {list-style: none;}.box {font-size: 10px;background: #ffffff; border-radius: 12px; margin-top:4em;width: 980px;height: 304px;border: 1px red solid;margin: 32px auto;}.box .menu {border-bottom: 1px solid #f6f6f6; margin: top 20px;width: 980;height: 39px;display: grid;grid-template-columns: repeat(3,1fr);text-align: center;line-height: 32px;/* border: solid 5px coral; */border-radius: 12px 12px 0 0;}.box .menu .active {color: red;background-color: #eee;/* border-radius: 12px 12px 0 0; */}.box .menu .active:nth-of-type(1) {border-radius: 12px 0 0 0;}.box .menu .active:nth-of-type(2) {border-radius: 0;}.box .menu .active:nth-of-type(3) {border-radius: 0 12px 0 0 ;}/* .box .menu .active .active {background-color: red;} */.box .menu .active b{display: block;background-color: red;width:18px; height:1px; margin: auto; margin-top:1px;}.box .content {width: 978px;height: 244px;}.box .content-block{padding: 10px;display: none;}.box .content-block.active {display: block;background-color: #ffffff;}.box .block1 dl {width: 800px;}.box .block1 dl dt {text-align: center;margin-top: 35px;}.box .block1 dl dt h2 {font-size: 20px; height: 24px; line-height: 24px; overflow: hidden; color: #333333; font-weight: bold;}.box .block1 dl dt p {height: 18px; line-height: 18px; overflow: hidden; color: #666666; margin-top:14px;}.box .block1 dl .row1 {width: 800px; height: 60px; border-radius: 6px; background: #fef6f6; margin-top:30px;}.box .block1 dl .row1 .search {display: flex;height: 60px;place-content: space-between;}.box .block1 dl .row1 .search .icon-fangdajing {/* background-color: red; */font-size:2px;color: #ccc;width: 50px;text-align: center;line-height: 60px;/* position: relative;right: -15px;top: 25px; */}.box .block1 dl .row1 .search .icon-fangdajing:hover {cursor: pointer;}.box .block1 dl .row1 .text1 {/* padding-left: 20px; */width: 800px;background: none;border: none;outline: none;/* margin-left:10px; */color: #999999;}.box .block1 dl .row1 .submit1 {width: 90px;border: none;/* background: none; */background: #f11717;border-radius: 0px 6px 6px 0px; font-size: 16px;color: #ffffff; font-weight: bold;/* outline: none; */cursor: pointer;}.box .block1 dl .row2 {width: 800px; height: 32px; overflow: hidden; margin-top:30px;}.box .block1 dl .row2 .RMsearch {display: flex;place-content: space-around;}.box .block1 dl .row2 .RMsearch em {line-height: 32px;width: 70px;font-weight: normal;font-style: normal;}.box .block1 dl .row2 .RMsearch span {display: flex;width: 720px;height: 32px;}.box .block1 dl .row2 .RMsearch span a {/* height: 32px; */box-sizing: border-box; border: 1px solid #e6e6e6;padding: 0px 20px; border-radius: 100px; line-height: 32px; color: #999999; text-decoration: none;margin-right:20px;}.box .block1 dl .row2 .RMsearch span a:hover{border: 1px solid #f11717; color: #f11717;}.box .block2 ul {width: 900px;height: 242px;margin: auto;display: grid;grid-template-columns: repeat(4,1fr);place-content: space-around;}.box .block2 ul li {width:198px; height: 95px;padding-left: 2.5px;/* width:400px; height: 300px; *//* border: 1px solid red; */background: #f7f8fa;border-radius: 3px;/* padding-top: 12px; *//* margin: 27px 0px 0px 34px; */display: grid;/* grid-auto-flow: row; *//* grid-template-columns: repeat(2,100px); *//* place-content: space-around space-around; *//* place-items: start start; */}.box .block2 ul li a {/* background-color: blue; *//* border: 1px solid blue; */display:grid;}/* 设置dl宽度,dl网格化 */.box .block2 ul li a dl {width: 160px; margin: auto;display: grid;}/* 设置dt */.box .block2 ul li a dl dt {height: 18px; line-height: 18px; overflow: hidden; font-weight: bold;}/* 设置dd拉开点距离,dd网格化 */.box .block2 ul li a dl dd {margin-top:10px;display: grid;width: 160px;height: 40px;grid-template-columns: 40px 1fr;}/* 设置img */.box .block2 ul li a dl dd span img{width: 38px; height: 38px; border-radius: 100px; margin-top:3px;background-color: green;}/* 设置em */.box .block2 ul li a dl dd em {width: 110px; height: 40px; font-size: 12px; color: #999999; overflow: hidden; height: 40px; line-height: 22px;/* background-color: blue; */}.box .block3 {background-color: red;width: 900px;height: 215px;margin: auto;overflow: hidden;margin-top:15px;}.box .block3 div {display: grid;grid-template-columns: repeat(4,1fr);}.box .block3 a {height: 40px; background: #f7f8fa;padding: 0px 20px; border-radius: 100px; line-height: 40px; color: #333333;text-decoration: none; margin: 30px 13px 0px 0px;}.box .block3 a:hover {background: #f11717; color: #ffffff;}
仿写效果如下:


四、一些数组方法实例演示
1. 数组的拆分和转换
‘…’ 和Array.from()
把一个数组拆开成单个元素
let arr = [1, 2, 3, 4, 5];//打印原数组console.log(arr);//拆成一组单个值console.log(...arr);//将一组单个值重新组成数组console.log([...arr]);

此方法也适用类数组对象,但对没有迭代器接口的对象不适用。
let obj = {0:1,1:2,2:3,length:3};console.log(obj);console.log(...obj);
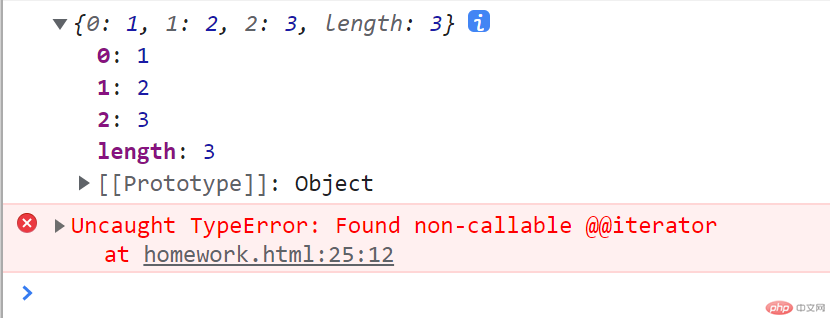
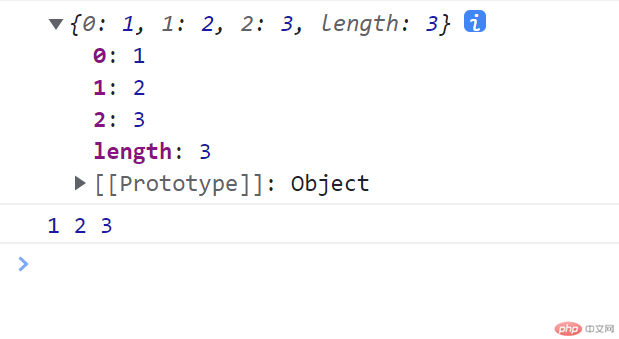
可以采用Array.from()来拆除这组单值
let objArr = {0:1,1:2,2:3,length:3};console.log(objArr);console.log(...Array.from(objArr));
2. 数组元素的删除和增加
2.1 shift和push
利用shift和push完成队列功能
let arr = [1, 2, 3, 4, 5];console.log(arr);arr.shift();arr.push(10);console.log(arr);

2.2 fill
fill() 方法用一个固定值填充一个数组中从起始索引到终止索引内的全部元素。不包括终止索引。
const arr1 = [1, 2, 3, 4];// 用0填充数组,从索引2开始填充直至索引4-1,也就是索引3,也就是结尾。console.log(arr1.fill(0, 2, 4));// 用5填充数组,从索引1开始直到最后。console.log(arr1.fill(5, 1));// 用6填充数组,直到最后。console.log(arr1.fill(6));

3. 数组的迭代方法
foreach,map
every,some
filter,find,findindex
reduce
entry
3.1 foreach和map
foreach
forEach() 方法对数组的每个元素执行一次给定的函数。
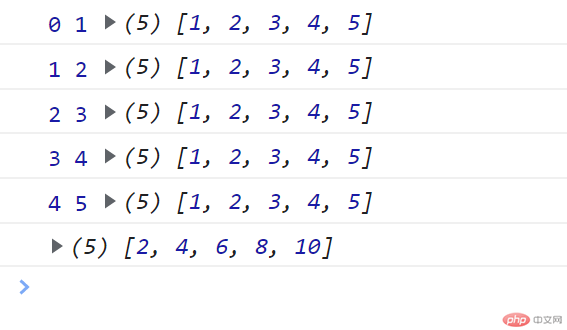
let arr = [1, 2, 3, 4, 5];let res = arr.forEach((value,index,arr) =>{console.log(index,value,arr);});

map
foreach()没有返回值,map()与其基本一样,但有返回值。
res = arr.map((value,index,arr) =>{console.log(index,value,arr);return value*2;});console.log(res);
3.2 every和some
被称为断言函数,用来做判断用。
every() 方法测试一个数组内的所有元素是否都能通过某个指定函数的测试。它返回一个布尔值。
some() 方法测试数组中是不是至少有 1 个元素通过了被提供的函数测试。它返回的是一个 Boolean 类型的值。
console.log(arr);// 数组成员的值是否每个都小于2console.log(arr.every(item => item< 2));// 数组成员的值有都小于2的console.log(arr.some(item => item<2));

3.3 filter和find、findindex
filter
filter() 方法创建一个新数组,其包含通过所提供函数实现的测试的所有元素。
// filter返回符合条件值组成的新数组console.log(arr.filter(item => item<4));// 只返回符合条件的第一个值console.log(arr.filter(item => item<4)[0]);

find、findindex
find() 方法返回数组中满足提供的测试函数的第一个元素的值。否则返回 undefined。
findIndex()方法返回数组中满足提供的测试函数的第一个元素的索引。若没有找到对应元素则返回-1。
console.log(arr);// 返回第一个符合条件的console.log(arr.find(item => item<4));// 返回符合条件值得索引console.log(arr.findIndex(item => item<4));

3.4 reduce
归并的效果
reduce(param1,param2)
param1,回调函数,函数还有四个参数分别累加值(必选),数组当前值(必选),数组索引(可选),数组本身(可选)
param2,累加的初始值
console.log(arr);// reduce第一个参数是回调函数,第二个是累加初始值,即acc = 10.cur为当前数组值。res = arr.reduce((acc, cur, index, arr) => acc + cur,10);// 10(acc)+1(cur)+2(cur)+3(cur)+4(cur)+5(cur)=25console.log(res);

3.5 entry
entry()方法返回一个新的Array Iterator对象,该对象包含数组中每个索引的键/值对。
const arr1 = ['a', 'b', 'c'];const iterator1 = arr1.entries();console.log("iterator长这样:",iterator1);console.log("iterator.next()长这样:", iterator1.next());console.log("iterator.next().done没开始遍历时的值:", iterator1.next().done);console.log(iterator1.next().value);console.log(iterator1.next().value);console.log(iterator1.next().value);console.log("这里就越界了:", iterator1.next().value);console.log("iterator.next().done遍历完的值:", iterator1.next().done);

4. 数组的排序
let arr = [1, 10, 20, 6];console.log(arr);// sort默认将数组成员当成字符串进行排序,用asii码值。console.log(arr.sort());// sort升序排序console.log(arr.sort(((a,b)=> a -b)));
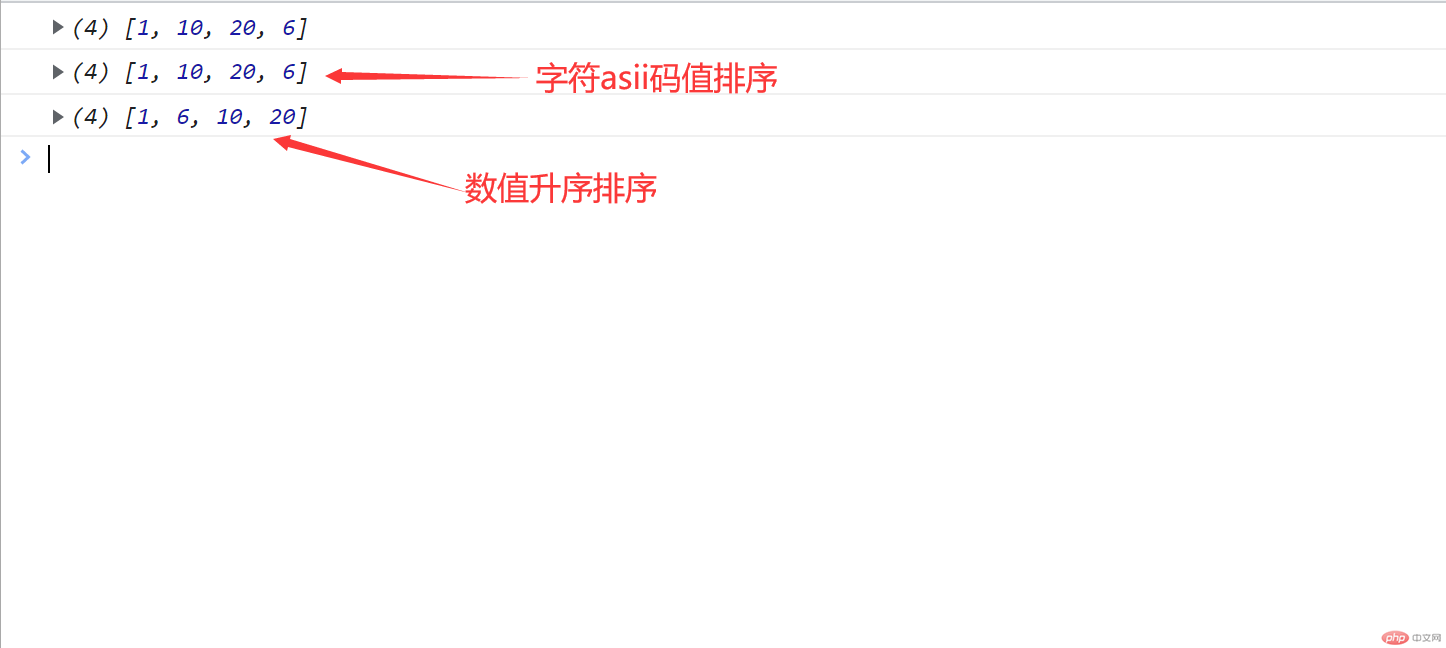
反过来使用b-a就是降序,就不展示效果了。
5. 数组转字符串
join
let arr = [1, 10, 20, 6];// alert弹窗的效果就是数组转换的字符串alert(arr);// join效果与alert转化的效果一样,默认是逗号分割的字符串。console.log(arr.join());// 跟换成其他符号console.log(arr.join('*'));
弹窗
join的效果
6. 数组的截取和拼接
6.1 slice
let arr = [1, 2, 3, 4, 5, 6, 7, 8 , 9, 10, 20];console.log(arr);console.log('截取2-4:');console.log(arr.slice(2,5));console.log('截取从2到最后:');console.log(arr.slice(2));console.log('截取倒数第四到倒数第六:');console.log(arr.slice(-6,-3));

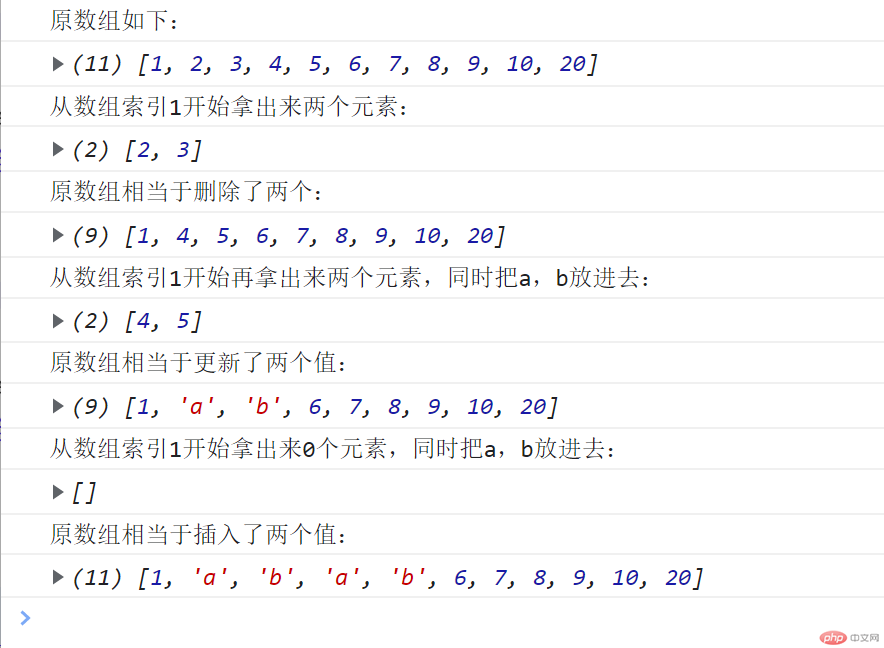
6.2 splice
console.log('原数组如下:');console.log(arr);console.log('从数组索引1开始拿出来两个元素:');console.log(arr.splice(1,2));console.log('原数组相当于删除了两个:');console.log(arr);console.log('从数组索引1开始再拿出来两个元素,同时把a,b放进去:');console.log(arr.splice(1,2,'a','b'));console.log('原数组相当于更新了两个值:');console.log(arr);console.log('从数组索引1开始拿出来0个元素,同时把a,b放进去:');console.log(arr.splice(1,0,'a','b'));console.log('原数组相当于插入了两个值:');console.log(arr);
6.3 concat
concat() 方法用于合并两个或多个数组。此方法不会更改现有数组,而是返回一个新数组。
const arr1 = ['a', 'b', 'c'];console.log("arr1:",arr1);const arr2 = ['d', 'e', 'f'];console.log("arr2:",arr2);const arr3 = arr1.concat(arr2);console.log("拼接arr1和arr2的结果:", arr3);

6.4 copyWithin
copyWithin() 方法浅复制数组的一部分到同一数组中的另一个位置,并返回它,不会改变原数组的长度。
const arr1 = ['a', 'b', 'c', 'd', 'e'];console.log(arr1);// 把第3个数组元素值复制到第0个数组元素开始的地方console.log(arr1.copyWithin(0, 3, 4));// 把第3至最后一个数组元素值复制到第0个数组元素开始的地方console.log(arr1.copyWithin(1, 3));// 把第2和第3个数组元素值复制到第1个数组元素开始的地方console.log(arr1.copyWithin(1, 2, 4));

6.5 flat
flat() 方法会按照一个可指定的深度递归遍历数组,并将所有元素与遍历到的子数组中的元素合并为一个新数组返回。即扁平化展开一个数组,解嵌套。
// 嵌套数组的展开let arr1 = [1, 2, [3, 4]];console.log(arr1.flat());// 两层数组只能被展开一层let arr2 = [1, 2, [3, 4, [5, 6]]];console.log(arr2.flat());// 展开2层嵌套的数组let arr3 = [1, 2, [3, 4, [5, 6]]];console.log(arr3.flat(2));//使用 Infinity,可展开任意深度的嵌套数组let arr4 = [1, 2, [3, 4, [5, 6, [7, 8, [9, 10]]]]];console.log(arr4.flat(Infinity));


