使用curl实现生肖查询
一个简单的curl功能,代码如下
<?php$playeryear = isset($_POST['year']) ? $_POST['year'] : `1990-06-05`;//聚合请求网址$url = 'http://apis.juhe.cn/fapig/zodiac/query?';//个人key$key ='d188b2c2ab1a8e37f8b819951c2a26b3';//测试年月日$keyword='1990-06-05';$param=http_build_query(['key'=>$key,'keyword'=>$keyword]);$handle=curl_init();curl_setopt($handle,CURLOPT_URL,$url . $param);curl_setopt($handle,CURLOPT_HEADER,false);curl_setopt($handle,CURLOPT_RETURNTRANSFER,true);$res=curl_exec($handle);$apidata = json_decode($res, true);curl_close($handle);$desc=$apidata['result'];//var_dump($desc);extract($desc);//echo $name;?><!DOCTYPE html><html lang="en"><head><meta charset="UTF-8"><meta http-equiv="X-UA-Compatible" content="IE=edge"><meta name="viewport" content="width=device-width, initial-scale=1.0"><title>Document</title></head><body><form action="moon.php" method="post" id="search"><fieldset class="login"><legend>请输入年月日</legend><label for="year">年月日:</label><input name="year" id="year" value="1990-06-05" autofocus /><button>提交</button></fieldset></form><label>生肖名称:<?= $name ?></label><label>生肖年份:<?= $years ?></label><label>吉祥方位:<?= $fw ?></label><label>吉忌颜色:<?= $sc ?></label><label>吉凶数字:<?= $sz ?></label><label>幸运花:<?= $xyh ?></label><label>总体运势:<?= $ys ?></label><label>事业:<?= $sy ?></label><label>爱情:<?= $aq ?></label><label>性格:<?= $xg ?></label><label>优点:<?= $yd ?></label><label>缺点:<?= $qd ?></label></body></html>
mvc框架实现
1.架构
- M :MODEL, 使用第三方包
composer require catfan/medoo实现 - V :VIEW, 使用第三方包
composer require league/plates实现 - C :CONTROLLER :业务逻辑是写在控制器中
2. 流程
- 创建自己的框架核心代码,MODEL, VIEW,分别继承第三方的包
- 创建自己的应用, 按MVC架构模式,创建属于自己的models, views, controllers
3.mvc框架实现详细过程
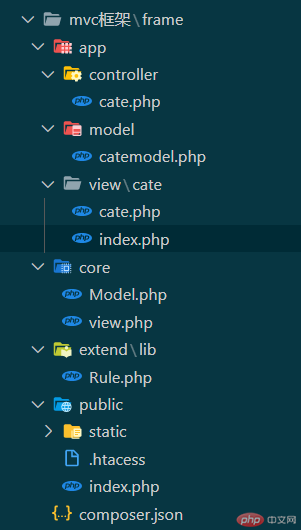
- 1.首先创建如下图目录,其中pulic为web访问目录,core为核心层目录,app为应用层目录

- 2.配置composer.json为下载三方包做准备,配置代码如下
"require":{"catfan/medoo":"^2.1.0","league/plates":"^3.4.0"},
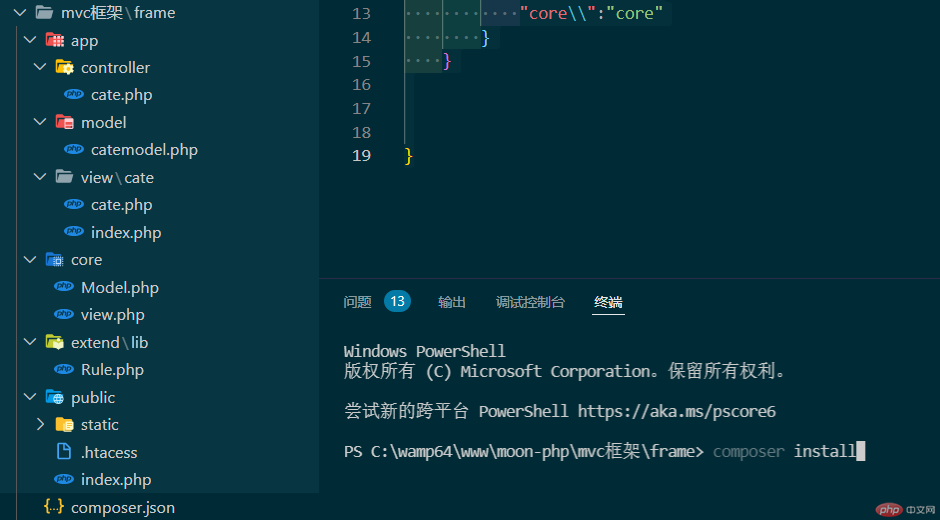
- 3.在frame目录打开终端,执行composer install安装第三方包。如图所示

- 4.安装完毕后多出
vendor目录,再次对composer.json配置autoload项,以便加载所有类,composer.json,代码如下。
{"require":{"catfan/medoo":"^2.1.0","league/plates":"^3.4.0"},"autoload": {"psr-4":{"lib\\":"extend/lib","app\\":"app","core\\":"core"}}}
5.在public/index.php加入代码
require __DIR__ . '/../vendor/autoload.php';加载所有类。6.让核心层core/model.php,core/view.php分别继承三方包中的
medoo类与Engine类
core/model.php代码如下
<?phpnamespace core;use Medoo\Medoo;class Model extends Medoo{public function __construct(){//mysql连接参数$options = ['type' => 'mysql','host' => 'localhost','database' => 'phpcn','username' => 'root','password' => '','charset' => 'utf8'];parent::__construct($options);}}
core/view.php代码如下
<?phpnamespace core;use League\Plates\Engine;class view extends Engine{public function __construct($path){parent::__construct($path);}}
7.让应用层的app/model/catemodel.php 继承核心层的model,代码如下
<?phpnamespace app\model;use core\Model;class catemodel extends model{public function __construct(){parent::__construct();}}
8.在应用层的app/view/cate/index.php加入渲染代码
<!DOCTYPE html><html lang="en"><head><meta charset="UTF-8"><meta http-equiv="X-UA-Compatible" content="IE=edge"><meta name="viewport" content="width=device-width, initial-scale=1.0"><link rel="stylesheet" href="static/css/style.css"><title>Document</title></head><body><table><caption>课程信息表</caption><thead><tr><td>编号</td><td>名称</td><td>封面</td><td>课程简介</td><td>创建时间</td><td>操作</td></tr></thead><tbody><?php foreach ($lists as $list) : ?><tr><td><?= $list['cou_id'] ?></td><td><?= $list['title'] ?></td><td><img style="width:100px" src=" <?= $list['pic'] ?>" alt="课程封面"></td><td><?= $list['info'] ?></td><td><?= date("Y-m-d H:m:s", $list['add_time']) ?></td><td><button>删除</button><button>编辑</button></td></tr><?php endforeach; ?></tbody></table><!-- 生成分页条 --><p><? for ($i = 1; $i <= $pages; $i++) : ?><? $jump = sprintf('?page=%d', $i) ?><? $active = ($i == $page) ? 'active' : '' ?><a class="<?= $active ?>" href="<?= $jump ?>"><?= $i ?></a><!-- 生成高亮分页条 --><? endfor ?></p></body></html>
9.在应用层的controller/cate.php加入逻辑代码controller/cate.php代码如下
<?phpnamespace app\controller;class Cate{public $view;public $model;public function __construct($model,$view){$this->model=$model;$this->view=$view;}public function index($page = 1, $pageSize = 10){$offset = ($page - 1) * $pageSize;$lists = $this->model->select('mj_course_lists', ['cou_id', 'title', 'pic', 'info', 'add_time'], ['LIMIT' => [$offset, $pageSize]]);// var_dump($lists);$total = $this->model->count('mj_course_lists');$pages = ceil($total / $pageSize);return $this->view->render('cate/index', ['lists' => $lists, 'pages' => $pages, 'page' => $page]);}}
至此一个mvc小框架已经完成。下面使用框架
3.使用mvc框架渲染页面
- 思路为创建应用层的model对象 与核心层的view对象,注入到应用层的cate对象中,使用cate对象中的index方法对页面进行渲染,实例代码如下
<?phprequire __DIR__ . '/../vendor/autoload.php';use core\Model;use core\View;use app\controller\Cate;use app\model\CateModel;//创建 应用层的mode$m = new CateModel;// 指定渲染文件路径$path = __DIR__ . '/../app/view';//创建 核心层的view对象$view = new View($path);// 创建应用层的cate对象$c = new Cate($m, $view);// 提取参数get 参数parse_str($_SERVER['QUERY_STRING'], $params);// 执行 cate对象中的index方法, 参数为 $paramsecho call_user_func_array([$c, 'index'], $params);

