- 实例演示如何正确优雅的获取表单元素 2. 实例演示dom树的遍历与常用属性 3. 实例演示dom元素的增删改操作 4. js操作元素内容的几个常用方法,并分析异同 5. 将留言板的实战案例进行仿写,加上一些样式 6. 实例演示 dataset对象 7. 实例演示如何获取元素的计算样式 8. 实例演示 classList 对象常用方法 9. 实例演示事件的添加与派发
一、优雅的获取表单元素
- 获取表单 - 通过form表单的ID获取
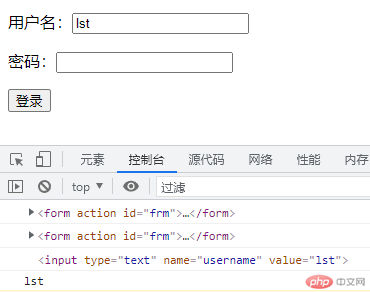
// 通过form表单的id获取整个表单 // document.forms可获取页面所有表单,加上索引[0]或.id可获取指定的表单 console.log(document.forms[0]); console.log(document.forms.frm); // 获取表单内的元素,可通过元素的name值来获取:forms.表单id.元素name console.log(document.forms.frm.username); // 获取元素的值:forms.表单id.元素name.value,获取其他属性值也一样,如:username.name;username.type console.log(document.forms.frm.username.value);

二、dom树的遍历与常用属性
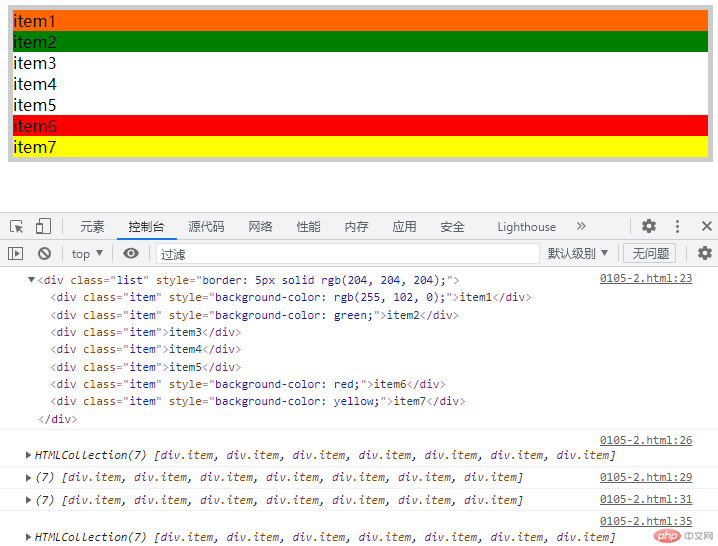
// dom树的遍历与常用属性 // 1.获取整个list元素 let div=document.querySelector('.list'); console.log(div); // 2.获取所有子节点元素:children,获取到的结果是一个元素集合。 let child=div.children; console.log(child); // 3.将元素集合转成数组 Array.from(集合) 或者 ...集合 const arr=Array.from(child); console.log(arr); const arr2=[...child]; console.log(arr2); // 常用属性 // 1.元素集合.firstElementChild可获取集合中的第一个元素。 console.log(child); div.firstElementChild.style.backgroundColor='#f60'; // 2.获取最后一个 div.lastElementChild.style.backgroundColor='yellow'; // 获取下一个兄弟元素 div.firstElementChild.nextElementSibling.style.backgroundColor='green'; // 获取上一个兄弟元素 div.lastElementChild.previousElementSibling.style.backgroundColor='red'; // 获取父节点 parentElement或parentNode div.lastElementChild.parentElement.style.border='5px solid #ccc';

三、dom元素的增删改操作
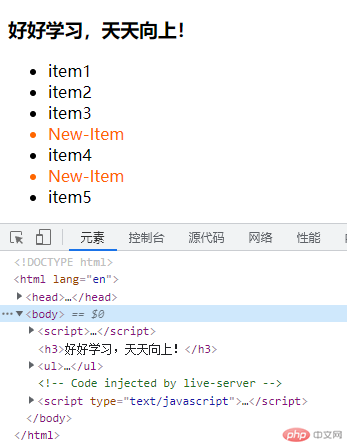
// 创建元素 document.createElement ul=document.createElement('ul'); document.body.append (ul); // 创建子元素li for(let i=0;i<5;i++){ let li=document.createElement('li'); li.textContent='item'+(i+1); ul.append(li); } // 查看元素 // 1.outerHtml获取元素的html字符串 console.log(ul.outerHTML); // 在节点之前插入元素before() let newLi=document.createElement('li'); newLi.textContent='New-Item'; newLi.style.color='#f60'; // 例:在第4个元素前面插入新建的元素 // 1.先获取第4个元素 let four=document.querySelector('li:nth-of-type(4)'); // 2.插入 four.before(newLi); // 在节点之后插入after() // 插入节点时必需新建或克隆节点,不能用之前创建的,否则就只是把之前创建的元素剪切移动到此处,之前插入的位置变为空了。 // 例:在第4个节点之后插入新节点 // 1.先创建或克隆新元素:克隆方法:元素.cloneNode(true),参数true如果不写只克隆节点不克隆文本。 let fourAfter=newLi.cloneNode(true); // 2.插入 four.after(fourAfter); // 在父节点插入元素insertAdjacentElement('插入位置',元素):有4个位置,节点开始位置之前beforeBegin、开始位置之后afterBegin、节点结束位置之前beforeEnd、结束位置之后afterEnd // 例:在UL前面插入一个h3 // 1.先创建h3元素 let H3=document.createElement('h3'); H3.textContent='好好学习,天天向上!'; console.log(H3); ul.insertAdjacentElement('beforeBegin',H3); // 替换元素replaceChild // 1.创建一个新元素 let a=document.createElement('a'); a.href='https://baidu.com'; a.textContent='百度'; // 2.执行替换最后一个元素 let last=ul.lastElementChild; ul.replaceChild(a,last); // 删除元素remove(节点) ul.lastElementChild.remove(last);

四、js操作元素内容的几个常用方法及异同
// textContent:返回当前元素及所有后代元素 标签内的文本内容(不含html标签本身),包括隐藏内容(display:none let box=document.querySelector('.box'); console.log(box.textContent); // innerText:仅返回可见的文本 console.log(box.innerText); // innerHTML:返回所有内容,包括html标签、style、文本(包括隐藏的)等全部内容 console.log(box.innerHTML); // outerHTML:返回元素本身所有的html字符串 console.log(box.outerHTML);
五、留言板
<head> <meta charset="UTF-8"> <meta http-equiv="X-UA-Compatible" content="IE=edge"> <meta name="viewport" content="width=device-width, initial-scale=1.0"> <title>Document</title> <style> *{padding: 0;margin: 0;box-sizing: border-box;} .lycontent { width: 25em; height: 3em; border: 1px solid rgb(3, 165, 138); padding: 0 10px; border-radius: 5px; } ul{ list-style: none;background-color: bisque;width: 20.8em;margin: -1em 0 0 8.4em;} li{ height: 2em;line-height: 2em;border-bottom: 1px dashed #ccc;padding-left:0.5em;} input{margin: 2em 10em;} </style></head><body> <input type="text" placeholder="请输入留言内容" class="lycontent" onkeydown="addmsg(this);"> <ul class="lylist"></ul> <script> function addmsg(obj){ // 判断按键,如果是回车键则执行添加留言 if(event.keyCode==13){ // 获取文本框元素 let input=document.querySelector('.lycontent'); // 获取文本框输入内容 let con=input.value; // 判断输入内容是否为空 if(con==''){ alert('总得说点啥吧!'); return false; } // 获取ul元素,作为父级插入使用 let ul=document.querySelector('ul'); // 新建li元素,并赋值输入的内容 let li=document.createElement('li'); li.textContent=con; // 根据留言规则,最新的一条显示在最上面,故应将li元素插入父节点开始位置的下方 ul.insertAdjacentElement('afterBegin',li); // 清空文本框并获取焦点 input.value=''; input.focus(); } } </script></body>

六、dataset对象
内置属性:title/style/id/class等
自定义属性:以data- 开头
<ul> <!-- data-开头的为自定义属性,用dataset.加上data-后面的自定义内容即可 --> <li class="item" data-types="电脑">item1</li> <li class="item" data-types="手机">item2</li> <li class="item" data-types="平板">item3</li> <li class="item" data-types="MP3">item4</li> <li class="item" data-types="电视">item5</li> </ul> <div data-me-name='松涛'>Hello World!</div>
<script> let li=document.querySelectorAll('li'); for(let i=0;i<li.length;i++){ // 获取方式1:去掉data-,直接通过元素.dataset.属性。例如:li设置的自定义属性为data-type='pc',则获取时通过li.dataset.type li[i].onclick=()=>console.log(li[i].dataset.types); } // 获取方式2:如果定义成这种形式:data-me-name,也是先去掉data-,然后将me-name转为小驼峰写法:meName let div=document.querySelector('div'); console.log(div.dataset.meName); // dataset是可读写属性,即可改变元素的自定义属性值 div.dataset.meName='小明'; </script>
七、获取元素的计算样式
<style> .box{ width: 10em;height: 10em;}</style><body> <div class="box" style="color: rgb(22, 22, 21);background-color: lightblue;">Hello World!</div></body>
// 获取元素样式分两种情况:1.元素行内样式,即定义在元素标签内的。如:<div style='color:red'>Hello</div> // 2.文档内定义在<style></style>标签中的样式以及外部引入的CSS样式,这些都属性计算样式。 // 获取第1种情况的方法:利用元素的style属性获取 **行内样式** 的值 // 此方式只能获取元素行内样式定义的属性值,不能获取<style></style>标签中定义的以及外部引入的CSS样式。 let div=document.querySelector('div'); console.log(div.style.color); console.log(div.style.backgroundColor); // 获取第2种情况的方法:需要通过window对象的计算样式属性来获取:window.getComputedStyle(元素).属性 // 此方式获取到的宽高度等有数值的属性是带单位的,如高度值表现为200px,如果只想要数值不想要单位,可以通过parseInt转换一下。 let width=window.getComputedStyle(div).width; console.log(width); // 打印 160px console.log(parseInt(width)); // 打印 160
八、classList 对象常用方法
<style> .blue { color: blue;} .red { color: red;} .green { color: green;}</style><body> <!-- 操作元素的class属性 --> <p>PHP中文网</p> <script> // 通过元素的classList对象来操作class let p=document.querySelector("p"); console.log(typeof p.classList); // 打印object // 1.add添加样式,可以叠加 p.classList.add('blue'); p.classList.add('red'); // 2.contains 判断某个样式是否存在,返回值:true/false console.log(p.classList.contains('blue')); // 返回true // 3.replace(旧样式,新样式)替换样式 p.classList.replace('red','green'); // 返回值为true/false 即替换成功与否,重复替换返回false // 4.remove(样式)删除样式 p.classList.remove('green'); //无返回值(undefined) // 5.toggle切换样式 p.classList.toggle('red'); </script></body>
九、事件的添加与派发
<body> <button>按钮一</button> <button>按钮二</button> <button>按钮三</button> <script> // 事件的添加方式一:先获取元素,然后通过元素.onclick(){}进行添加 let btn1=document.querySelector('button'); btn1.onclick=()=>console.log(btn1.textContent); // 删除事件:null btn1.onclick=null; // 方式二:事件监听器 addEventListener('事件click等',函数名) // 第二个参数:函数,可以直接写回调,但不能移除;想要移除,必需得是命名函数且在外部声明 // 注:函数名不用加(),也不用加'',否则报错。 let btn2=document.querySelector('button:nth-of-type(2)'); btn2.addEventListener('click',getName); function getName(){ console.log(1234); } // 移除事件 btn2.removeEventListener('click',getName); // 参数与添加一致 // 事件派发:让事件自动执行点击等事件操作,无需干预。 // 以按钮自动执行点击操作为例 let btn3=document.querySelector('button:nth-of-type(3)'); // 1.给按钮添加点击事件 let money=0; btn3.addEventListener('click',()=>{ console.log(money); money+=1.2; }) // 2.创建一个自定义事件:用new Event构造函数生成自定义事件,对标按钮的点击事件click // console.log(typeof new Event('click')); // 返回一个对象类型 object let getMoney=new Event('click'); // 3.实施事件派发 dispatchEvent(自定义事件名) btn3.dispatchEvent(getMoney); // 4.通过setTimeout可以延时执行;通过setInterval可以定时执行 setTimeout(()=>btn3.dispatchEvent(getMoney),1000); //延时派发 setInterval(()=>btn3.dispatchEvent(getMoney),1000); //定时派发 </script></body>


