浮动元素、定位,利用定位做布局
什么是浮动元素
浮动元素可以从文档流中脱离并释放原来占据的空间的元素
浮动元素的用途
可以在父容器中随意定位,使元素在定位时更加灵活,比如:垂直居中、层叠效果、多元素同行显示等
如何实现浮动元素
在css中用float属性来实现:float:left;/*左对齐浮动*/
浮动元素的特征
- 当元素实现浮动后,会释放原来文档流中的空间
- 在它之后的元素自动填充它的空间
- 只对后面的元素产生影响,对前面元素没有影响
- 任何元素,转为浮动元素的同时,也自动转为块级元素,具有块级元素的所有特征及属性
- 浮动元素只能在水平方向浮动并受限于父级元素的内容区
代码演示:
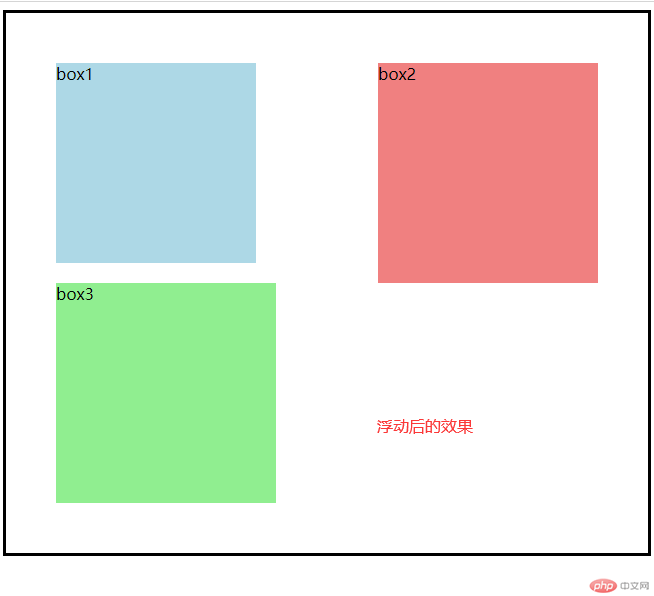
<!DOCTYPE html><html lang="en"><head><meta charset="UTF-8" /><meta name="viewport" content="width=device-width, initial-scale=1.0" /><title>浮动的基本特征</title><style>body {border: 3px solid #000;padding: 50px;}.box {width: 200px;height: 200px;}.box1 {background-color: lightblue;/* 左浮动 */float: left;}.box2 {background-color: lightcoral;width: 220px;height: 220px;/* 右浮动 */float: right;}.box3 {background-color: lightgreen;width: 220px;height: 220px;/* 不想让它受到前面的浮动元素的影响 *//* clear: left;clear: right; */clear: both;}</style></head><body><div class="box box1">box1</div><div class="box box2">box2</div><div class="box box3">box3</div><!-- 浮动元素只能水平方向浮动浮动元素的浮动边界仅限于内容区 --></body></html>
效果展示:

浮动元素产生的问题:
- 会给父元素的占位造成塌陷
演示代码:
<!DOCTYPE html><html lang="en"><head><meta charset="UTF-8" /><meta name="viewport" content="width=device-width, initial-scale=1.0" /><title>浮动元素的高度塌陷与解决方案</title><style>.container {border: 3px dashed red;}.item {width: 150px;height: 150px;}.item:first-of-type {background-color: lightgreen;}.item:nth-last-of-type(2) {background-color: lightcoral;}.item:last-of-type {background-color: lightblue;}.item {/*变成浮动*/float: left;}</style></head><body><!-- <div class="box"> --><div class="container"><div class="item">1</div><div class="item">2</div><div class="item">3</div><!-- <div class="clear"></div> --></div><!-- </div> --></body></html>
塌陷效果图:

塌陷的解决方案
解决方案有很多,这里介绍比较常用的5种解决方案,比较推荐的是解决方案4和解决方案5。
- 给父元素也添加一个高度(问题是不会随着子元素同步高度,每次要根据子元素的高度来更改父元素高度,不但麻烦,也不实用)
- 把父元素也浮动起来(问题是会给整个文档带 来联动效应,造成其它元素布局混乱)
- 添加一个专用元素用于清浮动(问题是多了一个无用的实体元素,给选择器带麻烦,取数带来麻烦)
- 通过添加一个伪元素来解决(推荐使用,衍生问题较小)
- 最简单的解决方案,用到BFC(块级格式化上下文)(终级解决方案,代码少,效果好)
详细代码展示
/* 解决方案1: 给父元素也添加一个高度 *//* .container { *//* height: 150px; *//* } *//* 解决方案2: 把父元素也浮动起来 *//* .container {float: left;}.box {float: left;} *//* 解决方案3: 添加一个专用元素用于清浮动 *//* div.clear {clear: both;} *//* 解决方案4: 通过添加一个伪元素来解决 *//* .container::after {content: "";display: block;clear: both;} *//* 解决方案5: 最简单的解决方案,用到BFC(块级格式化上下文) */.container {overflow: auto;}
第5种解决方案效果图

利用定位做一个通用三列布局案例
body代码:
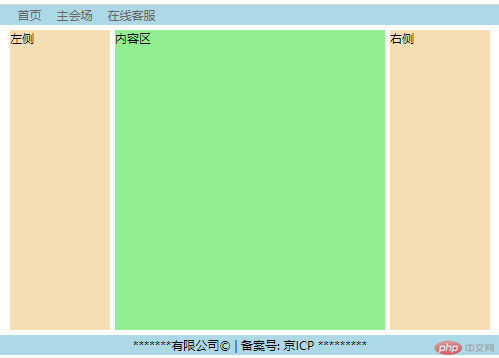
<body><!-- 页眉 --><div class="header"><!-- 内容区: 水平居中 --><div class="content"><ul><li><a href="">首页</a></li><li><a href="">主会场</a></li><li><a href="">在线客服</a></li></ul></div></div><!-- 主体 --><div class="container"><div class="left">左侧</div><div class="main">内容区</div><div class="right">右侧</div></div><!-- 页脚 --><div class="footer"><div class="content"><p>*******有限公司© | 备案号: 京ICP *********</p></div></div></body>
css代码:
<style>/* 先将所有元素初始化,避免引起定位不到位的情况 */* {/* 外边距为0 */margin: 0;/* 内边距为0 */padding: 0;/* 使高度或宽度均包括到边框,这样设置高宽时更容易被理解,不用考虑边框有多宽或多高 */box-sizing: border-box;}li {/* 去掉列表小点 */list-style: none;}a {/* 去掉链接上的下划线 */text-decoration: none;color: #666;}/* 页眉与页脚 */.header,.footer {height: 40px;background-color: lightblue;}/* 页眉与页脚的内容区 */.content {width: 960px;/* 居中处理 */margin: auto;}.content ul li {/* 将列表转为浮动元素,left表示靠左边 */float: left;line-height: 40px;/* 设置外边距,0表示上下各为0,15px表示左右各为15像素 */padding: 0 15px;}.content ul li:hover {background-color: coral;}/* 页脚样式 */.content p {/* 文字居中 */text-align: center;line-height: 40px;}/* 主体用定位 */.container {width: 960px;margin: 10px auto;/* background-color: #ccc; */min-height: 600px;/* 转为定位元素,做为定位父级 */position: relative;}.container > .left {width: 200px;background-color: wheat;min-height: 600px;/* 转为绝对定位,用来固定起始位置,top距顶端的距离,left距左端的距离 */position: absolute;top: 0;left: 0;}.container > .right {width: 200px;background-color: wheat;min-height: 600px;position: absolute;top: 0;right: 0;}.container > .main {background-color: lightgreen;min-height: 600px;width: 540px;position: absolute;top: 0;left: 210px;}</style>
效果图:


