表格与表单实战教程
购物车实战
body主体代码
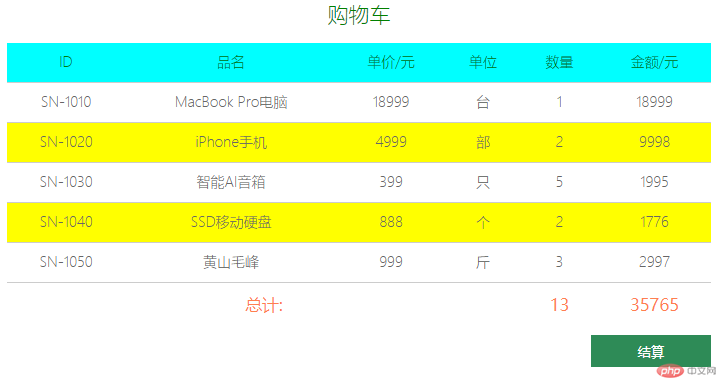
<body> <!-- 表格 --> <table> <!-- 标题 --> <caption> 购物车 </caption> <!-- 头部 --> <thead> <tr> <th>ID</th> <th>品名</th> <th>单价/元</th> <th>单位</th> <th>数量</th> <th>金额/元</th> </tr> </thead> <!-- 主体 --> <tbody> <tr> <td>SN-1010</td> <td>MacBook Pro电脑</td> <td>18999</td> <td>台</td> <td>1</td> <td>18999</td> </tr> <tr> <td>SN-1020</td> <td>iPhone手机</td> <td>4999</td> <td>部</td> <td>2</td> <td>9998</td> </tr> <tr> <td>SN-1030</td> <td>智能AI音箱</td> <td>399</td> <td>只</td> <td>5</td> <td>1995</td> </tr> <tr> <td>SN-1040</td> <td>SSD移动硬盘</td> <td>888</td> <td>个</td> <td>2</td> <td>1776</td> </tr> <tr> <td>SN-1050</td> <td>黄山毛峰</td> <td>999</td> <td>斤</td> <td>3</td> <td>2997</td> </tr> </tbody> <!-- 底部 --> <tfoot> <tr> <td colspan="4">总计:</td> <td>13</td> <td>35765</td> </tr> </tfoot> </table> <!-- 结算按钮 --> <div> <button>结算</button> </div> </body>
样式代码
<style> html { font-size: 14px; } table { /* 去掉间隙 */ border-collapse: collapse; /* 宽度设置为窗口的70% */ width: 70%; /* 横向居中 */ margin: auto; color: #666; /* 字体变细 */ font-weight: lighter; /* 文体居中 */ text-align: center; } /* 为单元格添加边框 th为头单元格,td为表体单元格 */ table thead th, table td { /* 添加底边框 线粗1px,solid 实线 */ border-bottom: 1px solid #ccc; /* 内边柜 */ padding: 10px; } /* 标题样式 */ table caption { /* rem指原始字体的倍数,如原始字体为14px,则1.5rem=14px*1.5=21px */ font-size: 1.5rem; /* 外边柜,这里以table thead 作为参照物 */ margin-bottom: 15px; color: green; } /* 设置表头栏字体及颜色 */ table th { font-weight: lighter; color: green; } /* 设置表头栏背景色 */ table thead tr:first-of-type { background-color: cyan; } /* 设置偶数行为背景色为黄色 */ table tbody tr:nth-of-type(even) { background-color: yellow; } /* 设置鼠标移动到行的悬停效果 移上变换背景色为粉色*/ table tbody tr:hover { background-color: pink; } /* 设置表底样式 */ table tfoot td { /* 不显示底部边框 */ border-bottom: none; color: coral; font-size: 1.2rem; font-weight: bolder; } /* 结算按钮 */ /* 用分组结构选择器取最后一个DIV */ body div:last-of-type { width: 70%; margin: 10px auto; } /* 用分组结构选择器取第一个DIV 因文档body中只有一个div,所以和最后一个div是同一个*/ body div:first-of-type button { /* 元素靠右,相对父元素 */ float: right; width: 120px; height: 32px; background-color: seagreen; color: white; border: none; /* cursor设置鼠标样式,pointer为手状 */ cursor: pointer; } /* 设置按钮鼠标悬停样式 */ body div:first-of-type button:hover { background-color: coral; font-size: 1.1rem; } </style>
显示效果

登录界面实战
body主体代码
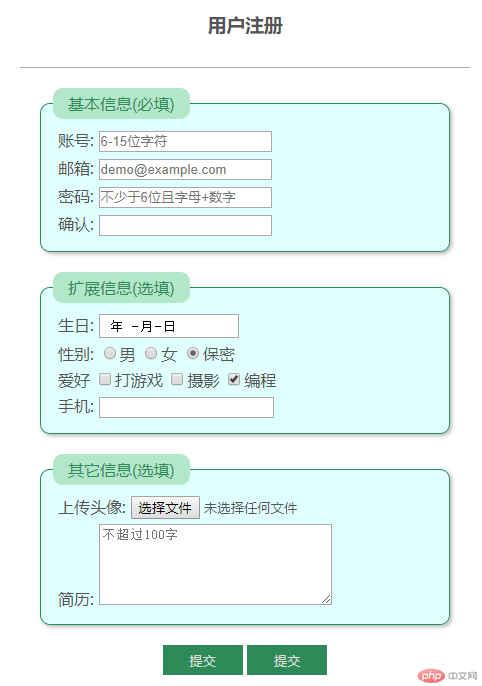
<body> <h3>用户注册</h3> <!-- form+input.... --> <!-- form:表单固定元素名,action提交目标,method为提交方式,常用的值有post、get --> <form action="" method="POST"> <!--fieldset 控件组 --> <fieldset> <!-- legeng为本控件组定义个标题,与fieldset配合使用,不用legeng,默认为无标题 --> <legend>基本信息(必填)</legend> <div> <!-- label:标签控件,for属性的值为需绑定控件的ID值,可以与其它控件绑定,绑定后,点击label控件, 则焦点转换到被绑定的控件上。for为空时则不绑定任何控件,独立显示,点击无效 --> <label for="my-username">账号:</label> <!-- input:文本录入控件 type常用属性值:text(文本)、email(邮箱)、password(密码)、date(日期)、radio(单选框)、 checkbox(复选框)、search(搜索框,与datalist配合使用时,可显示下拉提示效果) --> <input type="text" id="my-username" name="username" placeholder="6-15位字符" autofocus /> </div> <div> <label for="email-id">邮箱:</label> <input type="email" name="email" id="email-id" placeholder="demo@example.com" /> </div> <!-- 密码 --> <div> <label for="pwd-1">密码:</label> <!-- placeholder显示提示条件,当文本框为空值时显示 --> <input type="password"" name="password1" id="pwd-1" placeholder="不少于6位且字母+数字" /> </div> <div> <label for="pwd-2">确认:</label> <input type="password" name="password2" id="pwd-2" /> </div> </fieldset> <fieldset> <legend>扩展信息(选填)</legend> <div> <label >生日: <input type="date" name="birthday" /> </label> </div> <!-- 以下单选按钮用DIV包装后,起到一组按钮的效果 --> <div> <!-- 单选按钮 --> <label for="secret">性别:</label> <!-- 单选按钮中的name属性名必须相同 --> <input type="radio" name="gender" value="male" id="male" /><label for="male" >男</label > <input type="radio" name="gender" value="female" id="female" /><label for="female" >女</label > <input type="radio" name="gender" value="secret" id="secret" checked /><label for="secret">保密</label> </div> <div> <!-- 复选框 --> <label for="programme">爱好</label> <!-- 因为复选框返回是一个或多个值,最方便后端用数组来处理, 所以将name名称设置为数组形式便于后端脚本处理 --> <!-- checkbox的name属性值强烈建议加“[]”,为后端处理做准备 --> <input type="checkbox" name="hobby[]" id="game" value="game" /><label for="game" >打游戏</label > <!-- checked 默认选中 --> <input type="checkbox" name="hobby[]" value="shoot" id="shoot" /><label for="shoot">摄影</label> <input type="checkbox" name="hobby[]" value="programme" id="programme" checked /><label for="programme">编程</label> </div> <div> <!-- 选项列表 --> <label for="brand">手机:</label> <!-- search:搜索框,与下面的datalist(数据列表)配合使用,起到提示效果 --> <input type="search" list="phone" name="brand" id="brand" /> <datalist id="phone"> <option value="apple"> </option> <option value="huawei" label="华为"></option> <option value="mi" label="小米"> </option> </datalist> </div> </fieldset> <fieldset> <legend>其它信息(选填)</legend> <!--文件上传--> <div> <label for="uploads">上传头像:</label> <input type="file" name="user_pic" id="uploads" accept="image/png, image/jpeg, image/gif" /> </div> <!--文本域--> <div> <label for="resume">简历:</label> <!--注意文本域没有value属性--> <textarea name="resume" id="resume" cols="30" rows="5" placeholder="不超过100字" ></textarea> </div> </fieldset> <!-- 隐藏域, 例如用户的Id, 注册,登录的时间。。。。 隐藏域是为后端取数存数准备的,无须显示但必须存在的数据可以用隐藏域 用JS控制后,也可实现显示/隐藏效果 --> <input type="hidden" name="user_id" value="123" /> <p> <!-- submit为提交按钮控件,现在流行直接加button,不建议用submit,因样式控制没有button方便 --> <input type="submit" value="提交" class="btn" /> <button class="btn">提交</button> </p> </form> </body>
样式代码
<style> body { color: #555; } h3 { /* 文本居中 */ text-align: center; } form { width: 450px; /* 外边距 */ margin: 30px auto; border-top: 1px solid #aaa; } form fieldset { border: 1px solid seagreen; background-color: lightcyan; box-shadow: 2px 2px 4px #bbb; border-radius: 10px; margin: 20px; } form fieldset legend { background-color: rgb(178, 231, 201); /* border-radius:给元素添加圆角边框 */ border-radius: 10px; color: seagreen; padding: 5px 15px; } form div { margin: 5px; } form p { text-align: center; } form .btn { width: 80px; height: 30px; border: none; background-color: seagreen; color: #ddd; } /* 按钮鼠标悬停样式 */ form .btn:hover { background-color: coral; color: white; cursor: pointer; } /* 文本框得到焦点后的样式 */ input:focus { background-color: rgb(226, 226, 175); } </style>
显示效果


