
1、Ajax请求
1.1、GET请求
代码示例
前端代码
<!DOCTYPE html><html lang="en"><head><title></title><meta charset="UTF-8"><meta name="viewport" content="width=device-width, initial-scale=1"></head><body><script>//创建ajax对象var xhr = new XMLHttpRequest();//监听请求xhr.onreadystatechange = function(){if(xhr.readyState === 4 && xhr.status === 200){console.log(xhr.responseText);}};xhr.open("GET","get.php",true);xhr.send(null);</script></body></html>
后端数据
<?php$user['name'] = "zcx";$user['pwd'] = "123456";echo json_encode($user);?>
1.2、POST请求
application/x-www-form-urlencoded方法代码示例
前端代码
<!DOCTYPE html><html lang="en"><head><title></title><meta charset="UTF-8"><meta name="viewport" content="width=device-width, initial-scale=1"></head><body><script>//创建ajax对象var xhr = new XMLHttpRequest();//监听请求xhr.onreadystatechange = function(){if(xhr.readyState === 4 && xhr.status === 200){console.log(xhr.responseText);}};xhr.open("POST","post.php",true);xhr.setRequestHeader('Content-type','application/x-www-form-urlencoded');var user={name:"zcx",pwd:"123456",};var data = JSON.stringify(user);xhr.send(data);</script></body></html>
后端代码
<?php$user = key($_POST);echo $user;$data = json_decode($user);print_r($data);$data = json_decode($user,true);print_r($data);?>
application/x-www-form-urlencoded方法代码示例
前端代码
<!DOCTYPE html><html lang="en"><head><title></title><meta charset="UTF-8"><meta name="viewport" content="width=device-width, initial-scale=1"></head><body><script>//创建ajax对象var xhr = new XMLHttpRequest();//监听请求xhr.onreadystatechange = function(){if(xhr.readyState === 4 && xhr.status === 200){console.log(xhr.responseText);}};xhr.open("POST","post1.php",true);xhr.setRequestHeader('Content-type','application/json;charset=utf-8');var user={name:"zcx",pwd:"123456",};var data = JSON.stringify(user);xhr.send(data);</script></body></html>
后端代码
<?php$user = file_get_contents('php://input');echo $user;$data = json_decode($user);print_r($data);$data = json_decode($user,true);print_r($data);
1.3、FormData
代码示例
前端代码
<!DOCTYPE html><html lang="en"><head><title></title><meta charset="UTF-8"><meta name="viewport" content="width=device-width, initial-scale=1"><link href="" rel="stylesheet"></head><body><script>//创建ajax对象var xhr = new XMLHttpRequest();//监听请求xhr.onreadystatechange = function(){if(xhr.readyState === 4 && xhr.status === 200){console.log(xhr.responseText);}};xhr.open("POST","post2.php",true);var data = new FormData();data.append("name",'zcx')data.append("pwd",'123456')xhr.send(data);</script></body></html>
后端代码
<?php$user['name'] = $_POST['name'];$user['pwd'] = $_POST['pwd'];print_r($user);
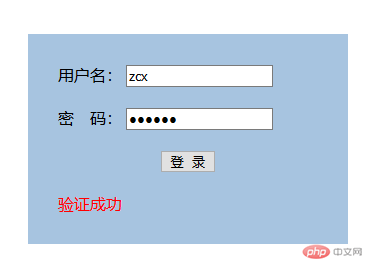
2、FormData完成用户登录与验证
代码示例
前端代码
<!DOCTYPE html><html lang="en"><head><meta charset="UTF-8"><meta name="viewport" content="width=<device-width>, initial-scale=1.0"><title>Document</title><style>body{box-sizing: border-box;margin: 0px;padding: 0px;}form{width: 260px;margin: auto;margin-top: 50px;background-color: #a7c4e0;padding: 30px 30px;display: grid;gap: 20px;}</style></head><body><form action="" method="POST" onsubmit="return false"><div><label>用户名:</label><input type="text" name="name" placeholder="请输入用户名" autofocus required ></div><div><label>密 码:</label><input type="password" name="pwd" placeholder="请输入用户名" required></div><div style="margin:auto;"><button>登 录</button></div></form></body></html><script>var form = document.querySelector("form");var btn = document.querySelector("form button");btn.onclick = function(){//创建ajax对象var xhr = new XMLHttpRequest();//监听请求xhr.onreadystatechange = function(){if(xhr.readyState === 4 && xhr.status === 200){var res = JSON.parse(xhr.responseText);switch(res.status){case 0:error = res.message;break;case 1:error = res.message;break;default:error="未知错误";}var span = document.createElement("span");span.innerHTML = error;span.style.color ="red";form.appendChild(span);}};xhr.open("POST","index.php",true);var data = new FormData(form);xhr.send(data);};var inputs = document.querySelectorAll("input");for(var i = 0;i < inputs.length; i++){inputs[i].oninput = function(){if(btn.nextElementSibling !== null) form.removeChild(btn.nextElementSibling)};}</script>
后端代码
<?php$pdo = new PDO("mysql:host=localhost;dbname=xxyl","root","root");$sql = "select count(`id`) from `users` where `name`=? and `pwd`=? limit 1";$stmt = $pdo->prepare($sql);$stmt->execute([$_POST['name'],md5($_POST['pwd'])]);$res = $stmt->fetch(PDO::FETCH_NUM);if($res[0]== 1){echo json_encode(['status'=>0,'message'=>'验证成功']);}else{echo json_encode(['status'=>1,'message'=>'用户名或密码错误']);}
" class="reference-link">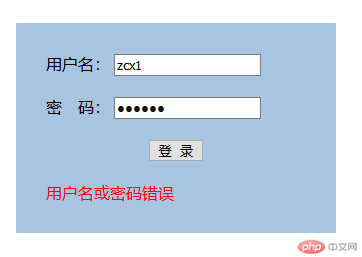
学习总结
本节课我们学习了Ajax与FormData的知识,通过本节课的学习对POST提交数据的方式有了新的认识,学到了FormData的知识,本知识都是以前不知道。通过以后的学习用于综合实践。