
案例一:商品列表展示区块的实现方法
要实现的效果
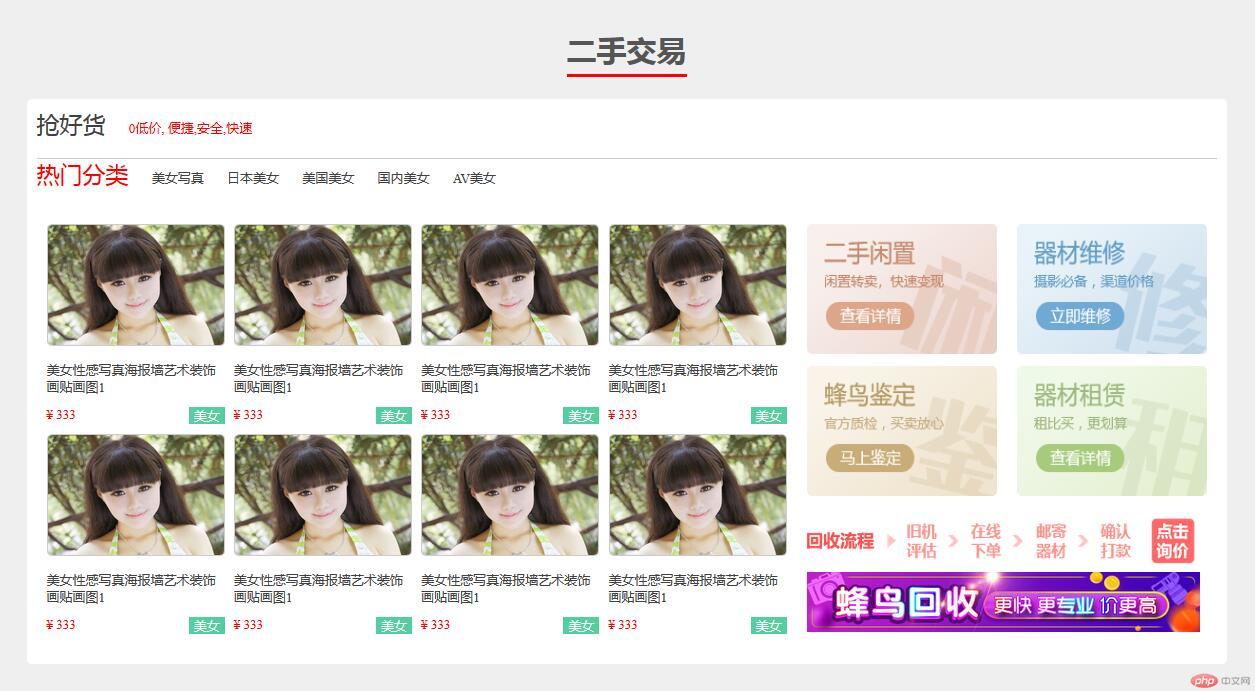
首先分析这个案例的结构,并确定关系
结构如下

按照分析的结构写出HTML代码
<!DOCTYPE html><html lang="en"><head><meta charset="UTF-8"><title>二手商品列表</title><link rel="stylesheet" href="public_second_hand.css"></head><body><!--标题组件--><div class="public-headline"><span>二手交易</span></div><!--交易专区--><div class="publi-second-hand"><!-- 抢好货标题--><div class="title1"><a href="">抢好货</a><span>0元低价,便捷,安全</span></div><!-- 分类标题--><div class="title2"><span>热门分类</span><!-- 在光标所在行按CTRL+D可以快速复制当前行--><a href="">美女写真</a><a href="">日本美女</a><a href="">美国美女</a><a href="">国内美女</a></div><!-- 商品内容区--><div class="goods"><!-- 商品列表--><div class="goods-list"><!-- 单个商品块--><div class="intro"><a href=""><img src="../../../static/images/shop1.jpg" alt="" width="176" height="120"></a><a href="">美女性感写真海报墙艺术装饰画贴画图1</a><div><span>¥ 333</span><span>美女</span></div></div><!-- 单个商品块--><div class="intro"><a href=""><img src="../../../static/images/shop2.jpg" alt="" width="176" height="120"></a><a href="">美女性感写真海报墙艺术装饰画贴画图1</a><div><span>¥ 333</span><span>美女</span></div></div><!-- 单个商品块--><div class="intro"><a href=""><img src="../../../static/images/shop3.jpg" alt="" width="176" height="120"></a><a href="">美女性感写真海报墙艺术装饰画贴画图1</a><div><span>¥ 333</span><span>美女</span></div></div><!-- 单个商品块--><div class="intro"><a href=""><img src="../../../static/images/shop4.jpg" alt="" width="176" height="120"></a><a href="">美女性感写真海报墙艺术装饰画贴画图1</a><div><span>¥ 333</span><span>美女</span></div></div><!-- 单个商品块--><div class="intro"><a href=""><img src="../../../static/images/shop5.jpg" alt="" width="176" height="120"></a><a href="">美女性感写真海报墙艺术装饰画贴画图1</a><div><span>¥ 333</span><span>美女</span></div></div><!-- 单个商品块--><div class="intro"><a href=""><img src="../../../static/images/shop6.jpg" alt="" width="176" height="120"></a><a href="">美女性感写真海报墙艺术装饰画贴画图1</a><div><span>¥ 333</span><span>美女</span></div></div><!-- 单个商品块--><div class="intro"><a href=""><img src="../../../static/images/shop7.jpg" alt="" width="176" height="120"></a><a href="">美女性感写真海报墙艺术装饰画贴画图1</a><div><span>¥ 333</span><span>美女</span></div></div><!-- 单个商品块--><div class="intro"><a href=""><img src="../../../static/images/shop8.jpg" alt="" width="176" height="120"></a><a href="">美女性感写真海报墙艺术装饰画贴画图1</a><div><span>¥ 333</span><span>美女</span></div></div></div><!-- 右侧图片功能区--><div class="quick-entry"><a href=""><img src="../../../static/images/1.png" alt=""></a><a href=""><img src="../../../static/images/2.png" alt=""></a><a href=""><img src="../../../static/images/3.png" alt=""></a><a href=""><img src="../../../static/images/4.png" alt=""></a><div><a href=""><img src="../../../static/images/ad1.png" alt=""></a><a href=""><img src="../../../static/images/ad2.jpg" alt=""></a></div></div></div></div></body></html>
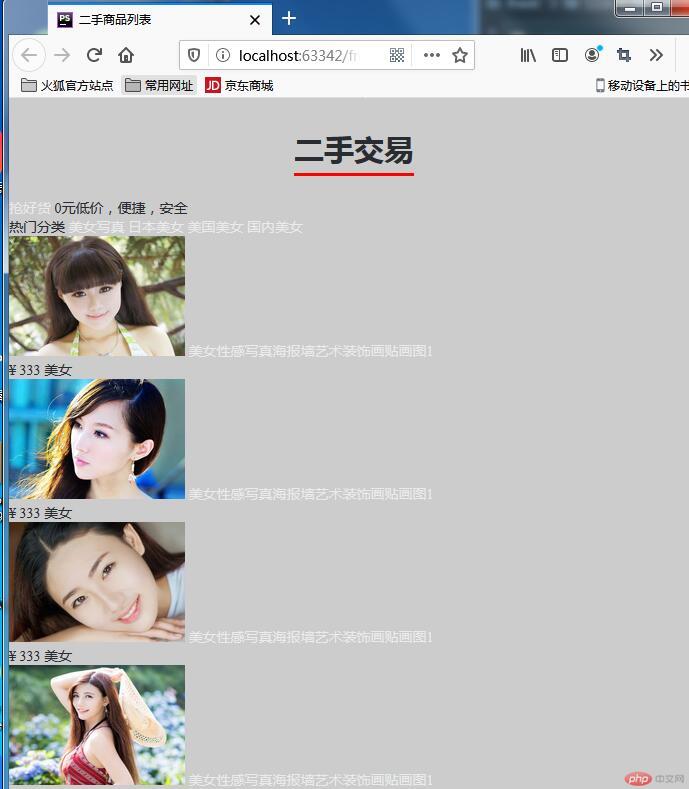
先运行一下看下效果

添加公共初始化的样式表
将PhpStorm显示方式设置为左右两栏方式,方便对照HTML

写出CSS样式表,并做好注释,尤其是自己还不太熟悉的命令
一定要做好注释加深印象
/*引入初始化样式表*/@import "../public_reset.css";/*引入标题样式*/@import "../../public/public_headline/public-headline.css";/*交易专区的样式表*/.publi-second-hand {width: 1200px;padding: 10px;/*防止盒子撑大*/box-sizing: border-box;margin: auto;/*加圆角*/border-radius: 5px;background-color: #fff;}/*鼠标经过加阴影*/.publi-second-hand:hover {box-shadow: 0 0 8px #888;}/*抢好货标题*/.publi-second-hand > .title1 {height: 50px;/*一个像素的的底部实线*/border-bottom: 1px solid #cccccc;box-sizing: border-box;}.publi-second-hand > .title1 > a {font-size: 23px;margin-right: 20px;}.publi-second-hand > .title1 > span {color: red;}/*分类标题*/.publi-second-hand > .title2 {height: 55px;}.publi-second-hand > .title2 > span {color: red;font-size: 23px;}.publi-second-hand > .title2 > span ~ a {padding-left: 20px;}/*鼠标经过分类标题时的颜色变化*/.publi-second-hand > .title2 > span ~ a:hover {color: lightcoral;}/*商品内容区*/.publi-second-hand > .goods {height: 440px;/*转为flex*/display: flex;}.publi-second-hand > .goods > .goods-list {padding: 10px;flex-basis: 800px;/*转为flex*/display: flex;flex-flow: row wrap;/*设置对齐方式为两端对齐*/justify-content: space-between;}.publi-second-hand > .goods > .goods-list > .intro{width: 178px;height: 200px;/*转为flex*/display: flex;/*设置主轴方向,并不允许换行*/flex-flow: column nowrap;justify-content: space-between;}.publi-second-hand > .goods > .goods-list > .intro img {border: 1px solid #cccccc;border-radius: 5px;}.publi-second-hand > .goods > .goods-list > .intro span:first-of-type {color: red;}.publi-second-hand > .goods > .goods-list > .intro > div {display: flex;}.publi-second-hand > .goods > .goods-list > .intro span:last-of-type {color: white;background-color: #55ce9f;padding: 0 5px;margin-left: auto;}/*右侧图片功能区*/.publi-second-hand > .goods > .quick-entry {flex-basis: 400px;padding: 10px;display: flex;/*按行方向排列并允许换行*/flex-flow: row wrap;justify-content: space-between;}.publi-second-hand > .goods > .quick-entry img {width: 190px;height: 130px;}.publi-second-hand > .goods > .quick-entry > div {width: 400px;display: flex;/*按列方向排列*/flex-direction: column;}.publi-second-hand > .goods > .quick-entry > div img {width: 393px;height: 60px;}
最终运行效果如下

案例二:评论组件的实现方法及步骤
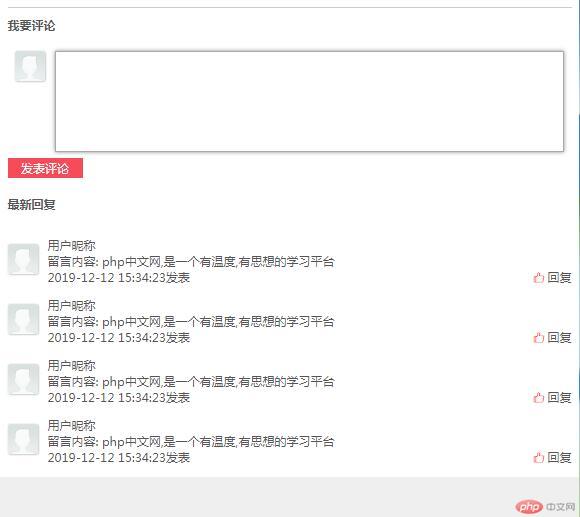
要实现的效果
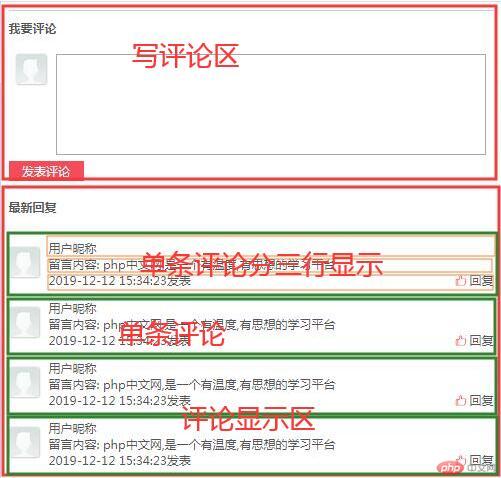
首先拿到图需要分析架构,写出HTML代码
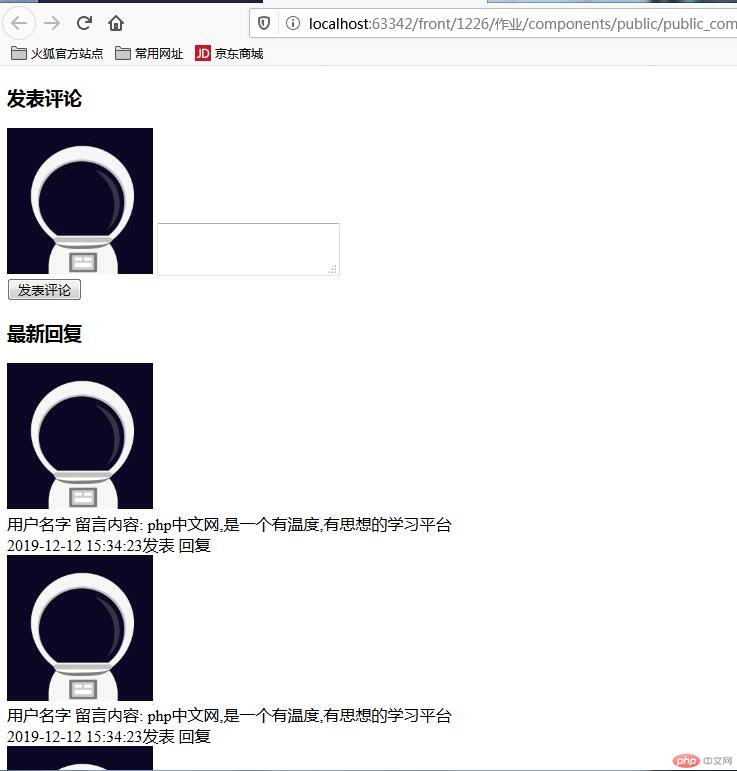
<!DOCTYPE html><html lang="en"><head><meta charset="UTF-8"><title>评论组件</title><!-- 引入字体图标样式表--><link rel="stylesheet" href="../../../static/font/iconfont.css"><link rel="stylesheet" href="public_comment_reply.css"></head><body><!--先写一个大区块(同组件名)--><div class="public-comment-reply"><!-- 发表评论区--><div class="public-comment"><h3>发表评论</h3><div><label for="public-comment"><img src="../../../static/images/user.jpg" alt=""></label><textarea name="" id="public-comment"></textarea></div><button>发表评论</button></div><!-- 评论列表显示区--><div class="public-reply"><h3>最新回复</h3><!-- 单条评论--><div><img src="../../../static/images/user.jpg" alt=""><div class="detail"><span>用户名字</span><span>留言内容: php中文网,是一个有温度,有思想的学习平台</span><div><span>2019-12-12 15:34:23发表</span><span><i class="iconfont icon-dianzan"></i>回复</span></div></div></div><div><img src="../../../static/images/user.jpg" alt=""><div class="detail"><span>用户名字</span><span>留言内容: php中文网,是一个有温度,有思想的学习平台</span><div><span>2019-12-12 15:34:23发表</span><span><i class="iconfont icon-dianzan"></i>回复</span></div></div></div><div><img src="../../../static/images/user.jpg" alt=""><div class="detail"><span>用户名字</span><span>留言内容: php中文网,是一个有温度,有思想的学习平台</span><div><span>2019-12-12 15:34:23发表</span><span><i class="iconfont icon-dianzan"></i>回复</span></div></div></div><div><img src="../../../static/images/user.jpg" alt=""><div class="detail"><span>用户名字</span><span>留言内容: php中文网,是一个有温度,有思想的学习平台</span><div><span>2019-12-12 15:34:23发表</span><span><i class="iconfont icon-dianzan"></i>回复</span></div></div></div><div><img src="../../../static/images/user.jpg" alt=""><div class="detail"><span>用户名字</span><span>留言内容: php中文网,是一个有温度,有思想的学习平台</span><div><span>2019-12-12 15:34:23发表</span><span><i class="iconfont icon-dianzan"></i>回复</span></div></div></div></div></div></body></html>
运行效果如下:
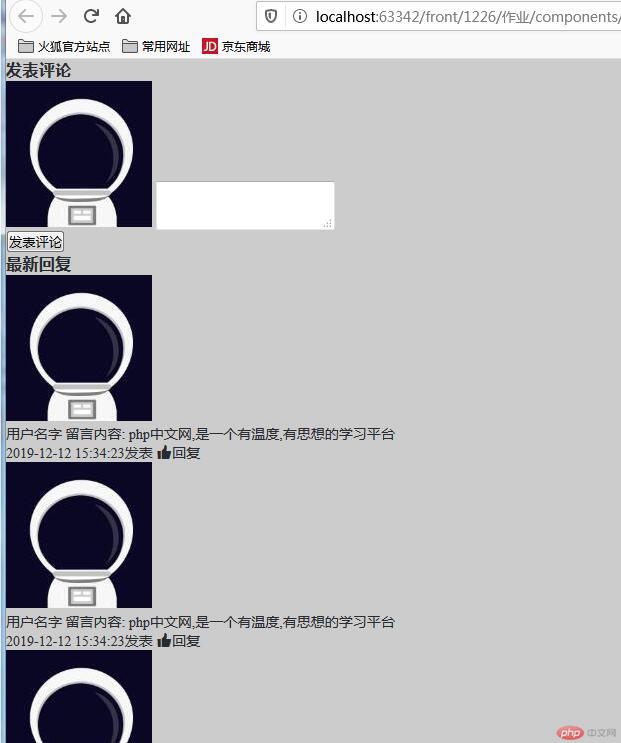
引入公共样式表后的效果:
/*初始化样式表*/@import "../public_reset.css";
按照效果图完成CSS样式部分代码的编写(做好注释方便后期修改):
/*初始化样式表*/@import "../public_reset.css";/*评论样式开始*/.public-comment-reply {padding: 15px;/*防止撑大*/box-sizing: border-box;background-color: #fff;/*转为flex*/display: flex;/*按列方向显示*/flex-direction: column;}/*定义头像的样式*/.public-comment-reply img {width: 60px;height: 60px;/*圆角*/border-radius: 5px;/*加边框和阴影*/box-shadow: 1px 1px 3px #cccccc;}.public-comment-reply > .public-comment {display: flex;flex-direction: column;}.public-comment-reply > .public-comment h3 {padding: 20px 0;/*在顶部加一个线条分隔*/border-top: 1px solid #cccccc;}.public-comment-reply > .public-comment > div {padding: 15px;height: 150px;display: flex;/*按行显示,不允许换行*/flex-flow: row nowrap;}.public-comment-reply > .public-comment > div img {/*单独定义头像的对齐方式*/align-self: flex-start;}.public-comment-reply > .public-comment > div textarea {height: 150px;margin-left: 20px;/*不允许拉伸文本框*/resize: none;flex: auto;}/*文本框加阴影*/.public-comment-reply > .public-comment > div textarea:hover {box-shadow: 0 0 8px #888888;}.public-comment-reply > .public-comment > button {font-size: 14px;background-color: #f64c59;/*去掉按钮边框*/border: none;color: white;width: 150px;height: 40px;/*定义按钮的对齐位置*/align-self: end;}/*鼠标经过按钮时的效果*/.public-comment-reply > .public-comment > button:hover {background-color: #178cee;box-shadow: 0 0 8px #888888;/*给鼠标变一个指针(小手)*/cursor: pointer;}/*回复区*/.public-comment-reply > .public-reply {display: flex;/*列对齐*/flex-direction: column;padding: 15px 0;}.public-comment-reply > .public-reply > h3 {padding: 20px 0;}.public-comment-reply > .public-reply > div {display: flex;margin-top: 30px;}/*图片居中*/.public-comment-reply > .public-reply > div > img {align-self: center;}.public-comment-reply > .public-reply > div > .detail {flex: auto;display: flex;flex-direction: column;margin-left: 20px;height: 90px;/*两端对齐*/justify-content: space-between;}.public-comment-reply > .public-reply > div > .detail > div {display: flex;/*两端对齐*/justify-content: space-between;}.public-comment-reply > .public-reply > div > .detail > div i {color: red;/*默认字体的1.2倍*/font-size: 1.2rem;margin-right: 5px;}
最终运行效果
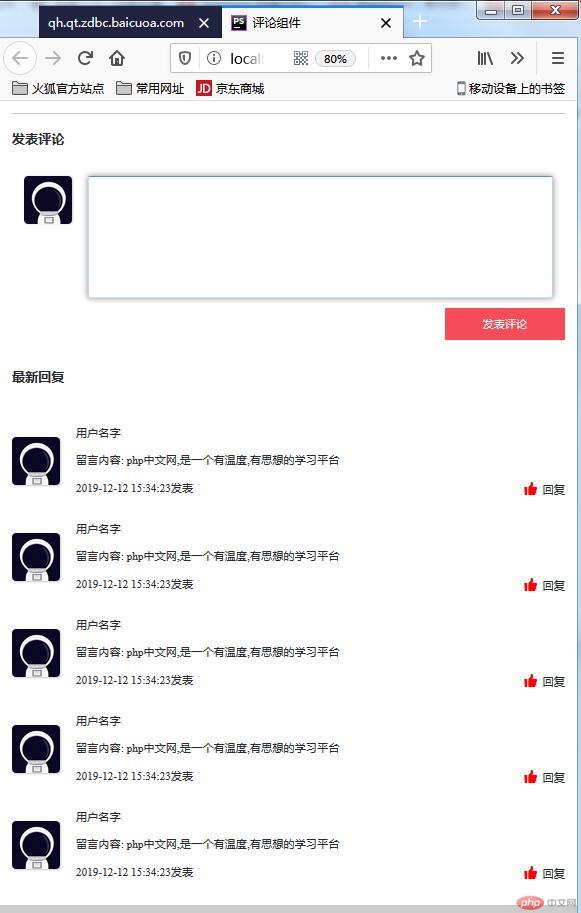
此效果中将 “发表评论” 的按钮靠右侧对齐,和参照图有所区别,更美观,代码如下:
/*定义按钮的对齐位置*/align-self: end;