一、Flex伸缩布局盒模型布局
CSS中的flex布局主要的布局思想就是让容器有能力让它下面的子元素能够改变其宽度和高度,以最好方式来填充容器中剩余空间,定义了display: flex;属性的父容器会变成弹性容器,简称伸缩容器,而它所包含的子元素会变成弹性子元素,简称伸缩元素。弹性元素具有拥有扩展填满弹性容器中的可用空间的特性。
在使用Flex布局定义弹性元素大小时,弹性容器会预留一些可用空间(剩余空间),我们可以通过调节弹性元素的相对大小和位置来确保弹性容器中的剩余空间可以分配多少个弹性元素,当弹性容器没有足够大的空间放置弹性元素,浏览器会按一定的比例减小弹性容器的大小,使其不溢出弹性容器。
如果我们想让一个父容器变成弹性容器,需要使用display属性来将其模式进行转换,如果需要将弹性容器中的某个弹性元素转换成弹性容器还是需要使用display来转换,弹性父容器只能控制它的子弹性元素,而不能控制孙子级的弹性元素,因此我们只需要记住想让哪个弹性父容器中的子元素拥有弹性特性那就得将它的父容器转换成弹性容器,不管是转换之前它是哪个弹性容器的子弹性元素都可以被转换成它的子元素的弹性父元素,这好像与我们的CSS子选择器一样,父亲控制儿子,儿子控制孙子一样哈哈
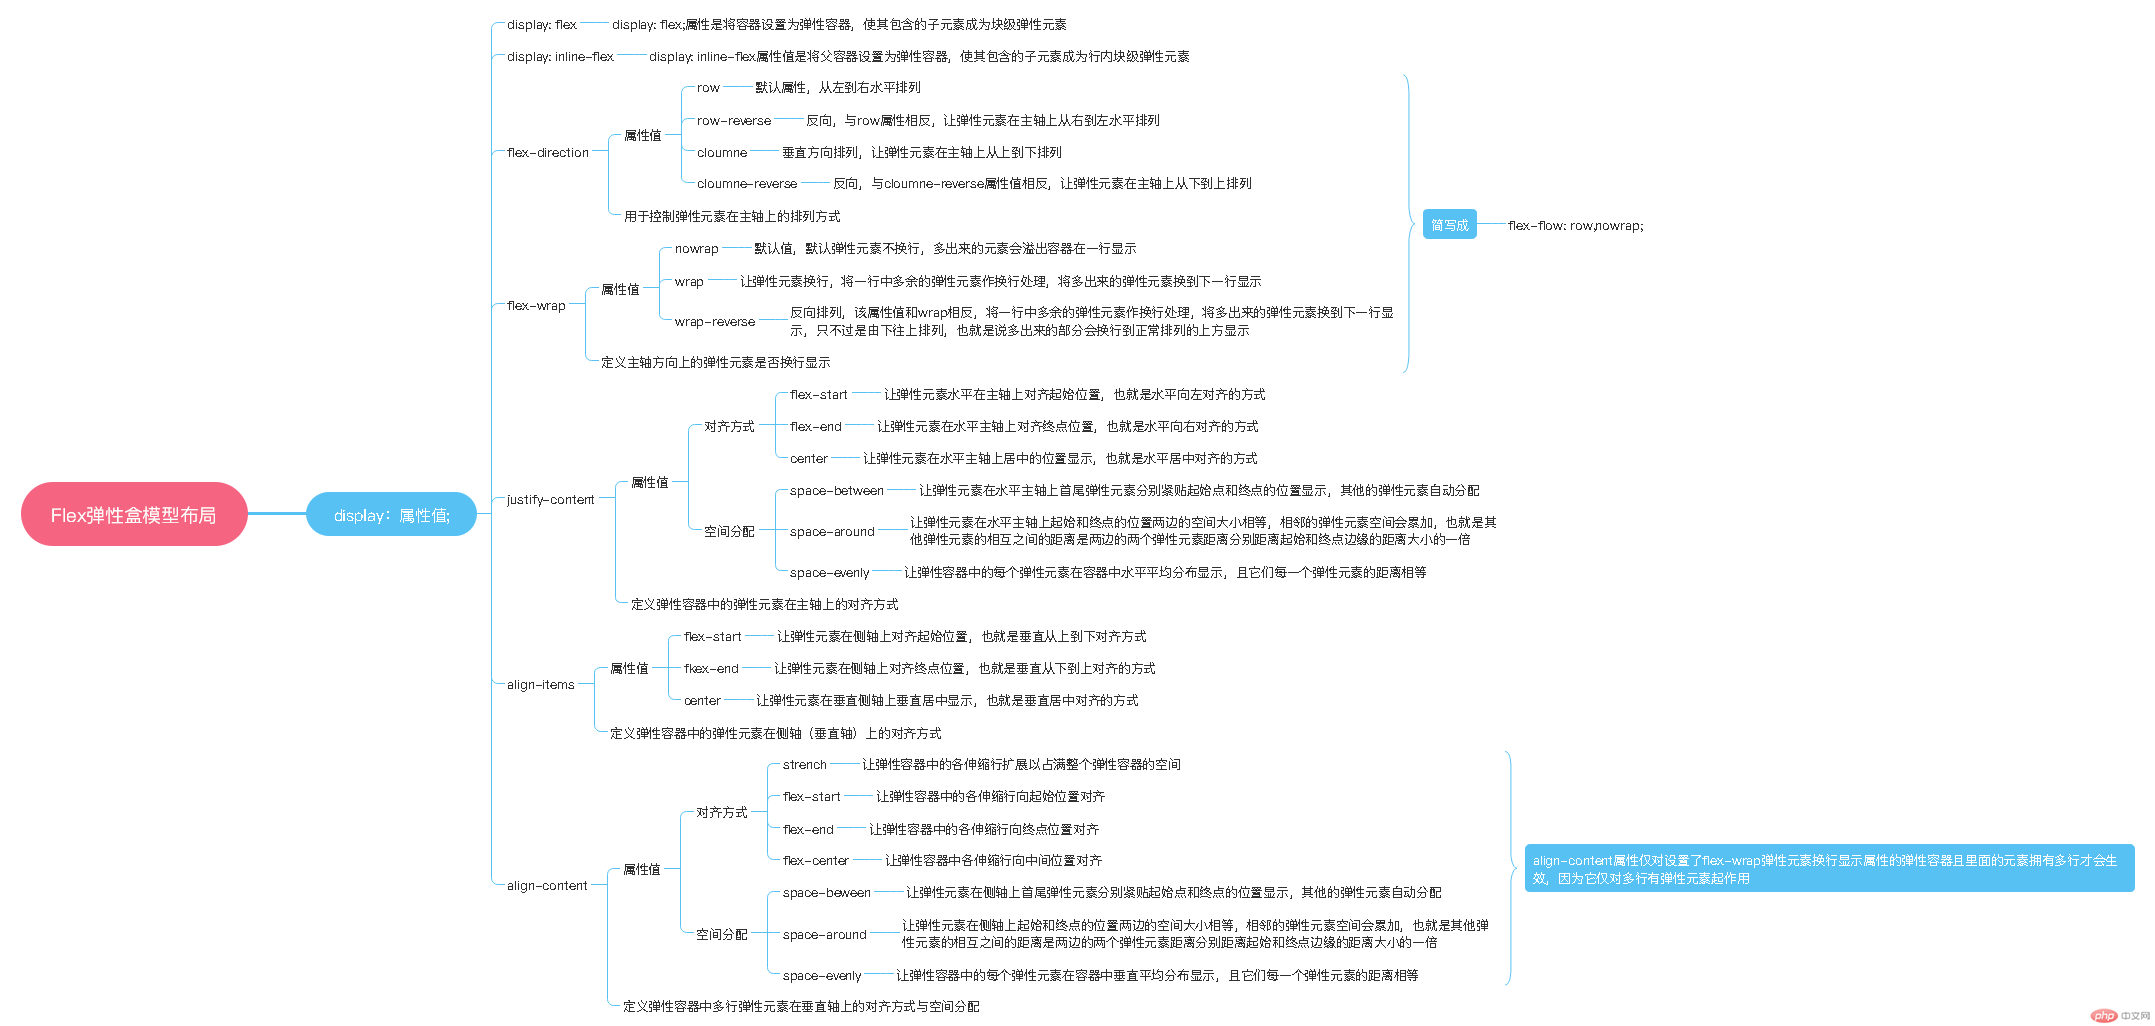
基本语法:display: flex;将元素设置为块级弹性容器 | inline-flex;将元素设置为行内块级弹性容器
将页面中某个元素用display:flex;属性转换成弹性容器之后,弹性父容器会按照它的默认方式来布局它下面的子弹性元素哦,我们可以再为弹性父容器设置其他属性和值来改变它的默认布局方式,那么这些属性都分别有哪些?怎么使用呢?我们先来看看都有哪些属性吧
flex-direction 用于控制弹性元素在主轴上的排列方式
flex-direction: row; 默认属性,从左到右水平排列
flex-direction: row-reverse; 反向,与row属性相反,让弹性元素在主轴上从右到左水平排列
flex-direction: cloumn; 垂直方向排列,让弹性元素在主轴上从上到下排列
flex-direction: cloumn-reverse; 反向,与cloumne-reverse属性值相反,让弹性元素在主轴上从下到上排列
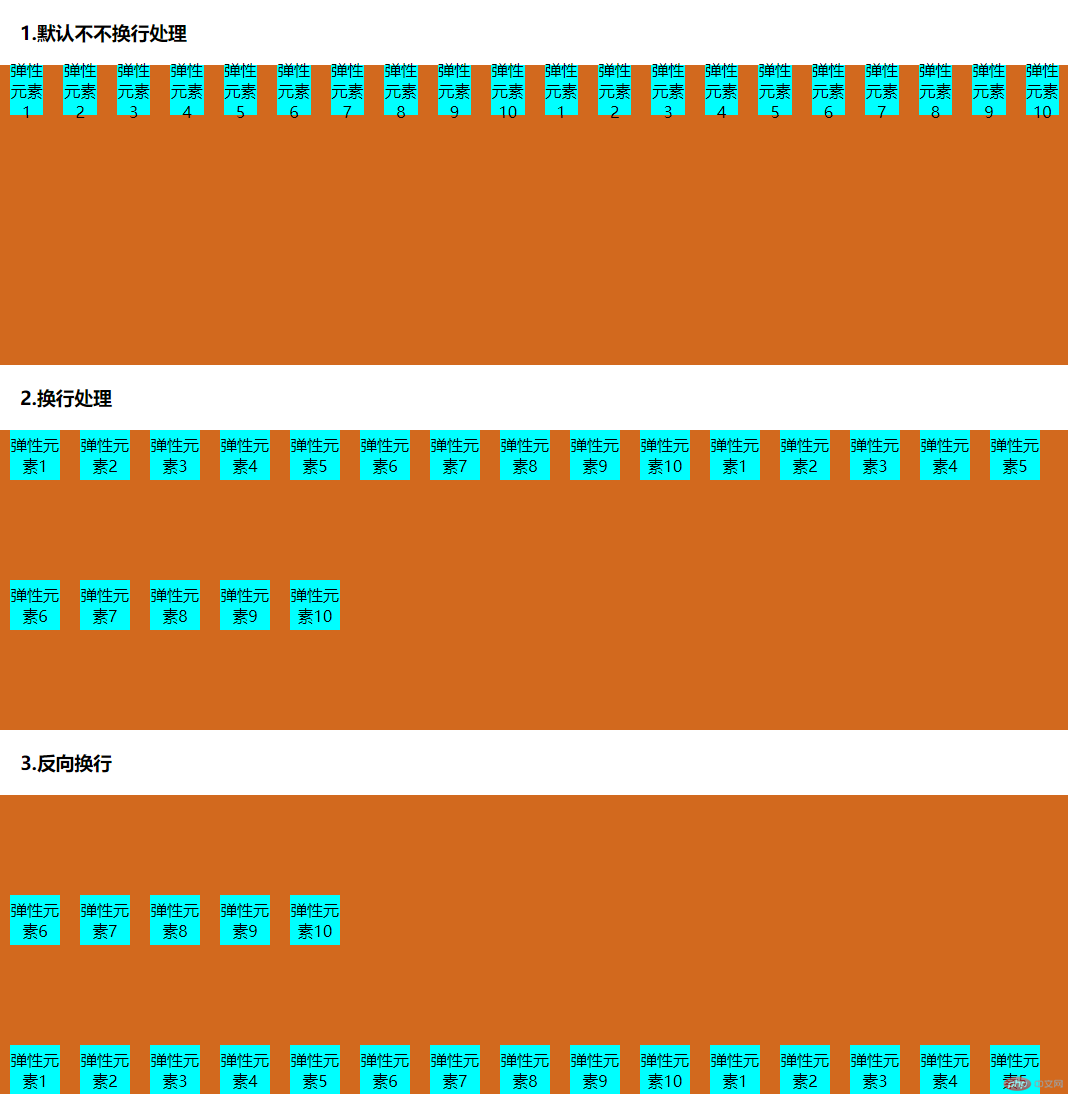
flex-wrap 定义主轴方向上的弹性元素是否换行显示
flex-wrap: nowrap; 默认值,默认弹性元素不换行,多出来的元素会溢出容器在一行显示
flex-wrap: wrap; 让弹性元素换行,将一行中多余的弹性元素作换行处理,将多出来的弹性元素换到下一行显示
flex-wrap: wrap-reverse; 反向排列,该属性值和wrap相反,将一行中多余的弹性元素作换行处理,将多出来的弹性元素换到下一行显示,只不过是由下往上排列,也就是说多出来的部分会换行到正常排列的上方显示
flex-flow: flex-direction,flex-wrap; 定义主轴方向以及弹性元素是否换行,flex-direction和flex-wrap简写
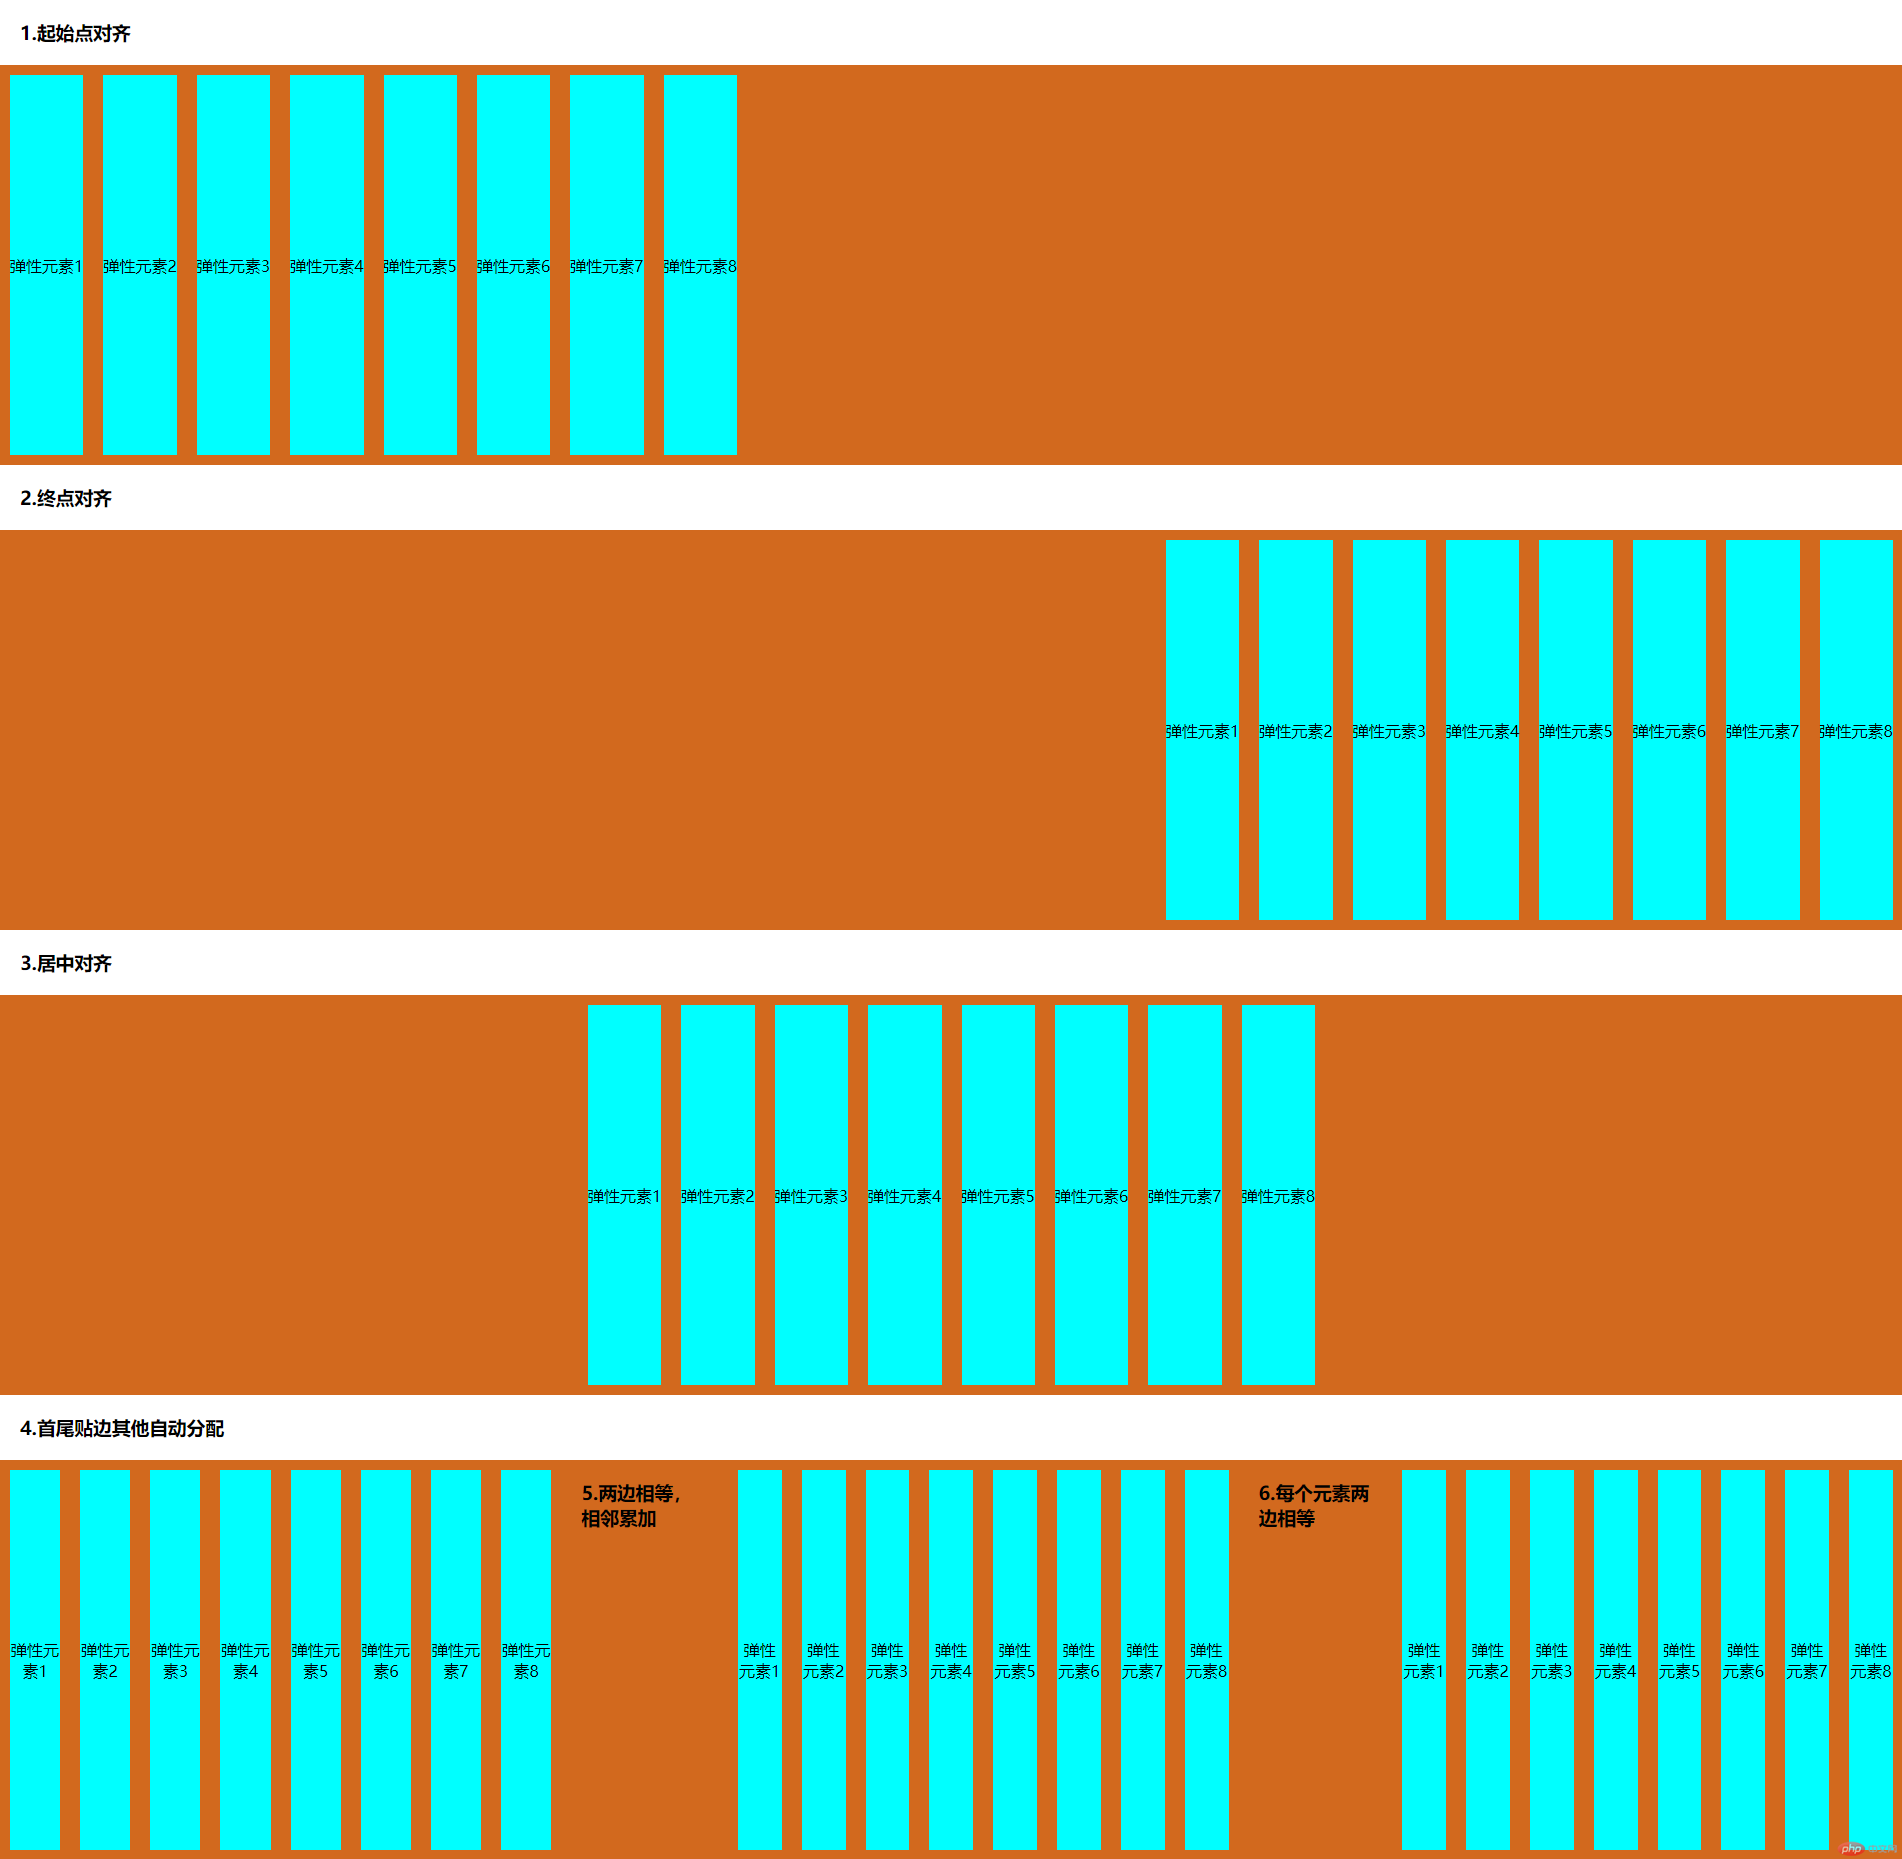
justify-content 定义弹性容器中的弹性元素在主轴上的水平对齐方式
justify-content: flex-start; 让弹性元素水平在主轴上对齐起始位置,也就是水平向左对齐的方式
justify-content: flex-end 让弹性元素在水平主轴上对齐终点位置,也就是水平向右对齐的方式
justify-content: center 让弹性元素在水平主轴上居中的位置显示,也就是水平居中对齐的方式
justify-content: space-between; 让弹性元素在水平主轴上首尾弹性元素分别紧贴起始点和终点的位置显示,其他的弹性元素自动分配
justify-content: space-around; 让弹性元素在水平主轴上起始和终点的位置两边的空间大小相等,相邻的弹性元素空间会累加,也就是其他弹性元素的相互之间的距离是两边的两个弹性元素距离分别距离起始和终点边缘的距离大小的一倍
justify-content: space-evenly; 让弹性容器中的每个弹性元素在容器中水平平均分布显示,且它们每一个弹性元素的距离相等
align-items 定义弹性容器中的弹性元素在侧轴(垂直轴)上的对齐方式
align-items: flex-start; 让弹性元素在侧轴上对齐起始位置,也就是垂直从上到下对齐方式
align-items: flex-end; 让弹性元素在侧轴上对齐终点位置,也就是垂直从下到上对齐的方式
align-items: center; 让弹性元素在垂直侧轴上垂直居中显示,也就是垂直居中对齐的方式
align-content 让容器中多行弹性元素在垂直轴上的对齐方式与空间分配
align-content: strench 让弹性容器中的各伸缩行扩展以占满整个弹性容器的空间
align-content: flex-start; 让弹性容器中的各伸缩行向起始位置对齐
align-content: flex-end; 让弹性容器中的各伸缩行向终点位置对齐
akign-content: cenger; 让弹性容器中各伸缩行向中间位置对齐
align-content: space-beween; 让弹性元素在侧轴上首尾弹性元素分别紧贴起始点和终点的位置显示,其他的弹性元素自动分配
align-content: spade-around; 让弹性元素在侧轴上起始和终点的位置两边的空间大小相等,相邻的弹性元素空间会累加,也就是其他弹性元素的相互之间的距离是两边的两个弹性元素距离分别距离起始和终点边缘的距离大小的一倍
align-content: space-evenly; 让弹性容器中的每个弹性元素在容器中垂直平均分布显示,且它们每一个弹性元素的距离相等
*注意:align-content属性仅对设置了flex-wrap弹性元素换行显示属性的弹性容器且里面的元素拥有多行才会生效,因为它仅对多行有弹性元素起作用
二、实践案例
第一个案例:
1.我们新建一个名叫display:flex.html的文件;在它的根目录下新建一个CSS文件夹并在文件夹里面创建一个flex_style.css文件和一个public.css的公共样式文件。
2.我们给display:flex.html文件中定义一个文档结构,给父容器div元素添加class类名为container,给它下面的所有span元素添加class类名为item代码如下:
<!DOCTYPE html><html lang="en"><head> <meta charset="UTF-8"> <title>将普通父容器转换成块级和行内块级弹性父容器</title> <link rel="stylesheet" href="css/flex_style.css"></head><body> <h3>1.块级弹性容器</h3> <div class="container "> <span class="item">弹性元素1</span> <span class="item">弹性元素2</span> <span class="item">弹性元素3</span> <span class="item">弹性元素4</span> <span class="item">弹性元素5</span> <span class="item">弹性元素6</span> <span class="item">弹性元素7</span> <span class="item">弹性元素8</span> <span class="item">弹性元素9</span> <span class="item">弹性元素10</span> </div><h3>2.行内块级弹性容器</h3> <div class="container"> <span class="item">弹性元素1</span> <span class="item">弹性元素2</span> <span class="item">弹性元素3</span> <span class="item">弹性元素4</span> <span class="item">弹性元素5</span> <span class="item">弹性元素6</span> <span class="item">弹性元素7</span> <span class="item">弹性元素8</span> <span class="item">弹性元素9</span> <span class="item">弹性元素10</span> </div></body></html>
3.得到上面的结构后,我们来想想接下来的步骤,是的,我们在定义好文档结构就要开始写样式不是,开始吧。别忘了我们需要定义public.css这个样式表的公共样式,为了直观的测试接下来的flex布局属性,这里面我想让每个元素的外边距和内边距都重置为零。代码如下:
* { margin: 0; padding: 0;}4.我们之后的案例中也会用到公共样式表,所以我们直接在公共样式表中定义一个通用的类选择器,并设置属性display: flex;这样就不用每次都去定义一次这个样式,只需要在我们案例中当前的样式表中导入这个公共样式表即可,代码如下:
/*公共样式*/* { margin: 0; padding: 0;}.flex { display: flex;}5.先在公共样式中把所有样式定义完成
/*公共样式*/* { margin: 0; padding: 0;}.flex { display: flex; flex-direction: row;}.inline-flex { display: inline-flex; flex-direction: column;}现在我们关注一下display:flex.html的样式表flex_style.css这个文件,开始写样式前我们先用@import “public.css”导入公共样式,然后给.container这个父元素和下面的子元素.item添加样式如下:
<div class="container flex"> <span class="item">弹性元素1</span> <span class="item">弹性元素2</span> <span class="item">弹性元素3</span> <span class="item">弹性元素4</span> <span class="item">弹性元素5</span> <span class="item">弹性元素6</span> <span class="item">弹性元素7</span> <span class="item">弹性元素8</span> <span class="item">弹性元素9</span> <span class="item">弹性元素10</span> </div>
@import "public.css";.container { height: 400px;/*设置父元素的高度*/ background: chocolate;/*给父元素一个背景*//*让父元素中的弹性元素按照水平贴紧父容器起始点和终点显示,其他自动分配空间*/}.item { background: cyan;/*给弹性元素一个背景*/ text-align: center;/*让弹性元素中的文字水平居中*/ display: flex;/*每个弹性元素也成为弹性容器*/ align-items: center; /*让每个弹性元素中的文本垂直居中对齐*/ margin: 10px;/*让每个弹性元素外边距有10像素的高度*/}现在来看看网页的效果如下:

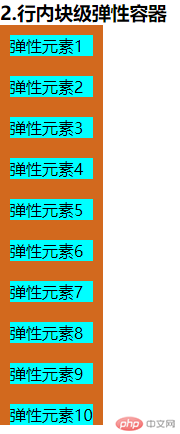
到此,我们第一个将父容器转换为弹性容器的小案例就完成了,是不是很简单呢?
为了更熟悉flex布局的属性我们继续做其他的案例
导航案例二
HTML代码:
<!DOCTYPE html><html lang="en"><head> <meta charset="UTF-8"> <title>flex布局做导航</title> <link rel="stylesheet" href="css/nav_style.css"></head><body> <nav> <a href="http://">首页</a> <a href="http://">视频教程</a> <a href="http://">入门教程</a> <a href="http://">社区问答</a> <a href="http://">技术文章</a> <a href="http://">编程词典</a> <a href="http://">资源下载</a> <a href="http://">工具下载</a> <a href="http://">联系我们</a> <a href="http://">关于我们</a> </nav></body></html>
CSS代码:
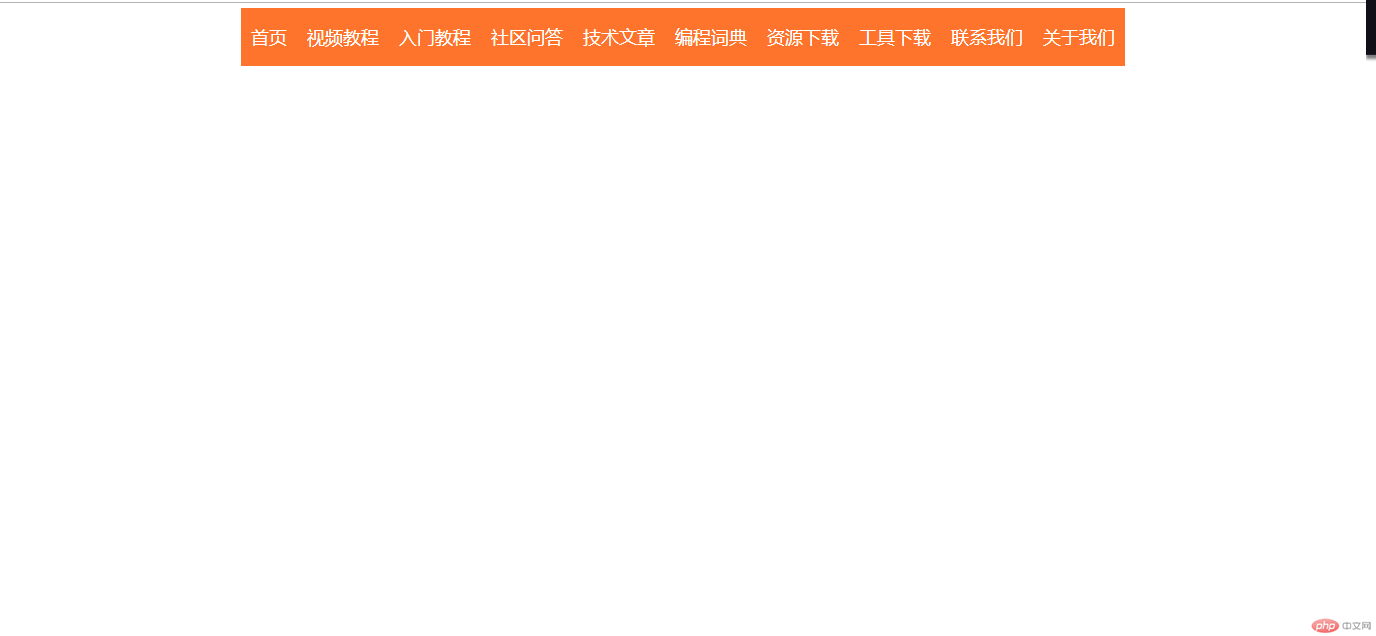
@import "public.css";nav { display: flex; justify-content: center;}/*公共样式*/* { margin: 0; padding: 0;}a { text-decoration: none; background: #ff742d; color: #fff; margin: 5px 0; padding: 10px; font-size: 18px; text-align: center; line-height: 38px;}a:hover { background: orange;}.flex { display: flex; flex-direction: row;}.inline-flex { display: inline-flex; flex-direction: column;}网页效果:
flex-direction属性案例三
HTML代码:
<!DOCTYPE html><html lang="en"><head> <meta charset="UTF-8"> <title>flex弹性元素的对齐方式</title> <link rel="stylesheet" href="css/align_style.css"></head><body> <h3>1.水平排列</h3> <div class="container flex row"> <span class="item">弹性元素1</span> <span class="item">弹性元素2</span> <span class="item">弹性元素3</span> <span class="item">弹性元素4</span> <span class="item">弹性元素5</span> </div><h3>2.反向水平排列</h3> <div class="container flex row-reverse"> <span class="item">弹性元素1</span> <span class="item">弹性元素2</span> <span class="item">弹性元素3</span> <span class="item">弹性元素4</span> <span class="item">弹性元素5</span> </div> <h3>3.垂直排列</h3> <div class="container flex cloumn"> <span class="item">弹性元素1</span> <span class="item">弹性元素2</span> <span class="item">弹性元素3</span> <span class="item">弹性元素4</span> <span class="item">弹性元素5</span> </div> <h3>4.反向垂直排列</h3> <div class="container flex cloumn-reverce"> <span class="item">弹性元素1</span> <span class="item">弹性元素2</span> <span class="item">弹性元素3</span> <span class="item">弹性元素4</span> <span class="item">弹性元素5</span> </div></body></html>
CSS代码:
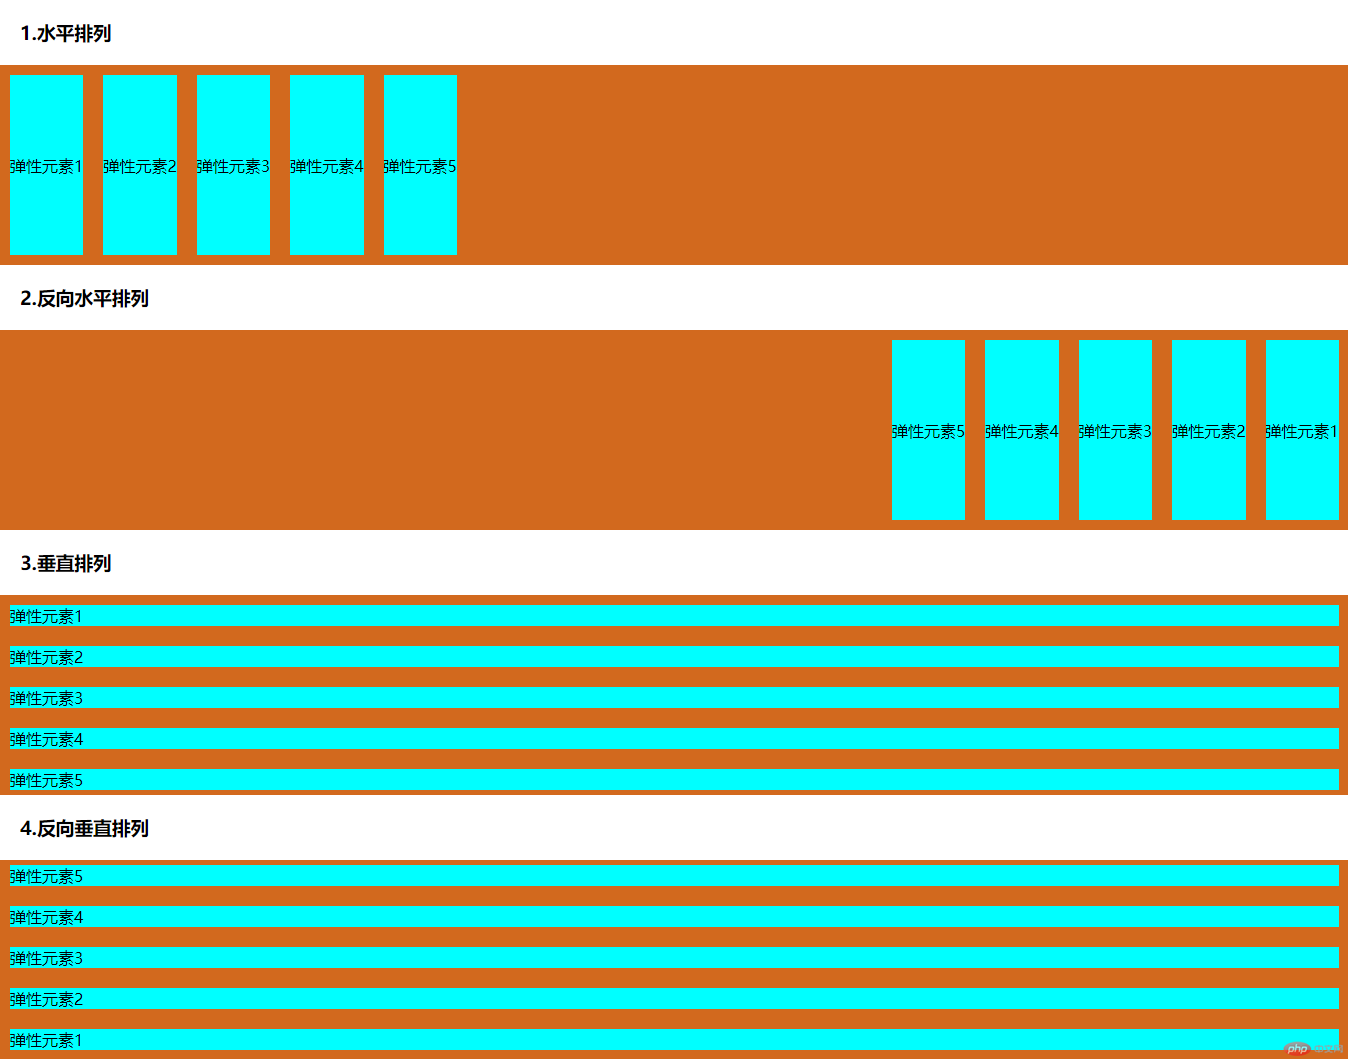
/*公共样式*/* { margin: 0; padding: 0;}a { text-decoration: none; background: #ff742d; color: #fff; margin: 5px 0; padding: 10px; font-size: 18px; text-align: center; line-height: 38px;}a:hover { background: orange;}h3 { margin: 20px;}.flex { display: flex; flex-direction: row;}.inline-flex { display: inline-flex;}.row { flex-direction: row;}.row-reverse { flex-direction: row-reverse;}/*水平排列*/.row-reverse { flex-direction: row-reverse;}/*反向水平*/.cloumn { flex-direction: column}.cloumn-reverce { flex-direction: column-reverse;}/*关联样式表*/@import "public.css";.container { height: 200px;/*设置父元素的高度*/ background: chocolate;/*给父元素一个背景*//*让父元素中的弹性元素按照水平贴紧父容器起始点和终点显示,其他自动分配空间*/}.item { background: cyan;/*给弹性元素一个背景*/ text-align: center;/*让弹性元素中的文字水平居中*/ display: flex;/*每个弹性元素也成为弹性容器*/ align-items: center; /*让每个弹性元素中的文本垂直居中对齐*/ margin: 10px;/*让每个弹性元素外边距有10像素的高度*/}网页效果
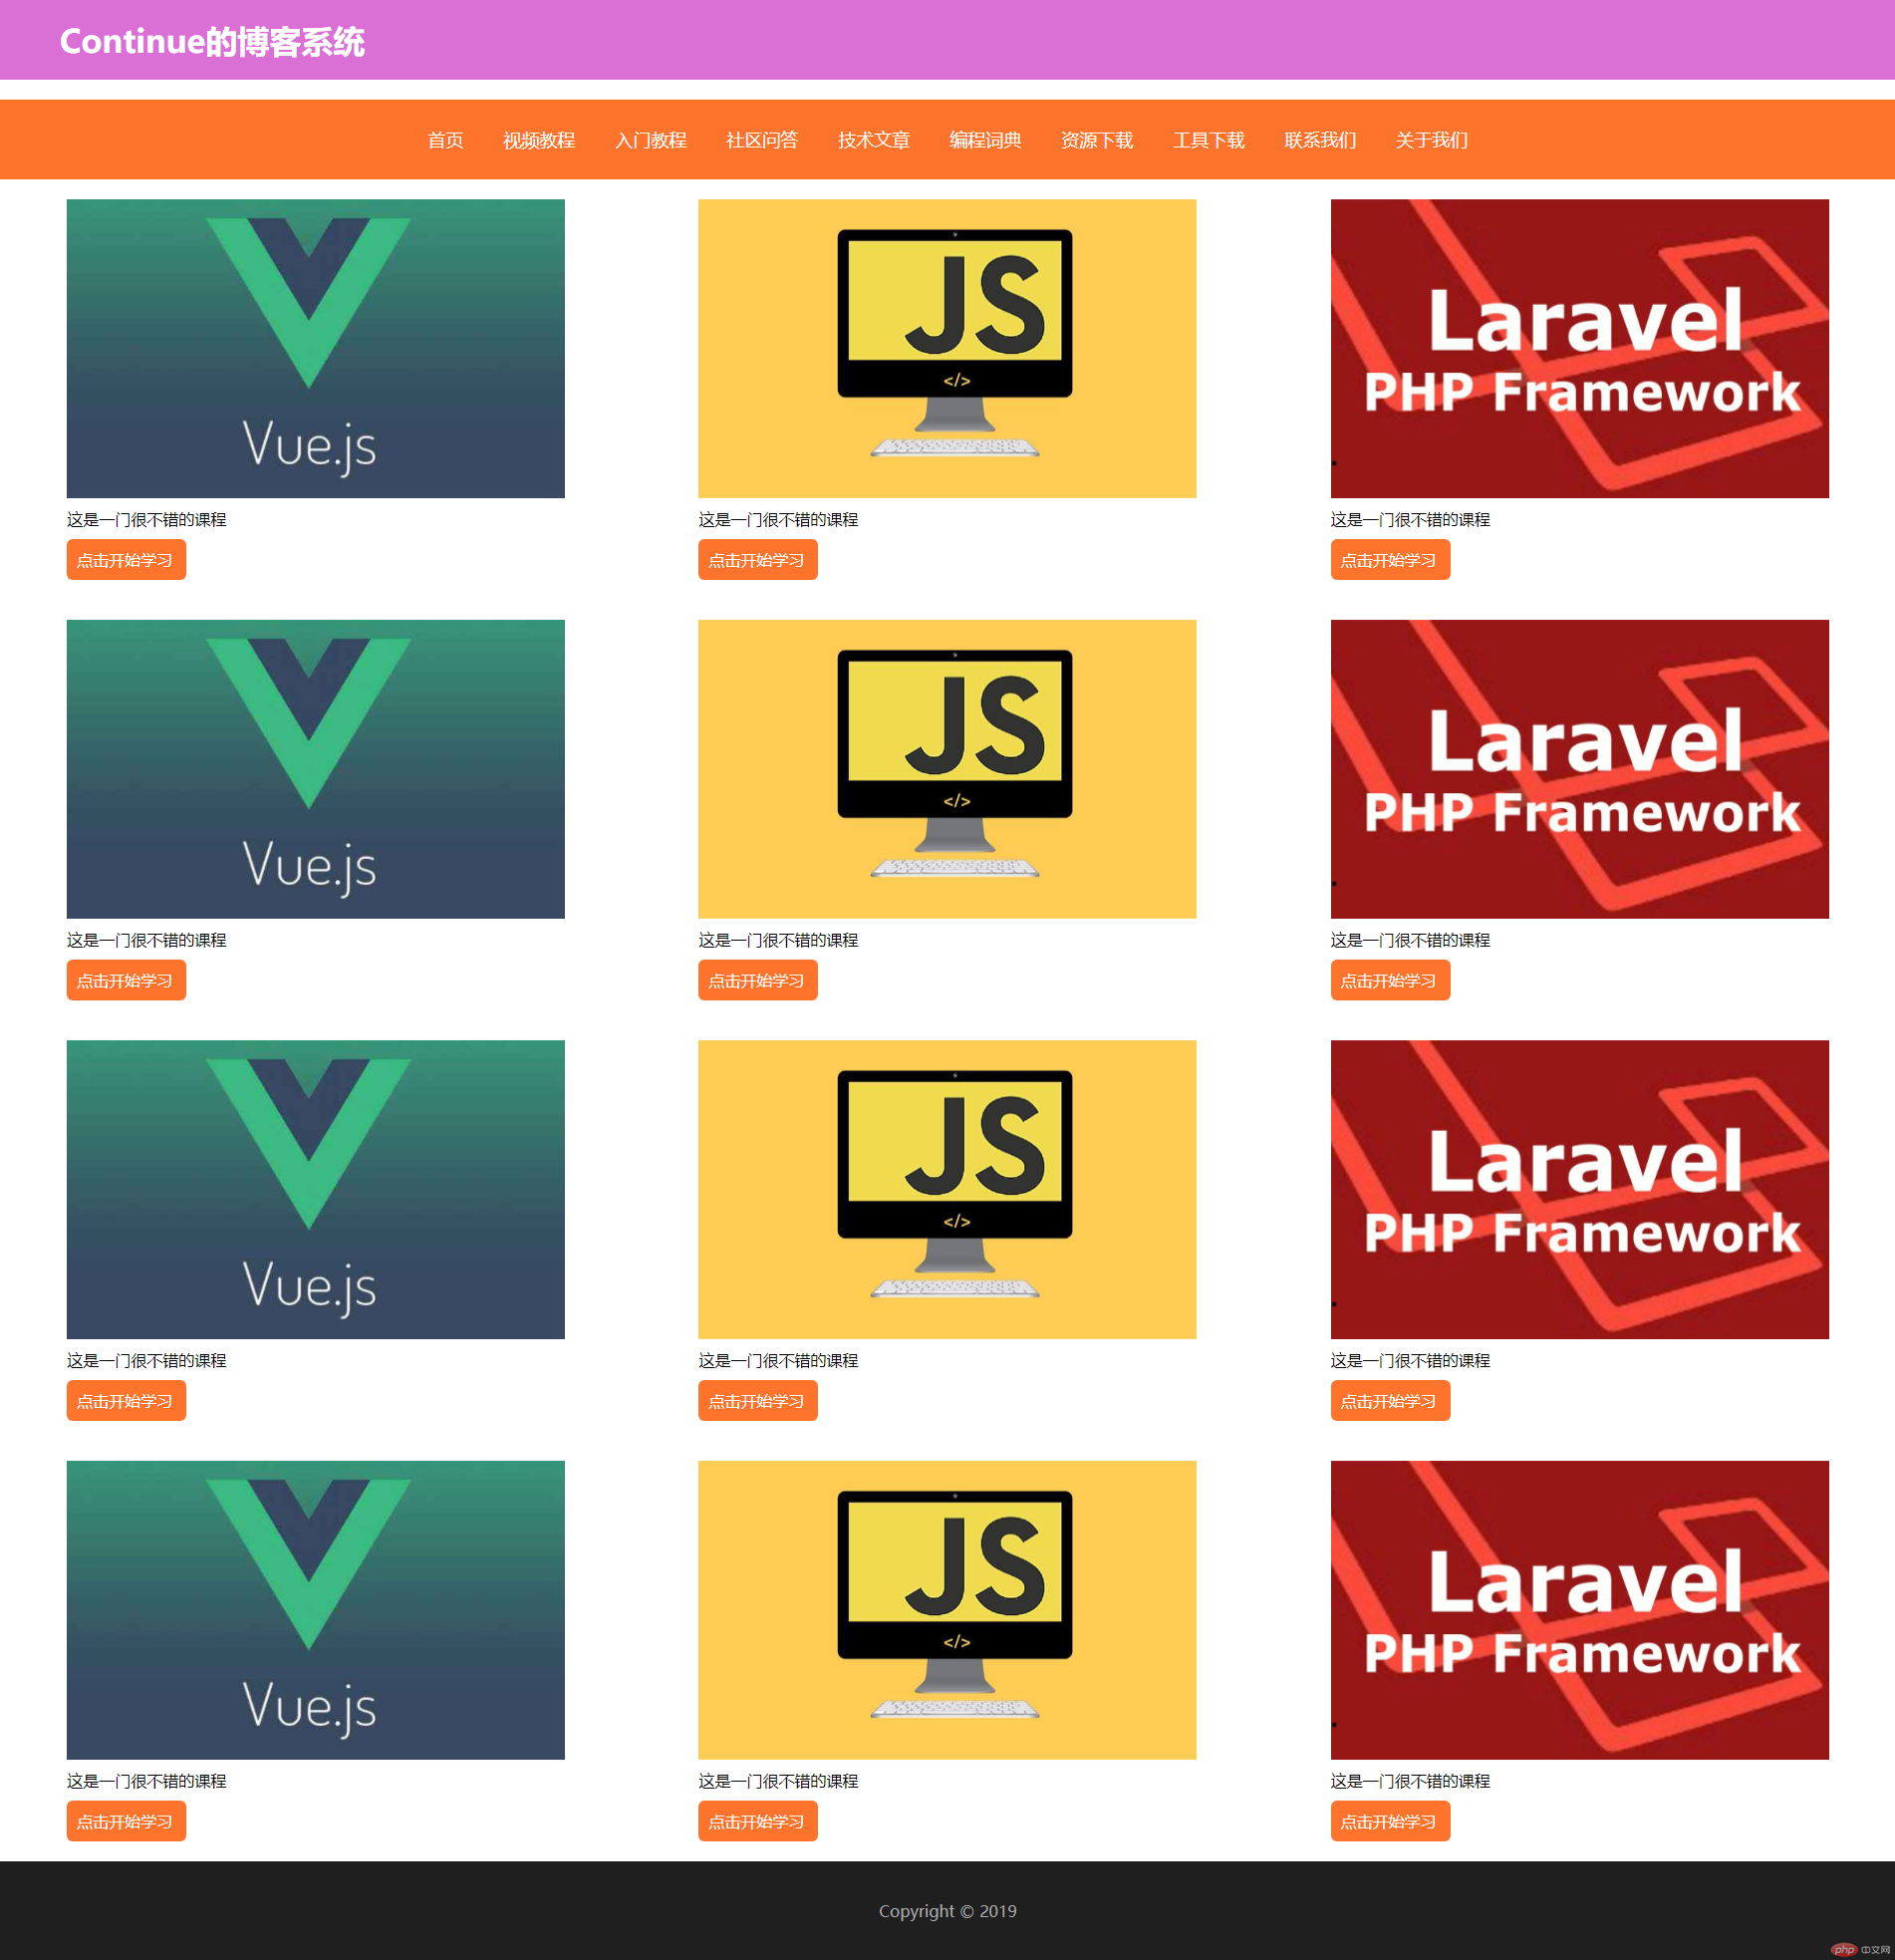
博客系统案例四
HTML代码:
<!DOCTYPE html><html lang="en"><head> <meta charset="UTF-8"> <meta name="viewport" content="width=device-width, initial-scale=1.0"> <meta http-equiv="X-UA-Compatible" content="ie=edge"> <title>flex布局博客</title> <link rel="stylesheet" href="css/blog_style.css"></head><body> <header><h1>Continue的博客系统</h1> </header> <nav> <a href="http://">首页</a> <a href="http://">视频教程</a> <a href="http://">入门教程</a> <a href="http://">社区问答</a> <a href="http://">技术文章</a> <a href="http://">编程词典</a> <a href="http://">资源下载</a> <a href="http://">工具下载</a> <a href="http://">联系我们</a> <a href="http://">关于我们</a> </nav> <main> <div class="card"> <img src="images/1.jpg" alt="" srcset=""> <span>这是一门很不错的课程</span> <a href="http://">点击开始学习</a> </div> <div class="card"> <img src="images/2.jpg" alt="" srcset=""> <span>这是一门很不错的课程</span> <a href="http://">点击开始学习</a> </div> <div class="card"> <img src="images/3.jpg" alt="" srcset=""> <span>这是一门很不错的课程</span> <a href="http://">点击开始学习</a> </div> <div class="card"> <img src="images/1.jpg" alt="" srcset=""> <span>这是一门很不错的课程</span> <a href="http://">点击开始学习</a> </div> <div class="card"> <img src="images/2.jpg" alt="" srcset=""> <span>这是一门很不错的课程</span> <a href="http://">点击开始学习</a> </div> <div class="card"> <img src="images/3.jpg" alt="" srcset=""> <span>这是一门很不错的课程</span> <a href="http://">点击开始学习</a> </div> <div class="card"> <img src="images/1.jpg" alt="" srcset=""> <span>这是一门很不错的课程</span> <a href="http://">点击开始学习</a> </div> <div class="card"> <img src="images/2.jpg" alt="" srcset=""> <span>这是一门很不错的课程</span> <a href="http://">点击开始学习</a> </div> <div class="card"> <img src="images/3.jpg" alt="" srcset=""> <span>这是一门很不错的课程</span> <a href="http://">点击开始学习</a> </div> <div class="card"> <img src="images/1.jpg" alt="" srcset=""> <span>这是一门很不错的课程</span> <a href="http://">点击开始学习</a> </div> <div class="card"> <img src="images/2.jpg" alt="" srcset=""> <span>这是一门很不错的课程</span> <a href="http://">点击开始学习</a> </div> <div class="card"> <img src="images/3.jpg" alt="" srcset=""> <span>这是一门很不错的课程</span> <a href="http://">点击开始学习</a> </div> </main> <footer> <p> Copyright © 2019</p> </footer></body></html>
CSS代码:
* { margin: 0; padding: 0;}nav>a { height: 80px; text-decoration: none; background: #ff742d; color: #fff; margin: 5px 0; padding: 10px; font-size: 18px; text-align: center; margin: 0 10px; box-sizing: border-box; display: flex; align-items: center;}body,div,nav,main { display: flex;}/*将所选择的元素转换成弹性容器*/main { flex-wrap:wrap; justify-content: space-around;}/*将main元素中的弹性元素换行,防止因为元素超出大小后溢出并将起始点和终点两边的元素空间相等,其他相邻的元素距离累加*/nav { justify-content: center; background: #ff742d; height: 80px;}body,.card { flex-direction: column;}.card { margin: 20px;}span { display: block; margin: 10px 0;}.card a { text-decoration: none; display: block; padding: 10px; background: #ff742d; width: 100px; color: #fff; border-radius: 6px;}a:hover { background: coral;}header { height: 80px; background: orchid ; margin-bottom: 20px; color: white; line-height: 80px; padding-left: 60px;}footer { height: 100px; background: #1F1F1F; color: #aaa; line-height: 100px; text-align: center;}网页效果:
flex-wrap换行案例五
HTML代码:
<!DOCTYPE html><html lang="en"><head> <meta charset="UTF-8"> <title>flex-wrap控制元素换行案例</title> <link rel="stylesheet" href="css/wrap_style.css"></head><body> <h3>1.默认不不换行处理</h3> <div class="container flex nowrap"> <span class="item">弹性元素1</span> <span class="item">弹性元素2</span> <span class="item">弹性元素3</span> <span class="item">弹性元素4</span> <span class="item">弹性元素5</span> <span class="item">弹性元素6</span> <span class="item">弹性元素7</span> <span class="item">弹性元素8</span> <span class="item">弹性元素9</span> <span class="item">弹性元素10</span> <span class="item">弹性元素1</span> <span class="item">弹性元素2</span> <span class="item">弹性元素3</span> <span class="item">弹性元素4</span> <span class="item">弹性元素5</span> <span class="item">弹性元素6</span> <span class="item">弹性元素7</span> <span class="item">弹性元素8</span> <span class="item">弹性元素9</span> <span class="item">弹性元素10</span> </div><h3>2.换行处理</h3> <div class="container flex wrap "> <span class="item">弹性元素1</span> <span class="item">弹性元素2</span> <span class="item">弹性元素3</span> <span class="item">弹性元素4</span> <span class="item">弹性元素5</span> <span class="item">弹性元素6</span> <span class="item">弹性元素7</span> <span class="item">弹性元素8</span> <span class="item">弹性元素9</span> <span class="item">弹性元素10</span> <span class="item">弹性元素1</span> <span class="item">弹性元素2</span> <span class="item">弹性元素3</span> <span class="item">弹性元素4</span> <span class="item">弹性元素5</span> <span class="item">弹性元素6</span> <span class="item">弹性元素7</span> <span class="item">弹性元素8</span> <span class="item">弹性元素9</span> <span class="item">弹性元素10</span> </div> <h3>3.反向换行</h3> <div class="container flex wrap-reverse "> <span class="item">弹性元素1</span> <span class="item">弹性元素2</span> <span class="item">弹性元素3</span> <span class="item">弹性元素4</span> <span class="item">弹性元素5</span> <span class="item">弹性元素6</span> <span class="item">弹性元素7</span> <span class="item">弹性元素8</span> <span class="item">弹性元素9</span> <span class="item">弹性元素10</span> <span class="item">弹性元素1</span> <span class="item">弹性元素2</span> <span class="item">弹性元素3</span> <span class="item">弹性元素4</span> <span class="item">弹性元素5</span> <span class="item">弹性元素6</span> <span class="item">弹性元素7</span> <span class="item">弹性元素8</span> <span class="item">弹性元素9</span> <span class="item">弹性元素10</span> </div></body></html>
CSS代码:
/*公共样式*/* { margin: 0; padding: 0;}a { text-decoration: none; background: #ff742d; color: #fff; margin: 5px 0; padding: 10px; font-size: 18px; text-align: center; line-height: 38px;}a:hover { background: orange;}h3 { margin: 20px;}.flex { display: flex; flex-direction: row;}.inline-flex { display: inline-flex;}.row { flex-direction: row;}.row-reverse { flex-direction: row-reverse;}/*水平排列*/.row-reverse { flex-direction: row-reverse;}/*反向水平*/.cloumn { flex-direction: column}.cloumn-reverce { flex-direction: column-reverse;}.nowrap { flex-wrap: nowrap;}.wrap { flex-wrap: wrap;}.wrap-reverse { flex-wrap: wrap-reverse;;}网页效果:
justify-content案例六
HTML代码:
<!DOCTYPE html><html lang="en"><head> <meta charset="UTF-8"> <title>flex-wrap控制元素换行案例</title> <link rel="stylesheet" href="css/justify_content.css"></head><body> <h3>1.起始点对齐</h3> <div class="container flex flex-start wrap"> <span class="item">弹性元素1</span> <span class="item">弹性元素2</span> <span class="item">弹性元素3</span> <span class="item">弹性元素4</span> <span class="item">弹性元素5</span> <span class="item">弹性元素6</span> <span class="item">弹性元素7</span> <span class="item">弹性元素8</span> </div><h3>2.终点对齐</h3> <div class="container flex flex-end wrap"> <span class="item">弹性元素1</span> <span class="item">弹性元素2</span> <span class="item">弹性元素3</span> <span class="item">弹性元素4</span> <span class="item">弹性元素5</span> <span class="item">弹性元素6</span> <span class="item">弹性元素7</span> <span class="item">弹性元素8</span> </div> <h3>3.居中对齐</h3> <div class="container flex center "> <span class="item">弹性元素1</span> <span class="item">弹性元素2</span> <span class="item">弹性元素3</span> <span class="item">弹性元素4</span> <span class="item">弹性元素5</span> <span class="item">弹性元素6</span> <span class="item">弹性元素7</span> <span class="item">弹性元素8</span> </div> <h3>4.首尾贴边其他自动分配</h3> <div class="container flex space-between "> <span class="item">弹性元素1</span> <span class="item">弹性元素2</span> <span class="item">弹性元素3</span> <span class="item">弹性元素4</span> <span class="item">弹性元素5</span> <span class="item">弹性元素6</span> <span class="item">弹性元素7</span> <span class="item">弹性元素8</span><h3>5.两边相等,相邻累加</h3> <div class="container flex space-around "> <span class="item">弹性元素1</span> <span class="item">弹性元素2</span> <span class="item">弹性元素3</span> <span class="item">弹性元素4</span> <span class="item">弹性元素5</span> <span class="item">弹性元素6</span> <span class="item">弹性元素7</span> <span class="item">弹性元素8</span> </div> <h3>6.每个元素两边相等</h3> <div class="container flex space-evenly"> <span class="item">弹性元素1</span> <span class="item">弹性元素2</span> <span class="item">弹性元素3</span> <span class="item">弹性元素4</span> <span class="item">弹性元素5</span> <span class="item">弹性元素6</span> <span class="item">弹性元素7</span> <span class="item">弹性元素8</span> </div></body></html>
CSS代码:
/*公共样式*/* { margin: 0; padding: 0;}a { text-decoration: none; background: #ff742d; color: #fff; margin: 5px 0; padding: 10px; font-size: 18px; text-align: center; line-height: 38px;}a:hover { background: orange;}h3 { margin: 20px;}.flex { display: flex; flex-direction: row;}.inline-flex { display: inline-flex;}.row { flex-direction: row;}.row-reverse { flex-direction: row-reverse;}/*水平排列*/.row-reverse { flex-direction: row-reverse;}/*反向水平*/.cloumn { flex-direction: column}.cloumn-reverce { flex-direction: column-reverse;}.nowrap { flex-wrap: nowrap;}.wrap { flex-wrap: wrap;}.wrap-reverse { flex-wrap: wrap-reverse;}.wrap { flex-wrap: wrap;}.flex-start { justify-content: flex-start;}.flex-end { justify-content: flex-end;}.center { justify-content: center;}.space-between { justify-content: space-between;}.space-around { justify-content: space-around;}.space-evenly { justify-content: space-evenly;}网页效果:
总结
1.align-content属性仅对设置了flex-wrap弹性元素换行显示属性的弹性容器且里面的元素拥有多行才会生效,因为它仅对多行有弹性元素起作用
2.控制弹性容器中的弹性元素是justify-content属性,它可以控制主轴上的水平分布对齐方式
3.控制弹性容器中的单行弹性元素的是align-items属性,它可以控制单行弹性元素在垂直轴的对齐方式
4.控制弹性容器中的多行弹性元素的是align-content属性,它只控制多行的弹性元素的垂直轴的分布对齐方式
5.父弹性容器下可以嵌套另一个父弹性容器,前提是必须使用display:flex;进行转换
手写代码


