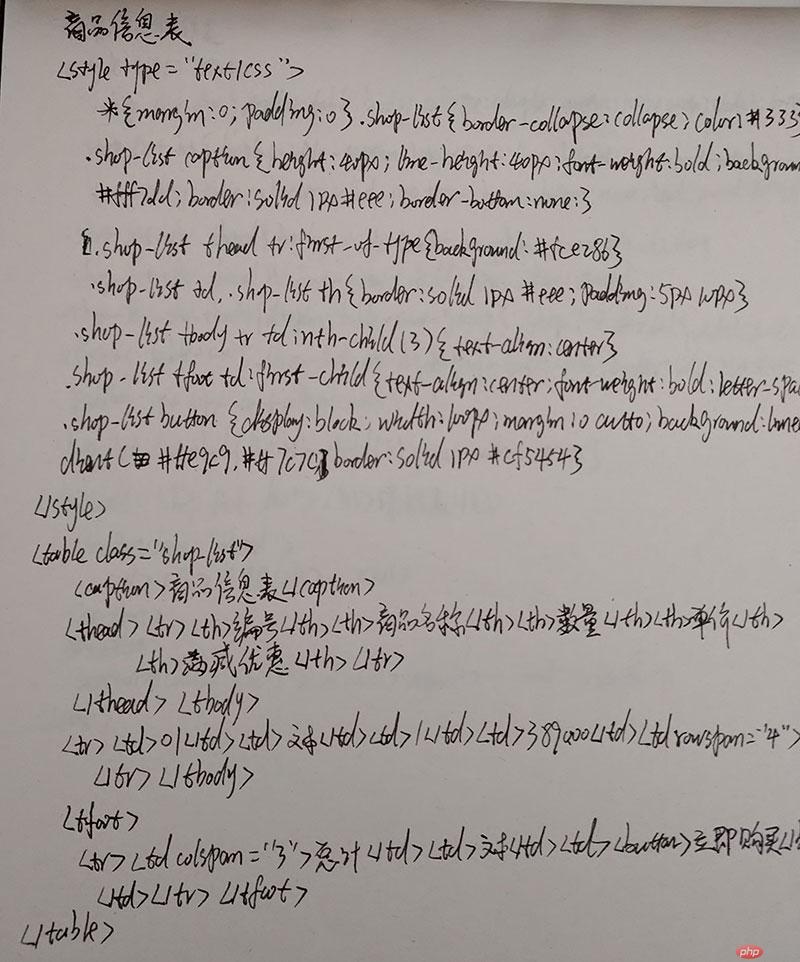
1.制作一张商品信息表,内容自定,要求用到行与列的合并
<style type="text/css">
    *{
        padding:0;
        margin:0
    }
    .shop-list{
        border-collapse: collapse;
        color: #333;
    }
    .shop-list caption{
        height: 40px;
        line-height: 40px;
        font-weight: bold;
        background: #fff7dd;
        border: solid 1px #eee;
        border-bottom: none;
    }
    .shop-list thead tr:first-of-type{
        background: #fce286;
    }
    .shop-list td,.shop-list th{
        border: solid 1px #eee;
        padding: 5px 10px;
    }
    .shop-list tbody tr td:nth-child(3){
        text-align: center;
    }
    .shop-list tfoot td:first-child{
        text-align: center;
        font-weight: bold;
        letter-spacing: 2em;
    }
    .shop-list button{
        display: block;
        width: 100px;
        margin: 0 auto;
        background: linear-gradient(#ffe9e9, #ff7c7c);
        border: solid 1px #cf5454;
    }</style><table class="shop-list">
    <caption>商品信息表</caption>
    <thead>
    <tr>
        <th>编号</th>
        <th>商品名称</th>
        <th>数量</th>
        <th>单价</th>
        <th>满减优惠</th>
    </tr>
    </thead>
    <tbody>

    <tr>
        <td>001</td>
        <td>小米pro9手机 12g 256g</td>
        <td>1</td>
        <td>3899.00</td>
        <td rowspan="4">满1000减100</td>
    </tr>
    <tr>
        <td>002</td>
        <td>小米pro9手机壳 海绵宝宝 磨砂耐摔</td>
        <td>1</td>
        <td>68.00</td>
    </tr>
    <tr>
        <td>003</td>
        <td>小米充电宝 4800mA毫安 秒冲 Type-C</td>
        <td>1</td>
        <td>128.00</td>
    </tr>
    </tbody>
    <tfoot>
    <tr>
        <td colspan="3">总计</td>
        <td>4095.00</td>
        <td><button>立即购买</button></td>
    </tr>
    </tfoot></table>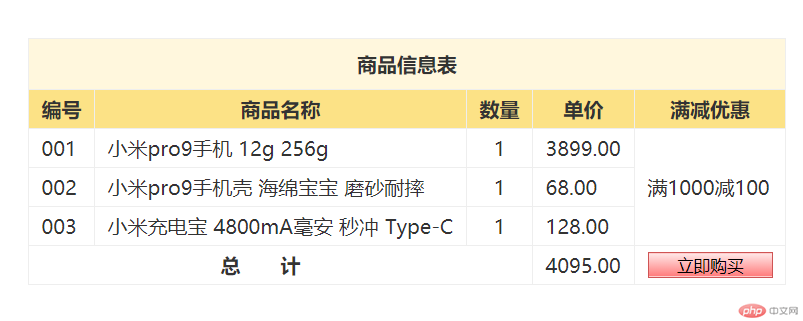
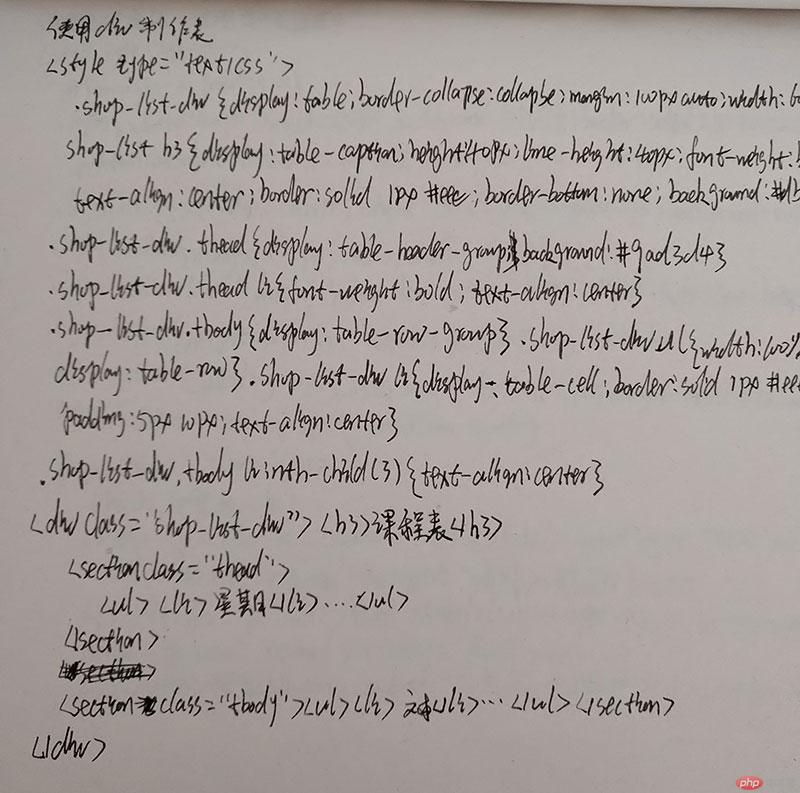
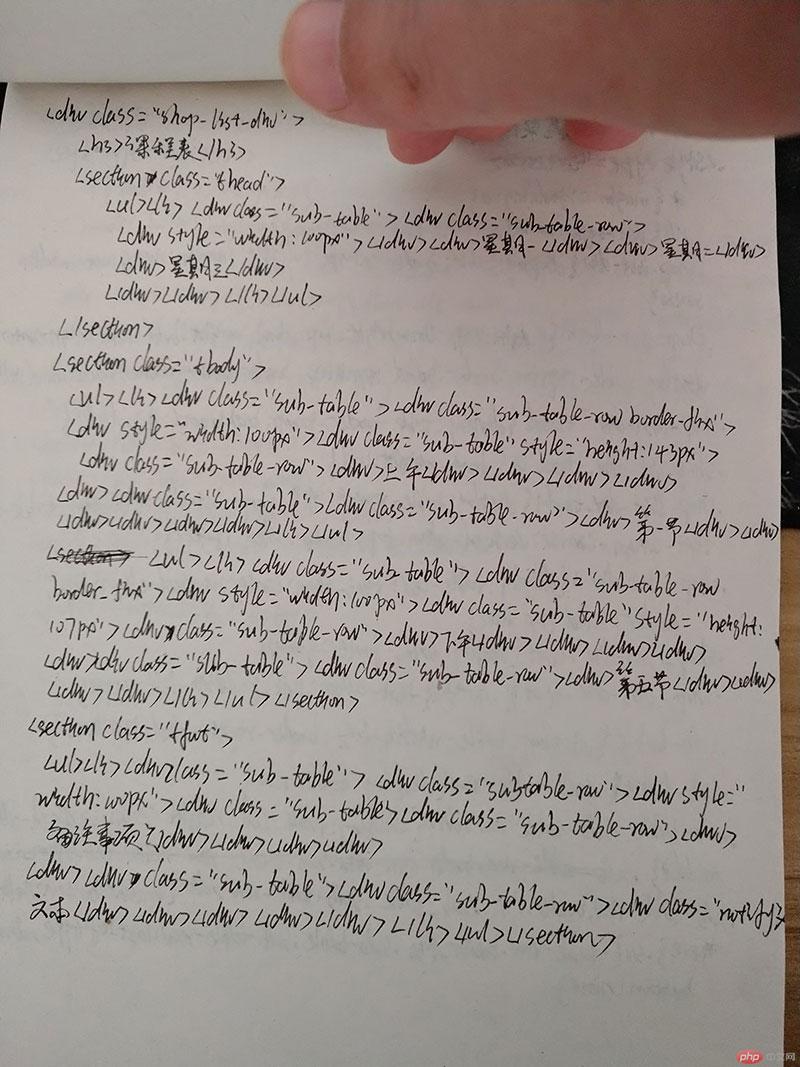
2.使用<div> <span> <p> <ul> ...等标签来制作一张课程表
<style type="text/css">
    ul {
        list-style: none;
    }

    .shop-list-div {
        display: table;
        border-collapse: collapse;
        margin: 100px auto;
        width: 600px;
    }

    .shop-list-div h3 {
        height: 40px;
        line-height: 40px;
        font-weight: bold;
        text-align: center;
        display: table-caption;
        border: solid 1px #eee;
        border-bottom: none;
        background: #dbfff5;
    }

    .shop-list-div .thead {
        display: table-header-group;
        background: #9ad3d4;
    }

    .shop-list-div .thead li {
        font-weight: bold;
        text-align: center;
    }

    .shop-list-div .tbody {
        display: table-row-group;
    }

    .shop-list-div ul {
        width: 100%;
        display: table-row;
    }

    .shop-list-div li {
        display: table-cell;
        border: solid 1px #eee;
        padding: 5px 10px;
        text-align: center;
    }

    .shop-list-div .tbody li:nth-child(3) {
        text-align: center;
    } </style><div class="shop-list-div">
    <h3>课程表</h3>
    <section class="thead">
        <ul>
            <li>星期一</li>
            <li>星期二</li>
            <li>星期三</li>
            <li>星期四</li>
            <li>星期五</li>
        </ul>
    </section>
    <section class="tbody">
        <ul>
            <li>HTML</li>
            <li>CSS</li>
            <li>Javascript</li>
            <li>PhP</li>
            <li>Photoshop</li>
        </ul>
        <ul>
            <li>CSS</li>
            <li>HTML</li>
            <li>PhP</li>
            <li>Javascript</li>
            <li>phpStorm</li>
        </ul>
        <ul>
            <li>HTML</li>
            <li>CSS</li>
            <li>Javascript</li>
            <li>PhP</li>
            <li>Photoshop</li>
        </ul>
        <ul>
            <li>HTML</li>
            <li>CSS</li>
            <li>Javascript</li>
            <li>PhP</li>
            <li>Photoshop</li>
        </ul>
        <ul>
            <li>Javascript</li>
            <li>PhP</li>
            <li>HTML</li>
            <li>Photoshop</li>
            <li>CSS</li>
        </ul>
        <ul>
            <li>Javascript</li>
            <li>CSS</li>
            <li>Photoshop</li>
            <li>HTML</li>
            <li>PhP</li>
        </ul>
        <ul>
            <li>Photoshop</li>
            <li>PhP</li>
            <li>CSS</li>
            <li>Javascript</li>
            <li>HTML</li>
        </ul>
    </section></div>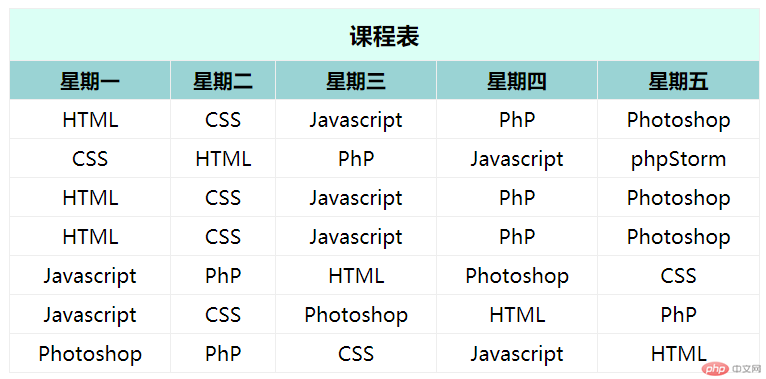
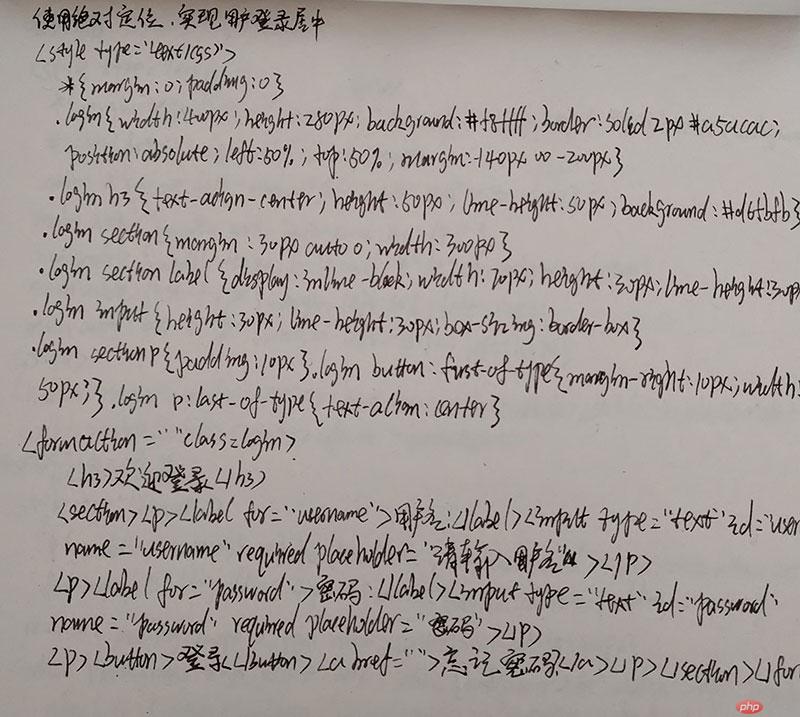
3.使用绝对定位,实现用户登录框在页面中始终居中显示
<style type="text/css">
*{
margin: 0;
padding: 0;
}
.login{
width: 400px;
height: 280px;
background: #f8ffff;
border: solid 2px #a5acac;
position: absolute;
left: 50%;
top: 50%;
margin: -140px 0 0 -200px;
}
.login h3{
text-align: center;
height: 50px;
line-height: 50px;
background: #d6fbfb;
}
.login section{
margin: 30px auto 0;
width: 300px;
}
.login section label{
display: inline-block;
width: 70px;
height: 30px;
line-height: 30px;
}
.login input{
height: 30px;
line-height: 30px;
box-sizing: border-box;
}
.login section p{
padding: 10px;
}
.login button:first-of-type{
margin-right: 10px;
width: 50px;
}
.login p:last-of-type{
text-align: center;
}</style><form action="" class="login">
<h3>欢迎登录</h3>
<section>
<p><label for="username">用户名:</label><input type="text" id="username" name="username" required placeholder="请输入用户名"></p>
<p><label for="password">密 码:</label><input type="text" id="password" name="password" required placeholder="请输入密码"></p>
<p><button>登录</button><a href="">忘记密码?</a></p>
</section></form>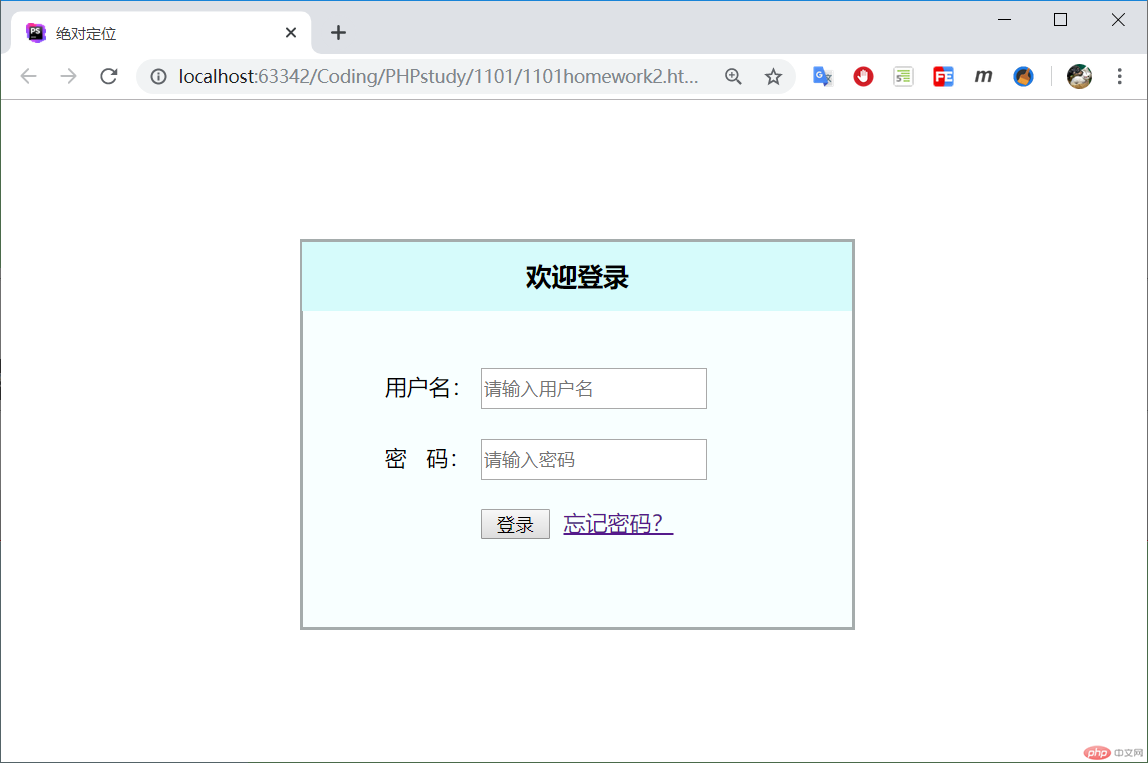
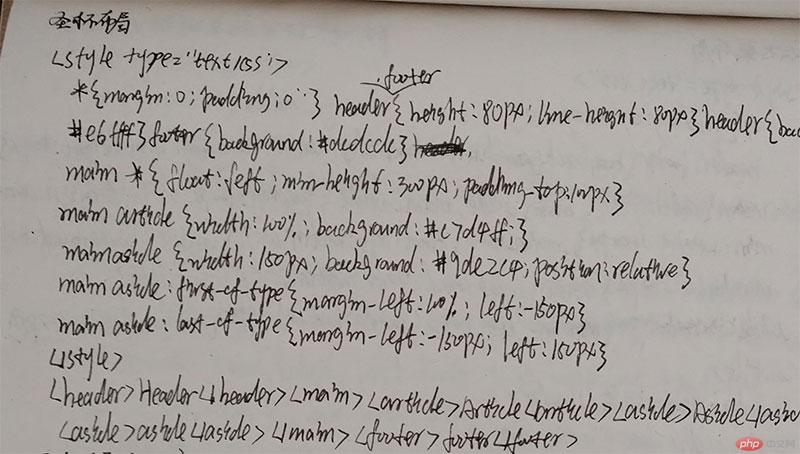
4.模仿课堂案例, 实现圣杯布局,并写出完整流程与布局思路
圣杯布局的产生是为了解决在多列水平布局的时候,主体内容加载延后的问题,该布局在不影响布局的情况使下主体内容排序第一,使浏览器优先加载主体内容。
<style type="text/css">
    *{
        padding: 0;
        margin: 0;
        text-align: center;
    }
    header{
        background: #e6ffff;
    }
    footer{
        background: #dcdcdc;
    }
    header,footer{
        height: 80px;
        line-height: 80px;
    }
    main{
        padding: 0 150px;
        overflow: hidden;
    }
    main *{
        float: left;
        min-height: 300px;
        padding-top: 100px;
    }
    main article{
        width: 100%;
        background: #c7d4ff;
    }
    main aside{
        width: 150px;
        background: #9de2c4;
        position: relative;
    }
    main aside:first-of-type{
        margin-left: -100%;
        left: -150px;
    }
    main aside:last-of-type{
        margin-left: -150px;
        left: 150px;
    }</style><header>Header</header><main><article>Article</article><aside>Aside</aside><aside>Aside</aside></main><footer>footer</footer>
思路:
将内容对象
<article> <aside> <aside>包裹在<main>标签中,设置浮动float:left,将<article>的width:100%设置,使其跟随父对象高度独占一行,将<main>标签的padding-left padding-right属性值设置为两个<aside>的宽度,为其预留显示位置。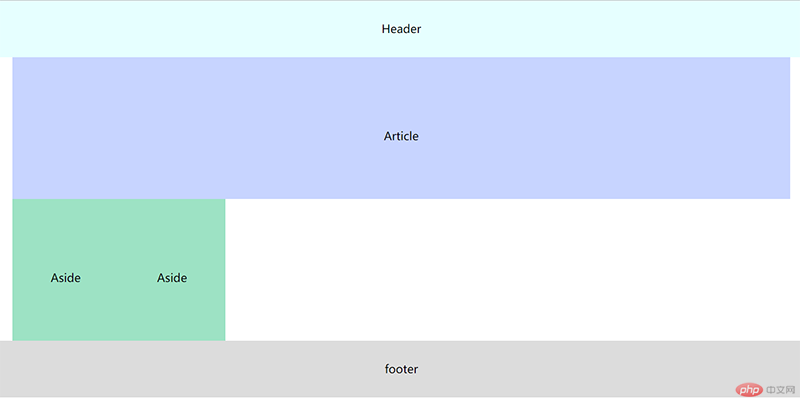
由于
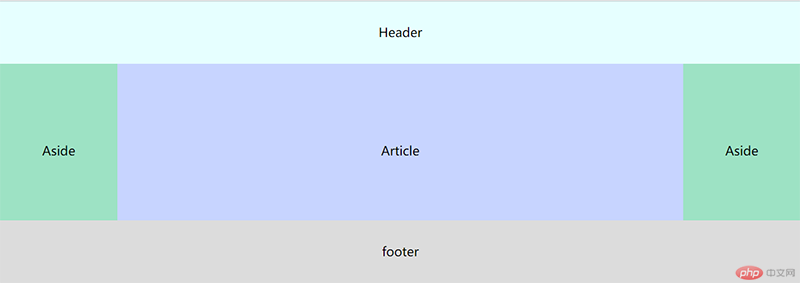
<article>宽度100%的原因占据了<aside>的空间,可以用margin-left负值,使<aside>标签与<article>在同一行。 要将第一个<aside>标签移动到父对象<main>的最左侧,其margin-left的属性应该是负<article>的宽度:margin-left:-100%。第二个<aside>margin-left的值应该是负它本身的宽度。
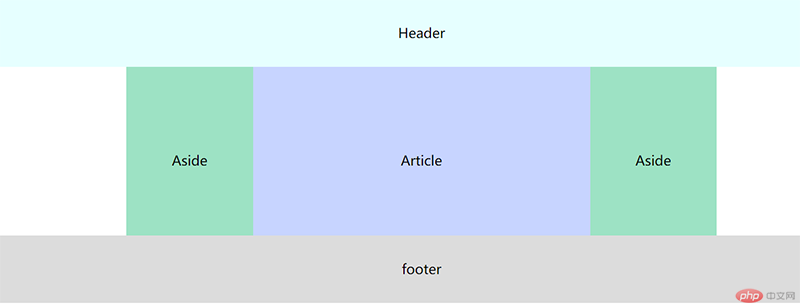
最后一步将两个
<aside>移动到<main>标签为其预留的位置,为<aside>添加position:relative属性相对定位,第一个<aside>left:-150px,left的负值是第一个<aside>的宽度,第二个<aside>的left属性因为是向右移动,所以直接添加left:150px即可。
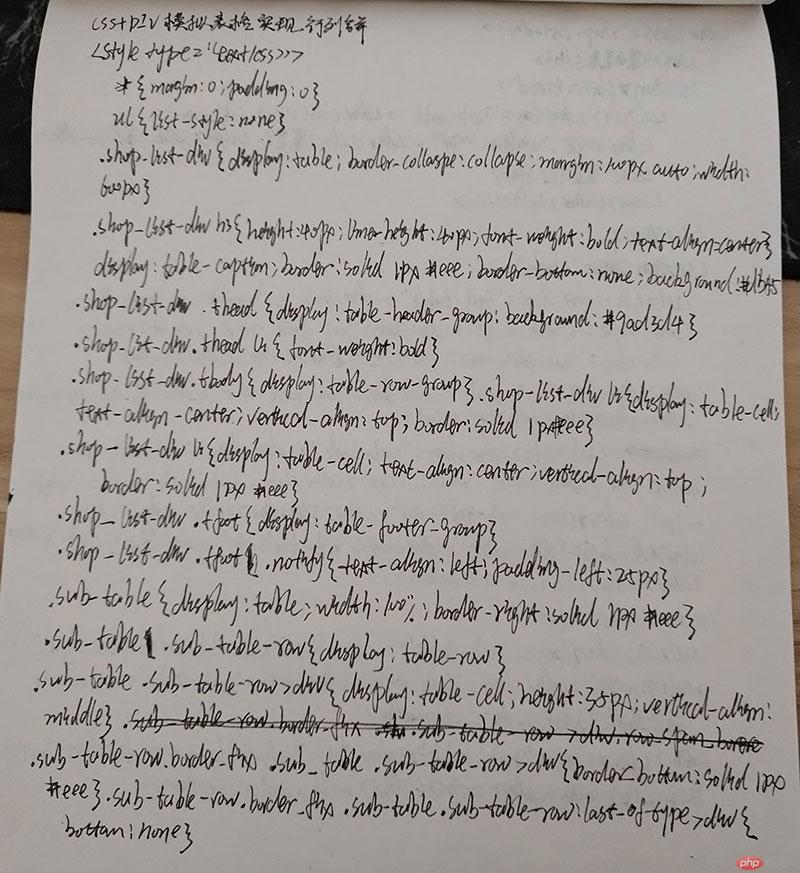
5.(选做): 不使用<table>写表格时,如何实现行与列合并
在使用 css+div 模拟 <table>,要尽量拆分单元格,使每行都是独立嵌套 <table> 这样在合并与拆分的时候才不会影响表布局。
在行合并的时候,同行其他单元格的每列数据都要用单独嵌套 <table> 包裹。
列合并的时候该行所有内容单独插入一个嵌套<table>标签中。 还要注意合并后的边框显示,最好在最初设计表格的时候想好边框怎么添加,尽量避免合并后边框重叠问题。
<style type="text/css">
    * {
        margin: 0;
        padding: 0;
    }

    ul {
        list-style: none;
    }

    .shop-list-div {
        display: table;
        border-collapse: collapse;
        margin: 100px auto;
        width: 600px;
    }

    .shop-list-div h3 {
        height: 40px;
        line-height: 40px;
        font-weight: bold;
        text-align: center;
        display: table-caption;
        border: solid 1px #eee;
        border-bottom: none;
        background: #dbfff5;
    }

    .shop-list-div .thead {
        display: table-header-group;
        background: #9ad3d4;
    }

    .shop-list-div .thead li {
        font-weight: bold;
    }

    .shop-list-div .tbody {
        display: table-row-group;
    }

    .shop-list-div ul {
        width: 100%;
        display: table-row;
    }

    .shop-list-div li {
        display: table-cell;
        text-align: center;
        vertical-align: top;
        border: solid 1px #eee;
    }

    .shop-list-div .tfoot {
        display: table-footer-group;
    }
    .shop-list-div .tfoot .notify{
        text-align: left;
        padding-left:25px    }
    .sub-table {
        display: table;
        width:100%;
        border-right: solid 1px #eee;
    }

    .sub-table .sub-table-row {
        display: table-row;
    }

    .sub-table .sub-table-row > div {
        display: table-cell;
        height:35px;
        vertical-align:middle;
    }
    .sub-table-row.border_fix .sub-table .sub-table-row > div{
        border-bottom: solid 1px #eee;
    }
    .sub-table-row.border_fix .sub-table .sub-table-row:last-of-type > div{
        border-bottom: none;
    }</style><div class="shop-list-div">
    <h3>课程表</h3>
    <section class="thead">
        <ul>
            <li>
                <div class="sub-table">
                    <div class="sub-table-row">
                        <div style="width:100px"></div>
                        <div>星期一</div>
                        <div>星期二</div>
                        <div>星期三</div>
                        <div>星期四</div>
                        <div>星期五</div>
                    </div>
                </div>
            </li>
        </ul>
    </section>
    <section class="tbody">
        <ul>
            <li>
            <div class="sub-table">
            <div class="sub-table-row border_fix">
            <div style="width:100px">
                <div class="sub-table"  style="height:143px" >
                    <div class="sub-table-row">
                        <div>上午</div>
                    </div>
                </div>
            </div>
            <div>
                <div class="sub-table">
                    <div class="sub-table-row"><div>第一节</div></div>
                    <div class="sub-table-row"><div>第二节</div></div>
                    <div class="sub-table-row"><div>第三节</div></div>
                    <div class="sub-table-row"><div>第四节</div></div>
                </div>
            </div>
            <div>
                <div class="sub-table">
                    <div class="sub-table-row"><div>第一节</div></div>
                    <div class="sub-table-row"><div>第二节</div></div>
                    <div class="sub-table-row"><div>第三节</div></div>
                    <div class="sub-table-row"><div>第四节</div></div>
                </div>
            </div>
            <div>
                <div class="sub-table">
                    <div class="sub-table-row"><div>第一节</div></div>
                    <div class="sub-table-row"><div>第二节</div></div>
                    <div class="sub-table-row"><div>第三节</div></div>
                    <div class="sub-table-row"><div>第四节</div></div>
                </div>
            </div>
            <div>
                <div class="sub-table">
                    <div class="sub-table-row"><div>第一节</div></div>
                    <div class="sub-table-row"><div>第二节</div></div>
                    <div class="sub-table-row"><div>第三节</div></div>
                    <div class="sub-table-row"><div>第四节</div></div>
                </div>
            </div>
            <div>
                <div class="sub-table">
                    <div class="sub-table-row"><div>第一节</div></div>
                    <div class="sub-table-row"><div>第二节</div></div>
                    <div class="sub-table-row"><div>第三节</div></div>
                    <div class="sub-table-row"><div>第四节</div></div>
                </div>
            </div>
            </div>
            </div>
            </li>
        </ul>
        <ul>
            <li>
            <div class="sub-table">
            <div class="sub-table-row border_fix">
            <div style="width:100px">
                <div class="sub-table" style="height:107px;">
                    <div class="sub-table-row">
                        <div>下午</div>
                    </div>
                </div>
            </div>
            <div>
                <div class="sub-table">
                    <div class="sub-table-row"><div>第五节</div></div>
                    <div class="sub-table-row"><div>第六节</div></div>
                    <div class="sub-table-row"><div>第七节</div></div>
                </div>
            </div>
            <div>
                <div class="sub-table">
                    <div class="sub-table-row"><div>第五节</div></div>
                    <div class="sub-table-row"><div>第六节</div></div>
                    <div class="sub-table-row"><div>第七节</div></div>
                </div>
            </div>
            <div>
                <div class="sub-table">
                    <div class="sub-table-row"><div>第五节</div></div>
                    <div class="sub-table-row"><div>第六节</div></div>
                    <div class="sub-table-row"><div>第七节</div></div>
                </div>
            </div>
            <div>
                <div class="sub-table">
                    <div class="sub-table-row"><div>第五节</div></div>
                    <div class="sub-table-row"><div>第六节</div></div>
                    <div class="sub-table-row"><div>第七节</div></div>
                </div>
            </div>
            <div>
                <div class="sub-table">
                    <div class="sub-table-row"><div>第五节</div></div>
                    <div class="sub-table-row"><div>第六节</div></div>
                    <div class="sub-table-row"><div>第七节</div></div>
                </div>
            </div>
            </div>
            </div>
            </li>
        </ul>
    </section>
    <section class="tfoot">
        <ul>
            <li>
            <div class="sub-table">
                    <div class="sub-table-row">
                        <div style="width:100px;">
                        <div class="sub-table">
                        <div class="sub-table-row">
                        <div>备注事项:</div>
                        </div></div></div>
                        <div>
                        <div class="sub-table">
                        <div class="sub-table-row">
                        <div class="notify">放学后请将桌面收拾整洁,桌椅放回原位。</div>
                        </div></div>
                        </div>
            </div>
            </div>
            </li>
        </ul>
    </section></div>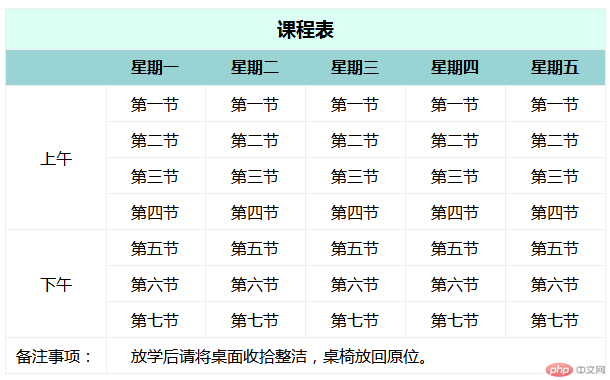
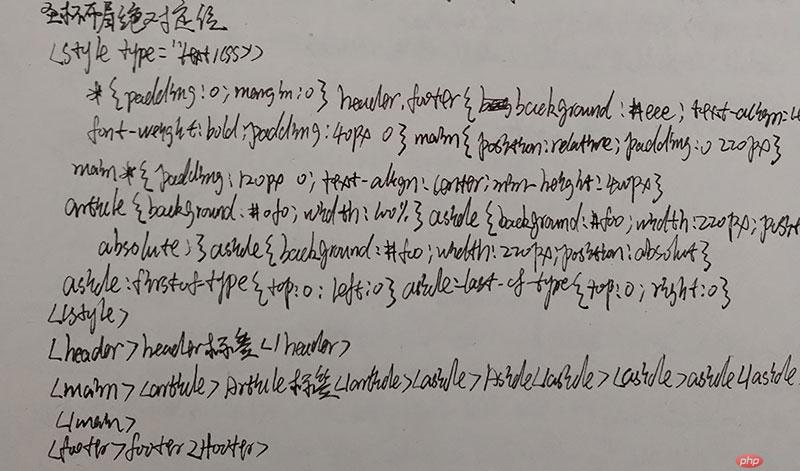
6.(选做): 将圣杯布局中的左右二列,使用绝对定位来实现
使用绝对定位要注意给最外侧 <main> 添加 position:relative 属性,否则两个浮动的 <aside> 标签会以窗口浮动。
  <style type="text/css">
    *{
        padding:0;
        margin:0
    }
    header,footer{
        background:#eee;
        text-align:center;
        font-weight:bold;
        padding:40px 0;
    }
    main {
        position:relative;
        padding:0 220px    }
    main *{
        padding:120px 0;
        text-align:center;
        min-height:400px    }
    article{
        background:#0f0;
        width:100%;
    }
    aside{
        background:#f00;
        width:220px;
        position:absolute;
    }
    aside:first-of-type{
        top:0;
        left:0;
    }
    aside:last-of-type{
        top:0;
        right:0;
    }
  </style>
  <header>Header标签</header>
  <main>
    <article>Article标签</article>
    <aside>Aside标签</aside>
    <aside>Aside标签</aside>
  </main>
  <footer>Footer标签</footer>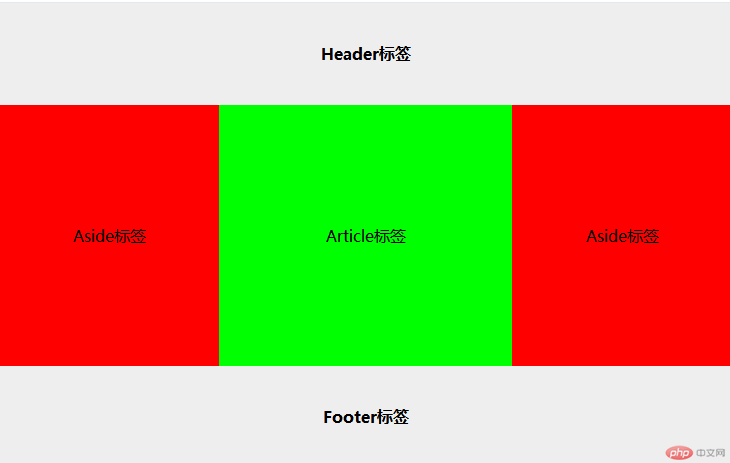
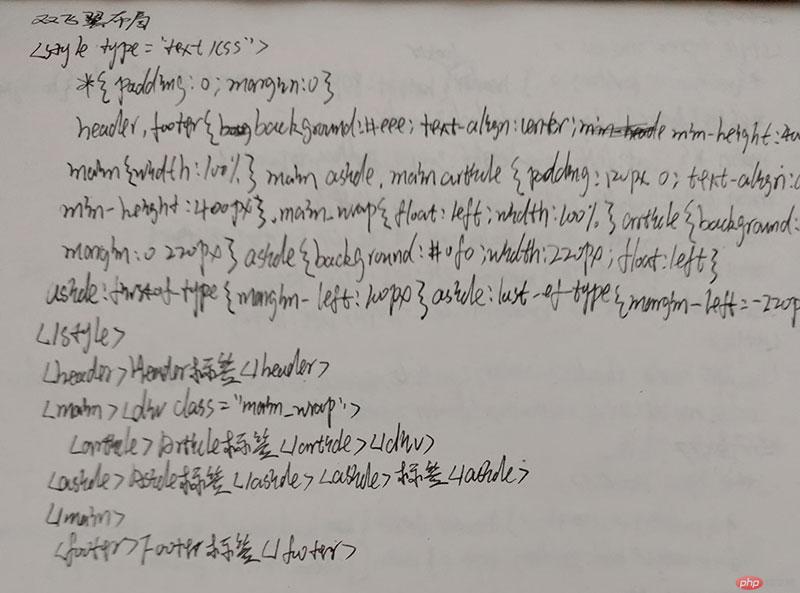
7.(选做): 与圣杯类似的"双飞翼"布局如何实现,并实例演示
双飞翼布局与圣杯布局的区别是,圣杯布局通过内边距 padding 来给两侧边栏留出空间,双飞翼布局则是将content内容包裹在标签内,给 content 添加 margin 属性,来留出空间给两侧边栏。
  <style type="text/css">
    *{
        padding:0;
        margin:0
    }
    header,footer{
        background:#eee;
        text-align:center;
        font-weight:bold;
        padding:40px 0;
    }
    main {
        width:100%;
    }
    main aside,main article{
        padding:120px 0;
        text-align:center;
        min-height:400px    }
    .main_wrap{
        float:left;
        width:100%;
    }
    article{
        background:#0f0;
        margin:0 220px;
    }
    aside{
        background:#f00;
        width:220px;
        float:left    }
    aside:first-of-type{
        margin-left:-100%;
    }
    aside:last-of-type{
        margin-left:-220px;
    }
  </style>
  <header>Header标签</header>
  <main>
  <div class="main_wrap">
    <article>Article标签</article>
  </div>
    <aside>Aside标签</aside>
    <aside>Aside标签</aside>
  </main>
  <footer>Footer标签</footer>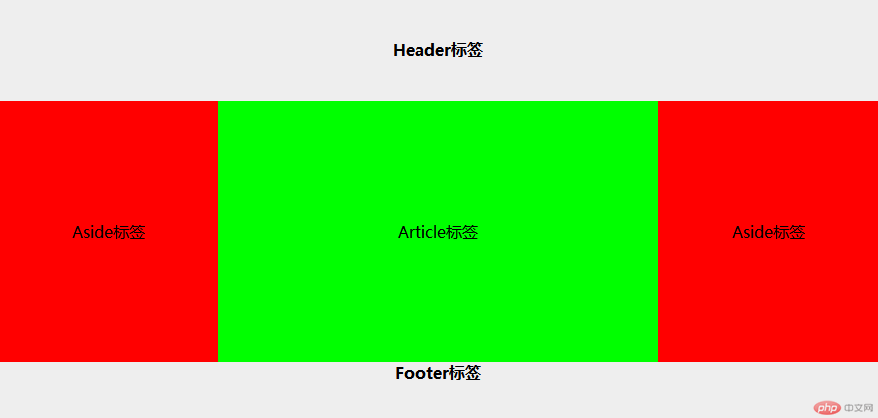
总结
使用css+div模拟table表格,层级嵌套和display属性要一一对照table嵌套层级,在做行与列合并的时候,尽量拆分每一行和每一列单元格,将数据都放在嵌套表里面,这样执行行列合并的时候不会影响布局,在最初设计表格的时候要考虑到边框重叠的问题,因为多个嵌套table,border-collapse属性已经没有效果了,只能单独使用选择器去掉重叠部分的边框。
圣杯布局和双飞翼布局的使用前提是:
1. 中间栏必须是自适应宽度
2. 两侧边栏必须是固定宽度
3. 网站布局必须是3列分布
圣杯布局和双飞翼区别是,圣杯布局是挤压中间栏,使用padding来给两侧边栏留出显示空间,双飞翼是给中间栏的外层添加了一层包裹div,设置属性
width:100%占据整行,float:left,给被包裹用于显示的div,添加margin-leftmargin-right属性,数值是<aside>的宽度。相对定位与绝对定位的区别是相对定位的
top left bottom right属性是以当前盒子显示位置为基准来移动,绝对定位的top left bottom right父对象以上的层级没有添加相对定位属性,则以窗口为基准来移动。
手抄代码部分重复的行省略了
