一、描述HTML与HTTP是什么,他们之间有什么联系?html:是超文本编辑语言http: 超文本传输语言关系:网站是通过http协议在服务端和客户端之间传输,经过浏览器的解析把内容显示在html页面上
二、制作一个导航,要求使用到列表,链接,图片,并使用图片做为链接元素
实例
<!DOCTYPE html>
<html lang="en">
<head>
    <meta charset="UTF-8">
    <title>导航</title>
</head>
<body>
<ul>
    <li ><a href="http://www.baidu.com" target="_blank"><img src="bd.jpg" alt="百度" width="50"> </a> </li>
    <li><a href="http://www.taobao.com" target="_blank"><img src="tb.jpg" alt="淘宝" width="50"></a> </li>
    <li><a href="http://www.jd.com" target="_blankt"><img src="jd.jpg" alt="京东" width="50"></a> </li>
    <li><a href="http://mp.weixin.qq.com" target="_blank"><img src="gzpt.jpg" alt="微信公众平台" width="50"></a> </li>
    <li><a href="http://www.php.cn" target="content"><img src="PHPZWW.jpg" alt="PHP中文网"></a> </li>
</ul>
</body>
</html>
运行实例 »
点击 "运行实例" 按钮查看在线实例
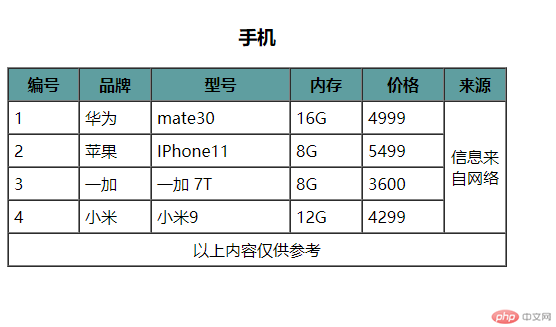
三、制作一张商品信息表, 要求用到标题, 头部与底部, 行与列方向的合并
实例
<!DOCTYPE html>
<html lang="en">
<head>
    <meta charset="UTF-8">
    <title>商品信息表</title>
</head>
<body>
<!--border='1' 表示框的宽度  cellspacing='0' 表示线重叠  celloadding='5' 表格内边框  width='500' b表格宽度-->
<table border="1" cellspacing="0" cellpadding="5" width="500px">
    <caption><h3>手机</h3></caption><!--表格标题-->
        <thead><!--表格头部-->
            <tr bgcolor="#5f9ea0"> <!--tr给表格一行  bgcolor表格的背景颜色-->
                <th>编号</th>  <!--表格列-->
                <th>品牌</th>
                <th>型号</th>
                <th>内存</th>
                <th>价格</th>
                <th>来源</th>
            </tr>
        </thead>
    <!--表格主体-->
        <tbody> <!--tbody表示表的主体内容 -->
            <tr> <!-- 给表一个行-->
                <td>1</td>
                <td>华为</td>
                <td>mate30</td>
                <td>16G</td>
                <td>4999</td>
                <td rowspan="5" align="center" width="50">信息来自网络</td>
                <!--合并列必须是在第一行里合并 要合并的列必须在同一个包含里比如tbody里-->

            </tr>
            <tr>
                <td>2</td>
                <td>苹果</td>
                <td>IPhone11</td>
                <td>8G</td>
                <td>5499</td>

            </tr>
             <tr>
                <td>3</td>
                <td>一加</td>
                <td>一加 7T</td>
                <td>8G</td>
                <td>3600</td>

            </tr>
            <tr>
                <td>4</td>
                <td>小米</td>
                <td>小米9</td>
                <td>12G</td>
                <td>4299</td>
            </tr>

        </tbody>
        <tfoot>
            <tr align="center">
                <td colspan="6">以上内容仅供参考</td>
            </tr>
        </tfoot>

</table>
</body>
</html>
运行实例 »
点击 "运行实例" 按钮查看在线实例
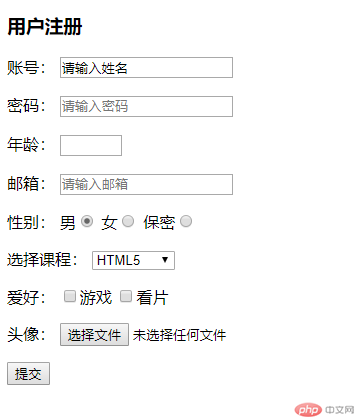
四、制作一张完整的用户注册表单, 要求尽可能多的用到学到的表单控件
实例
<!DOCTYPE html>
<html lang="en">
<head>
    <meta charset="UTF-8">
    <title>用户注册</title>
</head>
<body>
<h3>用户注册</h3>
<form action="login.php" method="post">
    <p>
        <label for="username">账号:</label>
        <!-- type 是给input规定类型  name 给属性取名  value 是值 能显示在输入框里 -->
        <input type="text" id="username" name="username" value="请输入姓名">
    </p>
    <p>
        <label for="password">密码:</label>
        <!-- type='passwprd'input规定密码类型  name 给属性取名  placeholder='' 提示信息 从外观上看跟VALUE差不多 -->
        <input type="password" id="password" name="password" placeholder="请输入密码">
    </p>
    <label for="age">年龄:</label>
    <!-- type='number'input规定数字类型  name 给属性取名  min='18'限制输入最小值  max限制输入最大值-->
    <input type="number" id="age" name="age" min="18" max="70">
    </p>
    <label for="email">邮箱:</label>
    <!-- type='email'input规定邮箱类型  name 给属性取名  placeholder='' 提示信息 从外观上看跟VALUE差不多 -->
    <input type="email" id="email" name="email" placeholder="请输入邮箱">
    </p>
    <label for="secrecy">性别:</label>
    <!-- type='radio'input规定单选类型  name 如果这是一组必须name的值相同否则可以多选 cheched是设置默认 -->
    <label for="male">男</label><input type="radio" id="male" name="gender" checked>
    <label for="female">女</label><input type="radio" id="female" name="gender">
    <label for="secrecy">保密</label><input type="radio" id="secrecy" name="gender">
    </p>
    <p>
        <label for="coures">选择课程:</label>
        <select name="coures" id="coures">
            <optgroup label="前端">
                <option value="这是h5" selected>HTML5</option>
                <option value="">CSS</option>
                <option value="">JS</option>
            </optgroup>
            <optgroup label="后端">
                <option value="">php</option>
                <option value="">mysql</option>
                <option value="">laravel</option>
            </optgroup>
        </select>
    </p>
    <p>
        <label for="mov">爱好:</label>
        <input type="checkbox" name="hobby[]" value="game" id="game"><label for="game">游戏</label>
        <!---checkbox 复选框   name='hobby[]' 带着中括号是以数组的形式传输--->
        <input type="checkbox" name="hobby[]" value="game" id="mov"><label for="mov">看片</label>
    </p>
    <p>
        <label for="photo">头像:</label>
        <!---file 上传-->
        <input type="file" name="photo" id="photo">
    </p>
     <button>提交</button>
</form>
</body>
</html>
运行实例 »
点击 "运行实例" 按钮查看在线实例


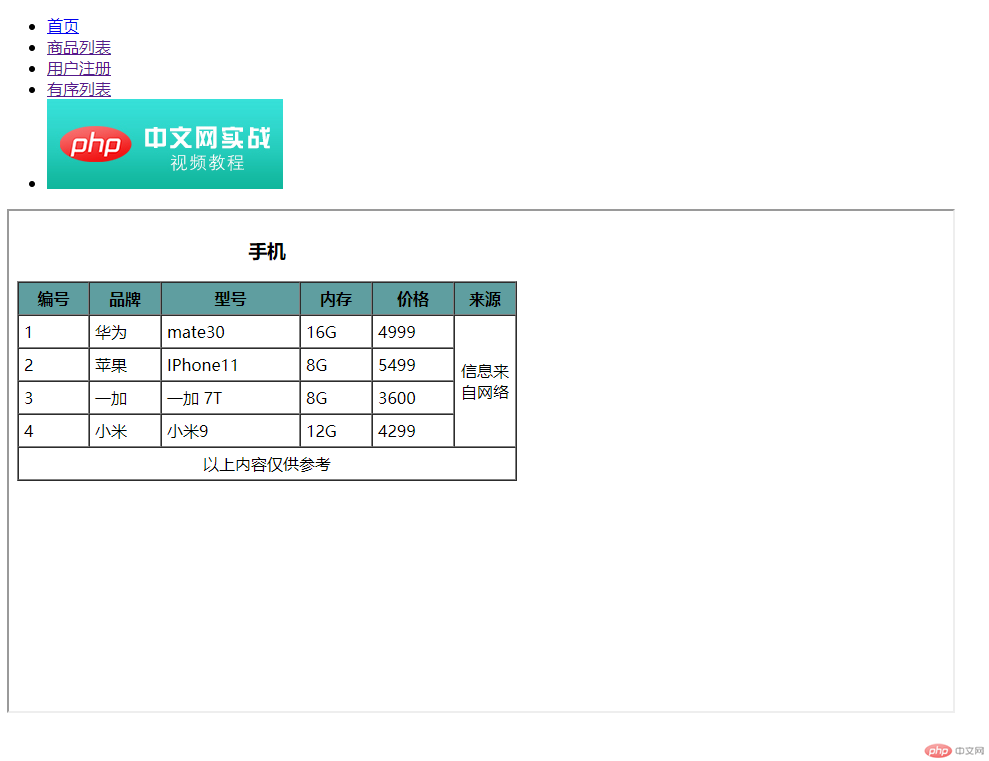
五、制作一个网站后面, 要求使用`<iframe>`内联框架实现
实例
<!DOCTYPE html>
<html lang="en">
<head>
    <meta charset="UTF-8">
    <title>导航</title>
</head>
<body>
<ul>
    <li ><a href="#">首页</a> </li>
    <li><a href="demo2.html" target="content">商品列表</a> </li>
    <li><a href="demo3.html" target="content">用户注册</a> </li>
    <li><a href="demo4.html" target="content">有序列表</a> </li>
    <li><a href="http://www.php.cn" target="content"><img src="https://www.php.cn/static/images/index_php_item3.jpg" alt="PHP中文网"></a> </li>
</ul>
<iframe srcdoc="<h2>欢迎光临管理系统</h2>" frameborder="1" name="content" width="50%" height="500"></iframe>
</body>
</html>
运行实例 »
点击 "运行实例" 按钮查看在线实例

六、总结: 为什么推荐使用语义化的标签?

