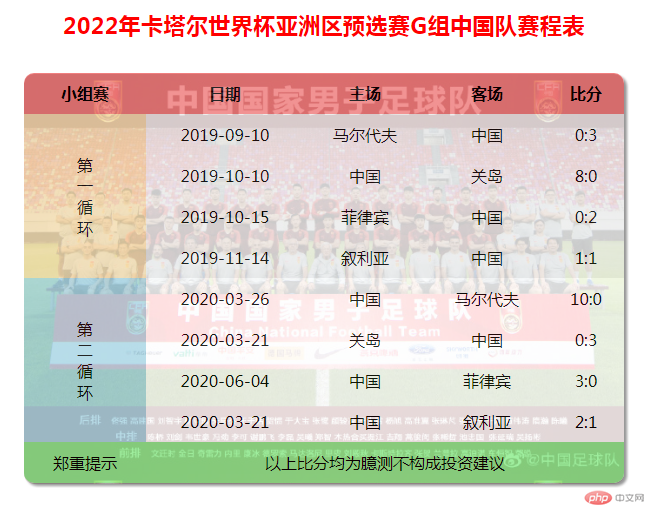
页面如下,是一个赛程表
<!DOCTYPE html>
<html>
	<head>
		<meta charset="utf-8">
		<title>CSS画表格</title>
		<link rel="stylesheet" href="css8.css">
	</head>
	<body>
		<table>
		        <!-- 标题 -->
		        <caption>
		            <h3>2022年卡塔尔世界杯亚洲区预选赛G组中国队赛程表</h3>
				</caption>
		            <!-- 表头 -->
		            <thead>
		                <tr>
		                    <th>小组赛</th>
		                    <th>日期</th>
		                    <th>主场</th>
		                    <th>客场</th>
		                    <th>比分</th>
		                </tr>
		            </thead>
		            <!-- 表格主体 -->
		            <tbody>
		                <tr>
		                    <td rowspan="4">第<br>一<br>循<br>环</td>
		                    <td>2019-09-10</td>
		                    <td>马尔代夫</td>
		                    <td>中国</td>
		                    <td>0:3</td>
		                </tr>
		                <tr>
		                    <td>2019-10-10</td>
		                    <td>中国</td>
		                    <td>关岛</td>
		                    <td>8:0</td>
		                </tr>
		                <tr>
		                    <td>2019-10-15</td>
		                    <td>菲律宾</td>
		                    <td>中国</td>
		                    <td>0:2</td>
		                </tr>
						<tr>
						    <td>2019-11-14</td>
						    <td>叙利亚</td>
						    <td>中国</td>
						    <td>1:1</td>
						</tr>
		                <tr>
		                    <td rowspan="4">第<br>二<br>循<br>环</td>
		                    <td>2020-03-26</td>
		                    <td>中国</td>
		                    <td>马尔代夫</td>
		                    <td>10:0</td>
		                </tr>
		                <tr>
		                    <td>2020-03-21</td>
		                    <td>关岛</td>
		                    <td>中国</td>
		                    <td>0:3</td>
		                </tr>
						<tr>
						    <td>2020-06-04</td>
						    <td>中国</td>
						    <td>菲律宾</td>
						    <td>3:0</td>
						</tr>
						<tr>
						    <td>2020-03-21</td>
						    <td>中国</td>
						    <td>叙利亚</td>
						    <td>2:1</td>
						</tr>
		            </tbody>
					<tfoot>
					    <tr>
					        <td>郑重提示</td>
					        <td colspan="4">以上比分均为臆测,不构成投资建议!</td>
					     </tr>
					</tfoot>
		    </table>
		</body>
</html>
表格很简单,用到了之前教学中提到的行合并,列合并。
样式文件如下
/* 给表格加上边框 */

table {
   /* border: 1px solid #666; */
    border-radius: 10px;
	border-spacing: 0;
}

th, td {
    /* border: 1px solid #666; */
}

/* 设置表格的宽度 */

table {
    width: 600px;
    margin: 20px auto;
}

/* 设置文本居中 */
th,td {
    text-align: center;
    padding: 10px;
}

/* 表格的标题设置 */
table caption {
    font-size: 1.2rem;
    font-weight: bolder;
	color: red;
    margin-bottom: 10px;
}

/* 设置表头背景颜色 */
table thead tr:first-of-type {
    background-color: lightcoral;
    border-radius: 20px;
}

/* 设置主体第1列,第2行背景颜色 */
table tbody>tr:first-of-type>td:first-of-type {
    background-color: wheat;
}

/* 设置主体第1列,倒数第4行背景颜色 */
table tbody>tr:nth-last-of-type(4)>td:first-of-type {
    background-color: lightblue;
}

/* 设置表尾背景色 */
table tfoot>tr:first-of-type {
    background-color: lightgreen;
    border-radius: 20px;
}

/* 设置表格阴影 */
table {
    box-shadow: 3px 3px 3px #999;
}

/* 用伪类类型选择器设置表格主体背景颜色 */
table tbody>tr:nth-of-type(1)>td,
table tbody>tr:nth-of-type(2)>td,
table tbody>tr:nth-of-type(3)>td,
table tbody>tr:nth-of-type(4)>td{
    background-color: #EEE;
}

/* 用伪类元素设置背景图片 */
table {
    position: relative;
}

table:before {
    content: "";
    width: 600px;
	/* 图的高度是截图量出来的 */
    height: 410px;
    position: absolute;
    left: 0;
    top: 86px;
    /* 添加伪元素背景 */
    background-image: url("qjf.jpg");
	/* 让背景图正好在table里面充满 */
	background-size: contain;
    opacity: 0.15;
    border-radius: 10px;
}

/*设置表格圆角*/

table thead tr:nth-of-type(1)>th:nth-of-type(1) {
    border-radius: 10px 0 0 0;
}

table thead tr:nth-of-type(1)>th:nth-of-type(5) {
    border-radius: 0 10px 0 0;
}

table tfoot tr:nth-of-type(1)>td:nth-of-type(1) {
    border-radius: 0 0 0 10px;
}

table tfoot tr:last-of-type td:last-of-type {
    border-radius: 0 0 10px 0;
}
运行效果如下:

一开始画表格的时候为了看得清楚内外边框都有1个像素的实线,最后把背景图调好之后,把实线全部注释掉,发现表格变短了,于是又把图片的高度缩小了20px。
用border-radius属性设置表格的4圆角很巧妙,这个是做搬运工,抄来的。

