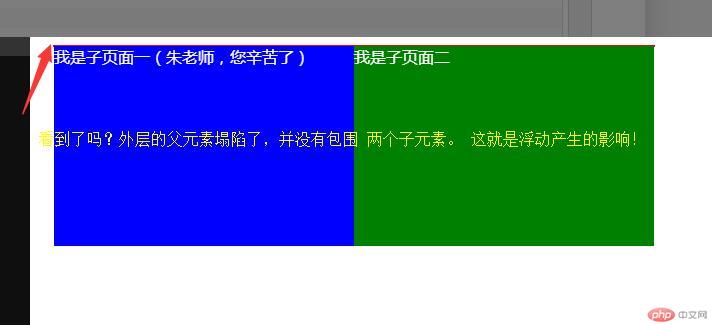
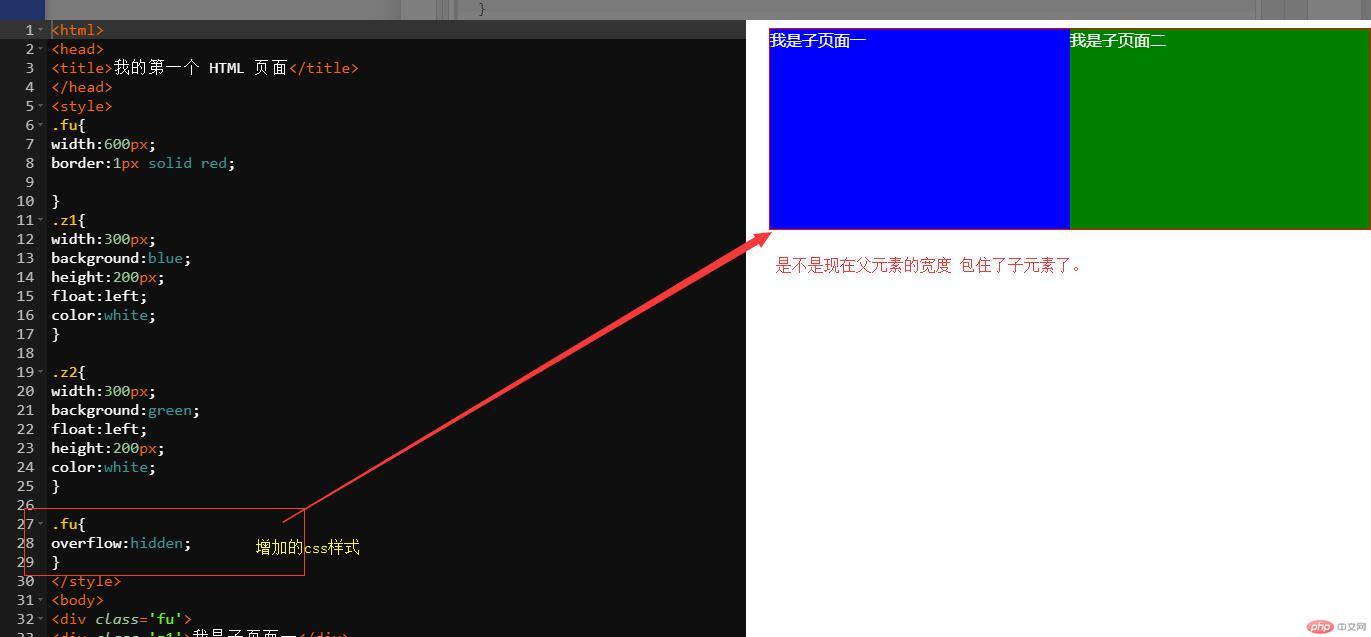
今天学习了如何消除子元素浮动造成父元素高度折叠的影响,这个在页面设计中是经常遇到的问题。下面根据学习自己实际操作解决方案如下:
一、如何消除子元素浮动造成父元素高度折叠的影响
我们先看一下,什么问题。
实例
<html>
<head>
<title>我的第一个 HTML 页面</title>
</head>
<style>
.fu{
width:600px;
border:1px solid red;

}
.z1{
width:300px;
background:blue;
height:200px;
float:left;
color:white;
}

.z2{
width:300px;
background:green;
float:left;
height:200px;
color:white;
}
</style>
<body>
<div class='fu'>
<div class='z1'>我是子页面一(朱老师,您辛苦了)</div>
<div class='z2'>我是子页面二</div>
</div>
</body>
</html>
运行实例 »
点击 "运行实例" 按钮查看在线实例
【分析】结果说明如下图片:

***************如何解决?看下面的解决示例
实例
<html>
<head>
<title>我的第一个 HTML 页面</title>
</head>
<style>
.fu{
width:600px;
border:1px solid red;

}
.z1{
width:300px;
background:blue;
height:200px;
float:left;
color:white;
}

.z2{
width:300px;
background:green;
float:left;
height:200px;
color:white;
}

.fu{
overflow:hidden;
}
</style>
<body>
<div class='fu'>
<div class='z1'>我是子页面一</div>
<div class='z2'>我是子页面二</div>
</div>
</body>
</html>
运行实例 »
点击 "运行实例" 按钮查看在线实例
【总结】
在处理这样的嵌套元素,发生高度折叠的情况,在父元素着增加 overflow:hidden 就可解决问题。看看下面的图片,加深您的印象!

二、三列布局的实现原理( 绝对定位实现, 浮动定位实现)
1、绝对定位实现列布局,示例如下:
实例
<html>
<head>
<title>绝对定位实现三列布局</title>
<style>
.hd{
width:1000px;
background:red;

}
.ma{
width:1000px;
background:black;

}
.fo{
width:1000px;
background:black;
color:white;

}


.left{
width:300px;
background:green;
height:500px;

}

.center{
background:yellow;
height:500px;

}

.right{
width:300px;
background:blue;
height:500px;
}

.ma{
position:relative;

}

.left{
position:absolute;
top:0;
left:0;

}
.right{
position:absolute;
right:0;
top:0;
}
.center{
margin: 0 300px;
}
</style>
</head>
<body>
<div class='hd'>header</div>
<div class='ma'>
<div class='left'>left</div>
<div class='center'>center</div>
<div class='right'>right</div>
</div>
<div class='fo'>footer</div>
</body>
</html>
运行实例 »
点击 "运行实例" 按钮查看在线实例
2、浮动定位实现列布局,示例如下:
实例
<html>
<head>
<title>float实现三列布局</title>
<style>
.hd{
width:1000px;
background:red;

}
.ma{
width:1000px;
background:black;
border:1px solid red;
margin-top:5px;
margin-bottom:5px;
}
.fo{
width:1000px;
background:black;
color:white;

}


.left{
width:300px;
background:green;
height:500px;

}

.center{
background:yellow;
height:500px;

}

.right{
width:300px;
background:blue;
height:500px;
}


.left{
float:left;
}
.right{
float:right;
}
.center{
float:left;
width:400px;
}
.ma{overflow:hidden;}
</style>
</head>
<body>
<div class='hd'>header</div>
<div class='ma'>
<div class='left'>left</div>
<div class='center'>center</div>
<div class='right'>right</div>
</div>
<div class='fo'>footer</div>
</body>
</html>
运行实例 »
点击 "运行实例" 按钮查看在线实例
【总结】 两个方式各有特点,个人感觉float布局实现上会好一些(纯个人爱好)。
老师,因为这段时间公司加班,我提交作业比较晚,您辛苦了,感谢您!

