作业展示页面:演示页面
工作较繁忙,完成作业较晚,抱歉!
试图在完成作业的同时多写一些代码,不恰当处请老师指出、赐教~~
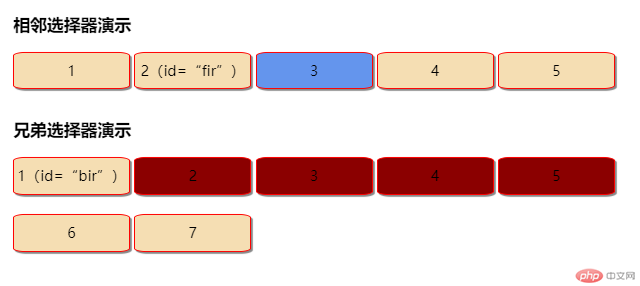
1. 实例演示相邻选择器与兄弟选择器,并分析异同
实例
<!DOCTYPE html>
<html lang="en">

<head>
    <meta charset="UTF-8">
    <meta name="viewport" content="width=device-width, initial-scale=1.0">
    <meta http-equiv="X-UA-Compatible" content="ie=edge">
    <title>css选择器</title>
    <style>
        ul {
            margin: 0;
            padding-left: 0;
            /* border: 1px dashed red; */
        }

        ul li {
            list-style: none;
            width: 8em;
            height: 40px;
            background-color: wheat;
            border: 1px solid red;
            text-align: center;
            border-radius: 10%;
            line-height: 40px;
            box-shadow: 2px 2px 1px #888;
            display: inline-block;
        }
        /* 相邻选择器 */

        #fir+li {
            background-color: cornflowerblue;
        }
        /* 兄弟选择器 */

        #bir~* {
            background-color: darkred;
        }
    </style>
</head>

<body>
    <!-- 相邻选择器演示 -->
    <div>
        <h3>相邻选择器演示</h3>
        <ul>
            <li>1</li>
            <li id="fir">2(id=“fir”)</li>
            <li>3</li>
            <li class="bro">4</li>
            <li class="bro">5</li>
        </ul>
    </div>
    <!-- 兄弟选择器演示 -->
    <div style="margin-top: 2em;">
        <h3>兄弟选择器演示</h3>
        <ul>
            <li id="bir">1(id=“bir”)</li>
            <li id="">2</li>
            <li>3</li>
            <li>4</li>
            <li class="bg-green">5</li>
        </ul>
        <br>
        <ul>
            <li>6</li>
            <li id="ds">7</li>
        </ul>

    </div>


</body>

</html>
运行实例 »
点击 "运行实例" 按钮查看在线实例
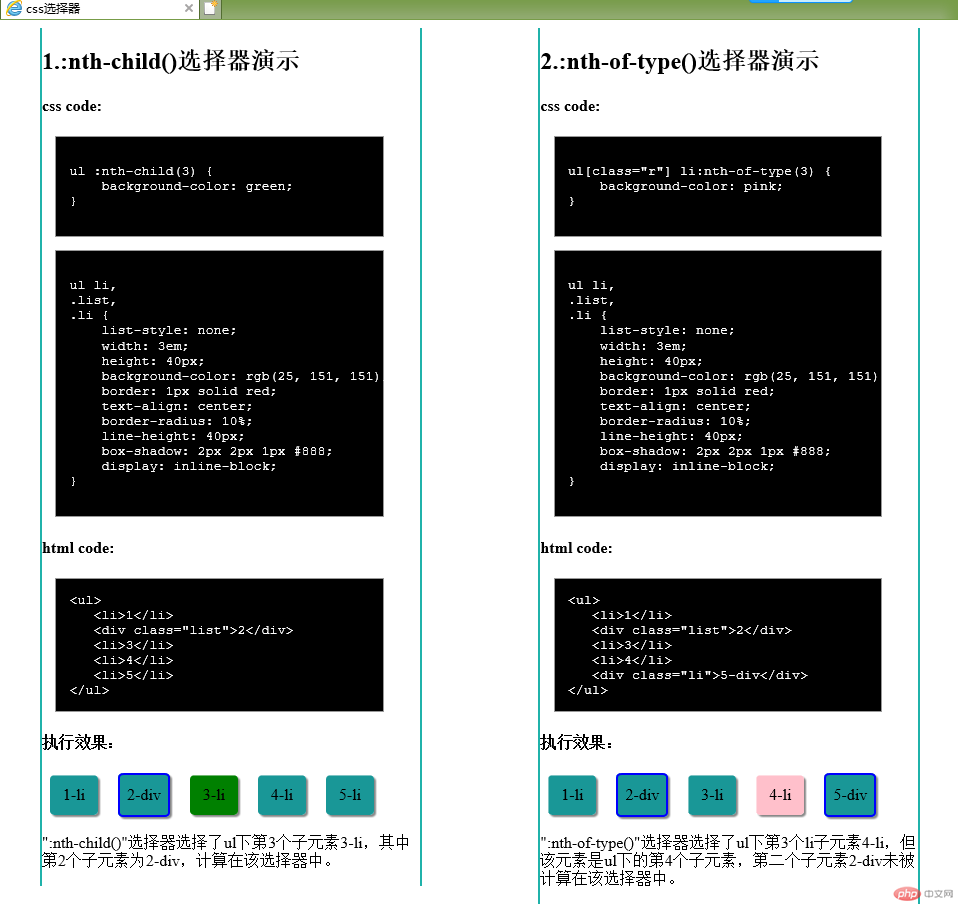
2. 实例演示:nth-child() 和 :nth-of-type()选择器,并分析异同
实例
<!DOCTYPE html>
<html lang="en">
<!-- 2. 实例演示:nth-child() 和 :nth-of-type()选择器,并分析异同 -->
<head>
<meta charset="UTF-8">
<meta name="viewport" content="width=device-width, initial-scale=1.0">
<meta http-equiv="X-UA-Compatible" content="ie=edge">
<title>css选择器</title>
<style>
.main-1 {
width: 40%;
margin: 0 2em;
border-left: 2px solid lightseagreen;
border-right: 2px solid lightseagreen;
float: left;
}
#main-2 {
width: 40%;
margin: 0 2em;
border-left: 2px solid lightseagreen;
border-right: 2px solid lightseagreen;
float: right;
}
code {
display: block;
width: 80%;
background-color: #000;
color: #fff;
margin: 1em;
padding: 1em;
border: 1px solid #999999;
}
ul {
margin: 0;
padding: 0;
/* border: 1px dashed red; */
}
ul li,
.list,
.li {
list-style: none;
width: 3em;
height: 40px;
background-color: rgb(25, 151, 151);
text-align: center;
border-radius: 10%;
line-height: 40px;
box-shadow: 2px 2px 1px #888;
display: inline-block;
margin: 0em 0.2em;
}
.list,
.li {
border: 2px solid blue;
/* box-sizing: border-box; */
}
ul[class="l"] :nth-child(3) {
background-color: green;
}
ul[class="r"] li:nth-of-type(3) {
background-color: pink;
}
</style>
</head>
<body>
<!-- :nth-child()选择器演示 -->
<div class="main-1">
<h2>1.:nth-child()选择器演示</h2>
<h4>css code:</h4>
<!-- css code ↓ -->
<code>
<pre>
ul :nth-child(3) {
background-color: green;
}
</pre>
</code>
<code>
<pre>
ul li,
.list,
.li {
list-style: none;
width: 3em;
height: 40px;
background-color: rgb(25, 151, 151);
border: 1px solid red;
text-align: center;
border-radius: 10%;
line-height: 40px;
box-shadow: 2px 2px 1px #888;
display: inline-block;
}
</pre>
</code>
<h4>html code:</h4>
<code>
<ul><br>
<li>1</li><br>
<div class="list">2</div><br>
<li>3</li><br>
<li>4</li><br>
<li>5</li><br>
</ul>
</code>
<h4>执行效果:</h4>
<ul class="l">
<li>1-li</li>
<div class="list">2-div</div>
<li>3-li</li>
<li>4-li</li>
<li>5-li</li>
</ul>
<p>":nth-child()"选择器选择了ul下第3个子元素3-li,其中第2个子元素为2-div,计算在该选择器中。</p>
</div>
<!-- :nth-of-type()选择器演示 -->
<div id="main-2">
<h2>2.:nth-of-type()选择器演示</h2>
<h4>css code:</h4>
<!-- css code ↓ -->
<code>
<pre>
ul[class="r"] li:nth-of-type(3) {
background-color: pink;
}
</pre>
</code>
<code>
<pre>
ul li,
.list,
.li {
list-style: none;
width: 3em;
height: 40px;
background-color: rgb(25, 151, 151);
border: 1px solid red;
text-align: center;
border-radius: 10%;
line-height: 40px;
box-shadow: 2px 2px 1px #888;
display: inline-block;
}
</pre>
</code>
<h4>html code:</h4>
<code>
<ul><br>
<li>1</li><br>
<div class="li">2</div><br>
<li>3</li><br>
<li>4</li><br>
<div class="li">5-div</div><br>
</ul>
</code>
<h4>执行效果:</h4>
<ul class="r">
<li>1-li</li>
<div class="li">2-div</div>
<li>3-li</li>
<li>4-li</li>
<div class="li">5-div</div>
</ul>
<p>":nth-of-type()"选择器选择了ul下第3个li子元素4-li,但该元素是ul下的第4个子元素,第二个子元素2-div未被计算在该选择器中。</p>
</div>
</body>
</html>运行实例 »
点击 "运行实例" 按钮查看在线实例

3. 实例演示:padding 对盒子大小的影响与解决方案, 使用宽度分离或box-sizing
实例
<!DOCTYPE html>
<html lang="en">
<head>
<!-- 3. 实例演示:padding 对盒子大小的影响与解决方案, 使用宽度分离或box-sizing -->
<meta charset="UTF-8">
<meta name="viewport" content="width=device-width, initial-scale=1.0">
<meta http-equiv="X-UA-Compatible" content="ie=edge">
<style>
body {
width: 90%;
}
header,
main {
display: block;
margin-left: auto;
margin-right: auto;
padding-left: 10%;
padding-right: 10%;
width: 80%;
border: 1px solid blue;
}
.box {
width: 200px;
height: 200px;
background-color: #11ff99;
line-height: 100px;
text-align: center;
margin: 1px auto;
box-sizing: content-box;
}
h6 {
border: 1px solid red;
width: 100px;
height: 100px;
text-indent: 0%;
}
code {
display: block;
margin-left: 2em;
text-indent: 0%;
min-width: 40%;
max-width: 80%;
background-color: #000000;
color: #fff;
}
</style>
<title>padding-内边距</title>
</head>
<body>
<header>
<h2>padding与盒子大小</h2>
</header>
<main>
<h3>1. padding样式的意义</h3>
<p>1.1 我们做一个边长100px的正方形盒子(背景色为绿色);</p>
<p>1.2 内嵌一个边长100px的正方形盒子(h6,border为红色);</p>
<p>html code:</p>
<code>
<pre>
<div class="box">
<h6>box-01-div</h6>
</div>
</pre>
</code>
<p>css code</p>
<code>
<pre>
.box {
width: 200px;
height: 200px;
background-color: #11ff99;
line-height: 100px;
text-align: center;
margin: 1px auto;
}
h6 {
border: 1px solid red;
width: 100px;
height: 100px;
text-indent: 0%;
}
</pre>
</code>
<p>1.3 页面效果如下:</p>
<div class="box">
<h6>box-01-div</h6>
</div>
<p>1.4 为【div class="box"】左边设置内边距padding-left:3em;</p>
<p>html code:</p>
<code>
<pre>
<div class="box" style="padding-left: 3em">
<h6>box-02-div</h6>
</div>
</pre>
</code>
<div class="box" style="padding-left: 30px">
<h6>box-02-div</h6>
</div>
<p>1.5 如上图所示,左侧延伸出来的部分,即为外层盒子左边的内边距30px。</p>
<p>总结:盒子的内边距,实际是指盒子的子元素可用区域的外边界线,是盒子元素的一部分,也就是说盒子内边距以内的区域,(默认状态下)是其子元素可以使用区域的外边界。</p>
<u>ps: border是指盒子的自然边界线;margin外边距是指盒子的外边界线(即与同级元素的边界)。</u><br>
<u>ps:我觉得可以用一个国家的领海和公海来辅助理解padding和margin,padding就像领海,是一个国家领土的一部分,margin就像公海,不是领土的一部分,但也绝对不是另一个国家的领土。这可以帮助理解margin同级塌陷和母子盒子嵌套时的padding和margin关系。(不知道此理解是否正确?)</u>
<h3>2. padding的计算方式</h3>
<p>2.1 默认状态下,box-sizing的值为content-box,即设置盒子宽高不包含边(外边距margin、边线border和内边距padding)。</p>
<p>2.2 对‘box-02-div’重新设置width为120px</p>
<p>html code:</p>
<code>
<pre>
<div class="box" style="padding-left:3em;width:120px;">
<h6>box-03-div</h6>
</div>
</pre>
</code>
<p>效果如下:</p>
<div class="box" style="padding-left: 3em;width:120px;">
<h6>box-03-div</h6>
</div>
<p><i>左侧30px的内边距无变化,右侧减少80px的width。</i></p>
<p>2.3 若更改‘box-02-div’的box-sizing的值为border-box,则会将盒子的边线border以及内边距padding算入盒子的width。</p>
<p>html code:</p>
<code>
<pre>
<div class="box" style="box-sizing:border-box;padding-left: 30px;">
<h6>box-04-div</h6>
</div>
</pre>
</code>
<p>效果如下:</p>
<div class="box" style="box-sizing:border-box;padding-left: 30px">
<h6>box-04-div</h6>
</div>
<p>母盒子div的width仍然为200px(而不是width:200px + padding-left:30px)。</p>
<p><b>总结:</b>使用box-sizing:border-box可以将边线和内边距宽度计算入盒子width,以解决布局时的计算问题。</p>
</main>
</body>
</html>运行实例 »
点击 "运行实例" 按钮查看在线实例
4. 实例演示: margin中的同级塌陷, 嵌套传递与自动挤压, 并提出解决方案或应用场景
实例
<!DOCTYPE html>
<html lang="en">
<!-- 4. 实例演示: margin中的同级塌陷, 嵌套传递与自动挤压, 并提出解决方案或应用场景 -->
<head>
<meta charset="UTF-8">
<meta name="viewport" content="width=device-width, initial-scale=1.0">
<meta http-equiv="X-UA-Compatible" content="ie=edge">
<style>
body {
width: 90%;
margin: 1px auto;
border: 1px solid blue;
}
div {
box-sizing: border-box;
}
header,
main {
display: block;
margin-left: auto;
margin-right: auto;
padding-left: 10%;
padding-right: 10%;
width: 80%;
border: 1px solid blue;
}
code {
display: block;
margin-left: 2em;
text-indent: 0%;
min-width: 40%;
max-width: 80%;
background-color: #000000;
color: #fff;
}
.box {
width: 100px;
height: 100px;
background-color: #11eeee;
border: 2px solid #991111;
}
.left {
float: left;
}
.right {
float: right;
}
.left,
.right {
width: 50%;
text-align: center;
border-left: 2px dotted darkblue;
padding-left: 1em;
}
.box-n {
background-color: rgba(200, 20, 20, 0.1);
}
#l-n,
#l {
border-top: 1px solid blue;
}
</style>
<title>margin外边距</title>
</head>
<body>
<header>
<h2>margin外边距</h2>
</header>
<main>
<div class="homework">
<!-- 同级塌陷演示 -->
<h3>1. margin同级塌陷</h3>
<p>1.1 通过div创建边长为100px的正方形标准盒子</p>
<p>1.2 设置盒子‘box-01-div’的下方外边距为30px,其下方的盒子上方外边距分别设置为0px和20px,比较样式差异。</p>
<p>html code:</p>
<code>
<pre>
<div class="left">
<div class="box" style="margin-bottom: 30px;">
<h5>box-01-div</h5>
</div>
<div class="box">
<h5>box-02-div</h5>
</div>
</div>
<div class="right">
<div class="box" style="margin-bottom: 30px;">
<h5>box-01-div</h5>
</div>
<div class="box" style="margin-top: 20px;">
<h5>box-03-div</h5>
</div>
</div>
</pre>
</code>
<p>页面效果如下:</p>
<div class="left">
<div class="box" style="margin-bottom: 30px;">
<h5>box-01-div</h5>
</div>
<div class="box">
<h5>box-02-div</h5>
</div>
</div>
<div class="right">
<div class="box" style="margin-bottom: 30px;">
<h5>box-01-div</h5>
</div>
<div class="box" style="margin-top: 20px;">
<h5>box-03-div</h5>
</div>
</div>
<p><b>总结:</b></p>
<p>按照领海和公海的比喻,margin相当于国家的公海区域,故是有可能在国家之间有交叉区域的。所以同级盒子之间垂直方向交叉的margin部分会重叠。</p>
<p>避免方式:已经知道原理,只需要通过合理设置交叉部分的margin值,做成预期的效果即可。</p>
<!-- 水平部分尝试? -->
<!-- margin嵌套传递演示 -->
<h3>2. margin嵌套传递演示</h3>
<p>父盒子元素border-top、padding-top宽度=0时,子盒子的margin-top传递给父元素盒子。</p>
<p>2.1 #s有border-top宽度时:</p>
<p>html code:</p>
<code>
<pre>
<div class="box-n" id="l" style="width: 250px;height: 250px;">
<div class="box-n" id="m" style="<b style="color: red;">border-top:3px solid red;</b>
width: 200px;height: 200px;">
<div class="box-n" id="s" style="height: 60px;width: 60px;
margin-top: 50px;">box#s</div>box#m
</div>
</div>
</pre>
</code>
<p>页面效果如下:</p>
<div class="box-n" id="l" style="width: 250px;height: 250px;">
<div class="box-n" id="m" style="border-top: 3px solid red;width: 200px;height: 200px;">
<div class="box-n" id="s" style="height: 60px;width: 60px;margin-top: 50px;">box#s</div>box#m
</div>
</div><br>
<p>2.2 #s-n的border-top宽度为0时:</p>
<p>html code:</p>
<code>
<pre>
<div class="box-n" id="l-n" style="width: 250px;height: 250px;">
<div class="box-n" id="m-n" style="<b style="color: red;">border-top:0px solid red;</b>
width: 200px;height: 200px;">
<div class="box-n" id="s-n" style="height: 60px;width: 60px;
margin-top: 50px;">box#s</div>box#m
</div>
</div>
</pre>
</code>
<p>页面效果如下:</p>
<div class="box-n" id="l-n" style="width: 250px;height: 250px;">
<div class="box-n" id="m-n" style="border-top: 0px solid red;width: 200px;height: 200px;">
<div class="box-n" id="s-n" style="height: 60px;width: 60px;margin-top: 50px;">box#s-n</div>box-m-n
</div>
</div><br>
<p><b>总结:</b></p>
<p>下图中将父元素的border-top宽度为0px,子盒子的margin-top: 50px传递给了父盒子。</p>
<p>避免方法:设置父元素border-top、padding-top宽度值不为0即可。</p>
</div><br>
<!-- 自动挤压演示 -->
<h3>3. 自动挤压演示</h3>
<div style="width:100%; background-color: #229999; height: 60px;">
<div class="box-auto" style="width: 100px; height: 60px; background-color: red; margin-left: 50px;">box-01</div>
</div><br>
<div style="width:100%; background-color: #229999; height: 60px;">
<div class="box-auto" style="width: 100px; height: 60px; background-color: red;margin-left: auto;">box-02</div>
</div><br>
<div style="width:100%; background-color: #229999; height: 60px;">
<div class="box-auto" style="width: 100px; height: 60px; background-color: red;margin-left: auto;margin-right: auto;">box-03</div>
</div><br>
</main>
</body>
</html><运行实例 »
点击 "运行实例" 按钮查看在线实例


