1、企业站点“关于我们”页面设计
实例
<!DOCTYPE html>
<html lang="en">
<head>
    <meta charset="UTF-8">
    <link rel="stylesheet" href="static/css/header.css">
    <link rel="stylesheet" href="static/css/footer.css">
    <link rel="stylesheet" href="static/css/about.css">
    <title>关于我们</title>
</head>
<body>
<!-- 头部 -->
<div class="header">
    <div class="content">
        <ul class="nav">
            <li class="item"><a href="index.html">首页</a></li>
            <li class="item"><a href="news.html">公司新闻</a></li>
            <li class="item"><a href="products.html">最新产品</a></li>
            <li class="item"><a href="about.html">关于我们</a></li>
            <li class="item"><a href="contact.html">联系我们</a></li>
        </ul>
    </div>
</div>


<!-- 中间主体 -->
<div class="container">

    <!-- 1. 中间内容区块 -->
    <div class="wrap">
        <div class="main">
            <div class="main-1">
                <h4>工作环境</h4>
                <hr align="left">
                <p>
                    一处温馨又不失严谨的工作环静,好促使人殷勤工作,充满上进心。
                    整齐橙色桌椅让人心念集中奋发,加倍用心,专研工作。
                    米白色办公桌让人细心,好用心工作,维持整洁一心的工作状态。
                </p>
                <img src="static/images/about2.jpg" alt="" width="100%" >
                <img src="static/images/about3.jpg" alt="" width="100%" >
            </div>

        </div>
    </div>

    <!-- 2. 左侧分为上下二 -->
    <div class="left">
        <div class="left-1">
            <h2 class="about-h2">关于</h2>
            <h2>PHP中文网</h2>
            <img src="static/images/about1.jpg" alt="" width="100%" >
            <h4>公司简介</h4>
            <hr align="left">
            <p>
                我公司生产的显示器, 不能当饭吃, 也不能当衣服穿, 并且全部都是方的, 只要通上电, 就可以使用了
                每一台显示器, 都带了一根电源线, 还有一根信号线, 出厂的时候, 没有配插线板, 需要
                用户自己***一下, 实在是不好意思了, 毕竟9块9就包邮了(***PDD商城哟)
            </p>
        </div>
    </div>

    <!-- 3. 右侧边栏区块 -->
    <div class="right">
        <div class="right-1">
            <img src="static/images/about4.jpg" alt="" width="100%" >
            <h4>公司荣誉</h4>
            <hr align="right">
            <p>
                企业荣誉管理是指主动策划和开发组织和员工的荣誉并对各种荣誉信息和实物进行收集、分类、保存、展示和利用的过程。

            </p>
        </div>

        <div class="right-2">
            <h4>公司历史</h4>
            <hr  align="left">
            <p>
                中国有着五千年悠久的历史--我们了望着两千年前建造的万里长城,心想着雄壮的兵马俑;有形象生动的甲骨文,
                有龙飞凤舞的狂草;有笔直端庄的正楷,有流畅连绵的行草;唐诗宋词,各有千秋,
            </p>
        </div>
    </div>
</div>

<!-- 底部 -->
<div class="footer">
    <div class="content">
        <p>
            <a href="">© PHP中文网版权所有</a>  |
            <a href="">0551-88889999</a>  |
            <a href="">皖ICP2016098801-1</a>
        </p>
    </div>
</div>

</body>
</html>
运行实例 »
点击 "运行实例" 按钮查看在线实例
实例
/******************* 主体样式开始 ******************/

/*双飞翼由大名鼎鼎的玉但提出, 淘宝网率先使用*/
/* 使用双飞翼布局实现主体部分 */

/***** 第一步: 主体容器设置总宽度,并水平居中,清浮动 *****/
.container{
    width: 1000px;
    margin: 0px auto;
    /*清浮动*/
    overflow:hidden;
}

/***** 第二步: 左,右二侧固定宽度,中间区块自适应 *****/

/* 1. 中间区块宽度设置在它的容器wrap中 */
.wrap{
    /* 继承父级区块container宽度 width:1000px; */
    width: inherit;
    min-height: 700px;
}

/* 2. 设置左,右区块的宽度和高度(因为无内容,所以设置了最小高度),并设置参考色块 */

.left{
    width: 300px;
    min-height: 700px;
}

.right{
    width: 300px;
    min-height: 700px;
}

/***** 第三步:将中间,左,右区块全部左浮动 *****/

/* 因中间区块宽度100%,所以左右会被挤压到下面 */
.wrap, .left, .right{
    margin-top: 20px;
    float: left;
}

/***** 第四步: 将left和right拉回到他们正确的位置上(重点) *****/

/* 通过设置区块的负外边距的方式,实现向反方向移动区块 */
.left{
    /* -100%等价于-1000px,将左区块拉回到中间的起点处*/
    margin-left: -100%;
}

.right{
    /* -200px就正好将右区块上移到中间区块右侧显示 */
    margin-left: -300px;
}

/***** 第五步: 将中间的内容区块 main 显示出来 *****/
.main{
    margin:0 300px ;
}

/*中间样式*/
.main-1{
    margin: 0 20px;
}

.main-1 img{
    margin: 15px 0;
}

.main-1 h4{
    text-align: left;
}
.main-1 hr{
    height: 3px;
    width: 50px;
    background-color: #6fba39;
}

.main-1 p{
    color: #333;
    text-align: left;
    font-size: 0.8em;
    line-height:1.8em;
}

/*左侧样式*/
.about-h2{
    color: #6fba39;
}

.left-1 h2,.left-1 h4{
    text-align: left;
}

.left-1 img{
    margin-top: 30px;
    margin-bottom: 15px;
}

.left-1 hr{
    height: 3px;
    width: 50px;
    background-color: #6fba39;
}

.left-1 p{
    color: #333;
    text-align: left;
    font-size: 0.8em;
    line-height:1.8em;
}

/*右侧样式*/

.right-1 img{
    margin: 15px 0;
}

.right-1 h4{
    text-align: right;
}
.right-1 hr{
    height: 3px;
    width: 50px;
    background-color: #6fba39;
}

.right-1 p{
    color: #333;
    text-align: right;
    font-size: 0.8em;
    line-height:1.8em;
}

.right-2 h4{
    margin-top: 30px;
    text-align: left;
}
.right-2 hr{
    height: 3px;
    width: 50px;
    background-color: #6fba39;
}

.right-2 p{
    color: #333;
    text-align: left;
    font-size: 0.8em;
    line-height:1.8em;
}
运行实例 »
点击 "运行实例" 按钮查看在线实例
运行结果:

2、JavaScript基本语法:
实例
<!DOCTYPE html>
<html lang="en">
<head>
    <meta charset="UTF-8">
    <title>javascript基础</title>
</head>
<body>
<script>
    //变量创建分为: 变量声明, 变量赋值
    var num1=5;
    var num2=10;
    var str='abcde';
   console.log('num1:'+num1); //控制台输入变量num1;

    //函数
    function sum(a,b) {
        var c=a+b;
        return c;
    }
    console.log('函数 :'+sum(num1,num2));

    //if-else语句
    var numif=88;
    if(numif>=60&&numif<85){
        console.log('if:及格了');
    }else if(numif>=85&&numif<=100){
        console.log('if:优秀了');
    }else {
        console.log('if:不及格!!!');
    }

   //三元运算符
    var res=numif>=60 ? '三元运算符:及格了':'三元运算符:不及格!!!';
    console.log(res)

    //switch语句
    var strswitch='';
    switch (true){
        case numif>=60&&numif<85:
            strswitch='switch:及格了';
            break;
        case numif>=85&&numif<=100:
            strswitch='switch:优秀了';
            break;
        default:
            strswitch='switch:不及格!!!';
    }
    console.log(strswitch);

    //for循环
    var numfor=0;
    for(var i=0;i<10;i++){
        numfor=numfor+i;
    }
   console.log('for循环:'+numfor)

    //while循环
    var numwhile=0;
    var j=0;
    while(j<10){
        numwhile=numwhile+j;
        j++;
    }
    console.log('while循环:'+numwhile);

    //do-while循环:
    var numdowhile=0;
    var h=0;
    do{
        numdowhile=numdowhile+h;
        h++;
    }while (h<10);
    console.log('do-while循环:'+numdowhile);

</script>
</body>
</html>
运行实例 »
点击 "运行实例" 按钮查看在线实例
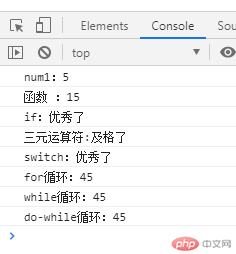
运行结果:


