一、外边距margin
实例
<!doctype html>
<html lang="en">
<head>
    <meta charset="UTF-8">
    <meta name="viewport"
          content="width=device-width, user-scalable=no, initial-scale=1.0, maximum-scale=1.0, minimum-scale=1.0">
    <meta http-equiv="X-UA-Compatible" content="ie=edge">
    <title>内边距对盒子内容区的影响</title>
    <script src="https://cdn.staticfile.org/jquery/1.10.2/jquery.min.js"></script>
    <!--<script src="./lib/js/jquery-3.4.1.js"></script>-->
    <style>
    *{  margin: 0;padding: 0; }
    body{background-color:#E9EAED;}
    .box{width:700px;height:100%;margin:20px auto;padding-top:10px; padding-bottom: 30px;text-align: center;background-color:white;border-radius:7px}
    .box h3{margin:0 auto;color: coral;}
    .box .box_ul_1{ list-style-type:none;text-align:center;color:white;margin:10px auto 0;width:440px;height:40px;}
    .box .box_ul_1 li:nth-child(1){ float:left;margin:0;display:block;width:120px;height:33px;border-bottom:7px solid #00CC66;background-color:#000000;color:white;border-radius:7px;}
    .box .box_ul_1 li:nth-child(2){ float:left;margin:0 40px;display:block;width:120px;height:33px;border-bottom:7px solid #000000;background-color:#000000;color:white;border-radius:7px;}
    .box .box_ul_1 li:nth-child(3){ float:left;margin:0;display:block;width:120px;height:33px;border-bottom:7px solid #000000;background-color:#000000;color:white;border-radius:7px;}
    .box .box_ul_1 li a {line-height: 40px;display:block;width:120px;height:33px;text-decoration: none;color:white;}
    .box .box_ul_1 li a:hover{ border-bottom: 7px solid #00CC66}
    .box1,.box2,.box3{width:580px;margin:0 auto;padding: 10px;border:1px dashed #C0C0C0;position:relative;top:-2px;
                      text-align: left;display: none;}
    .box1{display: block}
    .box1 .A{background-color:#32CD32;width:100px;height:60px;margin-bottom:10px;text-align: center;}
    .box1 .B{background-color:#F0E68C;width:100px;height:60px;margin-top:20px;text-align: center;}
    .box1 span{line-height: 60px}
    .box2 .A{background-color:#6495ED;width:200px;height:200px;text-align: center;}
    .box2 .B{background-color:#F0E68C;width:50px;height:50px;text-align:center;margin-top:50px;}
    .box2 .A span{line-height: 200px}
    .box2 .B span{line-height: 50px}
    .box3 .A{background-color:#F5DEB3;width:100px;height:100px;text-align: center;margin: auto}
    .box3 .B{background-color:#32CD32;width:100px;height:100px;text-align:center;margin:10px auto}
    </style>
</head>
<body>

<div class="box">
    <h3 id="margin">外边距的特点,即:margin属性的特点</h3>
    <ul class="box_ul_1">
    <li><a href="#margin" class="margin" name="1">1.同级塌陷</a></li>
    <li><a href="#margin" class="margin" name="2">2.嵌套传递</a></li>
    <li><a href="#margin" class="margin" name="3">3.自动挤压</a></li>
    </ul>
    <div class="box1">
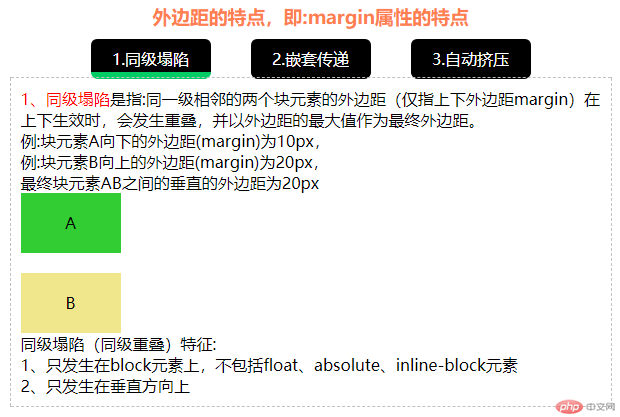
       <p><span style="color: red;line-height: unset">1、同级塌陷</span>是指:同一级相邻的两个块元素的外边距(仅指上下外边距margin)在</p>
       <p>上下生效时,会发生重叠,并以外边距的最大值作为最终外边距。</p>
       <p>例:块元素A向下的外边距(margin)为10px,</p>
       <p>例:块元素B向上的外边距(margin)为20px,</p>
       <p>最终块元素AB之间的垂直的外边距为20px</p>
       <div class="A"><span>A</span></div>
       <div class="B"><span>B</span></div>
       <p>同级塌陷(同级重叠)特征:</p>
       <p>1、只发生在block元素上,不包括float、absolute、inline-block元素</p>
       <p>2、只发生在垂直方向上</p>
    </div>
    <div class="box2">
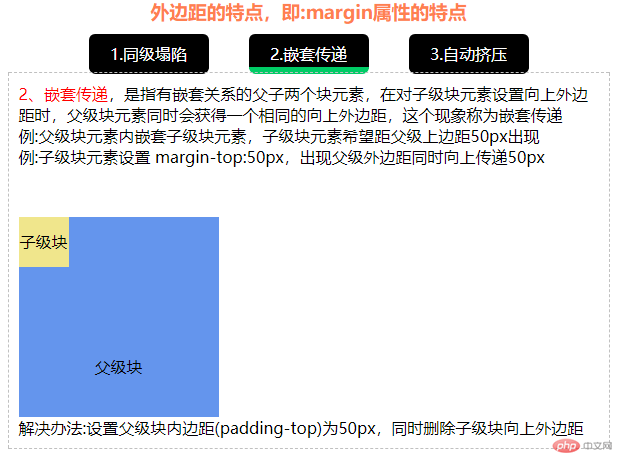
        <p><span style="color: red;line-height: unset">2、嵌套传递</span>,是指有嵌套关系的父子两个块元素,在对子级块元素设置向上外边</p>
        <p>距时,父级块元素同时会获得一个相同的向上外边距,这个现象称为嵌套传递</p>
        <p>例:父级块元素内嵌套子级块元素,子级块元素希望距父级上边距50px出现</p>
        <p>例:子级块元素设置 margin-top:50px,出现父级外边距同时向上传递50px</p>
        <div class="A">
          <div class="B" > <span>子级块</span></div>
          <span>父级块</span>
        </div>
        <p>解决办法:设置父级块内边距(padding-top)为50px,同时删除子级块向上外边距</p>
    </div>
    <div class="box3">
        <p><span style="color: red;line-height: unset">3、自动挤压</span>,指块元素在左右边距设置为自动时,块的左边距或右边距会将块推</p>
        <p>向他当前所能达到的最大外边距,因为左右两个外边距同时作用,从而达到块元素</p>
        <p>的水平居中现象</p>
        <div class="A"></div>
        <div class="B"></div>
    </div>
</div>
<script>
// margin外边距script
    $(".margin").click(function(){
            var id = $(this).attr("name");
        switch (id) {
            case "1":
                $(".box1").css("display","block");
                $(".box_ul_1 li:nth-child(1)").css("border-bottom","7px solid #00CC66");
                $(".box2").css("display","none");
                $(".box_ul_1 li:nth-child(2)").css("border-bottom","7px solid #000000");
                $(".box3").css("display","none");
                $(".box_ul_1 li:nth-child(3)").css("border-bottom","7px solid #000000");
            break;
            case "2":
                $(".box1").css("display","none");
                $(".box_ul_1 li:nth-child(1)").css("border-bottom","7px solid #000000");
                $(".box2").css("display","block");
                $(".box_ul_1 li:nth-child(2)").css("border-bottom","7px solid #00CC66");
                $(".box3").css("display","none");
                $(".box_ul_1 li:nth-child(3)").css("border-bottom","7px solid #000000");
            break;
            case "3":
                $(".box1").css("display","none");
                $(".box_ul_1 li:nth-child(1)").css("border-bottom","7px solid #000000");
                $(".box2").css("display","none");
                $(".box_ul_1 li:nth-child(2)").css("border-bottom","7px solid #000000");
                $(".box3").css("display","block");
                $(".box_ul_1 li:nth-child(3)").css("border-bottom","7px solid #00CC66");
            break;
        }
    })
</script>
</body>
</html>
运行实例 »
点击 "运行实例" 按钮查看在线实例
二、内边距 padding
实例
<!doctype html>
<html lang="en">
<head>
    <meta charset="UTF-8">
    <meta name="viewport"
          content="width=device-width, user-scalable=no, initial-scale=1.0, maximum-scale=1.0, minimum-scale=1.0">
    <meta http-equiv="X-UA-Compatible" content="ie=edge">
    <title>内边距对盒子内容区的影响</title>
    <script src="https://cdn.staticfile.org/jquery/1.10.2/jquery.min.js"></script>
    <!--<script src="./lib/js/jquery-3.4.1.js"></script>-->
    <style>
    *{  margin: 0;padding: 0; }
    body{background-color:#E9EAED;}
    .box{width:700px;height:100%;margin:20px auto;padding-top:10px; padding-bottom: 30px;text-align: center;background-color:white;border-radius:7px}
    .box h3{margin:0 auto;color: coral;}
    /*--margin结束,padding属性开始--*/
    .box .box_ul_2{ list-style-type:none;text-align:center;color:white;margin:10px auto 0;width:400px;height:40px;}
    .box .box_ul_2 li:nth-child(1){ float:left;margin:0 20px;display:block;width:160px;height:33px;border-bottom: 7px solid #00CC66;background-color:black;color:white;border-radius:7px;}
    .box .box_ul_2 li:nth-child(2){ float:left;margin:0 20px;display:block;width:160px;height:33px;border-bottom:7px solid #000000;background-color:#000000;color:white;border-radius:7px;}
    .box .box_ul_2 li a {line-height: 40px;display:block;width:160px;height:33px;text-decoration: none;color:white;}
    .box .box_ul_2 li a:hover{ border-bottom: 7px solid #00CC66}
    .box4,.box5{width:580px;margin:0 auto;padding:10px;border:1px dashed #C0C0C0;position:relative;top:-2px;
        text-align: left;display: none;}
    .box4{display: block}
    .box4 .A{width:200px;height: 100px;margin:10px 0;text-align:center;padding:0;border:1px solid #000000;background-color:chartreuse}
    .box4 .B{width:200px;height: 100px;margin:10px 0;text-align:center;padding:0 20px;border:1px solid #000000;background-color:chartreuse}
    .box4 .A span,.box4 .B span{line-height: 70px}
    .box5 .A{box-sizing:border-box;width:300px;height: 100px;margin:10px 0;padding:20px;border:1px solid #000000;background-color:mediumslateblue}
    .box5 .B{width:300px;height:100px;margin:10px 0;padding:20px;border:1px solid #000000;background-color:mediumslateblue}
      </style>
</head>
<body>
<div class="box">
    <h3 id="padding">内边距的特点,即:padding属性的特点</h3>
    <ul class="box_ul_2">
        <li><a href="#padding" class="padding" name="1">1.对盒中内容的影响</a></li>
        <li><a href="#padding" class="padding" name="2">2.box-sizing属性</a></li>
    </ul>
    <div class="box4">
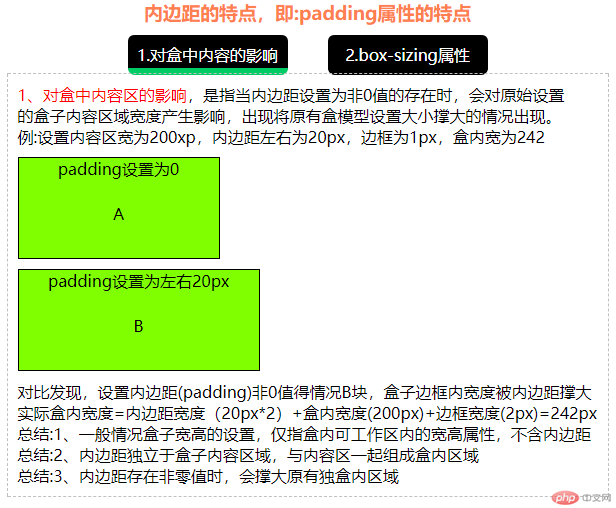
        <p><span style="color: red;line-height: unset">1、对盒中内容区的影响</span>,是指当内边距设置为非0值的存在时,会对原始设置</p>
        <p>的盒子内容区域宽度产生影响,出现将原有盒模型设置大小撑大的情况出现。</p>
        <p>例:设置内容区宽为200xp,内边距左右为20px,边框为1px,盒内宽为242</p>
        <div class="A"><p>padding设置为0</p> <span>A</span></div>
        <div class="B"><p>padding设置为左右20px</p><span>B</span></div>
        <p>对比发现,设置内边距(padding)非0值得情况B块,盒子边框内宽度被内边距撑大</p>
        <p>实际盒内宽度=内边距宽度(20px*2)+盒内宽度(200px)+边框宽度(2px)=242px</p>
        <p>总结:1、一般情况盒子宽高的设置,仅指盒内可工作区内的宽高属性,不含内边距</p>
        <p>总结:2、内边距独立于盒子内容区域,与内容区一起组成盒内区域</p>
        <p>总结:3、内边距存在非零值时,会撑大原有独盒内区域</p>

    </div>
    <div class="box5" id="box5">
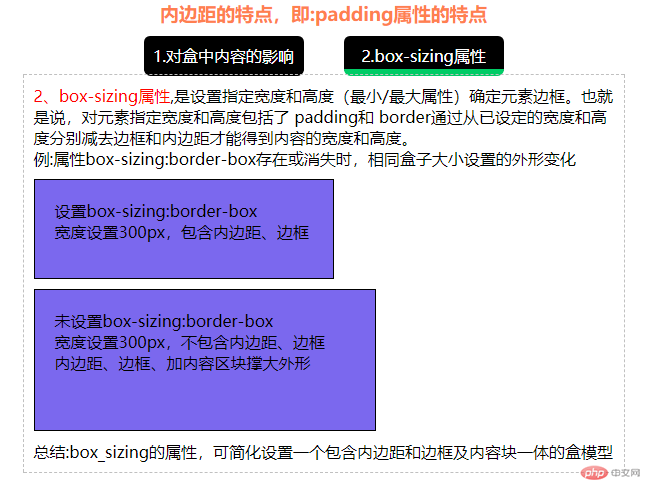
        <p><span style="color: red;line-height: unset">2、box-sizing属性</span>,是设置指定宽度和高度(最小/最大属性)确定元素边框。也就</p>
        <p>是说,对元素指定宽度和高度包括了 padding和 border通过从已设定的宽度和高</p>
        <p>度分别减去边框和内边距才能得到内容的宽度和高度。</p>
        <p>例:属性box-sizing:border-box存在或消失时,相同盒子大小设置的外形变化</p>
        <div class="A">
            <p>设置box-sizing:border-box</p>
            <p>宽度设置300px,包含内边距、边框</p>
        </div>
        <div class="B">
            <p>未设置box-sizing:border-box</p>
            <p>宽度设置300px,不包含内边距、边框</p>
            <p>内边距、边框、加内容区块撑大外形</p>
        </div>
        <p>总结:box_sizing的属性,可简化设置一个包含内边距和边框及内容块一体的盒模型</p>
    </div>
</div>
<script>
    // padding内边距script
    $(".padding").click(function(){
        var id = $(this).attr("name");
        switch (id) {
            case "1":
                $(".box4").css("display","block");
                $(".box_ul_2 li:nth-child(1)").css("border-bottom","7px solid #00CC66");
                $(".box5").css("display","none");
                $(".box_ul_2 li:nth-child(2)").css("border-bottom","7px solid #000000");

                break;
            case "2":
                $(".box4").css("display","none");
                $(".box_ul_2 li:nth-child(1)").css("border-bottom","7px solid #000000");
                $(".box5").css("display","block");
                $(".box_ul_2 li:nth-child(2)").css("border-bottom","7px solid #00CC66");
                break;
        }
    })
</script>
</body>
</html>
运行实例 »
点击 "运行实例" 按钮查看在线实例
三、浮动float
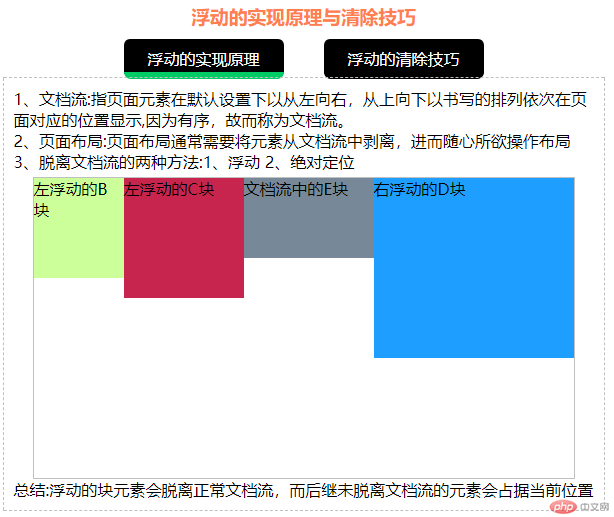
实例
<!doctype html>
<html lang="en">
<head>
    <meta charset="UTF-8">
    <meta name="viewport"
          content="width=device-width, user-scalable=no, initial-scale=1.0, maximum-scale=1.0, minimum-scale=1.0">
    <meta http-equiv="X-UA-Compatible" content="ie=edge">
    <title>内边距对盒子内容区的影响</title>
    <script src="https://cdn.staticfile.org/jquery/1.10.2/jquery.min.js"></script>
    <style>
    *{  margin: 0;padding: 0; }
    body{background-color:#E9EAED;}
    .box{width:700px;height:100%;margin:20px auto;padding-top:10px; padding-bottom: 30px;text-align: center;background-color:white;border-radius:7px}
    .box h3{margin:0 auto;color: coral;}
    .box .box_ul_3{ list-style-type:none;text-align:center;color:white;margin:10px auto 0;width:400px;height:40px;}
    .box .box_ul_3 li:nth-child(1){ float:left;margin:0 20px;display:block;width:160px;height:33px;border-bottom: 7px solid #00CC66;background-color:black;color:white;border-radius:7px;}
    .box .box_ul_3 li:nth-child(2){ float:left;margin:0 20px;display:block;width:160px;height:33px;border-bottom:7px solid #000000;background-color:#000000;color:white;border-radius:7px;}
    .box .box_ul_3 li a {line-height: 40px;display:block;width:160px;height:33px;text-decoration: none;color:white;}
    .box .box_ul_3 li a:hover{ border-bottom: 7px solid #00CC66}
    .box6,.box7{width:580px;margin:0 auto;padding:10px;border:1px dashed #C0C0C0;position:relative;top:-2px;
        text-align: left;display: none;}
    .box6{display: block}
    .box6 .A{width:540px;height:300px;margin:5px auto 0;border:1px solid #c0c0c0}
    .box6 .B{width:90px;height:100px;background-color:#CCFF99;float:left;}
    .box6 .C{width:120px;height:120px;background-color:#c7254e;float:left;}
    .box6 .D{width:200px;height:180px;background-color:#1E9FFF;float:right}
    .box6 .E{width:540px;height:80px;background-color:#778899;}
    .box7 .A{width:540px;height:300px;margin:5px auto 0;border:1px solid #c0c0c0}
    .box7 .B{width:90px;height:100px;background-color:#CCFF99;float:left;}
    .box7 .C{width:120px;height:120px;background-color:#c7254e;float:left;}
    .box7 .D{width:200px;height:180px;background-color:#1E9FFF;float:right}
    .box7 .E{width:540px;height:80px;background-color:#778899;clear: both;}
    </style>
</head>
<body>
<div class="box">
    <h3 id="float">浮动的实现原理与清除技巧</h3>
    <ul class="box_ul_3">
        <li><a href="#float" class="float" name="1">浮动的实现原理</a></li>
        <li><a href="#float" class="float" name="2">浮动的清除技巧</a></li>
    </ul>
    <div class="box6">
    <p>1、文档流:指页面元素在默认设置下以从左向右,从上向下以书写的排列依次在页</p>
    <p>面对应的位置显示,因为有序,故而称为文档流。</p>
    <p>2、页面布局:页面布局通常需要将元素从文档流中剥离,进而随心所欲操作布局</p>
    <p>3、脱离文档流的两种方法:1、浮动 2、绝对定位</p>
    <div class="A">
        <div class="B"><p>左浮动的B块</p></div>
        <div class="C"><p>左浮动的C块</p></div>
        <div class="D"><p>右浮动的D块</p></div>
        <div class="E"><p>文档流中的E块</p></div>
    </div>
    <p>总结:浮动的块元素会脱离正常文档流,而后继未脱离文档流的元素会占据当前位置</p>
    </div>
    <div class="box7">
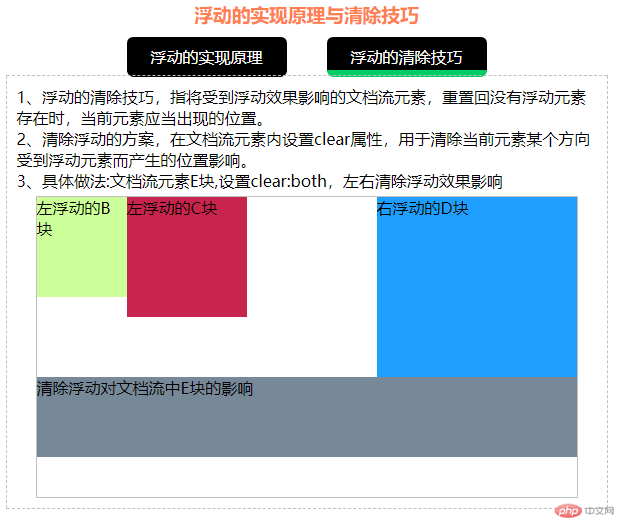
        <p>1、浮动的清除技巧,指将受到浮动效果影响的文档流元素,重置回没有浮动元素</p>
        <p>存在时,当前元素应当出现的位置。</p>
        <p>2、清除浮动的方案,在文档流元素内设置clear属性,用于清除当前元素某个方向</p>
        <p>受到浮动元素而产生的位置影响。</p>
        <p>3、具体做法:文档流元素E块,设置clear:both,左右清除浮动效果影响</p>
        <div class="A">
            <div class="B"><p>左浮动的B块</p></div>
            <div class="C"><p>左浮动的C块</p></div>
            <div class="D"><p>右浮动的D块</p></div>
            <div class="E"><p>清除浮动对文档流中E块的影响</p></div>
        </div>
    </div>
</div>
<script>
    // float浮动效果的原理和清除
    $(".float").click(function(){
        var id = $(this).attr("name");
        switch (id) {
            case "1":
                $(".box6").css("display","block");
                $(".box_ul_3 li:nth-child(1)").css("border-bottom","7px solid #00CC66");
                $(".box7").css("display","none");
                $(".box_ul_3 li:nth-child(2)").css("border-bottom","7px solid #000000");

                break;
            case "2":
                $(".box6").css("display","none");
                $(".box_ul_3 li:nth-child(1)").css("border-bottom","7px solid #000000");
                $(".box7").css("display","block");
                $(".box_ul_3 li:nth-child(2)").css("border-bottom","7px solid #00CC66");
                break;
        }
    })
</script>
</body>
</html>
运行实例 »
点击 "运行实例" 按钮查看在线实例
四、定位position
实例
<!doctype html>
<html lang="en">
<head>
    <meta charset="UTF-8">
    <meta name="viewport"
          content="width=device-width, user-scalable=no, initial-scale=1.0, maximum-scale=1.0, minimum-scale=1.0">
    <meta http-equiv="X-UA-Compatible" content="ie=edge">
    <title>内边距对盒子内容区的影响</title>
    <script src="https://cdn.staticfile.org/jquery/1.10.2/jquery.min.js"></script>
    <style>
    *{  margin: 0;padding: 0; }
    body{background-color:#E9EAED;}
    .box{width:700px;height:100%;margin:20px auto;padding-top:10px; padding-bottom: 30px;text-align: center;background-color:white;border-radius:7px}
    .box h3{margin:0 auto;color: coral;}

    .box .box_ul_4{ list-style-type:none;text-align:center;color:white;margin:10px auto 0;width:440px;height:40px;}
    .box .box_ul_4 li:nth-child(1){ float:left;margin:0;display:block;width:120px;height:33px;border-bottom:7px solid #00CC66;background-color:#000000;color:white;border-radius:7px;}
    .box .box_ul_4 li:nth-child(2){ float:left;margin:0 40px;display:block;width:120px;height:33px;border-bottom:7px solid #000000;background-color:#000000;color:white;border-radius:7px;}
    .box .box_ul_4 li:nth-child(3){ float:left;margin:0;display:block;width:120px;height:33px;border-bottom:7px solid #000000;background-color:#000000;color:white;border-radius:7px;}
    .box .box_ul_4 li a {line-height: 40px;display:block;width:120px;height:33px;text-decoration: none;color:white;}
    .box .box_ul_4 li a:hover{ border-bottom: 7px solid #00CC66}
    .box8,.box9,.box10{width:580px;margin:0 auto;padding:10px;border:1px dashed #C0C0C0;position:relative;top:-2px;
        text-align: left;display: none;}
    .box8{display: block}
    .box9 .A{width:540px;height:360px;margin:5px auto 0;border:1px solid #c0c0c0}
    .box9 .A .a{width:78px;height:78px;border:1px solid #c0c0c0;background-color: #66afe9}
    .box9 .A .b{width:78px;height:78px;border:1px solid #c0c0c0;background-color: #3e8f3e}
    .box9 .A .c{width:78px;height:78px;border:1px solid #c0c0c0;background-color: #FF5722}
    .box9 .A .d{width:78px;height:78px;border:1px solid #c0c0c0;background-color: #00ff00}
    .box9 .A .e{width:78px;height:78px;border:1px solid #c0c0c0;background-color: #c7254e}
    .box9 .A .a{position:relative;margin:0 auto;top:50px;}
    .box9 .A .b{position:relative;margin:0 auto;top:50px;left:-80px}
    .box9 .A .c{position:relative;margin:0 auto;top:-30px;right:-80px}
    .box9 .A .d{position:relative;margin:0 auto;top:-110px;}
    .box9 .A .e{position:relative;margin:0 auto;top:-110px;}

    .box10 .A{width:540px;height:360px;margin:5px auto 0;border:1px solid #c0c0c0;position:relative}
    .box10 .A .a{width:78px;height:78px;border:1px solid #c0c0c0;background-color: #66afe9}
    .box10 .A .b{width:78px;height:78px;border:1px solid #c0c0c0;background-color: #3e8f3e}
    .box10 .A .c{width:78px;height:78px;border:1px solid #c0c0c0;background-color: #FF5722}
    .box10 .A .d{width:78px;height:78px;border:1px solid #c0c0c0;background-color: #00ff00}
    .box10 .A .e{width:78px;height:78px;border:1px solid #c0c0c0;background-color: #c7254e}
    .box10 .A .a{position:absolute;left:78px}
    .box10 .A .b{position:absolute;top:78px}
    .box10 .A .c{position:absolute;left:78px;top:78px}
    .box10 .A .d{position:absolute;left:158px;top:78px}
    .box10 .A .e{position:absolute;left:78px;top:158px}
    </style>
</head>
<body>
<div class="box">
    <h3 id="position">相对定位与绝对定位</h3>
    <ul class="box_ul_4">
        <li><a href="#position" class="position" name="1">定位的种类</a></li>
        <li><a href="#position" class="position" name="2">相对定位</a></li>
        <li><a href="#position" class="position" name="3">绝对定位</a></li>
    </ul>
    <div class="box8">
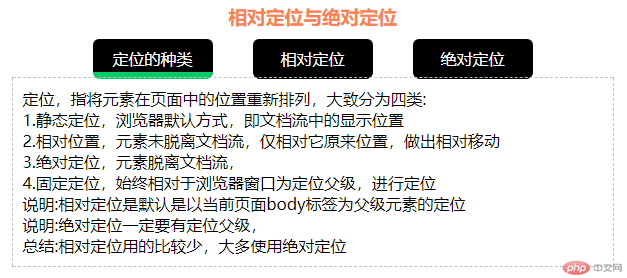
        <p>定位,指将元素在页面中的位置重新排列,大致分为四类:</p>
        <p>1.静态定位,浏览器默认方式,即文档流中的显示位置</p>
        <p>2.相对位置,元素未脱离文档流,仅相对它原来位置,做出相对移动</p>
        <p>3.绝对定位,元素脱离文档流,</p>
        <p>4.固定定位,始终相对于浏览器窗口为定位父级,进行定位</p>
        <p>说明:相对定位是默认是以当前页面body标签为父级元素的定位</p>
        <p>说明:绝对定位一定要有定位父级,</p>
        <p>总结:相对定位用的比较少,大多使用绝对定位</p>
    </div>
    <div class="box9">
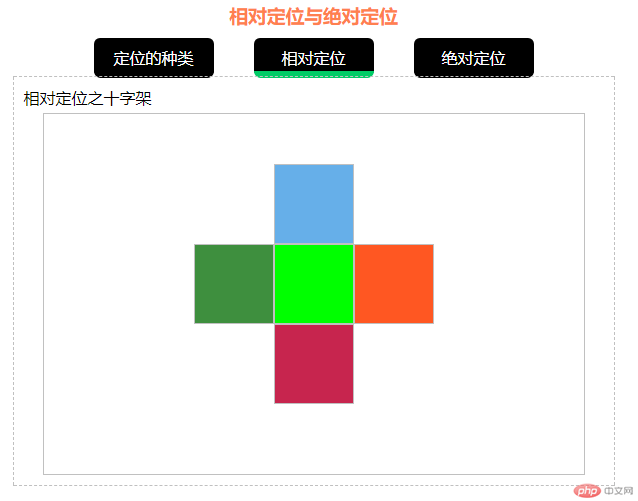
       <p>相对定位之十字架</p>
       <div class="A">
           <div class="a"></div>
           <div class="b"></div>
           <div class="c"></div>
           <div class="d"></div>
           <div class="e"></div>
       </div>
    </div>
    <div class="box10">
        <p>绝对定位之十字架</p>
        <div class="A">
            <div class="a"></div>
            <div class="b"></div>
            <div class="c"></div>
            <div class="d"></div>
            <div class="e"></div>
        </div>
       <p>总结:绝对定位会脱离文档流</p>
       <p>总结:第一步为绝对定位的父级元素设置定位属性position:absolute</p>
       <p>总结:当绝对定位没有明确指定父级元素时,会以body标签作为定位父级</p>
    </div>
</div>
<script>
    // position定位的原理
    $(".position").click(function(){
        var id = $(this).attr("name");
        switch (id) {
            case "1":
                $(".box8").css("display","block");
                $(".box_ul_4 li:nth-child(1)").css("border-bottom","7px solid #00CC66");
                $(".box9").css("display","none");
                $(".box_ul_4 li:nth-child(2)").css("border-bottom","7px solid #000000");
                $(".box10").css("display","none");
                $(".box_ul_4 li:nth-child(3)").css("border-bottom","7px solid #000000");
                break;
            case "2":
                $(".box8").css("display","none");
                $(".box_ul_4 li:nth-child(1)").css("border-bottom","7px solid #000000");
                $(".box9").css("display","block");
                $(".box_ul_4 li:nth-child(2)").css("border-bottom","7px solid #00CC66");
                $(".box10").css("display","none");
                $(".box_ul_4 li:nth-child(3)").css("border-bottom","7px solid #000000");
                break;
            case "3":
                $(".box8").css("display","none");
                $(".box_ul_4 li:nth-child(1)").css("border-bottom","7px solid #000000");
                $(".box9").css("display","none");
                $(".box_ul_4 li:nth-child(2)").css("border-bottom","7px solid #000000");
                $(".box10").css("display","block");
                $(".box_ul_4 li:nth-child(3)").css("border-bottom","7px solid #00CC66");
                break;
        }
    })
</script>
</body>
</html>
运行实例 »
点击 "运行实例" 按钮查看在线实例
五、登录效果 绝对定位
实例
<!DOCTYPE html>
<html lang="en">
<head>
    <meta charset="UTF-8">
    <title>绝对定位之登录框</title>
</head>
<style>
    *{
        margin: 0;
        padding: 0;
    }
    body{
        background-size: cover;
        background-image: url(https://img.php.cn/upload/image/469/903/765/1562588277169132.png);
        background-repeat: no-repeat;
    }
    .shade{
        width: 100%;
        height: 100%;
        position: absolute;
        background-color: #000000;
        opacity: 0.7;
    }
    .login{
        position:absolute;
        left:50%;
        top:50%;
        background-color: white;
        margin:-180px 0  0 -140px;

    }
    .login img{
        width: 280px;
        height: 360px;
    }
</style>
<body>
<div class="shade">
</div><div class="login"><img src="https://img.php.cn/upload/image/341/352/466/1562588870493210.png" alt=""></div>
</body>
</html>
运行实例 »
点击 "运行实例" 按钮查看在线实例

