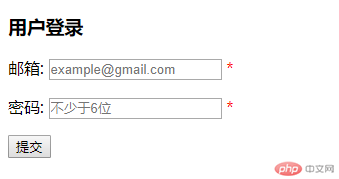
下面将展示Ajax验证表单代码及效果图
实例
<!DOCTYPE html>
<html lang="en">
<head>
    <meta charset="UTF-8">
    <title>ajax表单验证</title>
</head>
<body>
<h3>用户登录</h3>
<form name="login" method="post" onsubmit="return false">
    <p>
        <label for="email">邮箱:</label>
        <input type="email" id="email" name="email" placeholder="example@gmail.com">
        <span style="color: red" id="error_email">*</span>
    </p>
    <p>
        <label for="password">密码: </label>
        <input type="password" id="password" name="password" placeholder="不少于6位">
        <span style="color: red" id="error_psw">*</span>
    </p>
    <p>
        <button id="submit" type="button">提交</button>
        <span id="result"></span>
    </p>
</form>
<script>

    var login=document.forms.namedItem('login');
    var submit=document.getElementById('submit');
    var error_email=document.getElementById('error_email');
    var error_psw=document.getElementById('error_psw');
    var result=document.getElementById('result');
    submit.addEventListener('click',checkUser,false);
    function checkUser(){
        var user= isEmpty(login,error_email,error_psw);

         return user ? verfiy(user,result) : false;
    }

    function isEmpty(form,error1,error2){
        var email=form.email.value.trim();
        var password=form.password.value.trim();
        if(email.length===0){
            error1.innerText='邮箱不能为空';
            form.email.focus();
            return false;
        }else if(password.length===0){
            error2.innerText='密码不能为空';
            form.password.focus();
            return false;
        }
        return {
            email:email,
            password:password
        }

    }
    function verfiy(user,result){
        var request = new XMLHttpRequest();
// 2. 监听请求变化

        request.onreadystatechange = function () {
            if (request.status === 4) {
                if (request.status === 200) {
                    // 请求成员, 更新页面中的DOM元素
                    console.log(request.responseText);
                    result.innerHTML=request.responseText;
                }
            }
        };


// 如果是POST请求, 3-4步会发生变化

// 3. 初始化请求
        request.open('post', 'check.php', true);

// 4. 设置请求头
       request.setRequestHeader('Content-Type', 'application/x-www-form-urlencoded');

// 5. 发送请求
        var data='email='+user.email+'&password='+user.password;
        request.send(data);

    }


    login.email.addEventListener('input', function (){
        error_email.innerText = ''; // 清除邮箱错误提示
        result.innerText = '';  // 清除服务器返回的验证提示
    }, false);
    login.password.addEventListener('input', function (){
        error_psw.innerText = '';  // 清除密码错误提示
        result.innerText = '';  // 清除服务器返回的验证提示
    }, false);


</script>
</body>
</html>
运行实例 »点击 "运行实例" 按钮查看在线实例

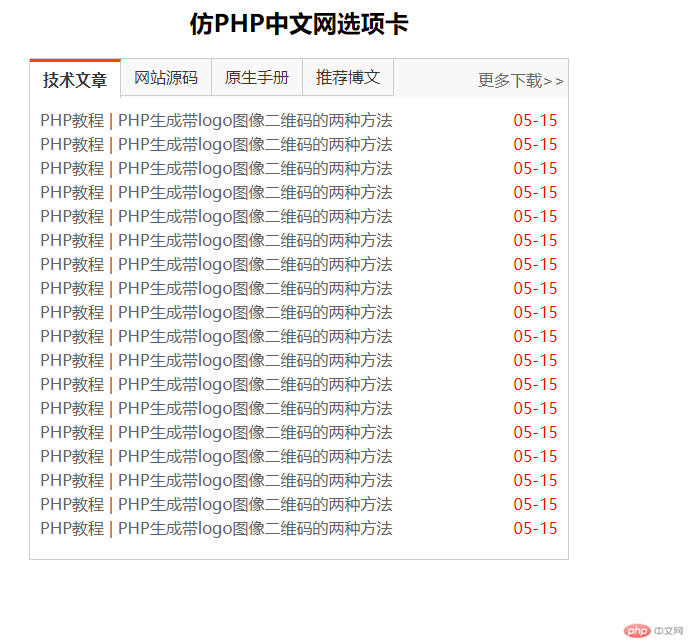
下面是选项卡代码及效果图
实例
<!DOCTYPE html>
<html lang="en">
<head>
    <meta charset="UTF-8">
    <title>Title</title>
    <style>
        h2 {
            text-align: center;
        }
        .box {
            width: 538px;
            height: 500px;
            background-color: white;
            border: 1px solid #ccc;
            margin: 20px auto;
            color: #363636;
        }
        .box > ul {
            margin: 0;
            padding: 0;
            background-color: #f8f8f8;
            /*border-bottom: 1px solid #ccc;*/
            overflow: hidden;
        }
        .box > ul li {
            list-style-type: none;
            width: 90px;
            height:36px;
            float:left;

            border-right: 1px solid #ccc;
            border-bottom: 1px solid #ccc;


            text-align: center;
            line-height: 36px;
        }
        .box ul + span {
            float:right;
            width:90px;
            height: 36px;
            line-height: 36px;
            margin-top: -36px;
        }
        .box ul + span >a {
            color: #696969;
            text-decoration: none;
        }

        .box li.active {
            background-color: #fff;
            font-weight: bolder;
            border-bottom: none;

            border-top: 3px solid orangered;
        }

        .box div {
            display: none;
        }

        .box div ul {
            margin: 0;
            padding: 10px;

            list-style-type: none;
        }

        .box div ul li {
            line-height: 1.5em;
            /*background-color: yellow;*/
        }

        .box div ul li a {
            color: #636363;
            text-decoration: none;
        }
        .box div ul li a:hover {
            color: #000;
        }

        .box div ul li  span {
            float: right;
            color: red;

        }

    </style>
</head>
<body>
<h2>仿PHP中文网选项卡</h2>
<div class="box">

    <ul>
        <!-- 创建四个选项卡,并设置第一个为当前激活高亮状态 -->
        <li class="active">技术文章</li>
        <li>网站源码</li>
        <li>原生手册</li>
        <li>推荐博文</li>
    </ul>
    <span><a href="">更多下载>></a></span>

    <!-- 其实你在页面中看到列表,其实都已经在页面中了,只是隐藏了起来,实际开发过程,大多是通过Ajax请求来动态获取 -->
    <div style="display: block;">

    </div>

    <div>

    </div>

    <div>

    </div>
    <div>

    </div>
</div>
<script>

    var box=document.getElementsByClassName('box')[0];
 //获取 无序列表
    var ul=box.getElementsByTagName('ul')[0];
//获取无序列表中li的内容
    var tab=ul.getElementsByTagName('li');
//选项卡下DIV中的内容
    var list=box.getElementsByTagName('div');
    for( var i=0;i<tab.length;i++){
        tab[i].index=i;
        tab[i].addEventListener('click',getData,false);
    }

    function getData(){

        for(var i=0;i<tab.length;i++){
            tab[i].className='';
            list[i].style.display='none';
        }
        this.classList.add('active');
        list[this.index].style.display='block';

        var n=this.index;
        var request=new XMLHttpRequest();
        request.onreadystatechange=function(){
            if (request.readyState===4){
                list[n].innerHTML=request.responseText;
            }
        };
        request.open('get','data.php?p='+n,true);
        request.send(null);
    }

    //机器人点击第一页
   var defalutTab=ul.firstElementChild;
    defalutTab.addEventListener('click',show,false);
    var event=new Event('click');
    defalutTab.dispatchEvent(event);
    function show(){
        var request=new XMLHttpRequest();
        request.onreadystatechange=function () {
            if (request.readyState===4){
                list[0].innerHTML=request.responseText;
            }

        };
        request.open('get','data.php?p=0',true);
        request.send(null);
    }
</script>
</body>
</html>
运行实例 »点击 "运行实例" 按钮查看在线实例

根据上方 学习到Ajax给我们带来的用户体验。
选项卡中的自动点击需要掌握及大量的代码体验。
学会如何使用Ajax POST 和GET
以及在使用Ajax的时候要想的全面一些 获取那些东西 从什么地方获取等。
博客列表 >Ajax验证表单数据及选项卡-2019年5月15日21点00分
Ajax验证表单数据及选项卡-2019年5月15日21点00分
- 小李广花荣原创转载
- 2019年05月23日 17:40:41766浏览
声明:本文内容转载自脚本之家,由网友自发贡献,版权归原作者所有,如您发现涉嫌抄袭侵权,请联系admin@php.cn 核实处理。
全部评论
文明上网理性发言,请遵守新闻评论服务协议

