详解PHP消息队列的实现以及运用(附流程图)
- 藏色散人转载
- 2022-10-27 16:00:095462浏览
消息队列的概念、原理、实现方式
概念
- 队列结构的一个中间件
- 不需要立即消费消息
- 由消费者或者订阅者进行按顺序消费
基本的流程图如下所示
- 流程

应用场景
- 冗余
- 解耦
- 流量削峰
- 异步通信
实现方式
- mysql:可靠、速度慢
- redis:速度快,对于大消息包处理较慢
- 消息系统:可靠、专业性强
消息的触发机制
- 死循环的方式,故障时无法及时恢复
- 定时任务:压力均分、但是处理量有上限
- 守护进程的方式
解耦 (订单和配送系统)
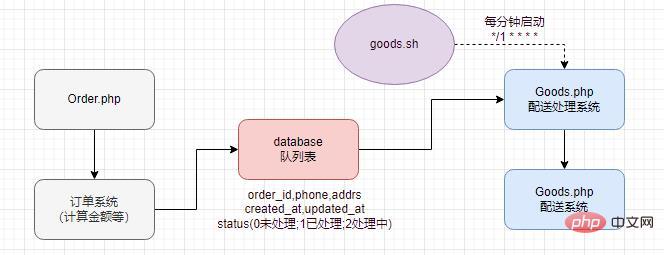
架构设计1 采用定时任务的方式

使用配送处理系统进行处理时,将当前数据库里需要处理的订单状态更新为2,待处理完成后将状态设为1
可以每次指定更新多少条数据
流量削锋 (redis实现秒杀)
-
使用队列的数据结构
- lpush/rpush 将数据放入列表中
- lpop/rpop 将数据移除列表并获取到移除的值
- ltrim 保留指定区间内的元素
- llen 获取列表长度
- lset 通过索引设置列表的值
- lindex 通过索引获取列表中的值
- lrange 获取指定范围的元素
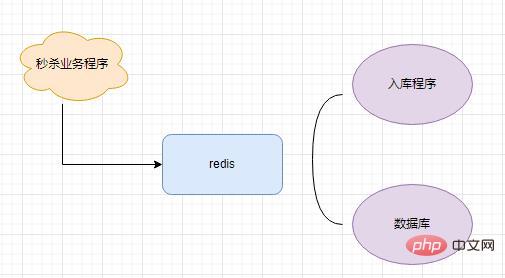
图示如下

-
代码流程如下
秒杀程序将请求写入redis(uid,time)
检查redis列表存放的长度,超过10个直接舍弃
-
通过死循环读取redis数据,并存入数据库
// Spike.php 秒杀程序if(Redis::llen('lottery') < 10){ // 成功 Redis::lpush('lottery', $uid.'%'.microtime());}else{ // 失败}// Warehousing.php 入库程序while(true){ $user = Redis::rpop('lottery'); if (!$user || $user == 'nil') { sleep(2); continue; } $user_arr = explode($user, '%'); $insert_user = [ 'uid' => $user_arr[0], 'time' => $user_arr[1] ]; $res = DB::table('lottery_queue')->insert($insert_user); if (!$res) { Redis::lpush('lottery', $user); }}
上述代码中假如并发过大的话会存在超卖的情况,此时可以使用文件锁或者redis分布式锁进行控制,先将商品放入redis list中 使用rpop进行取出,如果取不到则说明已经卖完
-
具体的思路及伪代码如下
// 先将商品放入redis中 $goods_id = 2; $sql = select id,num from goods where id = $goods_id; $res = DB::select($sql); if (!empty($res)) { // 也可以指定多少件 Redis::del('lottery_goods' . $goods_id); for($i=0;$i<$res['num'];$i++){ Redis::lpush('lottery_goods . $goods_id', $i); } LOG::info('商品存入队列成功,数量:' . Redis::llen('lottery_goods . $goods_id')); } else { LOG::info($goods_id . '加入失败'); }// 开始秒杀 $count = Redis::rpop('lottery_goods' . $goods_id); if (!$count) { // 商品已抢完 ... } // 用户抢购队列 $user_list = 'user_goods_id_' . $goods_id; $user_status = Redis::sismember($user_list, $user_id); if ($user_status) { // 已抢过 ... } // 将抢到的放到列表中 Redis::sadd($user_list, $uid); $msg = '用户:' . $uid . '顺序' . $count; Log::info($msg); // 生成订单等 ... // 减库存 $sql = update goods set num = num -1 where id = $goods_id and num > 0; // 防止超卖 DB::update($sql) // 抢购成功
rabbitmq
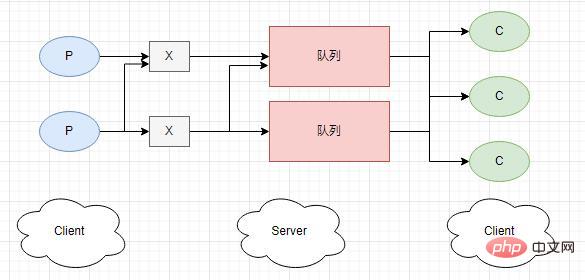
架构及原理

其中P代表生产者,X为交换机(channal),C代表消费者-
简单使用
  // Send.php
  require_once __DIR__.'/vendor/autoload.php';

  use PhpAmqpLib\Connection\AMQPStreamConnection;
  use PhpAmqpLib\Message\AMQPMessage;

  $connection = new AMQPStreamConnection('localhost', 5672, 'guest', 'guest');

  // 创建通道
  $channel = $connection->channel();
  // 声明一个队列
  $channel->queue_declare('user_email', false, false, false, false);
  // 制作消息
  $msg = new AMQPMessage('send email');
  // 将消息推送到队列
  $channel->basic_publish($msg, '', 'user_email');

  echo '[x] send email';

  $channel->close();
  $connection->close();
// Receive.php require_once __DIR__.'/vendor/autoload.php'; use PhpAmqpLib\Connection\AMQPStreamConnection; use PhpAmqpLib\Message\AMQPMessage; $connection = new AMQPStreamConnection('localhost', 5672, 'guest', 'guest'); //创建通道 $channel = $connection->channel(); $channel->queue_declare('user_email', false, false, false, false); // 当收到消息时的回调函数 $callback = function($msg){ //发送邮件 echo 'Received '.$msg->body.'\n'; }; $channel->basic_consume('user_email', '', false, true, false, false, $callback); // 保持监听状态 while($channel->is_open()){ $channel->wait(); }
以上是详解PHP消息队列的实现以及运用(附流程图)的详细内容。更多信息请关注PHP中文网其他相关文章!
声明:
本文转载于:learnku.com。如有侵权,请联系admin@php.cn删除


