详解Angular中的结构型指令、模块和样式
- 青灯夜游转载
- 2021-02-20 18:08:172408浏览

相关推荐:《angular教程》
一,结构型指令
*是一个语法糖,dec5e4d6c96c086f087e44e4daa4227c退出5db79b134e9f6b82c0b36e0489ee08ed相当于
<ng-template [ngIf]="user.login">
  <a>退出</a>
</ng-template>
避免了写ng-template。
473f067f1d72ddde2d8a395651927d7b
      811fc6446fb9b12517b02a4936ea68da
        alarm
      f707986a6e1dbde0e40f51b544d93ae3
    e43f8886161e94258ae0edd4bbcbe9d8

    adf0341f04f25ee4b7753d5094a966b9
      alarm
    f707986a6e1dbde0e40f51b544d93ae3 -->
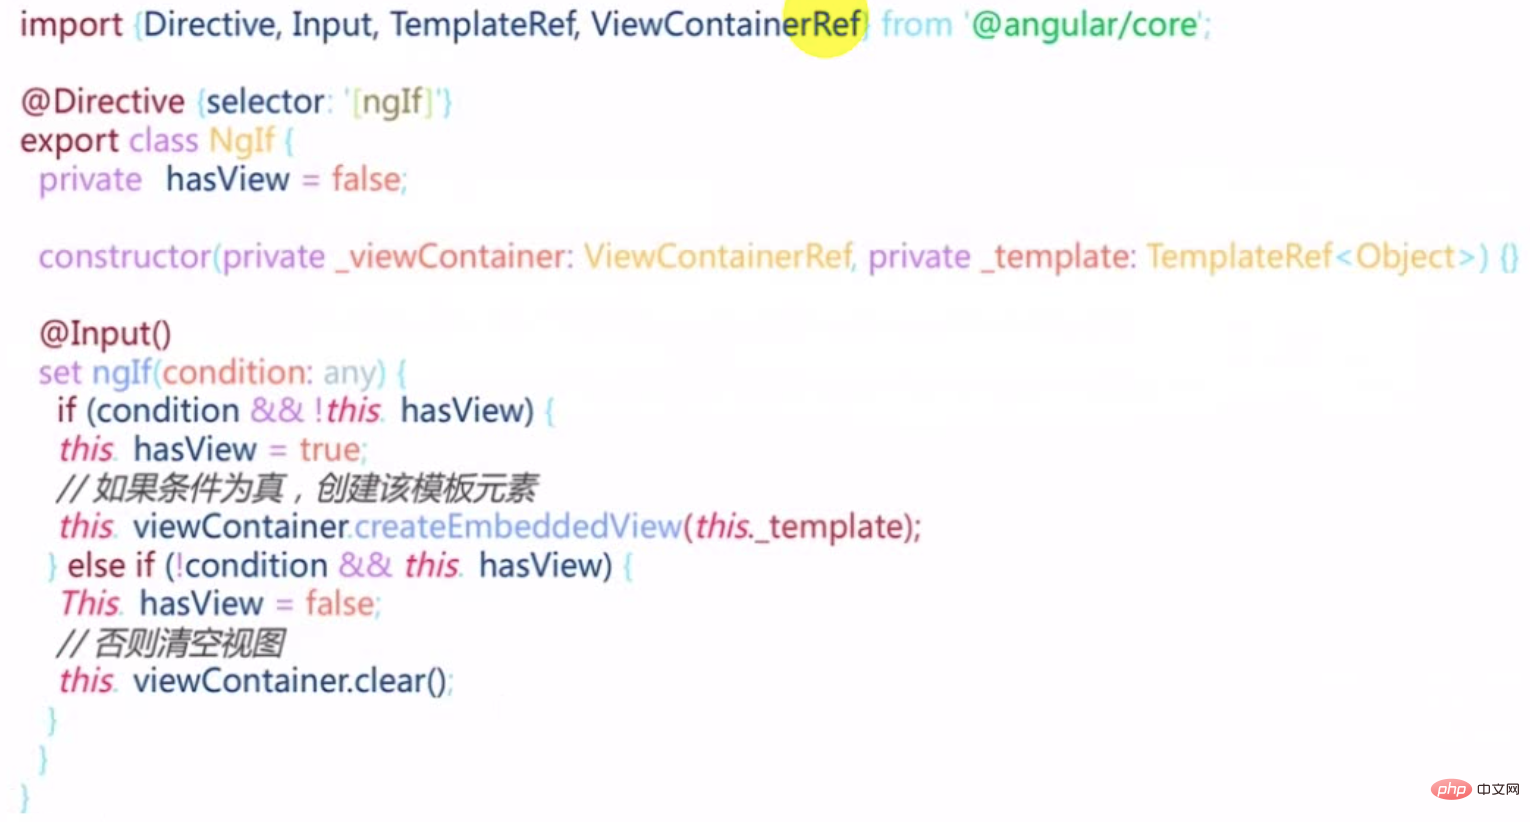
结构型指令为什么能改变结构?
ngIf源码

set方法标记为@Input,如果条件为真而且不含view的话,把内部hasView标识位置为true然后通过viewContainer根据template创建一个子view。
条件不为真就用视图容器清空所含内容。
viewContainerRef:容器,指令所在的视图的容器
二,模块Module
什么是模块?独立功能的文件集合,用来组织文件。
模块元数据
entryComponents:进入模块就要立刻加载的(比如对话框),而不是调用的时候加载。
exports:模块内部的想要让大家公用,一定要export出来。
forRoot()是什么?
imports: [RouterModule.forRoot(routes)],
imports: [RouterModule.forChild(route)];
其实forRoot和forChild是两个静态工厂方法。
constructor(guard: any, router: Router);
    /**
     * Creates a module with all the router providers and directives. It also optionally sets up an
     * application listener to perform an initial navigation.
     *
     * Options (see `ExtraOptions`):
     * * `enableTracing` makes the router log all its internal events to the console.
     * * `useHash` enables the location strategy that uses the URL fragment instead of the history
     * API.
     * * `initialNavigation` disables the initial navigation.
     * * `errorHandler` provides a custom error handler.
     * * `preloadingStrategy` configures a preloading strategy (see `PreloadAllModules`).
     * * `onSameUrlNavigation` configures how the router handles navigation to the current URL. See
     * `ExtraOptions` for more details.
     * * `paramsInheritanceStrategy` defines how the router merges params, data and resolved data
     * from parent to child routes.
     */
    static forRoot(routes: Routes, config?: ExtraOptions): ModuleWithProvidersee580c3a6c812ab9ca048c0a61ac2cbb;
    /**
     * Creates a module with all the router directives and a provider registering routes.
     */
    static forChild(routes: Routes): ModuleWithProvidersee580c3a6c812ab9ca048c0a61ac2cbb;
}
元数据根据不同情况会变化,元数据没办法动态指定,不写元数据,直接构造一个静态的工程方法,返回一个Module。
写一个forRoot()
创建一个serviceModule:$ ng g m services
import { NgModule } from '@angular/core';
import { CommonModule } from '@angular/common';

@NgModule({
  declarations: [],
  imports: [
    CommonModule
  ]
})
export class ServicesModule { }
ServiceModule里面的元数据不要了。用一个静态方法forRoot返回。
import { NgModule, ModuleWithProviders } from '@angular/core';
import { CommonModule } from '@angular/common';

@NgModule()
export class ServicesModule {
  static forRoot(): ModuleWithProviders{
    return {
      ngModule: ServicesModule,
      providers:[]
    }
  }
}
在core Module中导入的时候使用
imports: [ServicesModule.forRoot();]
三,风格定义
ngClass,ngStyle和[class.yourclass]
ngClass:用于条件动态指定样式类,适合对样式做大量更改的情况。预先定义好class。
<mat-list-item class="container" [@item]="widerPriority" [ngClass]="{
  'priority-normal':item.priority===3,
  'priority-important':item.priority===2,
  'priority-emergency':item.priority===1
}"
<div class="content" mat-line [ngClass]="{'completed':item.completed}">
<span [matTooltip]="item.desc">{{item.desc}}</span>
</div>ngStyle:用于条件动态指定样式,适合少量更改的情况。比如下面例子中[ngStyle]="{'order':list.order}"。key是一个字符串。
[class.yourclass] :[class.yourclass] = "condition"直接对应一个条件。这个condition满足适合应用这个class。等价于ngClass的写法,相当于是ngClass的变体,简写。
<div class="content" mat-line [class.completed]="item.completed">
    <span [matTooltip]="item.desc">{{item.desc}}</span>
</div>
1,使用ngStyle在拖拽的时候调整顺序。
原理就是动态指定flex容器样式的order为list模型对象里的order。
1、在taskHome中给app-task-list添加order
list-container是一个flex容器,它的排列顺序是按照order去排序的。
<app-task-list *ngFor="let list of lists"
class="list-container"
app-droppable="true"
[dropTags]="['task-item','task-list']"
[dragEnterClass]=" 'drag-enter' "
[app-draggable]="true"
[dragTag]=" 'task-list' "
[draggedClass]=" 'drag-start' "
[dragData]="list"
(dropped)="handleMove($event,list)"
[ngStyle]="{'order': list.order}"
>2、list数据结构里需要有order,所以增加order属性
lists = [
    {
      id: 1,
      name: "待办",
      order: 1,
      tasks: [
        {
          id: 1,
          desc: "任务一: 去星巴克买咖啡",
          completed: true,
          priority: 3,
          owner: {
            id: 1,
            name: "张三",
            avatar: "avatars:svg-11"
          },
          dueDate: new Date(),
          reminder: new Date()
        },
        {
          id: 2,
          desc: "任务一: 完成老板布置的PPT作业",
          completed: false,
          priority: 2,
          owner: {
            id: 2,
            name: "李四",
            avatar: "avatars:svg-12"
          },
          dueDate: new Date()
        }
      ]
    },
    {
      id: 2,
      name: "进行中",
      order:2,
      tasks: [
        {
          id: 1,
          desc: "任务三: 项目代码评审",
          completed: false,
          priority: 1,
          owner: {
            id: 1,
            name: "王五",
            avatar: "avatars:svg-13"
          },
          dueDate: new Date()
        },
        {
          id: 2,
          desc: "任务一: 制定项目计划",
          completed: false,
          priority: 2,
          owner: {
            id: 2,
            name: "李四",
            avatar: "avatars:svg-12"
          },
          dueDate: new Date()
        }
      ]
    }
  ];
3、在list拖拽换顺序的时候,改变order
交换两个srcList和目标list的顺序order
handleMove(srcData,targetList){
    switch (srcData.tag) {
      case 'task-item':
        console.log('handling item');
        break;
      case 'task-list':
        console.log('handling list');
        const srcList = srcData.data;
        const tempOrder = srcList.order;
        srcList.order = targetList.order;
        targetList.order = tempOrder;
      default:
        break;
    }
}更多编程相关知识,请访问:编程视频!!
以上是详解Angular中的结构型指令、模块和样式的详细内容。更多信息请关注PHP中文网其他相关文章!

