怎样使用React native ListView增加顶部下拉刷新和底下点击刷新
- php中世界最好的语言原创
- 2018-06-01 17:29:231571浏览
这次给大家带来怎样使用React native ListView增加顶部下拉刷新和底下点击刷新,使用React native ListView增加顶部下拉刷新和底下点击刷新的注意事项有哪些,下面就是实战案例,一起来看一下。
1. 底部点击刷新
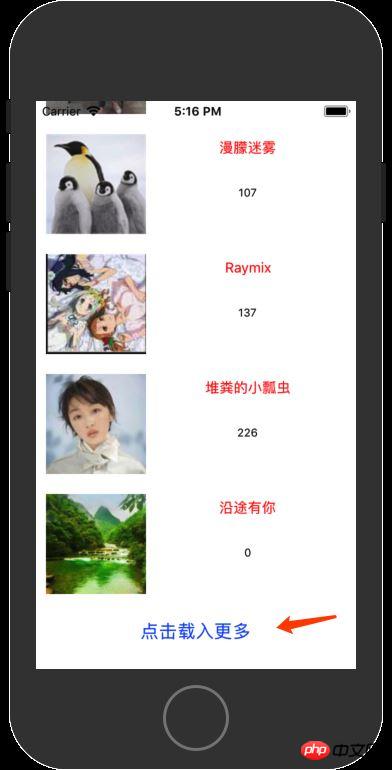
1.1 先增加一个按钮

render() {
  if(!this.state.data){
   return(
     <Text>Loading... </Text>
   )
  }else{
   return(
     <ListView
      refreshControl={
       <RefreshControl
         refreshing = {false}
         onRefresh = {this.reloadWordData.bind(this)}
       />
      }
      dataSource={this.state.data}
      renderRow={(rowData)=>this.renderRow(rowData)}
      renderFooter={this.renderFooter.bind(this)}
     >
      </ListView>

   );
  }
 }

renderFooter(){
   return (
   <View style={{marginVertical: 10, marginBottom:20}} >
      <Button
       onPress={this.addMoreOnFoot.bind(this)}
       title="点击载入更多"
      />
    </View>
   )
 }
给ListView 增加一个renderFooter 方法来绘制底部元素。在里面显示一个按钮。
按钮处理逻辑:
addMoreOnFoot(){
 // alert('addMoreOnFoot')
 // console.log('addMoreOnFoot')
 const url = 'http://127.0.0.1/getFootContent?lastid=' + this.state.footLastId + '&count=20&isTop=0'
 fetch(url)
 .then((response)=>response.json())
 .then((jsondata)=>{
   if (jsondata.data && jsondata.data.length > 0){
   const rowData = this.state.jsondata.concat(jsondata.data);
   this.setState({
    footLastId:jsondata.data[jsondata.data.length - 1]['id'],
    jsondata:rowData,
    data:new ListView.DataSource({rowHasChanged:(r1, r2) => r1 != r2}).cloneWithRows(rowData),
   })
   }
 })
 .catch((error)=>{
  alert(error);
 });
}
点击后进行网络处理,把之前最后一条id也传给服务器,让服务器返回这个id后面的20条记录。然后重新setState即可。
2. 头部下拉刷新
ListView中增加RefeshControl
render() {
  if(!this.state.data){
   return(
     <Text>Loading... </Text>
   )
  }else{
   return(

     <ListView
      refreshControl={
       <RefreshControl
         refreshing = {false}
         onRefresh = {this.reloadWordData.bind(this)}
       />
      }
      dataSource={this.state.data}
      renderRow={(rowData)=>this.renderRow(rowData)}
      renderFooter={this.renderFooter.bind(this)}
     >
      </ListView>

   );
  }
 }
载入最新的头部数据添加到this.State中
reloadWordData(){
  // alert(this.state.topLastId)
  const url = 'http://127.0.0.1/getFootContent?lastid=' + this.state.topLastId + '&count=20&isTop=1'
  fetch(url)
  .then((response)=>response.json())
  .then((jsondata)=>{
    if (jsondata.data && jsondata.data.length > 0){
    const rowData = jsondata.data.concat(this.state.jsondata);
    this.setState({
     topLastId:jsondata.data[0]['id'],
     jsondata:rowData,
     data:new ListView.DataSource({rowHasChanged:(r1, r2) => r1 != r2}).cloneWithRows(rowData),
    })
    }
  })
  .catch((error)=>{
   alert(error);
  });
 }
相信看了本文案例你已经掌握了方法,更多精彩请关注php中文网其它相关文章!
推荐阅读:
以上是怎样使用React native ListView增加顶部下拉刷新和底下点击刷新的详细内容。更多信息请关注PHP中文网其他相关文章!
声明:
本文内容由网友自发贡献,版权归原作者所有,本站不承担相应法律责任。如您发现有涉嫌抄袭侵权的内容,请联系admin@php.cn

