jWiard 基于JQuery的强大的向导控件介绍_jquery
- WBOYWBOYWBOYWBOYWBOYWBOYWBOYWBOYWBOYWBOYWBOYWBOYWB原创
- 2016-05-16 18:00:121314浏览
我就不贴我现在做项目的代码,我直接把作者的示例搬过来,因为改动不大,只要做点修改,就能很好的满足我们自己的需求。
原文地址 猛点这里下载
作者官网 不过是英文的,英语好的话 可以看原文,生怕我表达错误。
不知道童鞋们在平时的开发用到用向导式开发这种方式没有?有人问 什么是向导式开发呢?其实,很简单,就是让用户完成一个步骤,然后点击下一步,完成一个步骤就点击下一步,这样 按照我师父的来说,可以很好的提升用户体验。
OK,废话不说了,先来一个最简单的例子:
例子1:
1.1当然咯,既然是JQuery 就少不了需要引用JQuery库吧。在上面就能下到相关的类库。
JQuery Class and Style
1.2 然后就开始写 HTML代码了,也很简单。
HTML Code
Are you sure you want to begin? Press "Next" to proceed?
Are you sure you want to?
You can still go back. Or press "Next" again to confirm.
Done, click "Finish" to end
你可以在上面的HTML代码了 进行添加相关的div,不过 可别忘记了给最外面的赋上title值哦。
1.3 js开始调用。
JS Call
$(".jWizard").jWizard({
menuEnable: true,
counter: {
enable: true,
progressbar: true
},
effects: { enable: true }
});
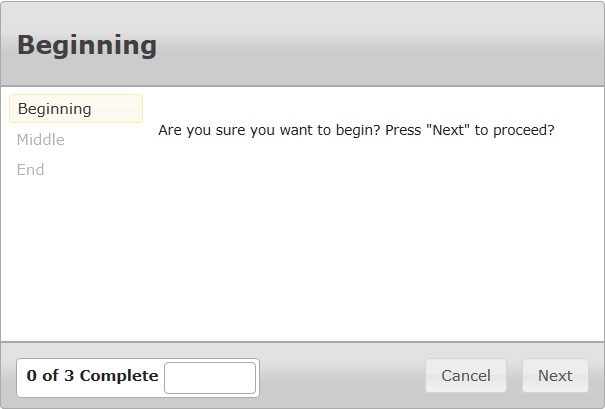
OK, 到此为止,上面的基本步骤就实现了,效果如下:

示例 2:给next添加事件
在我现在做的第一个版本里,刚开始比如有上传文件,验证文件等等操作,很二的直接在页面放了一个button,然后触发它的javascript代码。这样做可以满足基本功能的需求,可是也非常严重的损害了用户的体验。因为,现在的用户非常的懒,能少做一点事情,它是绝对不会多做的。所以,如果你放一个button,用户不想去点击,然后就点击next了,那么就得不到需要的用户,就会报错。
因此,我们可以把一些操作都集成到Next中去,那这样子就灰常灰常的方便了,而且页面也变的灰常灰常的整洁大方。
其余代码可以基本不变,现在我主要讲一下js里面的事件机制,代码如下:
var $w = $("#events-test");
$w.validate({ errorClass: "ui-state-error-text" });
$w
.jWizard({
buttons: {
cancelType: "reset", // 点击”Cancel“按钮的时候 触发的动作,比如我在项目中,是跳到第一页 重新开始。
finishType: "submit" // 在最后一步点击”finish“的时候,出发的动作,也就是提交。
},
// 点击”Cancel“按钮的时候 触发的动作,比如我在项目中,是跳到第一页 重新开始。
cancel: function(event, ui) {
$w.jWizard("firstStep");
}, // 点击previous的时候触发的动作。比如在我项目中,因为当把所有的邮件都发送完毕的时候,就不能让用户上一页了,所以我要把上一页的功能给进禁止掉。很简单,如下;
previous: function(event, ui) {
// if(ui.currentStepIndex==7){return false;} 就可以了。7 指的是你的div的顺序数字,从0开始,哈这个会数吧。
},
next: function(event, ui) {
// 这里同理哦,就是控制下一页的情况,也是上面一样。比如,在我项目中,有一个上传数据的,要是没有就不能让它上传。这种情况 你可以先设定一个bool值,然后,
if(fileUploadComplete){ $.get("@Url.Action("VerificationSchema", "Home")", // 这里学习MVC的童鞋们应该很熟悉 其实也就是在action home 下面的方法 VerificationSchema function (data) { // 获取成功后返回的数据 var newData = eval(data); // 因为用的json 所以用eval 进行转换 schemaVerification=newData.HasErrors; if(newData.HasErrors) { var listing1 = document.getElementById("listing1"); listing1.innerHTML = "Congruations.Please go on."; } else { document.getElementById("ErrorNotification").innerHTML="Sorry.Your Schema wrong,please check it."; var listing1 = document.getElementById("listing1"); listing1.innerHTML = newData.Result; } },"json");} else { //这里主要是当没有选择数据的时候 进行提示 alert("Please firstly Upload the Excel File you need"); return false; } break; },
finish: function(event, ui) {
alert("Thank you!");
}
})
/**下面的绑定是事件处理程序,它们都将在继续回调之前执行*/
/**ui = {
type: "上一个|下一个|第一个|最后一个|手册",
currentStepIndex: [int],
nextStepIndex: [int]
};*/
// This event handler is specifically used for form validation
.bind("jwizardchangestep", function (event, ui) {
// "manual" is always triggered by the user, never jWizard itself
if (ui.type !== "manual") {
var $currentStep = $w.find(".jw-step:eq(" ui.currentStepIndex ")"),
$inputs = $currentStep.find("input:text");
/**我假设您在此回调中运行了“jquery.validate.js”*/
if ($inputs.length > 0 && !$inputs.valid()) {
$currentStep.find("label.error").effect("highlight");
return false;
}
}
})
// This event handler is for handling custom navigation through the wizard
.bind("jwizardchangestep", function (event, ui) {
// "manual" is always triggered by the user, never jWizard itself
if (ui.type !== "manual") {
// 这里其实是比较重要的,因为这里就是选择对应div的实现方式的,你只需要把相应模块的javascript代码集成到这里就可以了。
switch (ui.currentStepIndex) {
// on the first step, the user must agree to the terms and conditions
case 0:
if ($("#agree").is(":not(:checked)")) {
// use this effect to give the user feedback
$("#agree").parent().effect("pulsate");
return false;
}
break;
// on the 3rd step, (zero-index) the username being filled means we are skipping the openid step
case 2:
if ($("#username").val() != "") {
// by setting this value on the event object, I am telling jWizard to override the nextStepIndex
event.nextStepIndex = 4;
// you must at least call event.preventDefault(); in order for this to work
return false;
}
break;
}
}
// by using nextStepIndex, we can intercept the user when they are *about to start* on a particular step
switch (ui.nextStepIndex) {
// in this case, I am displaying a summary on the last step of the wizard
case 4:
var oFormValues = {
name: $("#name").val(),
email: $("#email").val(),
username: $("#username").val(),
openid: undefined
};
$("#summary-name").children("td").text(oFormValues.name);
$("#summary-email").children("td").text(oFormValues.email);
if (oFormValues.username != "") {
$("#summary-username").show().children("td").text(oFormValues.username);
$("#summary-openid").hide().children("td").text("");
} else {
var $openid = $w.find("input:radio:checked[name=openid]");
oFormValues.openid = ($openid.length === 1) ? $openid.val() : $("#openid-other").val();
$("#summary-username").hide().children("td").text("");
$("#summary-openid").show().children("td").text(oFormValues.openid);
}
break;
}
});
// if the user clicks the openid link on step 3, (zero-index) cause the wizard to jump to the openid step
$("#openid").click(function () {
$w.jWizard("changeStep", 3);
return false;
});
// if an openid radio button is checked, blank out the `other` textbox
$w.find("input:radio[name=openid]").change(function (event) {
$("#openid-other").val("");
});
// if the `other` openid textbox is used, blank out the radio buttons
$("#openid-other").change(function (event) {
if (this.value != "") {
$w.find("input:radio[name=openid]").removeAttr("checked");
}
});
sum,我的搜狗怎么突然就没有用了。
算了 以上就是我的一点点经验,就不说了,吃饭时间到了,如果有需要的童鞋在做开发的时候,如果遇到问题,可以进行共同讨论,呵呵 共同进步嘛。
具体效果在这里 。

