如何将 Gemini API 与 React.js 集成:分步指南。
- Susan Sarandon原创
- 2024-12-18 21:08:191022浏览
了解如何将 Gemini API 集成到 React.js 项目中以创建交互式聊天机器人体验。
由于我不会深入研究样式,因此请参阅 GitHub 存储库中的样式表。您还可以在这里查看演示。
话不多说,让我们开始吧!
获取您的 Gemini API 密钥:
在将 Gemini API 集成到您的 React.js 项目中之前,您需要获取 API 密钥。请按照以下步骤操作:
访问 Google AI Studio
打开浏览器并导航至 Google AI Studio 页面。访问开发者文档
进入 Google AI Studio 主页后,找到侧边栏。从选项中选择“开发人员文档”。请求 API 密钥
在开发人员文档页面中,查找标有“获取 Gemini API 密钥”的按钮。点击它。验证并确认
如果您尚未登录,请使用您的 Google 帐户登录。您可能需要完成一些身份验证步骤或同意条款和条件才能继续。复制您的 API 密钥
生成密钥后,复制它。确保安全 - 在 React.js 项目中使用 Gemini API 时需要此密钥来验证您的请求。
提示:如果您想检查您的API密钥,文档页面上会有一个curl命令。将 YOUR_API_KEY 占位符替换为您从 Google AI Studio 获取的 API 密钥。打开 Git Bash 并粘贴修改后的curl 命令。如果 API 密钥有效且有效,您应该会收到 JSON 格式的响应。
设置 React.js 项目:
使用 CRA 设置项目并安装所需的库。将 my-app 替换为您的项目名称。
npx create-react-app my-app
npm install @google/generative-ai
npm install react-markdown
npm install react-icons
删除不必要的文件并在 src 文件夹中创建一个 Components 文件夹。
另外,在根目录中创建一个 .env 文件来安全地存储 API 密钥。
REACT_APP_GEMINI_API_KEY=YOUR_API_KEY_HERE
每当我们需要 API 密钥时,我们都会使用它:
process.env.REACT_APP_GEMINI_API_KEY
设置模型:
在组件文件夹中创建一个 Model.jsx 文件。这将包含定义设置以使用generateContent函数与Gemini API交互的代码。
// components/Model.jsx
const { GoogleGenerativeAI } = require("@google/generative-ai");

const genAI = new GoogleGenerativeAI(process.env.REACT_APP_GEMINI_API_KEY);
const model = genAI.getGenerativeModel({ model: "gemini-1.5-flash" });

export const generateContent = async (prompt) => {
    const result = await model.generateContent(prompt);
    console.log(result.response.text());
    return result.response.text; // return the response
}
首页.jsx:
在组件文件夹中,创建Home.jsx。该文件将定义以下逻辑:
- 获取用户输入并将其发送到模型。
- 清除和发送按钮的逻辑。
- 显示聊天记录。
代码如下:
import React, { useState } from "react";
import { IoIosSend } from "react-icons/io";
import { generateContent } from './Model';
import ReactMarkdown from 'react-markdown'; // to render markdown responses
import './home.css'

export default function Home() {
  const [userInput, setUserInput] = useState('');
  const [response, setResponse] = useState([]);
  const [isLoading, setIsLoading] = useState(false);

  const handleUserInput = (e) => {
    setUserInput(e.target.value);
  };

  const handleClear = () => {
    setUserInput('');
    setResponse([]);
    setIsLoading(false);
  };

  const handleSubmit = async () => {
    if (!userInput.trim()) {
      setResponse([{ type: "system", message: "Please enter a prompt.." }]);
      return;
    }

    setIsLoading(true);
    try {
      const res = await generateContent(userInput);
      setResponse(prevResponse => [
        ...prevResponse,
        { type: "user", message: userInput },
        { type: "bot", message: res()},
      ]);
      setUserInput('');
    } catch (err) {
      console.error("Error generating response:", err);
      setResponse(prevResponse => [
        ...prevResponse,
        { type: "system", message: "Failed to generate response" },
      ]);
    } finally {
      setIsLoading(false);
    }
  };

  const handleKeyPress = (e) => {
    if (e.key === 'Enter') {
      e.preventDefault();
      handleSubmit();
    }
  };

  return (
    <div className="chat-container">
      {response.length === 0 ? (
        <h1>Got Questions? Chatty's Got Answers.</h1>
      ) : (
        <div className="chat-history">
          {response.map((msg, index) => (
            <p key={index} className={`message ${msg.type}`}>
              <ReactMarkdown>{msg.message}</ReactMarkdown>
            </p>
          ))}
          {isLoading && <p className="loading-text">Generating response...</p>}
        </div>
      )}

      <div className="input-container">
        <button onClick={handleClear} className="clear-btn">Clear</button>

        <input
          type="text"
          value={userInput}
          onChange={handleUserInput}
          onKeyDown={handleKeyPress}
          placeholder="Type your message here..."
          className="chat-input"
        />

        <button onClick={handleSubmit} className="send-btn">
          <IoIosSend />
        </button>
      </div>
    </div>
  );
}
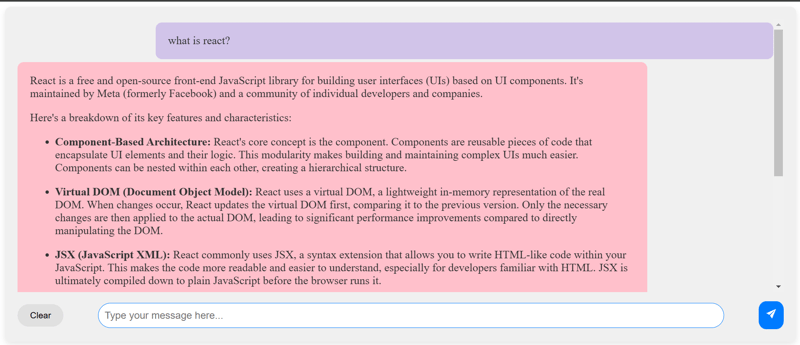
这就是我们将要看到的!

为什么使用 React Markdown?
我们使用 React Markdown,因为 Gemini API 返回以 Markdown 格式的响应。该库有助于在页面上正确呈现它,确保任何 Markdown 语法(例如链接或粗体文本)在 UI 中正确显示。

解释:
我们创建了三个本地状态:userInput、response 和 isLoading。
- userInput:存储用户在输入字段中输入的当前值。
- 响应:存储聊天历史记录,包括来自用户和机器人的消息。
- isLoading:跟踪应用程序是否正在等待 Gemini API 的响应。
功能:
- handleUserInput():每当用户在输入字段中键入时更新 userInput 状态。
- handleClear():当用户单击Clear按钮时重置状态,有效清除聊天。
- handleSubmit():检查输入是否为空,设置加载状态,获取AI响应,更新聊天记录,处理错误,完成后重置输入字段和加载状态。
- handleKeyPress():如果按下 Enter 键,则会阻止默认操作(表单提交)并触发handleSubmit 函数。
结论:
在本教程中,我们学习了如何将 Gemini API 集成到 React.js 应用程序中。我们介绍了设置项目、处理用户输入、与 API 交互以及使用 React 的状态管理和 React-markdown 显示响应。
为了进一步增强您的项目,您可以添加其他功能,例如用户身份验证、保存聊天历史记录以便在页面刷新后也能持久保存等等。
编码快乐! ?
以上是如何将 Gemini API 与 React.js 集成:分步指南。的详细内容。更多信息请关注PHP中文网其他相关文章!

